Category

Quick & Easy Chicken

Category

Easy Thai Baked Chicken Meatballs

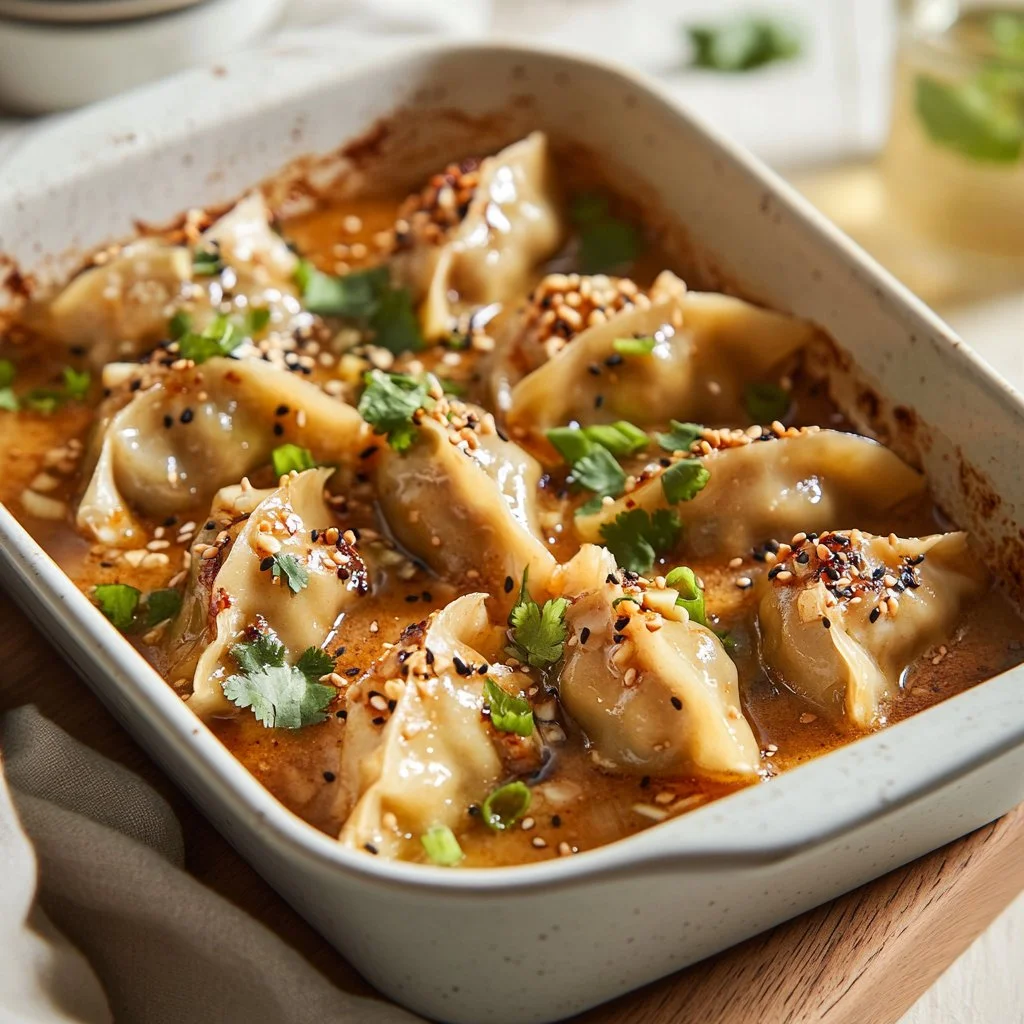
In a cozy kitchen, laughter bounces off the walls as the sound of my kids setting the table fills the air. The comforting aroma of something savory wafts through, calling everyone to gather. Tonight, that aroma comes from a batch of Easy Thai Baked Chicken Meatballs. It’s those simple moments that make cooking so special, especially when I can whip up a meal that feels like a warm hug but doesn’t leave me in a frenzy.

Why This Easy Thai Baked Chicken Meatballs Feels Like Home

Every family has their go-to meals that evoke feelings of comfort and joy. For us, Easy Thai Baked Chicken Meatballs is one of those dishes. It’s not just a meal; it’s a memory, a conversation starter, and a canvas for creativity.

The magic of this recipe lies in its simplicity. With just a handful of ingredients, it brings a burst of flavor to our dining table without consuming too much of our evening. This recipe feels good to prepare, and even better to share.

Easy Thai Baked Chicken Meatballs

Why Easy Thai Baked Chicken Meatballs is Our New Family Favorite

The charm of Easy Thai Baked Chicken Meatballs is hard to resist. It checks all the boxes for a busy family meal: quick to prepare, healthy, and bursting with flavors that everyone loves. Whether it’s a Monday night or a special occasion, these meatballs always steal the spotlight.

They remind me of family gatherings where laughter and shared meals were at the center of everything. I can already hear my kids asking if there are leftovers for lunch the next day. The appeal of this dish runs deep, proving it’s not only delicious but also a lovely way to connect over food.

The Simple Magic Behind Easy Thai Baked Chicken Meatballs

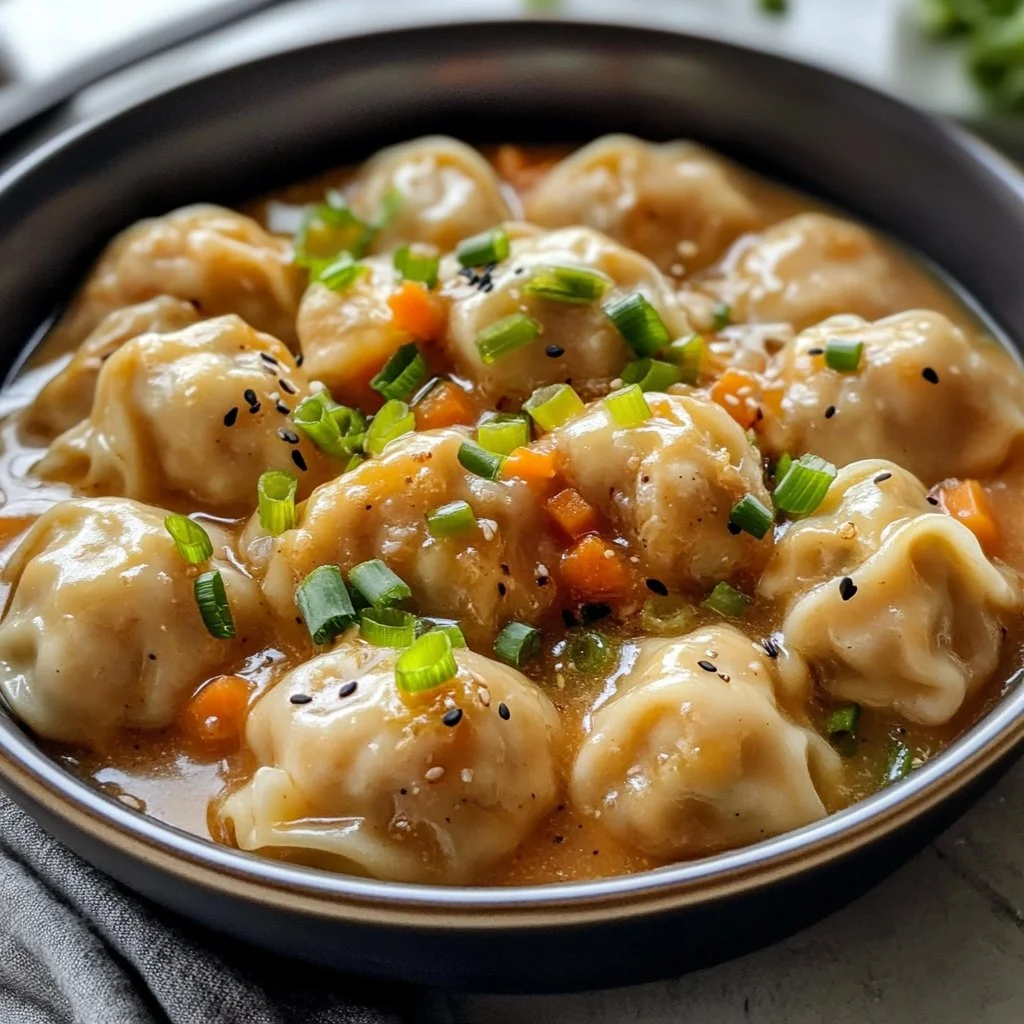
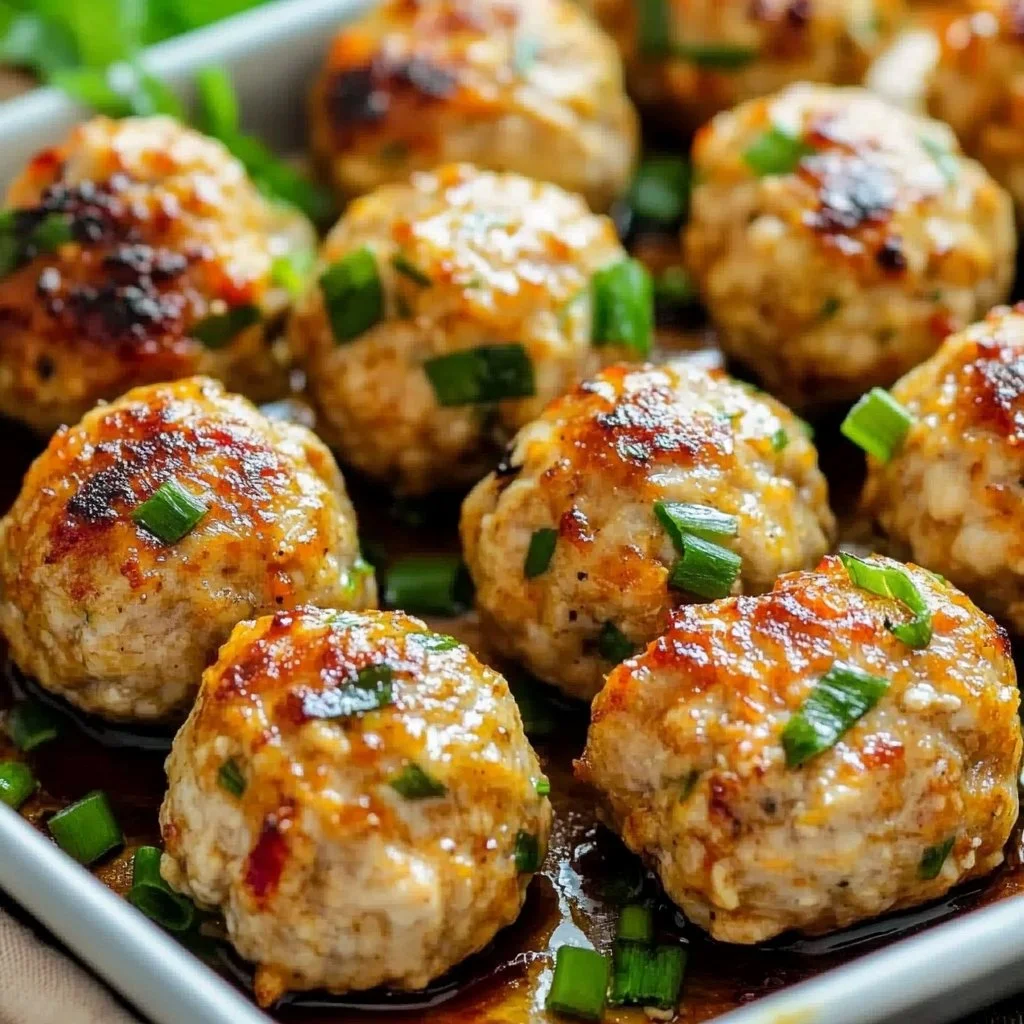
Why does this dish work so well, you might wonder? It’s all about balance. The ground chicken provides a light yet satisfying protein, while the red curry paste introduces a delightful kick. Fresh ginger adds warmth, and the breadcrumbs give the meatballs a lovely texture. Together, they create an experience that’s much more than the sum of its parts.

As someone who loves experimenting in the kitchen, I find this recipe sparks joy and creativity. You can serve it with a variety of dipping sauces, or pair it with jasmine rice and steamed vegetables. No matter how you dress it up, it always feels special.

Why This Recipe Works for Our Busy, Joyful Nights

On those busy weeknights, the last thing I want is to spend hours in the kitchen. Easy Thai Baked Chicken Meatballs is my secret weapon. They come together quickly and require minimal cleanup. This lets me spend quality time with my family, sharing stories about our day as we wait for dinner to be ready.

Cooking should be a shared joy, not a chore. With this recipe, I can involve my children in the prep. They love getting their hands a little messy by forming meatballs, and it turns into a fun bonding experience. This recipe isn’t just about food; it’s about making memories.

“This is where the magic happens—when the aroma fills the kitchen and my kids come running in, asking ‘Is it ready yet?’”

How to Make Easy Thai Baked Chicken Meatballs, The Heartwarming Way

When it comes to cooking, simplicity is key. With Easy Thai Baked Chicken Meatballs, you’ll see that the steps are straightforward and the process can be joyful. Let’s walk through the journey from mixing ingredients to enjoying the flavorful end result.

Step-by-Step Overview: Keeping It Simple

  1. Preheat your oven to 400°F (200°C) and line a baking sheet with parchment paper. This creates a non-stick surface for our meatballs.

  2. In a large bowl, combine ground chicken, red curry paste, grated ginger, breadcrumbs, green onions, egg, salt, and pepper. Mix until well combined. Don’t worry about being perfect here; just ensure everything is cohesive.

  3. Form the mixture into small meatballs and place them on the prepared baking sheet. Aim for uniform sizes so they cook evenly.

  4. Bake in the preheated oven for 20-25 minutes, or until the meatballs are cooked through and golden brown. You’ll know they are ready when the smell makes everyone’s stomach growl.

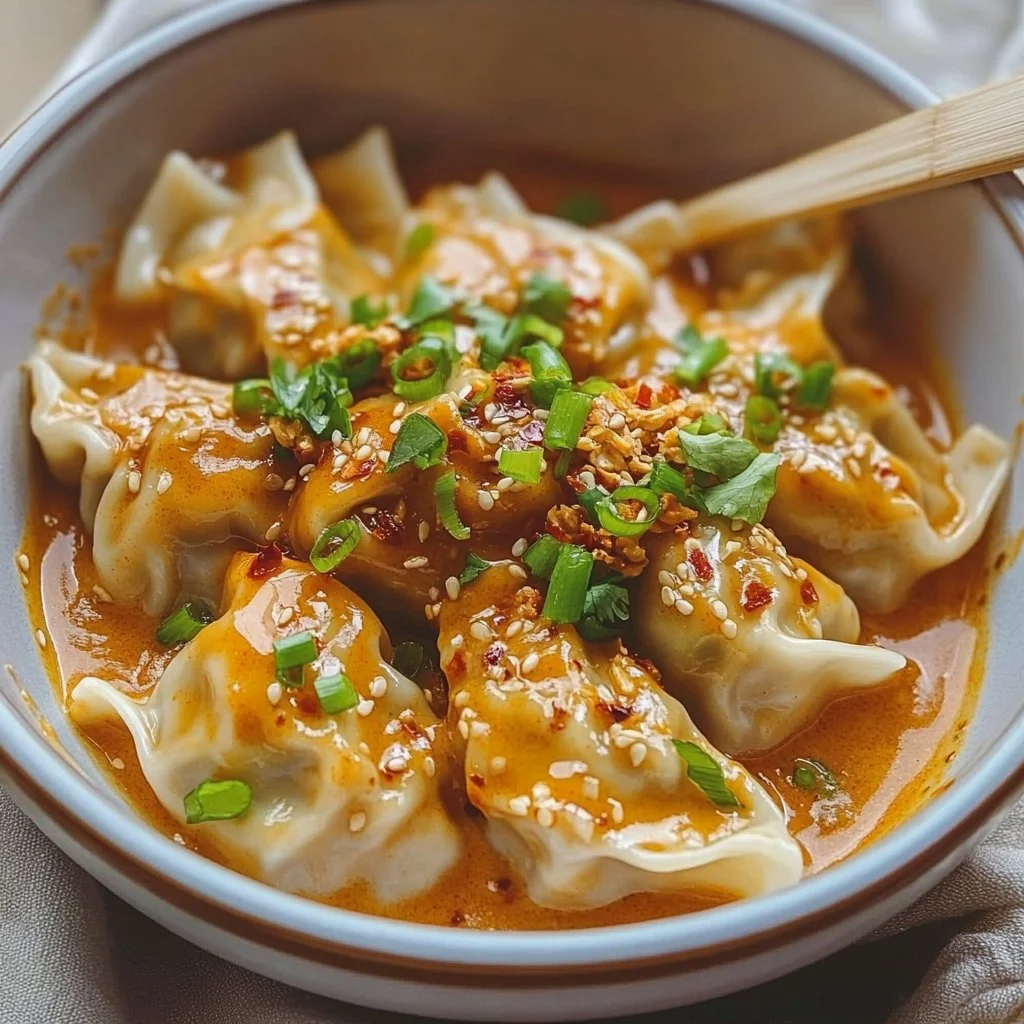
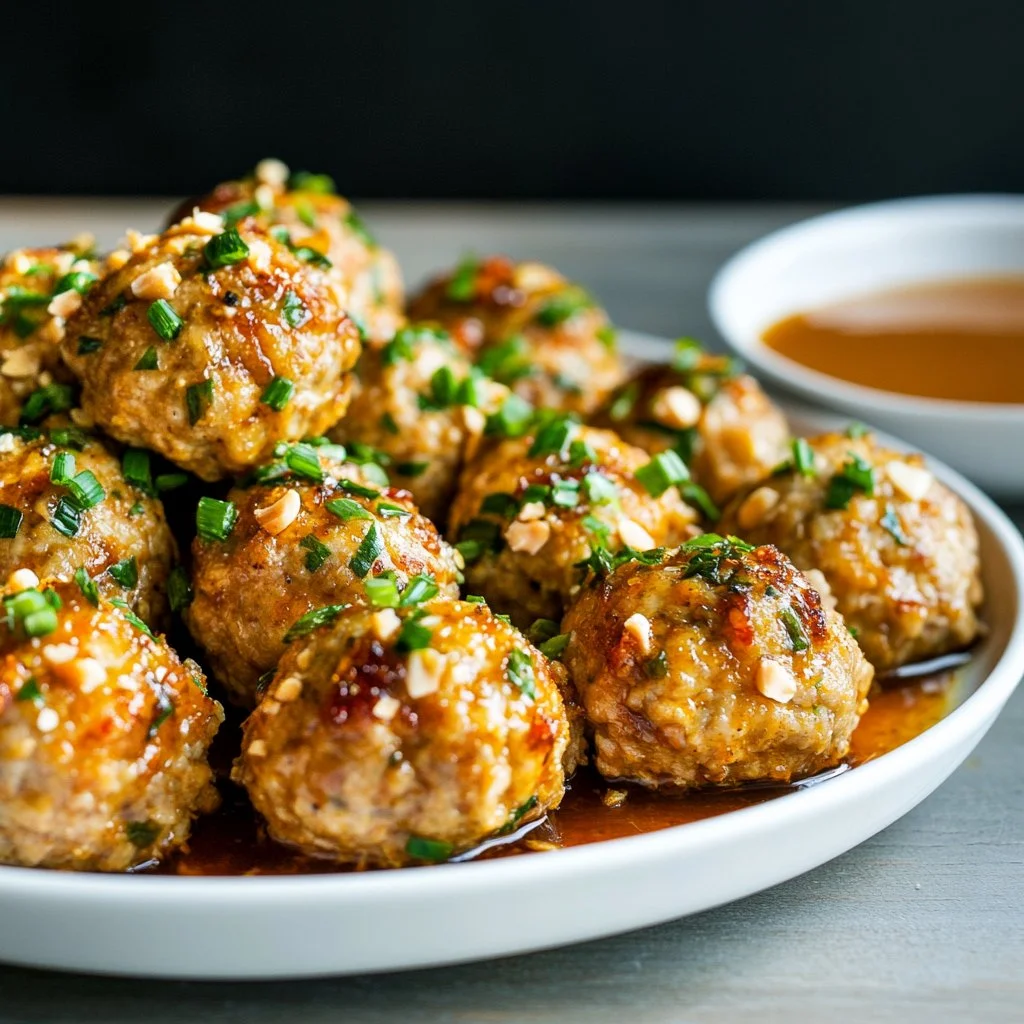
  5. Serve warm with peanut dipping sauce. This adds a creamy, nutty flavor that takes the dish over the top.

Each of these steps is designed to keep you engaged and relaxed. Mix, form, bake, and serve. That’s it!

Ingredients You’ll Need

Cooking is all about having the right ingredients on hand. For Easy Thai Baked Chicken Meatballs, you’ll need the following:

  • 1 pound ground chicken
  • 2 tablespoons red curry paste
  • 1 tablespoon fresh ginger, grated
  • 1/4 cup breadcrumbs
  • 1/4 cup green onions, chopped
  • 1 egg
  • Salt and pepper to taste
  • Peanut dipping sauce (for serving)

Don’t skip out on the fresh herbs; they are the soul of the dish! If you’re missing some ingredients, feel free to adjust. Cooking should be creative and stress-free.

Step-by-Step Directions

  1. Preheat your oven to 400°F (200°C) and line a baking sheet with parchment paper. This helps to prevent sticking.

  2. In a large bowl, combine ground chicken, red curry paste, grated ginger, breadcrumbs, green onions, egg, salt, and pepper. Mix until well combined. This is the point where the fun begins! Don’t worry if it feels a little sticky – that’s a good thing.

  3. Form the mixture into small meatballs and place them on the prepared baking sheet. I like making them about the size of a golf ball. This is a great time to let kids help; they love getting their hands in there.

  4. Bake in the preheated oven for 20-25 minutes, or until the meatballs are cooked through and golden brown. You’ll want to check them halfway through and rotate the pan for even cooking.

  5. Serve warm with peanut dipping sauce. This final touch is what elevates the dish. Let everyone dip their meatballs into the sauce for an exciting flavor explosion.

Serving Easy Thai Baked Chicken Meatballs with Love

Dinnertime in our household is all about sharing and enjoying. I love serving Easy Thai Baked Chicken Meatballs family-style in the middle of the table, where everyone can help themselves.

Pair it with some fragrant jasmine rice and steamed veggies, and you have a meal that’s colorful as well as nutritious. Some of my kids like to add a sprinkle of sesame seeds or crushed peanuts to give it that extra crunch. It really makes the dish shine, and it becomes a fun ritual for us.

Easy Thai Baked Chicken Meatballs

Another beautiful aspect of this recipe is that it’s versatile. You can switch the sides based on what you have and what you love. Whether you’re throwing together a quick weeknight meal or creating a feast for friends, Easy Thai Baked Chicken Meatballs fits in beautifully.

Storage & Reheat Tips (Keeping the Goodness)

If you happen to have leftovers—although they don’t last long in my house—here are some tips to store and reheat them.

Let the meatballs cool completely before placing them in an airtight container. They will stay fresh for about three days in the fridge. The microwave works for immediate lunches, but if you want to keep that just-baked warmth, the oven is the best option to reheat.

Simply pop them in at 350°F (175°C) for about 10 minutes, and they’ll taste fresh again.

My Kitchen Notes & Shortcuts

After making Easy Thai Baked Chicken Meatballs multiple times, I’ve picked up a few tips that make the process even smoother:

  • Use day-old bread for breadcrumbs. Just toss in a food processor—saves time and reduces waste.
  • Make a double batch and freeze half. You can enjoy these delicious meatballs for a quick meal later.
  • Get the kids involved in mixing and forming the meatballs. They love being part of the cooking process, and it always leads to fun memories.
  • Mix up the protein! Ground turkey or even plant-based alternatives work great.
  • Try adding finely chopped vegetables like bell peppers or carrots into the mixture for added nutrition.

These shortcuts help me save time and add a bit of creativity to our meals.

Family-Friendly Variations

Cooking is all about personal touch. While Easy Thai Baked Chicken Meatballs is a family favorite, here are some twists you might consider to make it your own:

  • Swap ground chicken for ground turkey or even lean beef if that’s what you have.
  • Add shredded carrots or zucchini for added nutrition and a pop of color in the meatballs.
  • Serve them with a yogurt dipping sauce for a refreshing change.
  • Experiment with different herbs like cilantro for a unique herby flavor.
  • If your family prefers less spice, use a milder curry paste or adjust the amount to suit your taste.

By playing with the ingredients, you can create a version of this dish that feels uniquely yours.

FAQs About Easy Thai Baked Chicken Meatballs

Can I make this ahead for a busy week?

Absolutely! In fact, letting it sit for an hour lets the flavors develop better, just like an old family recipe.

What can I serve with these meatballs?

They pair beautifully with rice, noodles, or even a fresh salad. Get creative and use what you have on hand!

Can I store uncooked meatballs in the freezer?

Yes! Just shape the meatballs and freeze them on a tray. Once frozen, you can transfer them to a freezer bag. Bake them straight from frozen, adding a few extra minutes to the cooking time.

What should I do if my meatballs are dry?

For the next batch, consider adding a little more egg or breadcrumbs. Both contribute moisture and help bind the ingredients together.

One Final Thought from My Kitchen

As I tuck my kids into bed after another joyful meal, I reflect on the delightful evening spent sharing Easy Thai Baked Chicken Meatballs. Cooking should be a joyful experience, and it’s my hope that this dish bridges the gaps in your family, sparking connection and warmth at the table.

I hope this recipe finds its way into your family’s laughter and stories. If it does, my grandmother’s kitchen is smiling. Until next time, happy cooking!

Easy Thai Baked Chicken Meatballs

Prep Time 15 minutes
Cook Time 25 minutes
Total Time 40 minutes
Servings 4 servings
Calories 300
These Easy Thai Baked Chicken Meatballs are a quick, flavorful family favorite that brings comfort to the dinner table.

Ingredients

Meatball Ingredients

  • 1 pound ground chicken (Use ground turkey or beef as alternatives.)
  • 2 tablespoons red curry paste (Adjust amount for less spice if desired.)
  • 1 tablespoon fresh ginger, grated
  • 1/4 cup breadcrumbs (Use day-old bread for best results.)
  • 1/4 cup green onions, chopped
  • 1 large egg
  • to taste salt
  • to taste pepper

For Serving

  • to taste peanut dipping sauce (Enhances flavor; serve warm.)

Instructions 

Preparation

  • Preheat your oven to 400°F (200°C) and line a baking sheet with parchment paper.
  • In a large bowl, combine ground chicken, red curry paste, grated ginger, breadcrumbs, green onions, egg, salt, and pepper. Mix until well combined.
  • Form the mixture into small meatballs and place them on the prepared baking sheet.

Cooking

  • Bake in the preheated oven for 20-25 minutes, or until the meatballs are cooked through and golden brown.
  • Serve warm with peanut dipping sauce.

Notes

Use cooking as a way to bond with family; involve kids in the formation of meatballs. Store leftovers in an airtight container, and reheat in the oven for best results.
Calories: 300kcal
Course: Dinner, Main Course
Cuisine: Asian, Thai
Keyword: Baked Chicken Meatballs, Comfort Food, Easy Recipe, Family Dinner, Thai Meatballs

Chicken Crust Pizza

There’s something magical about the sounds of a family kitchen. Perhaps it’s the clinking of forks and the soft laughter of kids as they gather around the table, or the delightful smell of something delicious simmering away on the stove. Maybe it’s the moments that bring everyone together, where with just a few ingredients, love fills the air. One of the dishes that perfectly captures this warmth and joy is Chicken Crust Pizza. It’s not just a meal; it’s an experience that can transform an ordinary night into an extraordinary family gathering.

Why This Chicken Crust Pizza Feels Like Home

Chicken Crust Pizza creates that cozy feeling of home with every bite. This dish is where comfort and creativity meet. For me, it’s not just about the flavors but also about the stories that unfold around it. Whether it’s a busy weeknight or a relaxed weekend, this pizza makes its way onto our table like a familiar friend. It marries tradition with innovation, offers a lighter twist on a classic, and somehow always brings smiles.

What I adore most about this pizza is that it feels special without being stressful. It’s a dish everyone loves, from the pickiest eaters to the adventurous ones. There’s a sense of togetherness as we work side by side in the kitchen, discussing toppings and crafting the ideal pizza. So, let’s dive into why this Chicken Crust Pizza is truly a game changer for busy families like yours.

Chicken Crust Pizza

Why Chicken Crust Pizza is Our New Family Favorite

Creating a Chicken Crust Pizza means gathering around the table with laughter and connection. It’s like a big warm hug that transforms a simple dinner into a lively family event. Want to know why this pizza is on regular rotation at our house? It’s quick, satisfying, and versatile. You can toss together whatever toppings your family loves, making it the perfect avenue for creative expression.

I’ll never forget a time when my niece helped me sprinkle cheese over the top. The kitchen filled with giggles every time a cheesy clump fell to the side. It’s these moments that build memories. This recipe brings us together, turning cooking into a canvas for creativity while ensuring there’s still time for laughter and fun.

The Simple Magic Behind Chicken Crust Pizza

What makes Chicken Crust Pizza so special is its ability to cater to everyone’s tastes while keeping preparation effortless. Think about it: with just a few ingredients and no complicated techniques, you can create something that feels indulgent yet wholesome. The beauty of using ground chicken is in the texture it brings. A golden, crispy crust that invites you to dive in.

From my experience, slight variations in the cooking time create that perfect crust. A little browning here and there adds a depth of flavor, just like my grandmother taught me. And when the cheese melts, it’s a sight that draws everyone to the kitchen.

Why This Recipe Works for Our Busy, Joyful Nights

In our home, dinner is about connection. We cherish our family meals, even amid busy schedules. Chicken Crust Pizza aligns perfectly with our whirlwind evenings. The process is streamlined, allowing us to eat together with minimal fuss.

In about 30 minutes, you can serve up a delicious meal that feels special without requiring an army of pots and pans. We often pair it with a simple side salad or some roasted veggies, making it nearly a complete meal in one.

Chicken Crust Pizza

How to Make Chicken Crust Pizza, The Heartwarming Way

Making Chicken Crust Pizza is quite straightforward. Let me walk you through the steps that keep it joyful and simple.

“This is where the magic happens—when the aroma fills the kitchen and my kids come running in, asking ‘Is it ready yet?’”

Step-by-Step Overview: Keeping It Simple

This pizza comes together beautifully, so don’t worry if it’s your first time. You’ll find joy in the kitchen with this simple process.

  1. Preheat your oven to 425°F (220°C).
  2. In a bowl, combine ground chicken, mozzarella cheese, Parmesan cheese, egg, garlic powder, onion powder, Italian seasoning, salt, and pepper.
  3. Spread the mixture evenly onto a parchment-lined baking sheet to form a pizza crust.
  4. Bake for 12-15 minutes until the crust is golden and cooked through.
  5. Remove from the oven, add desired toppings, and bake for an additional 10 minutes until the cheese is melted.
  6. Slice and serve hot.

When you see that golden crust emerging from the oven, trust me, your heart will melt a little. It’s a comforting sight that signals all eyes will be on you, waiting for that first delicious slice.

Ingredients You’ll Need

Just a few ingredients are all you need to create this delightful Chicken Crust Pizza.

  • 1 pound ground chicken
  • 1 cup shredded mozzarella cheese
  • 1/4 cup grated Parmesan cheese
  • 1 egg
  • 1 teaspoon garlic powder
  • 1 teaspoon onion powder
  • 1 teaspoon Italian seasoning
  • Salt and pepper to taste
  • Toppings of choice (e.g., marinara sauce, more cheese, vegetables, pepperoni)

Don’t worry if you don’t have all the exact items. Use what’s in your fridge. This is all about flavor and creativity, so feel free to experiment. Fresh herbs can add a pop of color and brightness, making the dish sing.

Step-by-Step Directions

I love how this recipe simplifies creating something scrumptious.

  1. Preheat your oven to 425°F (220°C). This ensures that the crust gets that lovely crispy finish.

  2. In a bowl, combine the ground chicken, mozzarella cheese, Parmesan cheese, egg, garlic powder, onion powder, Italian seasoning, salt, and pepper. Stir until everything is well mixed. Kids can jump in and help with stirring; they’ll feel proud!

  3. Spread the mixture evenly onto a parchment-lined baking sheet to form a pizza crust. Aim for an even layer so it cooks through well. It doesn’t have to look perfect; just have fun with it.

  4. Bake for 12-15 minutes until the crust is golden and cooked through. The aroma will start to fill your kitchen, and you’ll know you’re on the right track.

  5. Remove from the oven, add the toppings you like, and return to the oven for an additional 10 minutes until the cheese is melted. You might want to include some of your kids’ favorites to keep them engaged.

  6. Finally, slice and serve hot. Everyone is bound to help themselves for seconds—how easy is that?

Serving Chicken Crust Pizza with Love

When we sit down to eat, Chicken Crust Pizza becomes more than just a meal; it’s a celebration of flavors and togetherness. We often serve this pizza family-style in the middle of the table. Everyone reaches in, creating a little chaos of smiles and shared stories.

I love pairing it with a side salad or roasted veggies. If we have leftover marinara sauce, it becomes a tasty dip for those cheesy crust edges. My kids enjoy adding extra toppings right at the table, giving them a sense of ownership over their meal.

Chicken Crust Pizza

Storage & Reheat Tips

We often have plenty of leftovers, and the best part is knowing how to preserve that goodness. Here’s how we keep the flavors strong for tomorrow’s joy.

Store any remaining Chicken Crust Pizza in an airtight container in the refrigerator. It should last for about 3-4 days. I recommend reheating it in the oven rather than the microwave because the oven brings back that just-made warmth and crispiness. It only takes about 10-15 minutes at 350°F (175°C) to do the trick.

If you decide to freeze leftovers, wrap them tightly in foil or plastic wrap before placing them in a freezer bag. They can last for up to a month. When you’re ready, simply reheating in the oven is again the best option to restore their original delightful texture.

My Kitchen Notes & Shortcuts

Cooking is all about efficiency, especially when life gets busy. Here are a few tips I’ve gathered from making Chicken Crust Pizza over and over.

  • Prep Ahead: You can mix the chicken crust mixture in advance and store it in the fridge for a day. This cuts down on prep time when you’re ready to bake.

  • Personal Touch: Swap out the cheese for other varieties like gouda or cheddar, or add fresh herbs when mixing for an extra flavor kick.

  • Kids in the Kitchen: Let your children add toppings, which turns dinner into a fun activity. They’ll enjoy the hands-on approach and feel proud of their creations.

  • Slicing Tips: Use a pizza cutter for clean slices; you’ll avoid all that stretching and tearing of cheese.

  • Weekly Meal Planner: Consider making this pizza a regular feature on your meal plan. It’s easy, delicious, and always brings people together.

Family-Friendly Variations

There’s room to play with this dish and make it your own. Here are some modifications that my family enjoys.

  • Veggie Delight: Load up with vegetables. Sautéed bell peppers, mushrooms, or spinach make lovely additions or even a colorful topping.

  • Cheesy Chicken Alfredo: Drizzle a bit of Alfredo sauce before adding mozzarella and Parmesan for a rich flavor twist.

  • BBQ Chicken Crust Pizza: Swap the marinara for BBQ sauce and top it with grilled chicken, red onions, and cilantro. It’s a fun take on classic flavors.

  • Cottage Cheese Twist: If you’re looking for added protein and lower calories, consider adding cottage cheese to your mixture.

It’s amazing how little changes can create new memories around the dinner table. Feel free to adapt this dish and let each family member put their signature twist on it.

FAQs About Chicken Crust Pizza

Can I make this ahead for a busy week?

Absolutely! Letting the chicken mixture sit for an hour lets the flavors mingle beautifully, similar to how an old family recipe is better with time.

What can I use as a topping?

The possibilities are endless! Use whatever you have on hand, from fresh vegetables to various cheeses or even leftover grilled chicken pieces.

How do I store leftovers?

Place any leftover pizza in an airtight container in the fridge. It will keep well for about 3-4 days. Just remember to reheat in the oven for the best results.

Can I customize the crust?

Definitely. You can add spices or herbs based on your personal taste. And if using ground turkey fits your family better, go for it.

Is it suitable for kids to help out?

Absolutely! This is a fantastic dish for getting kids involved in the kitchen. Let them mix, spread the mixture, or choose toppings.

One Final Thought from My Kitchen

I hope this Chicken Crust Pizza finds its way into your home, bringing laughter, connection, and flavor each time. Cooking should be a celebration, a chance to bond, create, and enjoy. So, the next time you’re looking for that perfect dish to bring everyone together, think of this heartfelt recipe. As I always say, if it warms your home like a hug, my grandmother’s kitchen is smiling right at you.

Until next time, happy cooking!

Chicken Crust Pizza

Prep Time 10 minutes
Cook Time 25 minutes
Total Time 35 minutes
Servings 4 servings
Calories 270
A delightful and healthy twist on traditional pizza, perfect for family gatherings and customizable with various toppings.

Ingredients

For the Chicken Crust

  • 1 lb ground chicken (Use chicken breast or thigh meat according to preference.)
  • 1 cup shredded mozzarella cheese
  • 1/4 cup grated Parmesan cheese
  • 1 large egg (Binder for crust.)
  • 1 teaspoon garlic powder
  • 1 teaspoon onion powder
  • 1 teaspoon Italian seasoning
  • to taste salt and pepper

Toppings

  • as needed toppings of choice (e.g., marinara sauce, more cheese, vegetables, pepperoni) (Be creative with your favorite toppings.)

Instructions 

Preparation

  • Preheat your oven to 425°F (220°C).
  • In a bowl, combine ground chicken, mozzarella cheese, Parmesan cheese, egg, garlic powder, onion powder, Italian seasoning, salt, and pepper.
  • Spread the mixture evenly onto a parchment-lined baking sheet to form a pizza crust.

Baking

  • Bake for 12-15 minutes until the crust is golden and cooked through.
  • Remove from the oven, add desired toppings, and bake for an additional 10 minutes until the cheese is melted.
  • Slice and serve hot.

Notes

Store leftovers in an airtight container in the refrigerator for 3-4 days. Reheat in the oven for best results.
Calories: 270kcal
Course: Dinner, Main Course
Cuisine: American, Family-Friendly
Keyword: Chicken Crust Pizza, Comfort Food, Family Recipe, Healthy Pizza, Quick Dinner

Buffalo Chicken Salad

There’s nothing quite like the sound of laughter and clinking dishes filling the air as everyone gathers around the table. The aromas wafting from the kitchen are a comforting reminder of family connections and shared moments. As I prepare a vibrant Buffalo Chicken Salad, the excitement builds. It’s a dish that not only feeds our bodies but nourishes our spirits. Each time I make it, I’m reminded of the special gatherings and the joy that simple meals can bring.

Why This Buffalo Chicken Salad Feels Like Home

Buffalo Chicken Salad has a special place in our hearts and on our dinner table. It offers the perfect blend of comfort and zest. The blend of tender chicken, crunchy celery, and a delightful zing from the Buffalo sauce makes it irresistible. This dish embodies warmth and flavor, encapsulating the spirit of family dinners where laughter mingles with the delightful scents of home-cooked meals.

What makes Buffalo Chicken Salad a family favorite is how it comes together effortlessly. On busy evenings, I can whip it up in no time without sacrificing taste. This recipe feels like a warm hug at the dinner table. Everyone loves the combination of flavors, and the joy of sharing a meal brings us closer. It’s these simple yet profound moments that make this dish feel so special.

In our household, this dish saves the day when time is short but family time is crucial. There’s something magical about a meal that pleases both the pickiest eaters and adventurous palates. Plus, it requires only a few clean-up dishes, allowing more time for making memories rather than prepping and washing.

Buffalo Chicken Salad

The Simple Magic Behind Buffalo Chicken Salad

What makes Buffalo Chicken Salad truly shine is how quickly it can be prepared while still feeling indulgent. It’s ideal for those joyful nights when life feels a bit hectic. Picture this: a large bowl of vibrant colors, the air filled with the aroma of spicy Buffalo sauce, and the comforting crunch of fresh celery. It’s more than just a meal; it’s a comforting experience.

Next up, let’s dive into preparing this delightful dish. It’s all about embracing simplicity while making it special. The creamy texture from Greek yogurt blends perfectly with the heat of the Buffalo sauce. When everything comes together, you end up with a dish that not only satisfies hunger but also creates connections around the dinner table.

“This is where the magic happens—when the aroma fills the kitchen and my kids come running in, asking ‘Is it ready yet?’”

Cooking is more than following a recipe; it’s about the experience. When you hear the cheerful chatter of your loved ones as they gather, you know it’s all come together well.

Ingredients You’ll Need

To create this fabulous Buffalo Chicken Salad, you’ll need the following ingredients:

  • 2 cups rotisserie chicken, shredded
  • 1/2 cup celery, chopped
  • 1/2 cup Greek yogurt
  • 1/4 cup Buffalo sauce
  • Salt and pepper to taste
  • Optional: green onions, chopped, for garnish

Gathering these simple, flavorful essentials sparks creativity in the kitchen. Don’t skip on the fresh herbs; they add a burst of flavor that feels like sunshine. Use what you have on hand; this dish is about improvisation and making it your own.

Step-by-Step Directions

  1. In a large bowl, combine the shredded rotisserie chicken and chopped celery. Make sure to mix them well, letting the textures meld together.
  2. Add the Greek yogurt and Buffalo sauce, mixing thoroughly until the chicken is beautifully coated with the creamy, spicy blend.
  3. Season with salt and pepper to taste. This little step can elevate your dish, so taste as you go!
  4. Serve immediately or refrigerate for meal prep. It’s an easy meal to make ahead of time. Just know that letting it sit for a little allows the flavors to deepen.
  5. Garnish with chopped green onions if desired. That little pop of color adds visual appeal!

As you mix the flavors, let the kids join in. It’s the fun part, and you may just surprise yourself with the laughter shared in those moments. Enjoy the texture and aromas while you cook; they are signs that you’re on the right track.

Serving Buffalo Chicken Salad with Love

Bringing Buffalo Chicken Salad to the table is always a special moment. I love to present it family-style, in a big bowl in the center, allowing everyone to help themselves. There’s something truly rewarding in watching loved ones dig in, sharing their version of the salad with added toppings or extra sauce.

On busy nights, I like to pair the salad with a side of crispy tortilla chips or soft pita bread. It’s the perfect complement, adding a delightful crunch to the flavorful chicken. Each member of our family often has their unique twist; some go heavy on the hot sauce, while others prefer a drizzle of ranch dressing for a milder touch. The beauty of Buffalo Chicken Salad is how everyone can make it uniquely theirs.

Buffalo Chicken Salad

Storage & Reheat Tips

One thing I’ve learned over the years is how to make Buffalo Chicken Salad last for another meal without losing its charm. Leftovers can be a blessing, especially with this dish. Store the salad in an airtight container in the refrigerator for up to three days.

When reheating, the microwave works fine for a quick lunch. Just keep an eye on it so you don’t overheat the yogurt. However, if you want to bring back that fresh-out-of-the-kitchen warmth, the oven is a better choice. Just warm it gently, giving it a taste to ensure the flavors are still rich and inviting.

My Kitchen Notes & Shortcuts

Here are a few tips I’ve picked up in the kitchen while making Buffalo Chicken Salad:

  • Use leftover rotisserie chicken or any cooked chicken you have on hand. It saves time and tastes just as good.
  • Add a squeeze of lime or lemon to brighten the flavors. A little acidity can lift the whole dish.
  • Get the kids involved by allowing them to stir or add in the sauce. They’ll love being part of the process.
  • Make a double batch and enjoy it over the next few days. It keeps beautifully and is great for quick lunches.
  • Experiment with fresh herbs or even avocado for a creamy twist.

Cooking should be a joyful experience. Embrace these tricks to enhance the time you spend in the kitchen with loved ones.

Family-Friendly Variations

What’s wonderful about Buffalo Chicken Salad is its versatility. Let your creativity shine! Here are some of our favorite twists on the recipe:

  • Swap Greek yogurt for sour cream for a different creaminess.
  • Add shredded carrots for extra crunch and sweetness. They fit right in with the rest of the ingredients.
  • For a lighter version, use a low-fat yogurt or even a plant-based option. It still tastes fantastic.
  • Try incorporating different vegetables like diced bell peppers or sweet corn to elevate the flavor and nutrition.
  • Make it a wrap! Use the chicken salad as a filling for wraps or pitas for a fun family lunch idea.

Feel free to play with tradition and add your unique touch. Each variation tells your family’s story.

FAQs About Buffalo Chicken Salad

Can I make this ahead for a busy week?
Absolutely! In fact, letting it sit for an hour allows the flavors to get to know one another, just like an old family recipe.

What can I use instead of rotisserie chicken?
Any cooked chicken will work well. Grilled chicken, baked, or even leftover holiday turkey is delicious.

What if I don’t have Greek yogurt?
No worries. Sour cream, mayonnaise, or a dairy-free substitute will work just fine. Customize it based on your dietary needs.

Can I freeze Buffalo Chicken Salad?
It’s best not to freeze the salad because of the yogurt’s texture. However, you can freeze the chicken mixture before adding yogurt.

What can I serve on the side?
Consider a simple green salad, fresh fruit, or some crunchy veggies and dip. It all pairs beautifully with the salad.

One Final Thought from My Kitchen

As you prepare Buffalo Chicken Salad, remember this: Cooking is about more than just nourishment. It’s about weaving together flavors, memories, and stories with every dish. I hope this recipe finds its way into your family’s laughter and shared moments. May your table be filled with warmth, love, and delicious food, making every meal a delightful occasion.

Until next time, happy cooking and savor every bite!

Buffalo Chicken Salad

Prep Time 10 minutes
Total Time 10 minutes
Servings 4 servings
Calories 350
A comforting blend of shredded chicken, crunchy celery, and zesty Buffalo sauce, perfect for family gatherings.

Ingredients

Main Ingredients

  • 2 cups rotisserie chicken, shredded (You can use leftover cooked chicken as well.)
  • 1/2 cup celery, chopped
  • 1/2 cup Greek yogurt (Can substitute with sour cream or a dairy-free option.)
  • 1/4 cup Buffalo sauce (Adjust based on your spice preference.)
  • to taste Salt and pepper (Essential for flavor enhancement.)
  • optional green onions, chopped, for garnish (Adds visual appeal and flavor.)

Instructions 

Preparation

  • In a large bowl, combine the shredded rotisserie chicken and chopped celery, mixing them well.
  • Add the Greek yogurt and Buffalo sauce, mixing thoroughly until the chicken is beautifully coated.
  • Season with salt and pepper to taste, ensuring to taste as you go.
  • Serve immediately or refrigerate for meal prep. Letting it sit allows the flavors to deepen.
  • Garnish with chopped green onions if desired before serving.

Notes

For added flavor, a squeeze of lime or lemon can brighten the dish. Getting kids involved can make cooking even more enjoyable.
Calories: 350kcal
Course: Main Course, Salad
Cuisine: American
Keyword: Buffalo Chicken Salad, Easy Chicken Recipes, Family-Friendly Meals, Healthy Alternatives, Quick Dinner Ideas

Hawaiian Chicken Salad: Gluten-Free & Whole Health Flexi-Plan

There’s a unique rhythm that fills our kitchen as the afternoon sun streams through the window. The sound of my kids setting the table blends with the joyous aromas wafting through the air, reminiscent of summertime adventures. Each scent tells a story, as if inviting us to share in a moment of warmth and connection. One of our favorite go-to recipes during these blissful gatherings is a Hawaiian Chicken Salad that effortlessly brings comfort and joy to our table, while also being gluten-free and perfect for our Whole Health Flexi-Plan.

Why This Hawaiian Chicken Salad: Gluten-Free & Whole Health Flexi-Plan Feels Like Home

This dish doesn’t just taste good; it feels like home on a plate. The combination of juicy chicken, vibrant pineapple, and bright, fresh greens transports me back to sunny days spent in the backyard, surrounded by laughter and love. The Hawaiian Chicken Salad is not just a salad; it’s an experience, a comforting reminder of family gathering around the table to share stories and smiles.

One of the best parts about this recipe is its ability to come together quickly. In less than an hour, you can have a wholesome meal that feels special, even on the busiest of nights. It’s perfect for those evenings when you want to cook something delicious without spending all day in the kitchen.

Hawaiian Chicken Salad: Gluten-Free & Whole Health Flexi-Plan

Why Hawaiian Chicken Salad: Gluten-Free & Whole Health Flexi-Plan is Our New Family Favorite

Let’s talk about flavor. This salad bursts with freshness, combining sweet and savory elements that keep everyone coming back for more. The crunch of the romaine, the creaminess of the avocado, and the tropical sweetness from the pineapple create a symphony of textures and tastes.

Moreover, it’s adaptable. Whether you need a meal tailored to dietary restrictions or simply want to use what you have on hand, this Hawaiian Chicken Salad has you covered. It invites creativity, allowing you to play with the ingredients and make it your own. This recipe embodies the spirit of cooking with love and intention, and that’s exactly what makes it a favorite in our household.

The Simple Magic Behind Hawaiian Chicken Salad: Gluten-Free & Whole Health Flexi-Plan

Sometimes, the magic of cooking lies in the process—gathering ingredients, mixing flavors, and ultimately sharing the meal. The Hawaiian Chicken Salad shines in this respect. Each step is straightforward and rewarding. Plus, it’s a dish that allows little hands to help along the way. From marinating the chicken to tossing the salad, everyone can get involved, creating cherished memories together.

A hint of coconut milk in the marinade adds an unexpected layer of flavor, making the chicken tender and juicy. It’s the little details, like these, that elevate the dish, while still keeping the preparation simple enough not to feel overwhelming.

Why This Recipe Works for Our Busy, Joyful Nights

Life can get hectic, and dinner often becomes a race against the clock. That’s where this Hawaiian Chicken Salad shines. It combines deliciousness with a practical approach. You can marinate the chicken in advance, even the day before if you wish. This convenience allows the flavors to deepen and ensures that when the dinner bell rings, everything is ready to go.

The best part? There are minimal dishes to wash. You can prepare the salad in one bowl, marinate the chicken in another, and a quick wipe down leaves you with a clean kitchen. It’s meals like this that remind me that feeding our family doesn’t have to be a chore. Instead, it can be a delight.

How to Make Hawaiian Chicken Salad: Gluten-Free & Whole Health Flexi-Plan, The Heartwarming Way

Cooking this Hawaiian Chicken Salad is an experience you’ll enjoy. From handling fresh ingredients to the enticing aroma that fills the air, every step brings you closer to a satisfying meal. Let me give you a quick overview of the process to make it all feel achievable.

  • First, you’ll need to marinate the chicken. The marinade suits both the meat and your taste buds, adding a depth of flavor that is simply irresistible.
  • Next, prepare a vibrant salad base with fresh romaine, creamy avocado, and your choice of colorful veggies like cherry tomatoes and red onion.
  • Finally, layer everything together and drizzle your homemade dressing for that perfect finish.

It’s such an enjoyable process, especially when you notice the vibrant colors and feel the textures come alive in front of you. Trust me, the joy of watching it come together is almost as good as eating it.

“This is where the magic happens—when the aroma fills the kitchen and my kids come running in, asking ‘Is it ready yet?’”

Ingredients You’ll Need

Gathering your ingredients is one of the exciting parts of cooking. Here’s what you will need for this delightful Hawaiian Chicken Salad:

  • 1/3 cup light coconut milk
  • 1/4 cup fresh pineapple juice
  • 1 tbsp gluten-free tamari sauce
  • Zest of 1 lime
  • 2 garlic cloves, minced
  • 1/4 tsp onion powder
  • 1/4 tsp cumin
  • 1/4 tsp paprika
  • 1/4 tsp ginger powder
  • 1/4 tsp salt
  • 1/2 tbsp olive oil
  • 1 large chicken breast
  • 3/4 cup fresh pineapple pieces
  • 6 cups chopped romaine lettuce
  • 1/2 avocado, sliced
  • 1/2 red onion, sliced
  • 1/2 cup cherry tomatoes, halved
  • 1 1/2 cups cooked quinoa
  • 1 1/2 tbsp lime juice
  • 2 1/2 tbsp olive oil
  • 2 tbsp finely chopped cilantro
  • 1/2 tsp honey
  • 1/4 tsp salt
  • Black pepper to taste

A quick tip: Don’t skip the fresh herbs; they’re the soul of the dish. And remember, this recipe is flexible. Use what you have in your fridge and let your creativity shine. Cooking is about expressing yourself, not just following a recipe.

Step-by-Step Directions

Making this Hawaiian Chicken Salad is straightforward and fun. Here’s how to do it step-by-step:

  1. Marinate Chicken: In a bowl, combine coconut milk, pineapple juice, gluten-free tamari, lime zest, garlic, onion powder, cumin, paprika, ginger powder, salt, and olive oil. Add the chicken breast, ensuring it’s well-coated. Marinate for a minimum of 3 hours, preferably overnight for the best flavor.

  2. Prepare Dressing: In a jar, shake together lime juice, olive oil, cilantro, honey, salt, and black pepper. Set aside for at least 15 minutes to let the flavors blend.

  3. Cook Chicken: Heat a non-stick skillet over high heat and add a little olive oil. Once hot, add the marinated chicken. Cook for about 3 minutes on each side until golden. Remove the chicken from the pan and cover loosely with foil for about 5 minutes before slicing thickly.

  4. Sear Pineapple: In the same skillet, add the pineapple pieces. Sear for about 1-2 minutes on each side until caramelized and golden. This step adds incredible depth of flavor.

  5. Assemble Salad: On a platter, arrange the chopped romaine, avocado slices, red onion, cherry tomatoes, and cooked quinoa. Top with the sliced chicken and seared pineapple or any fresh fruit of your choice.

  6. Serve: Drizzle the dressing over the top and serve immediately, enjoying the colorful presentation and lovely aroma.

Each step is an opportunity to involve the family. Let the kids toss the salad together or drizzle the dressing; it’s a wonderful way to make the cooking process a team effort.

Serving Hawaiian Chicken Salad: Gluten-Free & Whole Health Flexi-Plan with Love

When it comes time to serve this delightful salad, I love putting it together family-style. By placing everything on the table, it creates an inviting atmosphere where everyone helps themselves. The beauty of sharing a meal, I believe, lies in the connections it forges.

We typically enjoy this salad alongside some warm gluten-free bread or rice cakes. The sweet, tangy flavor of the dressing beautifully complements the chicken and pineapple, making it an absolute hit at our table. My kids often choose to add extra avocado or pineapple, personalizing it in a way that makes each serving uniquely their own.

Hawaiian Chicken Salad: Gluten-Free & Whole Health Flexi-Plan

Storage & Reheat Tips

Storing the leftovers of this Hawaiian Chicken Salad is simple and keeps the flavors intact. Here are some tips to make sure you enjoy every last bite the next day:

  • Storage: Keep any leftover salad in an airtight container in the refrigerator. The key is to store the dressing separately if you can, as it keeps the salad fresh and crisp.
  • Reheat: The best way to reheat the chicken is in the oven. Just pop it in at 350 degrees Fahrenheit for about 10-15 minutes. This helps retain the chicken’s juiciness and texture. The microwave will work, but it lacks that just-cooked warmth.

Making sure you preserve the flavors and textures guarantees that this dish will taste just as wonderful the next day.

My Kitchen Notes & Shortcuts

Cooking this Hawaiian Chicken Salad has taught me a few valuable tricks over time. Here are some of my favorite kitchen notes that have made the process smoother and more enjoyable:

  • Pre-marinate: Always marinate the chicken ahead of time. It can even be done in the morning for dinner later.
  • Bulk cook quinoa: Make a larger batch of quinoa earlier in the week to use in various meals. It’s an easy way to save time.
  • Get the kids involved: Let your children help in the kitchen. They love adding the toppings and mixing the salad. Plus, it’s a great opportunity for them to learn.
  • Herb variations: Use different herbs based on your family’s taste. Mint or basil can provide a refreshing twist.
  • Leftover makeover: If you have leftover salad, turn it into a wrap or a grain bowl for lunch the next day.

Each of these little insights reflects my journey in the kitchen, ensuring cooking feels both joyful and manageable.

Family-Friendly Variations

One of the best aspects of this Hawaiian Chicken Salad is its versatility. It’s an open invitation to get creative. Here are a few ways you can make it your own:

  • Switch up the proteins: Feel free to use grilled shrimp or even tofu for a vegetarian option.
  • Use mixed greens: While romaine is crunchy and refreshing, you can use any greens you prefer or even a mix for added flavor.
  • Extra crunch: Consider adding nuts or seeds like slivered almonds or pumpkin seeds for an added texture.
  • Spice it up: A dash of chili flakes in the dressing can add a zing that some family members might enjoy.
  • Additional vegetables: Sliced cucumbers or bell peppers can easily be added for extra color and crunch.

Let your creativity guide you, and don’t be afraid to explore the flavors your family loves.

FAQs About Hawaiian Chicken Salad: Gluten-Free & Whole Health Flexi-Plan

Here are a few common questions about this recipe. It’s always helpful to have clarity before you begin cooking:

Can I make this ahead for a busy week?

Absolutely! In fact, letting it sit for an hour lets the flavors meld beautifully, enhancing the overall taste.

Is this recipe kid-friendly?

Definitely! The sweet pineapple and crunchy ingredients are usually a hit with kids. Plus, they can help assemble the salad, making it a fun activity.

What can I substitute for quinoa?

If quinoa isn’t your preference, brown rice or even farro works great too. Each grain brings its texture and flavor, making the dish versatile.

Can I use frozen pineapple?

Yes! Just thaw and drain any excess water before adding it to your salad. Frozen pineapple can still offer that sweet, fruity taste.

One Final Thought from My Kitchen

As I sit at my table with my family, laughter and stories flow just as freely as the flavors of our meals. I hope this Hawaiian Chicken Salad joins your family gathering, becoming another cherished recipe in your kitchen. Cooking is a gift we share, and through meals like this, we nurture our loved ones and create lasting memories.

Until next time, happy cooking! May your kitchen always be filled with love, laughter, and delicious meals that connect your family.

Hawaiian Chicken Salad

Prep Time 15 minutes
Cook Time 15 minutes
Total Time 30 minutes
Servings 4 servings
Calories 450
A refreshing and comforting Hawaiian Chicken Salad that combines juicy chicken, vibrant pineapple, and fresh greens, perfect for family gatherings and easy to prepare.

Ingredients

For the Marinade

  • 1/3 cup light coconut milk (Adds creaminess and tropical flavor)
  • 1/4 cup fresh pineapple juice (Enhances tropical taste)
  • 1 tbsp gluten-free tamari sauce (Soy sauce alternative)
  • 1 tbsp olive oil (For marinating the chicken)
  • Zest of 1 lime (Adds brightness)
  • 2 cloves garlic, minced (For flavor)
  • 1/4 tsp onion powder
  • 1/4 tsp cumin
  • 1/4 tsp paprika
  • 1/4 tsp ginger powder
  • 1/4 tsp salt (Seasoning)

For the Salad

  • 1 large chicken breast (Main protein)
  • 3/4 cup fresh pineapple pieces (For sweetness)
  • 6 cups chopped romaine lettuce
  • 1/2 avocado, sliced (Adds creaminess)
  • 1/2 medium red onion, sliced
  • 1/2 cup cherry tomatoes, halved (For color)
  • 1 1/2 cups cooked quinoa (For added texture)
  • 1 1/2 tbsp lime juice (For dressing)
  • 2 1/2 tbsp olive oil (For dressing)
  • 2 tbsp finely chopped cilantro (For freshness)
  • 1/2 tsp honey (Adds sweetness)
  • 1/4 tsp salt
  • to taste black pepper (For seasoning)

Instructions 

Preparation

  • In a bowl, combine coconut milk, pineapple juice, gluten-free tamari, lime zest, garlic, onion powder, cumin, paprika, ginger powder, salt, and olive oil. Add the chicken breast, ensuring it’s well-coated. Marinate for a minimum of 3 hours, preferably overnight.
  • In a jar, shake together lime juice, olive oil, cilantro, honey, salt, and black pepper. Set aside for at least 15 minutes.

Cooking

  • Heat a non-stick skillet over high heat and add a little olive oil. Cook the marinated chicken for about 3 minutes on each side until golden, then cover loosely with foil for about 5 minutes before slicing.
  • In the same skillet, sear pineapple pieces for about 1-2 minutes on each side until caramelized.

Assembly

  • On a platter, arrange chopped romaine, avocado slices, red onion, cherry tomatoes, and cooked quinoa. Top with sliced chicken and seared pineapple.
  • Drizzle the dressing over the top and serve immediately.

Notes

Serve alongside warm gluten-free bread or rice cakes. This salad is versatile; feel free to add any vegetables or substitute proteins as needed.
Calories: 450kcal
Course: Main Course, Salad
Cuisine: American, Hawaiian
Keyword: Family-Friendly, Gluten-Free Salad, Hawaiian Chicken Salad, Healthy Recipe, Quick Meals

Savory BLT Chicken Salad

There’s something absolutely wonderful about gathering around the table, listening to the laughter of children as they set the table, and smelling something delightful coming from the kitchen. Today, as my kids scurry around, I’m reminded of the warm, comforting meals we used to share. Cooking is like wrapping my family in a hug, and today’s special dish, Savory BLT Chicken Salad, embodies that cozy, homey feeling perfectly. This salad isn’t just food; it’s a celebration of flavors, colors, and family connection.

Why This Savory BLT Chicken Salad Feels Like Home

When I first crafted this Savory BLT Chicken Salad, I intended to create something quick and delicious that everyone in my family would love. The blend of tender chicken with crispy bacon and fresh tomatoes instantly transports me back to sunny picnics and warm evenings spent gathered in the backyard. Each bite feels like a comforting reminder of home—familiar, satisfying, and just plain happy.

This dish has become a family favorite because it checks all the boxes: it’s easy to prepare, uses simple ingredients, and tastes amazing. It’s also versatile enough to make on busy weeknights or leisurely weekends. The delightful mix of textures—crunchy lettuce, juicy tomatoes, and crispy bacon—keeps everyone coming back for more.

Why Savory BLT Chicken Salad is Our New Family Favorite

Cooking can sometimes feel like a chore, especially after a long day at work or running errands, but this salad makes it easy to put something delicious on the table without the usual stress. You can have it ready in about 20 minutes, which is perfect when you want to spend less time in the kitchen and more time with your loved ones.

Often, we find ourselves busy but still want to share a meal that feels special. This salad allows me to make that happen effortlessly. Plus, it’s a great way to incorporate leftovers. If you have grilled chicken or other ingredients in your fridge, you can easily adapt the recipe to fit what you already have.

Savory BLT Chicken Salad

The Simple Magic Behind Savory BLT Chicken Salad

What makes this Savory BLT Chicken Salad so wonderful is its simplicity. The fresh flavors meld beautifully together, creating a delightful dish that feels special yet effortless. The creamy dressing elevates the savory elements, ensuring every bite is bursting with flavor. This is exactly the type of meal that can be enjoyed any night of the week—making it a seamless fit for my busy life.

When preparing this dish, the aroma wafting through the kitchen brings a warm feeling, reminiscent of lazy afternoons spent cooking with family. It’s the kind of meal that draws everyone in, making them eager to gather ’round the table.

How to Make Savory BLT Chicken Salad, The Heartwarming Way

Let’s dive into making this heartwarming Savory BLT Chicken Salad! Though it may seem complex, trust me when I say it’s easier than it looks. Each step adds layers of flavor and excitement to the mix. When making this salad, keep an eye on those textures. You want to maintain that delightful crunch!

“This is where the magic happens—when the aroma fills the kitchen and my kids come running in, asking ‘Is it ready yet?’”

Step-by-Step Overview: Keeping It Simple

  1. In a large bowl, combine the shredded chicken, crumbled bacon, halved cherry tomatoes, and chopped romaine lettuce.

  2. In a separate bowl, mix together the mayonnaise, Dijon mustard, salt, and pepper.

  3. Pour the dressing over the chicken mixture and toss to coat.

  4. Serve chilled or at room temperature.

With each step, remember to add your personal touch. Maybe it’s the way you mix the dressing or the stories you share while prepping. Cooking together can create lasting memories that transcend the food on the table.

Ingredients You’ll Need

To make our Savory BLT Chicken Salad, you’ll want to gather the following simple, high-quality ingredients:

  • 2 cups cooked chicken, shredded
  • 4 slices bacon, cooked and crumbled
  • 1 cup cherry tomatoes, halved
  • 1 cup romaine lettuce, chopped
  • 1/2 cup mayonnaise
  • 2 tablespoons Dijon mustard
  • Salt and pepper to taste

As you gather your ingredients, keep in mind that this salad is quite forgiving. Don’t hesitate to use what you have on hand. Fresh herbs can elevate the flavors, so consider adding them for an extra flavor pop.

Step-by-Step Directions

  1. Begin by shredding the cooked chicken. Use leftover rotisserie chicken to save time if you like.

  2. Cook your bacon until crispy. I always make a bit extra so we can snack on it while preparing!

  3. In a large bowl, combine the shredded chicken, crumbled bacon, halved cherry tomatoes, and chopped romaine lettuce. This colorful medley is so inviting.

  4. In a separate bowl, mix the mayonnaise with the Dijon mustard. The aroma of the mustard adds a delightful tang.

  5. Season the dressing with salt and pepper. Taste and adjust as needed—cooking is all about your personal preferences after all.

  6. Pour the dressing over the chicken mixture and toss gently to coat everything evenly. The creamy texture binds all the flavors together.

  7. Serve chilled or at room temperature. Either way, you’re in for a treat.

Along the way, encourage kids to help out. Let them stir the salad, or let the younger ones sprinkle the seasoning. Cooking can be a joyful family activity.

Serving Savory BLT Chicken Salad with Love

When it comes to serving the Savory BLT Chicken Salad, we love to do it family-style. I put it all in a large bowl in the center of the table, allowing everyone to help themselves. There’s something uniquely comforting about gathering around a communal dish, passing it back and forth, and sharing stories while we serve.

You might choose to pair it with crunchy bread or hearty crackers; the contrast adds an enjoyable element. I sometimes whip up a light vinaigrette to drizzle on top if we’re feeling fancy. Everyone has different tastes—some like it with more tomatoes, while others prefer extra bacon.

Savory BLT Chicken Salad

Storage & Reheat Tips (Keeping the Goodness)

Storing leftovers can be just as important as the cooking process itself. I usually recommend keeping the salad in an airtight container in the fridge. This will help maintain freshness for a couple of days. Mix in any extra ingredients you love right before serving to keep it lively.

If you want to reheat the chicken itself, the microwave is fast but lacks that fresh salad warmth. I prefer reheating in the oven at a low temperature to keep it feeling like it just came together.

My Kitchen Notes & Shortcuts

Cooking should never feel like a chore! Here are some quick tips I’ve learned along the way:

  • Substitutions: If you’re out of mayonnaise, yogurt can work as a lighter alternative.
  • Prep Ahead: Cook the chicken and bacon in advance and keep them in the fridge for when inspiration strikes.
  • Kids in the Kitchen: Let kids help wash the veggies or tear the lettuce—cooking is best when everyone pitches in!
  • Leftover Love: Use leftover salad as a filling for wraps—this makes for an easy lunch option.

Family-Friendly Variations

Don’t be afraid to get creative and make this dish your own! Here are some variations you could explore:

  • Instead of bacon, try using turkey or keeping it vegetarian with extra veggies.
  • For a twist, add avocado slices for a creamy texture or corn for a pop of sweetness.
  • If your family loves crunch, toss in some nuts or seeds for added flair.

Food is a wonderful medium for storytelling. Every twist you add is another chapter in your family’s cooking adventures.

FAQs About Savory BLT Chicken Salad

Can I make this ahead for a busy week?

Absolutely! In fact, letting it sit for an hour before serving will let the flavors blend beautifully—like an old family recipe.

How long can I store leftovers?

You can store them for about 2 to 3 days in the fridge. Ensure it’s in an airtight container to keep that freshness intact.

Is the chicken cooking method important?

It’s not! You can use grilled, roasted, or even poached chicken. Whatever fits your schedule or leftovers works perfectly.

Can I use different types of lettuce?

Of course! Feel free to mix it up with spinach or kale for a different taste and texture.

What can I serve with the salad?

While this salad shines on its own, serving it with crusty bread or even a vegetable side can elevate your meal.

One Final Thought from My Kitchen

As you embark on cooking this Savory BLT Chicken Salad, remember that at its core, cooking is all about connection, love, and creativity. It’s about the smiles that come from your family as they taste something you made with your own hands.

I hope this dish finds its way into your family’s laughter and stories. If it does, my grandmother’s kitchen is smiling, and so am I. Happy cooking!

Savory BLT Chicken Salad

Prep Time 10 minutes
Cook Time 10 minutes
Total Time 20 minutes
Servings 4 servings
Calories 450
A warm, comforting salad featuring tender chicken, crispy bacon, and fresh vegetables that brings family together around the table.

Ingredients

Main Ingredients

  • 2 cups cooked chicken, shredded (Use leftover rotisserie chicken for convenience.)
  • 4 slices bacon, cooked and crumbled (Cook until crispy.)
  • 1 cup cherry tomatoes, halved
  • 1 cup romaine lettuce, chopped

Dressing Ingredients

  • 1/2 cup mayonnaise (Can be substituted with yogurt.)
  • 2 tablespoons Dijon mustard
  • to taste salt and pepper (Adjust according to personal preference.)

Instructions 

Preparation

  • Begin by shredding the cooked chicken. Use leftover rotisserie chicken to save time if you like.
  • Cook your bacon until crispy. I always make a bit extra so we can snack on it while preparing!
  • In a large bowl, combine the shredded chicken, crumbled bacon, halved cherry tomatoes, and chopped romaine lettuce.
  • In a separate bowl, mix the mayonnaise with the Dijon mustard. Season the dressing with salt and pepper.
  • Pour the dressing over the chicken mixture and toss gently to coat everything evenly.
  • Serve chilled or at room temperature.

Notes

This salad is forgiving; feel free to use whatever ingredients you have on hand. Fresh herbs can enhance the flavors. Cooking with family can create lasting memories.
Calories: 450kcal
Course: Main Course, Salad
Cuisine: American
Keyword: BLT Chicken Salad, Chicken Salad, easy salad recipe, family-friendly meal, Quick Dinner

Homemade Costco Chicken Salad Recipe

There it is—the gentle clatter of forks and spoons as my kids set the table, busy with their chatter and laughter. The warmth of the kitchen envelops us as I prepare something special, creating a comforting atmosphere that wraps around us like a cozy blanket. Today, it’s the delightful Homemade Costco Chicken Salad Recipe, the perfect dish to bring us together. This salad isn’t just food; it’s a flavor-packed hug that promises satisfaction and memories.

Why This Homemade Costco Chicken Salad Recipe Feels Like Home

Homemade meals have a unique ability to evoke memories, and this chicken salad is no exception. It reminds me of summertime barbeques, family gatherings, and laid-back nights where we sit around the table, sharing stories and laughter. The magic of this Homemade Costco Chicken Salad Recipe lies in its simplicity. With a few trusted ingredients, it comes together quickly, allowing you to savor the moment rather than stress over the cooking.

In our family, this recipe has become a staple not just for its taste but because it cultivates a sense of connection. It’s a dish that everyone loves, from the youngest taste tester to the most discerning palate. When I make this salad, I can almost hear my grandmother’s voice reminding me to use fresh herbs and let the flavors meld together—her secret to every delicious meal.

Why Homemade Costco Chicken Salad Recipe is Our New Family Favorite

It’s no surprise that this recipe has quickly become a favorite in our home. On busy days, this chicken salad acts as a quick solution to mealtime chaos. With minimal effort, it combines flavor and nutrition in a balanced way, making it a perfect fit for our busy, joyful lives.

This Homemade Costco Chicken Salad is not just a recipe; it’s an experience. The bright notes of lemon tied with the creaminess of the dressing remind us of summer picnics. Every bite is a trip down memory lane, filled with laughter and stories shared over a hearty meal. It delights everyone, and nothing brings us together like a bowl of chilled chicken salad that you can serve in a myriad of ways.

The Simple Magic Behind Homemade Costco Chicken Salad Recipe

There is something truly special about a recipe that comes together in less than an hour, yet tastes like it has been carefully crafted. The Homemade Costco Chicken Salad Recipe stands out because it satisfies cravings without overwhelming you in the kitchen. Imagine an evening where you’ve had a long day, but by following a handful of straightforward steps, dinner is on the table in no time.

This recipe is flexible, allowing you to adjust it based on what you have on hand. Perhaps you have some fresh herbs from the garden or a couple of leftover veggies in the fridge. This dish feels effortless yet elegant, providing comfort in a hustle-and-bustle world. It’s those little celebrations and simple dinners that make the day feel complete, and this chicken salad plays a vital role in that.

The Cooking Process, Made Joyful

“This is where the magic happens—when the aroma fills the kitchen and my kids come running in, asking ‘Is it ready yet?’”

Let me guide you through the process of making this delightful Homemade Costco Chicken Salad Recipe. The steps are simple, and soon you’ll find yourself surrounded by family, the table overflowing with love and laughter. You’ll notice the vibrant colors of the ingredients and enjoy the fresh scent that fills the air as you begin to cook.

  1. Begin by shredding your cooked chicken. If you have a food processor, pulse the chicken in small batches for finer texture. Otherwise, use two forks or chop finely with a knife. Place the shredded chicken in a large bowl and set it aside while you prepare the dressing.

  2. In a medium bowl, whisk together mayonnaise, sour cream, white wine vinegar, and lemon juice. Add salt and sugar, and stir until smooth. This creamy dressing brings all the ingredients together and will elevate the dish beautifully.

  3. Pour the dressing over the shredded chicken. Gently add the diced celery and onion. Mix everything thoroughly until the dressing is evenly distributed. This ensures every bite is packed with flavor.

  4. Refrigerate the salad for at least an hour to allow the flavors to meld. Trust me; it’s worth the wait! Serve it cold and enjoy its refreshed, tangy taste. It’s even better the next day when all the ingredients have had time to infuse!

With each step, you can involve your kids in the process. Let them mix the dressing or sprinkle in the diced vegetables. Cooking together can transform the kitchen into a joyful space full of shared tasks and fun.

Ingredients You’ll Need

Gathering the necessary ingredients for the Homemade Costco Chicken Salad Recipe is a delightful task. Here’s what you’ll need:

  • 3-pound cooked rotisserie-style chicken (shredded)
  • 1/2 cup mayonnaise
  • 1/2 cup sour cream (use dairy-free if needed)
  • 2 tablespoons white wine vinegar
  • 1/2 lemon (juiced, about 1 tablespoon)
  • 1/2 teaspoon sea salt
  • 2 teaspoons sugar (optional for sugar-free diets)
  • 6 celery ribs (finely diced)
  • 1/2 white onion (finely diced)

Don’t skip the fresh herbs; they’re the soul of the dish! Feel free to use what’s in your fridge, as this recipe is more about creativity than perfection. If you have roasted red peppers or diced apples sitting in your pantry, they can easily add an exciting twist!

Homemade Costco Chicken Salad Recipe

Step-by-Step Directions

Now that you have your ingredients gathered, let’s dive deeper into the process.

  1. Start by shredding your cooked chicken.

    • If you’re using a food processor, be sure to pulse in small batches to avoid a mushy texture.
    • Otherwise, use two forks to shred the chicken or chop finely with a knife.
    • Set the shredded chicken aside as you prepare the dressing.
  2. Next, whisk together your creamy dressing.

    • Combine mayonnaise, sour cream, white wine vinegar, and fresh lemon juice in a medium bowl.
    • Add salt and sugar, if using, then stir until smooth.
    • This dressing is the heart of the dish, blending the flavors into something extraordinary.
  3. Bringing the elements together.

    • Pour your dressing over the shredded chicken in a large bowl.
    • Gently add your finely diced celery and onion.
    • Mix everything thoroughly so that every piece of chicken is coated in the dressing.
  4. The waiting game.

    • Cover the salad and refrigerate for at least one hour.
    • This allows the flavors to meld, creating a richer taste.
    • Serve it cold to captivate your family’s palates.

As you cook, don’t rush. Take it slow and let the families’ love infuse into the dish. The essence of homemade meals comes not just from the ingredients but from the care you put into them.

Serving Homemade Costco Chicken Salad Recipe with Love

Homemade meals are about connection, and serving your Homemade Costco Chicken Salad Recipe is no different. When we sit down to enjoy this salad, I often put it in a large serving bowl right in the center of our kitchen table.

Everyone gets to help themselves, forming their plates with generous scoops of chicken salad. It’s fun to watch my kids debate how much they want and which toppings they will select. We sometimes add fresh herbs, a sprinkle of paprika, or serve it alongside some crunchy crackers.

The salad pairs beautifully with crusty bread or light greens. It provides a vibrant, hearty option that pleases everyone and sparks conversations about daily life. And of course, if there are leftovers, they are nothing short of delicious, finding their way into lunchboxes for the next day.

Homemade Costco Chicken Salad Recipe

Storage & Reheat Tips

Keeping leftovers can be a game-changer when it comes to meal planning. The Homemade Costco Chicken Salad can last in your fridge for about 3-5 days when stored correctly.

After enjoying a hearty meal with the salad, simply cover the bowl or transfer the salad into an airtight container and store it in the refrigerator. When it’s time to enjoy the leftovers, the microwave is a quick solution for lunchtime.

However, if you want that freshly made warmth, consider using the oven. Just reheat it at low temperatures to keep its flavor intact. While it’s not traditional to reheat salad, it’s still worthy of delighting your taste buds in different forms.

My Kitchen Notes & Shortcuts

Cooking is a journey with lessons that keep evolving over time. Here are some tips from my kitchen that will make your cooking experience smoother:

  • If you have a food processor, use it for shredding chicken. It saves time and lets you achieve the perfect texture quickly.
  • Pre-chop your vegetables ahead of time. You can store them in the fridge for easy access when making the salad.
  • Don’t be afraid to play with flavors. Adding diced grapes or nuts can give a delightful crunch to the salad.
  • Encourage kids to help. They can wash veggies, help in chopping (if skills allow), or mix the dressing.
  • Last but not least, let your family help create as well. Ask them if they’d like to add a special ingredient; it will make the meal feel even more personal.

Family-Friendly Variations

The great aspect of the Homemade Costco Chicken Salad Recipe is its versatility. You can easily change it up to make it your own.

Experience beautiful flavor twists by adding different ingredients. Here are some variations we enjoy:

  • Avocado Chicken Salad: Substitute half the mayo with mashed avocado for a creamier, healthier alternative.
  • Herb-Infused: Experiment with fresh herbs such as dill, parsley, or cilantro to brighten up the flavor.
  • Add Fruits: A handful of grapes or sliced apples can add a splash of sweetness. Kids love it and enjoy the added texture!
  • Crunchy Twist: Mix in chopped walnuts or sunflower seeds for an irresistible crunch.

Feel free to experiment and make it your own. A dish crafted with love is always better, and adding your family’s personal touch makes it even more special.

FAQs About Homemade Costco Chicken Salad Recipe

Can I make this ahead for a busy week?

Absolutely! In fact, letting it sit for an hour allows the flavors to get to know each other, much like a well-loved family recipe. You can easily prepare it the night before.

What if I have leftover chicken?

Using leftover chicken is a perfect way to give this recipe a new life. It saves time and cuts down on food waste!

Is this recipe flexible with other ingredients?

Yes, it truly is! You can swap in your favorite fresh veggies or nuts based on what you have on hand for an exciting twist.

Can I serve this dish warm?

While the salad is traditionally chilled, you can lightly warm it if you prefer. Just remember to serve it with crunchy bread or fresh slices.

How do I get the kids involved in making this?

Kids will love helping shred the chicken, measuring ingredients for the dressing, or mixing it all together. Letting them be a part of the process creates lasting memories.

One Final Thought from My Kitchen

As I wrap up this conversation about the Homemade Costco Chicken Salad Recipe, I hope it finds a way into your family’s laughter and stories. This dish is about more than just a meal; it’s about connection and the cherished moments we create around the table.

So gather your ingredients, invite your loved ones, and let the aroma of a home-cooked meal fill your kitchen. Until next time, happy cooking!

Homemade Costco Chicken Salad

Prep Time 15 minutes
Total Time 1 hour 15 minutes
Servings 6 servings
Calories 320
A comforting and flavorful chicken salad that's perfect for family gatherings, evoking memories of summer picnics with its creamy dressing and fresh ingredients.

Ingredients

Main Ingredients

  • 3 pounds cooked rotisserie-style chicken (shredded)
  • 0.5 cup mayonnaise
  • 0.5 cup sour cream (use dairy-free if needed)
  • 2 tablespoons white wine vinegar
  • 0.5 lemon (juiced, about 1 tablespoon)
  • 0.5 teaspoon sea salt
  • 2 teaspoons sugar (optional for sugar-free diets)
  • 6 ribs celery (finely diced)
  • 0.5 white onion (finely diced)

Instructions 

Preparation

  • Begin by shredding your cooked chicken. If you have a food processor, pulse the chicken in small batches for finer texture. Otherwise, use two forks or chop finely with a knife. Place the shredded chicken in a large bowl and set it aside.
  • In a medium bowl, whisk together mayonnaise, sour cream, white wine vinegar, and lemon juice. Add salt and sugar, and stir until smooth.
  • Pour the dressing over the shredded chicken. Gently add the diced celery and onion. Mix everything thoroughly until the dressing is evenly distributed.
  • Refrigerate the salad for at least an hour to allow the flavors to meld. Serve it cold.

Notes

Feel free to use fresh herbs and adjust the ingredients based on what you have on hand. The recipe is flexible, and leftovers can last about 3-5 days in the fridge.
Calories: 320kcal
Course: Main Course, Salad
Cuisine: American
Keyword: Chicken Salad, Costco Style, Easy Meal, Family Recipe, Homemade

Viral Dumpling Bake

I remember the sound of little feet padding across the tile while the kitchen filled with a warm, tangy smell that made everyone pause what they were doing. My youngest would pop her head around the corner and announce, "It smells like dumplings!" That evening, a simple Viral Dumpling Bake turned a busy weeknight into a small celebration. If you love one-pan dinners that bring people close, you might enjoy this as much as we do; it reminds me of other quick oven meals like my 30-minute oven-baked chicken thighs, which I reach for when time is short and comfort matters.

Why This Viral Dumpling Bake Feels Like Home

There is something nearly magical about a dish that needs almost no fuss yet yields big, cozy flavors. Viral Dumpling Bake is one of those recipes. It bakes in a single skillet, bubbles with a glossy sauce, and the dumplings puff into soft pillows that soak up every savory note.

Viral Dumpling Bake

This recipe matters because it solves the weekday puzzle: fast, satisfying, and mostly hands-off. Meanwhile, it still tastes thoughtful and special, like you took the time to make dinner with care. It makes few dishes, pleases kids and adults, and can be adapted easily if you want it spicier, gentler, or more veggie-forward.

Why this recipe works for our busy, joyful nights is simple. The ingredients are usually pantry-friendly. The prep is short. The oven does the heavy lifting so you can help with homework, fold laundry, or set the table together. From there the house fills with a smell that gets everyone to the table, pronto.

How to Make Viral Dumpling Bake, The Heartwarming Way

“This is where the magic happens, when the aroma fills the kitchen and the kids come running, asking ‘Is it ready yet?’”

Next up, a quick overview: you combine frozen dumplings with veggies and a simple sauce, bring it to a gentle boil, and then bake until the sauce is bubbly and the dumplings are warmed through. Look for the sauce to thicken slightly and for edges to brown a touch. You want the dumplings to be soft but with a little texture where they touch the skillet.

The cooking process gives clear signals. When the sauce bubbles and smells bright with soy and garlic, you know you are close. When small golden flecks appear around the edges, that little browning adds a deep, toasty flavor just like my grandmother always taught me to look for.

Step-by-Step Overview: Keeping It Simple

  1. Preheat your oven to 400°F (200°C).
    Set the rack in the center so the dumplings bake evenly.
    Tip: I preheat the pan with the oven off to avoid a cold center.

  2. In a large oven-safe skillet, combine the frozen dumplings, mixed vegetables, broth, soy sauce, sriracha, garlic powder, onion powder, salt, and pepper.
    Stir gently so the dumplings don’t tear and everything is evenly coated.
    Tip: Let the frozen dumplings sit for a minute in the pan so they stop clumping together.

  3. Stir to combine all ingredients evenly.
    Make sure vegetables are spread out and dumplings sit in the sauce.
    Tip: Use a wooden spoon to scrape any bits off the bottom—those bits are flavor friends.

  4. Bring the mixture to a gentle boil over medium heat on the stovetop.
    Watch the sauce as it just begins to bubble and steam.
    Tip: Keep it gentle; a rolling boil can be too aggressive for delicate dumplings.

  5. Once boiling, transfer the skillet to the preheated oven and bake for 15-20 minutes, or until the dumplings are heated through and the sauce is bubbly.
    Check at 15 minutes; you want a glossy sauce and dumplings that are tender.
    Tip: If you like a crisp edge, broil for 1-2 minutes at the end but watch closely.

  6. Remove from the oven and let it cool slightly.
    Give it 3 to 5 minutes so the sauce settles and the dumplings set up a bit.
    Tip: This is the perfect time to chop green onions and open any sauces.

  7. Garnish with chopped green onions and serve hot.
    Serve family-style and encourage everyone to help themselves.
    Tip: A squeeze of lime or a drizzle of sesame oil finishes it beautifully.

Viral Dumpling Bake

Ingredients You’ll Need

  • 1 package of frozen dumplings
  • 1 cup of mixed vegetables (like bell peppers, broccoli, or carrots)
  • 1 cup of chicken or vegetable broth
  • 1 tablespoon of soy sauce
  • 1 tablespoon of sriracha (or to taste)
  • 1 teaspoon of garlic powder
  • 1 teaspoon of onion powder
  • Salt and pepper to taste
  • Chopped green onions for garnish

Friendly note: Don’t skip the green onions. They brighten the dish and feel like the final hug. Use what’s in your fridge—this recipe is forgiving. If you have fresh garlic, swap it for garlic powder for a brighter bite. If you want more protein, toss in some cooked shredded chicken or a handful of edamame.

If you like lemony or buttery flavors in quick bakes, try my baked lemon butter chicken another time when you want that comforting oven-cooked feeling.

Serving Viral Dumpling Bake with Love

Viral Dumpling Bake

We serve Viral Dumpling Bake right in the skillet, in the middle of the table, and everyone digs in family-style. I set out small bowls of extras so each person can customize: extra sriracha, soy, sesame oil, chili flakes, or a simple soy-sesame dipping sauce.

For sides, a crisp green salad or steamed rice works beautifully. Sometimes we add crunchy cucumber slices or a quick pickled carrot to cut through the richness. My teens love adding extra sriracha and a sprinkle of toasted sesame seeds. My partner prefers a little spoonful of hoisin for a sweet note.

There’s often a favorite at our table. My oldest likes to scoop up dumplings with a fork and load them with green onions, while my youngest prefers plain dumplings with a bit of sauce. The way everyone eats it becomes part of the memory.

If you enjoy playful family meals, you might also like the silly fun of sharing Chi Chi’s baked chicken chimichangas one weekend; the family loves building small plates and trying different toppings.

Storage & Reheat Tips (Keeping the Goodness)

Storing leftovers thoughtfully keeps the meal tasting like it was made with care. Once cooled, transfer the dumpling bake to an airtight container and refrigerate within two hours. It keeps well for 3 to 4 days.

For reheating, the oven is the best choice to restore texture. Heat to 350°F (175°C) and warm for 10 to 15 minutes until bubbly. Meanwhile, the microwave works for a quick lunch; cover loosely and heat in 1-minute intervals to avoid sogginess. A skillet on medium-low with a splash of broth will revive the sauce and add a touch of crispness to the bottoms.

If you want to freeze, cool completely and freeze in a shallow airtight container for up to one month. Thaw overnight in the fridge before reheating for best results. From there, reheat gently in the oven.

If your leftovers feel a bit dry, stir in a tablespoon of broth or a drizzle of soy sauce when reheating. It brings back that cozy saucy texture we love.

If you enjoy creamy bakes, compare techniques with my chicken alfredo pasta bake which uses a similar approach to reheating and preserving creaminess.

My Kitchen Notes & Shortcuts

  • Swap veggies freely: I often use a frozen mixed vegetable bag on busy nights. It keeps the cook time predictable and the cleanup easy.
  • Double the sauce if you like it saucy: If you enjoy extra sauce to spoon over rice, add an extra 1/4 cup of broth and a splash more soy.
  • Make it a weekday trick: Pre-chop green onions and measure spices into a small container the night before. Dinner is practically ready when you walk in the door.
  • Kid-approved helpers: Let kids arrange dumplings in the skillet or sprinkle green onions. It’s safe, fun, and they feel proud.
  • One-pan finish: Use an oven-safe skillet so you do not transfer anything. Less washing, more hugging at the table.

If you like rich skillet comfort that reheats well, my creamy oven baked chicken thighs use similar time-saving tricks and family-friendly seasonings.

Family-Friendly Variations

Our family plays with this recipe depending on mood. Here are a few easy switches:

  • Lighter version: Use vegetable broth and low-sodium soy, add more veggies like bok choy and mushrooms, and reduce the sriracha.
  • Kid-friendly: Skip the sriracha and serve it on the side. Add a touch of honey to the sauce for a sweet note kids often like.
  • Cheesy twist: Sprinkle a little shredded mozzarella over the top for the last 5 minutes of baking. It adds a fun, gooey layer.
  • Protein boost: Toss in pre-cooked shredded chicken or thinly sliced leftover pork. It keeps the dumplings as the star while making the meal heartier.
  • Crispy bottom: If you want more texture, finish with a short broil to get the edges golden and slightly crisp.

Give it a try with what you have in the fridge. This is about creativity, not perfection, and the best twists are often the ones kids invent during dinner.

Viral Dumpling Bake

FAQs About Viral Dumpling Bake

What if my dumplings are really big or very small?

Most frozen dumplings will work. If they are larger, add a few extra minutes in the oven. If they are tiny, check earlier around 12 minutes. You want tenderness and the sauce to be bubbly.

Can I make this ahead for a busy week?

Absolutely. Assemble and refrigerate for several hours or overnight. Bring it to a gentle simmer on the stove before popping it in the oven. Letting it sit helps the flavors meld, the way slow-simmered recipes do.

Is there an easy vegetarian version?

Yes. Use vegetable broth and check the dumplings are vegetarian. Load up on broccoli, bell peppers, carrots, and mushrooms for a filling meal.

How do I adjust the spice level?

Start with half the sriracha, serve more at the table, or swap it for chili paste for a deeper heat. A drizzle of honey will balance heat if it gets too bold.

What’s a good dipping sauce to serve on the side?

A simple mix of soy sauce, rice vinegar, a touch of sesame oil, and chopped green onions is perfect. Add a little honey or sugar if you prefer sweet-salty.

One Final Thought from My Kitchen

I hope this version of Viral Dumpling Bake becomes one of those recipes you reach for when life is full but you still want something warm on the table. It has saved nights, gathered people, and created small, important moments in my home.

There is a special kind of comfort in a dish that comes together quickly and still feels like a hug. Give it a try—you might surprise yourself, and I promise the kids will ask for seconds.

Conclusion

If you want the original inspiration behind this trend, take a look at Snacking Emily’s Viral One-Pan Baked Dumplings which sparked a lot of creative twists online. For a fun Trader Joe’s spin and more variations, check out Lovely Delites’ Trader Joe’s Viral Dumpling Bake.

Viral Dumpling Bake

Prep Time 10 minutes
Cook Time 20 minutes
Total Time 30 minutes
Servings 4 servings
Calories 350
A cozy one-pan dinner that combines frozen dumplings, mixed vegetables, and a savory sauce, perfect for busy weeknights.

Ingredients

Main Ingredients

  • 1 package frozen dumplings
  • 1 cup mixed vegetables (like bell peppers, broccoli, or carrots) (Use any vegetables you have on hand.)
  • 1 cup chicken or vegetable broth
  • 1 tablespoon soy sauce
  • 1 tablespoon sriracha (Adjust to taste.)
  • 1 teaspoon garlic powder (Fresh garlic can be used instead.)
  • 1 teaspoon onion powder
  • to taste salt and pepper
  • for garnish chopped green onions (Don't skip this; it brightens the dish.)

Instructions 

Preparation

  • Preheat your oven to 400°F (200°C). Set the rack in the center.
  • In a large oven-safe skillet, combine frozen dumplings, mixed vegetables, broth, soy sauce, sriracha, garlic powder, onion powder, salt, and pepper.
  • Stir gently to avoid tearing the dumplings and ensure everything is evenly coated.
  • Bring the mixture to a gentle boil over medium heat on the stovetop.

Baking

  • Once boiling, transfer the skillet to the preheated oven and bake for 15-20 minutes, or until the dumplings are heated through and the sauce is bubbly.
  • Remove from the oven and let it cool slightly for 3 to 5 minutes.
  • Garnish with chopped green onions and serve hot.

Notes

This dish can be made ahead and stored in the fridge. It's versatile and can be customised with different vegetables or proteins. Great served family-style.
Calories: 350kcal
Course: Dinner, Main Course
Cuisine: American, Asian
Keyword: Comfort Food, Dumpling Bake, Easy Dinner, Family Meal, One-Pan Dinner

One-Pan Juicy Chicken with Balsamic Sauce

I can still hear my little one clattering spoons at the table while a sweet, tangy steam rises from the skillet. That noise, that smell, and the way everyone leans in when dinner is ready are what cooking is for me. Tonight it is One-Pan Juicy Chicken with Balsamic Sauce, a dish that makes the table feel a little cozier and the weeknight a little kinder. If you like quick meals that still feel special, this is one to keep. For other cozy chicken ideas that live in my weeknight rotation, I sometimes compare notes with my take on my chicken shawarma with garlic sauce, which is also a family pleaser.

Why One-Pan Juicy Chicken with Balsamic Sauce Feels Like Home

This recipe hits the sweet spot between comfort and ease. The balsamic gives a warm, slightly sweet tang that balances the savory chicken. The tomatoes burst and make a small, glossy sauce while the cheese melts into soft ribbons on top.

One-Pan Juicy Chicken with Balsamic Sauce

It works because the pan does most of the work. You sear the chicken to build flavor, then let the oven finish it with the sauce. Fewer dishes and a big payoff at the table make this feel like a hug in a hurry.

I often tell friends that if you have a skillet and a hot oven, you can make a meal that tastes like you spent hours on it. Meanwhile, it gives you time to set out a salad or toss some bread on the table. For a different flavor profile on busy nights, I’ll lean on something like my favorite chipotle honey chicken thighs and save this balsamic dish for when we want something bright and cheesy.

How to Make One-Pan Juicy Chicken with Balsamic Sauce, The Heartwarming Way

“This is where the magic happens—when the aroma fills the kitchen and my kids come running in, asking ‘Is it ready yet?’”

Start by thinking about texture. You want a golden brown sear on the outside and tender, juicy meat inside. The balsamic reduces into a shiny glaze that clings to the chicken and tomatoes. The mozzarella adds a gentle, melty finish that kids and grown-ups both adore.

From there, you move from stovetop to oven. The sear locks flavor in, the oven cooks evenly, and the short final melt keeps the cheese soft rather than rubbery. My grandmother always taught me to watch the color of the juices near the thickest part of the meat. If they run clear and the chicken feels springy, you are close to done.

For another simple skillet meal that gives similar comfort, I sometimes use the same sear-and-roast idea from my butter lemon bowtie chicken and swap in balsamic and tomatoes.

Ingredients You’ll Need

4 boneless, skinless chicken breasts
1 cup balsamic vinegar
1 cup cherry tomatoes, halved
1 cup mozzarella cheese, shredded
Fresh basil leaves
Salt and pepper to taste
Olive oil

Friendly note: Don’t skip the fresh basil. It lifts the whole dish and makes it sing. If you don’t have cherry tomatoes, use halved grape tomatoes or even chopped vine tomatoes. The ingredients are forgiving, which is a relief on busy nights.

For a pantry-friendly swap, shredded provolone or a mild cheddar can stand in for mozzarella. If you plan meals ahead, this recipe pairs well with mashed or roasted sides similar to what I do when I make the crockpot white chicken chili on cold days.

Step-by-Step Directions

  1. Preheat the oven to 400°F (200°C).
    Get the oven ready so you can move the skillet straight in when the chicken is seared. A hot oven gives an even finish.

  2. In a large oven-safe skillet, heat olive oil over medium heat.
    Let the oil warm until it shimmers. This helps the chicken brown instead of sticking.

  3. Season chicken breasts with salt and pepper, then sear them in the skillet until browned on both sides.
    Aim for a golden crust. A little browning here builds flavor, just like grandma showed me.

  4. Pour balsamic vinegar over the chicken and add cherry tomatoes.
    The vinegar will hiss and start to reduce. Stir the tomatoes gently so they nestle around the chicken.

  5. Transfer the skillet to the oven and bake for 20-25 minutes, until the chicken is cooked through.
    Check the thickest part for clear juices and a firm, springy feel. For peace of mind, the internal temp should reach 165°F (74°C).

  6. Remove from the oven, sprinkle mozzarella cheese on top, and return to the oven until the cheese is melted.
    This only takes a few minutes. Watch closely so the cheese melts softly without browning too much.

  7. Garnish with fresh basil before serving.
    Tear the basil to release its aroma and scatter it over the hot cheese and tomatoes.

Quick encouragement: Let the kids help with halving tomatoes or tearing basil. They feel proud and it’s a small moment that makes dinner feel shared. After the cheese melts, give the dish a gentle swirl with a spoon so the balsamic coats everything evenly.

One-Pan Juicy Chicken with Balsamic Sauce

Serving One-Pan Juicy Chicken with Balsamic Sauce with Love

One-Pan Juicy Chicken with Balsamic Sauce

I bring the skillet to the center of the table and let everyone serve themselves. It feels homey and relaxed, and the dish keeps warm in the pan while people pass plates and sides around.

We often pair this with a simple green salad dressed with olive oil and lemon, and some crusty bread to soak up the sauce. For a heartier meal, roasted baby potatoes or a side of buttered pasta does the trick and keeps kids happy.

One of my favorite family memories is watching my partner tear off hunks of bread to soak up the last balsamic pearls. My youngest insists on extra basil and always asks for a tomato on the side. These small preferences become part of the meal’s story.

For a busy night when I want another comforting option on the menu, I sometimes riff on the flavor and use the same serving idea as my easy crockpot chicken thighs, which is great when I need something slow-cooked alongside a quick skillet.

Storage & Reheat Tips (Keeping the Goodness)

Store leftovers in an airtight container in the refrigerator for up to 3 days. The sauce keeps well and the chicken stays moist if you seal it up.

To reheat, the oven or a skillet is best. Preheat the oven to 350°F (175°C), place the chicken in a baking dish with a splash of water or stock, and cover loosely with foil to retain moisture. Heat for 10-15 minutes until warmed through.

The microwave is fine for a quick lunch. Cover the chicken loosely to prevent splatter and heat in short bursts to avoid drying out. If you want to refresh the sauce a bit, add a teaspoon of balsamic and a drizzle of olive oil before reheating.

If you are meal-prepping, you can portion the chicken with sides in single containers for easy lunches. A quick warm-up makes it taste almost like freshly made.

My Kitchen Notes & Shortcuts

  • Prep ahead: Halve the tomatoes and shred the mozzarella the night before. Store them separately so the cheese stays dry.
  • Use a thermometer: A quick read thermometer blows my mind for consistent results. Aim for 165°F (74°C).
  • One-pan clean-up: Line the counter with a damp towel to set hot utensils on, and soak the skillet in warm soapy water after it cools to cut down scrubbing time.
  • Kid helpers: Let little hands tear basil or sprinkle cheese. They love to help and it speeds things up.
  • Swap smart: No fresh basil? Use a sprinkle of dried basil or parsley and finish with a squeeze of lemon for brightness.

These small habits save time and keep flavor up. Over the years I’ve learned that a few minutes of prep and the right tools make family dinners feel calm and joyful.

Family-Friendly Variations

  • Lighter version: Use half the mozzarella and add a big handful of arugula after the chicken comes out of the oven for a peppery lift.
  • Kid-friendly tweak: Swap balsamic for a mix of ketchup and a splash of vinegar if your kids prefer less tang. Add a touch of honey for sweetness.
  • Add vegetables: Toss thinly sliced bell peppers or zucchini into the pan with the tomatoes for more color and nutrition.
  • Make it smoky: Stir in a teaspoon of smoked paprika with the salt and pepper for a depth of flavor that pairs beautifully with balsamic.
  • Make it creamier: Stir a spoonful of mascarpone or cream into the pan just before serving for a velvety finish.

Each variation invites your family to make this recipe their own. Change one small thing and watch how tastes and stories evolve.

One-Pan Juicy Chicken with Balsamic Sauce

FAQs About One-Pan Juicy Chicken with Balsamic Sauce

Q: Can I make this ahead for a busy week?
A: Absolutely. It holds up well in the fridge and actually tastes a little richer after the flavors settle. Reheat gently in the oven.

Q: What if my chicken breasts are uneven in thickness?
A: Pound them lightly to an even thickness so they cook evenly. A quick tip is to place them between two sheets of plastic and give a gentle whack with a rolling pin.

Q: Is balsamic vinegar going to be too strong for kids?
A: You can use less vinegar or add a splash of honey to soften the tang. The tomatoes and cheese help balance it too.

Q: Can I use bone-in chicken?
A: Yes, but increase the oven time and check the internal temperature. Bone-in pieces take longer to reach 165°F (74°C).

Q: How can I keep the mozzarella from getting rubbery?
A: Add the cheese only at the end and return to the oven for a short time, just until it melts. That keeps it soft and creamy.

One Final Thought from My Kitchen

I hope this One-Pan Juicy Chicken with Balsamic Sauce brings a little ease and a lot of warmth to your table. It has become a way for my family to pause, laugh, and fill up on good food without a lot of fuss. Give it a try; you might surprise yourself with how simple and comforting it feels.

Conclusion

If you like exploring other balsamic chicken ideas, I also like the way this Baked Balsamic Chicken Recipe – Little Broken plays with the same sweet-tangy base in a sheet-pan style. For another skillet approach that focuses on quick weeknight cooking, this Skillet Balsamic Chicken Breasts – Easy Weeknight Recipes is a handy reference.

One-Pan Juicy Chicken with Balsamic Sauce

Prep Time 15 minutes
Cook Time 25 minutes
Total Time 40 minutes
Servings 4 servings
Calories 350
A cozy and easy recipe that combines seared chicken with a tangy balsamic sauce, topped with cherry tomatoes and melted mozzarella for a comforting weeknight dinner.

Ingredients

For the Chicken

  • 4 pieces boneless, skinless chicken breasts
  • 1 cup balsamic vinegar
  • 1 cup cherry tomatoes, halved (You can substitute with halved grape tomatoes or chopped vine tomatoes.)
  • 1 cup mozzarella cheese, shredded (Shredded provolone or a mild cheddar can be used as a replacement.)
  • to taste salt
  • to taste pepper
  • 1 tablespoon olive oil (Use to sear the chicken.)

Instructions 

Preparation

  • Preheat the oven to 400°F (200°C).
  • In a large oven-safe skillet, heat olive oil over medium heat.
  • Season chicken breasts with salt and pepper, then sear them in the skillet until browned on both sides.
  • Pour balsamic vinegar over the chicken and add cherry tomatoes.

Cooking

  • Transfer the skillet to the oven and bake for 20-25 minutes, until the chicken is cooked through.
  • Remove from the oven, sprinkle mozzarella cheese on top, and return to the oven until the cheese is melted.
  • Garnish with fresh basil before serving.

Notes

Store leftovers in an airtight container in the refrigerator for up to 3 days. To reheat, use the oven or skillet for best results.
Calories: 350kcal
Course: Dinner, Main Course
Cuisine: American
Keyword: balsamic sauce, Chicken, Comfort Food, easy weeknight dinner, One-Pan Meal

Viral Trader Joe's Dumpling Bake

I remember the sound of forks tapping plates while a warm, savory smell moved through the house, the way my kids would press their noses to the oven window and ask the same hopeful question, "Is it ready yet?" That exact moment led me to the Viral Trader Joe’s Dumpling Bake. It started as a curious try on a busy weeknight and turned into our quick comfort-food ritual. If you love one-pan ease with a little bit of bold flavor, this will be your new, kind-of-secret go-to. For another fast, family-friendly weeknight idea, I also reach for a recipe like my favorite 30-minute oven-baked chicken thighs when time is tight.

Why This Viral Trader Joe’s Dumpling Bake Feels Like Home

Viral Trader Joe's Dumpling Bake

There is something honest about dumplings tucked into a cozy, saucy bake. The dish brings texture and color, with golden edges where the dumplings peek out and a glossy, fragrant sauce pooling around them.

This Viral Trader Joe’s Dumpling Bake matters because it saves time, needs almost no chopping, and still gives you a big, comforting payoff. It is one of those dinners that feels special without asking for much work. My grandmother used to say food tells a story; this bake tells one about simple ingredients becoming something everyone leans in for.

Because it’s easy to scale, you can make it for two or for the whole gang. Meanwhile, the aroma fills the house and pulls people toward the table. That smell is its own invitation.

How to Make Viral Trader Joe’s Dumpling Bake, The Heartwarming Way

“This is where the magic happens—when the aroma fills the kitchen and my kids come running in, asking ‘Is it ready yet?’”

Start with frozen potstickers, add pantry-friendly sauces, and let the oven do the rest. The dumplings steam and soak up the sauce until everything is warm and inviting. Look for the sauce to bubble around the edges and the top dumplings to be soft with a few golden spots. That tells you the flavors have married and the texture is right.

Think of the result as a hybrid of potstickers and a casserole. The dumplings keep their tender chew while the sauce brings in creaminess and a little heat if you add chili crisp at the end. It is easier than it looks and far more satisfying than a frozen dinner.

Ingredients You’ll Need

  • 1/4 cup Trader Joe’s Soyaki
  • 3/4 bottle Trader Joe’s Thai-Style Red Curry Sauce
  • 1 cup coconut milk (unsweetened)
  • 1 tablespoon minced garlic
  • 1/2 cup water
  • 20 frozen potstickers of your choice (chicken, beef, or veggie)
  • Fresh cilantro, chopped (for garnish)
  • Green onions, thinly sliced (for garnish)
  • 1 spoonful Crunchy Chili Onion or chili crisp (for garnish)

A few friendly notes: don’t skip the fresh herbs, they’re the soul of the dish. If your kids are picky about cilantro, swap it for parsley or basil. That Thai-style red curry and coconut milk are a warm, slightly sweet pairing that keeps the bake from feeling heavy. Also, I sometimes swap the soyaki for a teriyaki when I’m in a different mood, and it still sings. For another saucy weeknight favorite that plays well with dumplings or veggies, try the lemony brightness in baked lemon butter chicken for inspiration.

Step-by-Step Directions

  1. Preheat oven to 400°F.
    Make sure your oven rack sits in the center for even heat.

  2. In a small bowl, whisk together the Soyaki, Thai-style red curry sauce, coconut milk, minced garlic, and water until smooth.
    Taste the sauce and adjust salt or heat as you like; the coconut milk softens the curry’s snap.

  3. Arrange frozen potstickers in a baking dish (8×8 or 9×13) and pour the sauce evenly over the dumplings.
    Give each dumpling a little space so steam can circulate and each one gets saucy.

  4. Cover tightly with foil and bake for 30–40 minutes, until bubbly and hot.
    Peek at 30 minutes; if the sauce needs more time to bubble or the dumplings are still very frozen in the center, give it another 5–10 minutes.

  5. Top with chopped cilantro, sliced green onions, and a spoonful of Crunchy Chili Onion before serving.
    Serve immediately so the garnish keeps its texture.

A quick tip from my kitchen: if you want edges with a touch of caramelization, uncover for the last 5 minutes and move under the broiler carefully. Watch closely; things brown fast. Also, let the kids help sprinkle the green onions. It’s their favorite part and makes them feel proud of dinner.

Viral Trader Joe's Dumpling Bake

Serving Viral Trader Joe’s Dumpling Bake with Love

Viral Trader Joe's Dumpling Bake

We serve this bake family-style in the middle of the table, bowls and spoons ready, with little plates for anyone who likes dipping. Sometimes I set out extra Crunchy Chili Onion, lime wedges, and soy sauce so everyone can customize as they wish.

For sides, a simple cucumber salad or steamed broccoli balances the richness and adds a crisp counterpoint. My kids love to scoop the saucy dumplings over a bed of rice, while my husband prefers them straight from the dish. If you want a creamy side, a small scoop of plain yogurt on the side tames heat and keeps things gentle for little mouths. For a more indulgent combination, try a buttery garlic noodle on the side similar to flavors you find in our chicken alfredo pasta bake.

Bring it to the table with a warm pitcher of water or a big iced tea. The point is to make the meal easy to share. Let everyone dig in; these are the dinners that build small, happy memories.

Storage & Reheat Tips (Keeping the Goodness)

Store leftovers in an airtight container in the fridge for up to 3 days. The potstickers will soften more over time but the flavors stay lovely.

To reheat with care, I like the oven. Spread the leftovers in a shallow dish, cover loosely, and bake at 350°F until heated through, about 10–15 minutes. For a quick lunch, the microwave works fine. Heat in 30-second bursts, stirring in between to keep the sauce even.

If you want to refresh texture, you can pan-sear reheated dumplings quickly in a nonstick skillet to bring back some chew and a little crisp on the bottoms. Add a drop of oil and watch closely; you are just reviving texture, not reheating from cold.

My Kitchen Notes & Shortcuts

  • Swap proteins and save time: Use pre-cooked dumplings or leftover grilled meat in place of frozen potstickers for a transformation that keeps things interesting. For more quick swaps that save dinner, I often borrow ideas from easier dishes like creamy oven-baked chicken thighs.
  • Make it in advance: Mix the sauce the night before and keep it in the fridge. Arrange dumplings and pour sauce just before baking. This shaves minutes off dinner time.
  • Kid involvement: Let the kids arrange the potstickers. They like making rows and it gives them a role in dinner prep.
  • Spice control: If someone is sensitive to heat, hold back the Crunchy Chili Onion until serving so individuals can add it themselves.
  • Texture trick: For a browned top, remove foil for the final 5 minutes or carefully run under the broiler for 1-2 minutes for a golden finish.

Family-Friendly Variations

Turn this into a milder version by swapping the Thai-style red curry sauce for a Thai peanut sauce or a mild teriyaki. Use coconut milk or swap for almond milk if you prefer a lighter texture.

To make it vegetarian, choose veggie potstickers and add a handful of frozen peas or edamame before baking. If you want more greens, tuck in chopped spinach or thinly sliced bok choy under the dumplings so it wilts gently as the dish cooks.

For a heartier family meal, add a layer of cooked rice noodles or rice in the bottom of the pan before arranging dumplings. The noodles soak up sauce and make it feel like a full casserole.

If you have adventurous eaters, finish with a squeeze of lime and a sprinkle of toasted sesame seeds for brightness and crunch that wakes up the whole dish.

FAQs About Viral Trader Joe’s Dumpling Bake

Viral Trader Joe's Dumpling Bake

Can I make this ahead for a busy week?
Absolutely. Prepare the sauce ahead and keep it in the fridge. Arrange the frozen dumplings and pour the sauce just before baking. Letting it sit for an hour helps the flavors come together.

What if I only have a smaller or larger baking dish?
Use what fits. A 9×13 makes a bigger batch and an 8×8 concentrates the flavors. Adjust bake time slightly; larger dishes may need a few extra minutes to bubble through.

Which dumpling flavor is best?
All are good. Chicken and beef give a meaty comfort, and veggie is great for lighter dinners. Choose what your family likes and have fun swapping.

How do I reduce the sodium?
Choose low-sodium versions of the sauces if available, or dilute slightly with extra coconut milk and water. Taste before baking and tweak.

Can I freeze leftovers?
You can freeze the baked dish in an airtight container for up to 1 month. Thaw overnight in the fridge before reheating gently in the oven.

One Final Thought from My Kitchen

I hope this recipe becomes one of those dinners you turn to when life is busy and you still want to feed the people you love something real. It gives you comfort without fuss, and it leaves room for little hands to help. Give it a try; you might surprise yourself with how quickly it disappears from the table. My grandmother’s kitchen would be pleased.

Conclusion

If you want to read another take on this comfort-forward bake, I found a clear, helpful version at Trader Joe’s Viral Dumpling Bake – Lovely Delites that breaks down the method in a friendly way. For a recipe that includes a short video and step-by-step photos, see the write-up at Dumpling Bake (Viral One-Pan Trader Joe’s Dumplings) & VIDEO which is great if you like watching the process.

Until next time, happy cooking and warm meals around your table.

Viral Trader Joe's Dumpling Bake

Prep Time 10 minutes
Cook Time 40 minutes
Total Time 50 minutes
Servings 4 servings
Calories 350
A comforting one-pan dish featuring frozen potstickers submerged in a creamy, flavorful sauce, perfect for busy weeknight dinners.

Ingredients

For the Sauce

  • 1/4 cup Trader Joe’s Soyaki
  • 3/4 bottle Trader Joe’s Thai-Style Red Curry Sauce
  • 1 cup coconut milk (unsweetened)
  • 1 tablespoon minced garlic
  • 1/2 cup water

For the Dumplings

  • 20 pieces frozen potstickers of your choice (chicken, beef, or veggie)

For Garnish

  • to taste Fresh cilantro, chopped (Don't skip the fresh herbs!)
  • to taste Green onions, thinly sliced (Kid-friendly involvement suggested!)
  • 1 spoonful Crunchy Chili Onion or chili crisp (Adjust for spice preference)

Instructions 

Preparation

  • Preheat oven to 400°F and place the oven rack in the center.
  • In a small bowl, whisk together the Soyaki, Thai-style red curry sauce, coconut milk, minced garlic, and water until smooth.
  • Taste the sauce and adjust salt or heat as desired.

Baking

  • Arrange frozen potstickers in a baking dish (8×8 or 9×13) and pour the sauce evenly over the dumplings.
  • Cover tightly with foil and bake for 30–40 minutes, until bubbly and hot.
  • Uncover for the last 5 minutes for caramelization if desired.
  • Top with chopped cilantro, sliced green onions, and a spoonful of Crunchy Chili Onion before serving.

Notes

Store leftovers in an airtight container in the fridge for up to 3 days. Reheat in the oven at 350°F for about 10–15 minutes, or microwave in 30-second bursts. For a lighter option, use almond milk instead of coconut milk. Make it vegetarian by choosing veggie potstickers.
Calories: 350kcal
Course: Dinner, Main Course
Cuisine: Asian, Fusion
Keyword: Dumpling Bake, Frozen Potstickers, One-Pan Meal, Quick Dinner, Trader Joe's

Crockpot Chicken and Sweet Potatoes

As you step into the kitchen, the sound of the crockpot gently bubbling is music to your ears. The sweet aroma of chicken and sweet potatoes fills the air, warming your heart and inviting your loved ones to gather around the table. You know that in just a few hours, you’ll have a comforting meal ready to serve, one that brings a smile to everyone’s face.

Why This Works

Crockpot Chicken and Sweet Potatoes

This crockpot chicken and sweet potatoes recipe is a family favorite. It’s simple, delicious, and perfect for busy weeknights. The beauty of this dish lies in its ability to blend flavors seamlessly over hours of cooking.

Using the crockpot saves you time without sacrificing quality. As the chicken cooks, it becomes tender and juicy, while the sweet potatoes absorb all the flavors. Your family will appreciate a hearty meal that warms not just their stomachs, but their hearts.

Process Overview

“This is where the magic happens—when the aroma fills the kitchen.”

Cooking in a crockpot is both convenient and rewarding. The first step is a quick prep, then you can walk away and let the slow cooker do its job. As the hours go by, you’ll be rewarded with an enticing smell that makes everyone excited for dinner.

Ingredients

To make this dish, here’s what you’ll need:

  • 4 boneless, skinless chicken breasts
    Tip: Look for chicken that feels moist and smells fresh. This will ensure the best flavor and texture.

  • 2 large sweet potatoes, peeled and cubed
    Tip: Sweet potatoes should be firm with smooth skin. A little sweetness makes everything better!

  • 1 onion, chopped
    Tip: Any type of onion will work, but yellow onions tend to be sweeter.

  • 2 cloves garlic, minced
    Tip: Fresh garlic always adds a richer flavor than powdered.

  • 1 teaspoon paprika
    Tip: Smoked paprika gives a wonderful depth of flavor, if you have it on hand.

  • Salt and pepper to taste
    Tip: Seasoning ensures that all the flavors pop; don’t be shy!

  • 1 cup chicken broth
    Tip: Homemade broth is great if you have some, but store-bought works too!

  • Fresh parsley for garnish (optional)
    Tip: A sprinkle of parsley adds a fresh touch to the dish and enhances the visual appeal.

Directions

  1. Place the cubed sweet potatoes and chopped onion in the bottom of the crockpot.
    Start with a solid base. The sweet potatoes will soak up that delicious chicken flavor.

  2. Lay the chicken breasts on top of the veggies.
    This way, the chicken juices will drip down, making everything even more flavorful.

  3. Sprinkle with minced garlic, paprika, salt, and pepper.
    These seasonings create a beautiful aroma that will make your kitchen come alive.

  4. Pour the chicken broth over the top.
    This adds moisture to keep everything nice and tender as it cooks.

  5. Cover and cook on low for 6-7 hours or on high for 4-5 hours, until the chicken is cooked through and tender.
    Trust the process; the low slow method yields the best results.

  6. Shred the chicken with two forks and mix it with the vegetables before serving.
    Shredding the chicken allows it to blend beautifully with the sweet potatoes and onions.

  7. Garnish with fresh parsley if desired.
    This final touch completes your dish, adding color and freshness.

Serving

Crockpot Chicken and Sweet Potatoes

Serving this meal family-style is the way to go. Place the entire crockpot in the center of the table and let everyone help themselves. Consider offering a side of crusty bread to scoop up the delicious sauce and veggies. This creates a shared experience, encouraging laughter and connection around the table.

Storage

This crockpot chicken and sweet potatoes dish stores well. Leftovers can be kept in an airtight container in the fridge for up to 3 days. When reheating, add a splash of chicken broth to keep everything moist and flavorful. You can also freeze individual portions for up to 3 months. Just make sure to use freezer-safe containers.

Kitchen Notes

  • Prep Ahead: Chop the vegetables the night before to save time.
  • Use Leftovers: Shred any leftover chicken for sandwiches or salads.
  • Make it Spicy: Add red pepper flakes for some heat.
  • Switch Up the Veggies: You can add carrots or bell peppers for added flavor.
  • Quick Clean-Up: Lining your crockpot with a special liner will help with easy clean-up.

Variations

If you have picky eaters, consider these tweaks:

  • Swap the Chicken: Use turkey cutlets or even tofu for a plant-based option.
  • Different Seasoning: Experiment with Italian seasoning for a different flavor profile.
  • Change the Veggies: Use regular potatoes or even carrots if sweet potatoes aren’t popular.
  • Dairy-Free: Substitute chicken broth with vegetable broth to cater to different diets.

FAQ

  1. Can I use frozen chicken?
    Yes, but you need to increase the cooking time by about an hour.

  2. What can I serve with this dish?
    A simple salad or some steamed broccoli would be great compliments.

  3. Is there an alternative to paprika?
    Yes, you can use cayenne for heat or skip it entirely for a neutral flavor.

  4. Can I cook this on the stove instead?
    Absolutely! Just simmer on low heat in a pot for about 1-2 hours, stirring occasionally.

  5. How do I know when the chicken is done?
    The internal temperature should reach 165°F, and it should shred easily.

Conclusion

As the day winds down, gather your loved ones around the table. Share stories, laughter, and this delicious crockpot chicken and sweet potatoes meal. It’s a dish that nourishes both body and soul, bringing everyone closer together. Remember, the best meals are those made with love. Enjoy!

Crockpot Chicken and Sweet Potatoes

Prep Time 15 minutes
Cook Time 6 hours 30 minutes
Total Time 6 hours 45 minutes
Servings 6 servings
Calories 400
A simple and comforting crockpot recipe featuring tender chicken and sweet potatoes, perfect for busy weeknights.

Ingredients

Main Ingredients

  • 4 pieces boneless, skinless chicken breasts (Look for chicken that feels moist and smells fresh.)
  • 2 large sweet potatoes, peeled and cubed (Sweet potatoes should be firm with smooth skin.)
  • 1 medium onion, chopped (Any type of onion will work, but yellow onions tend to be sweeter.)
  • 2 cloves garlic, minced (Fresh garlic adds a richer flavor than powdered.)
  • 1 teaspoon paprika (Smoked paprika gives a wonderful depth of flavor.)
  • Salt and pepper to taste (Seasoning ensures that all the flavors pop.)
  • 1 cup chicken broth (Homemade broth is great, but store-bought works too.)
  • Fresh parsley for garnish (optional) (Adds a fresh touch and enhances visual appeal.)

Instructions 

Preparation

  • Place the cubed sweet potatoes and chopped onion in the bottom of the crockpot.
  • Lay the chicken breasts on top of the veggies.
  • Sprinkle with minced garlic, paprika, salt, and pepper.
  • Pour the chicken broth over the top.
  • Cover and cook on low for 6-7 hours or on high for 4-5 hours, until the chicken is cooked through and tender.
  • Shred the chicken with two forks and mix it with the vegetables before serving.
  • Garnish with fresh parsley if desired.

Notes

Leftovers can be kept in an airtight container in the fridge for up to 3 days. Reheat with a splash of chicken broth. Freeze individual portions for up to 3 months.
Calories: 400kcal
Course: Dinner, Main Course
Cuisine: American, Comfort Food
Keyword: Comforting Recipes, Crockpot Chicken, Easy Dinner, Family Meal