Author

Amelia Hart

Browsing

Bang Bang Chicken Bowl: An Incredible Ultimate Recipe for 2023

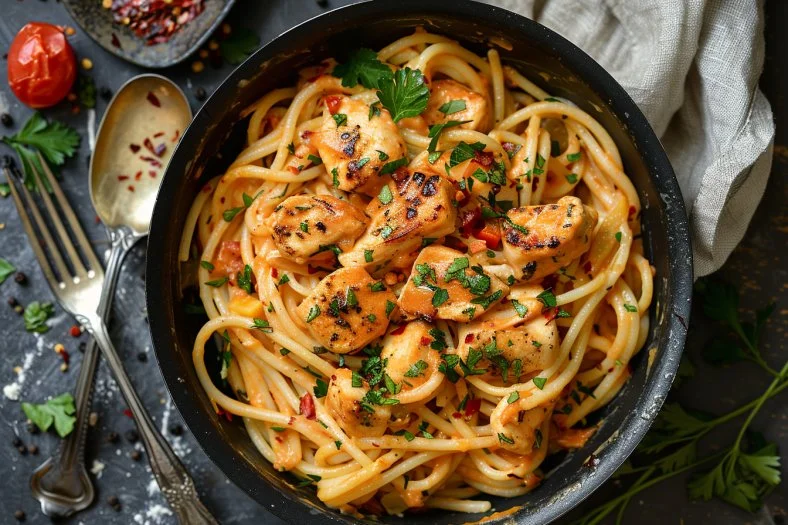
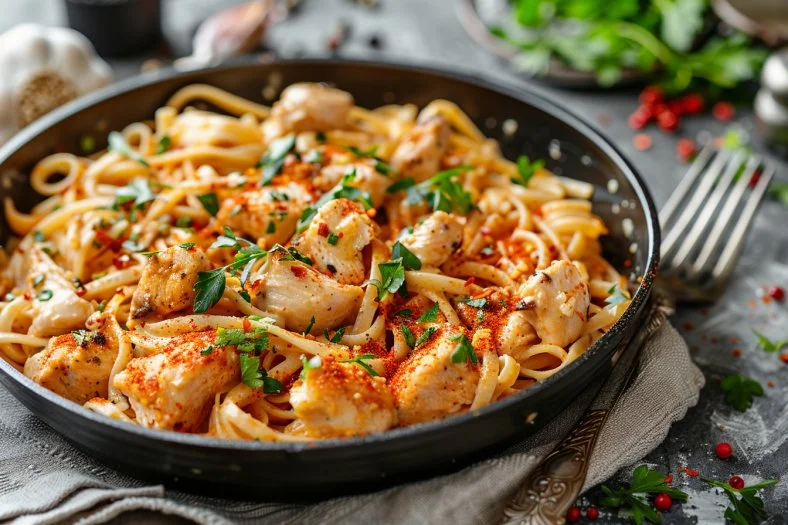
I can smell the ginger and garlic frying, and I hear the soft sizzle of chicken hitting a hot skillet. The kitchen feels warm and busy with small hands helping to chop and the family count-down to dinnertime. This Bang Bang Chicken Bowl is my go-to when I need a meal that comforts everyone and comes together quickly.

If you like recipes that please picky eaters and busy parents, you might also enjoy my bang bang chicken sliders recipe. I test everything in a home kitchen with hungry kids and friendly neighbors. That real-world testing matters to me and to your family.

Why this works

Bang Bang Chicken Bowl: An Incredible Ultimate Recipe for 2023

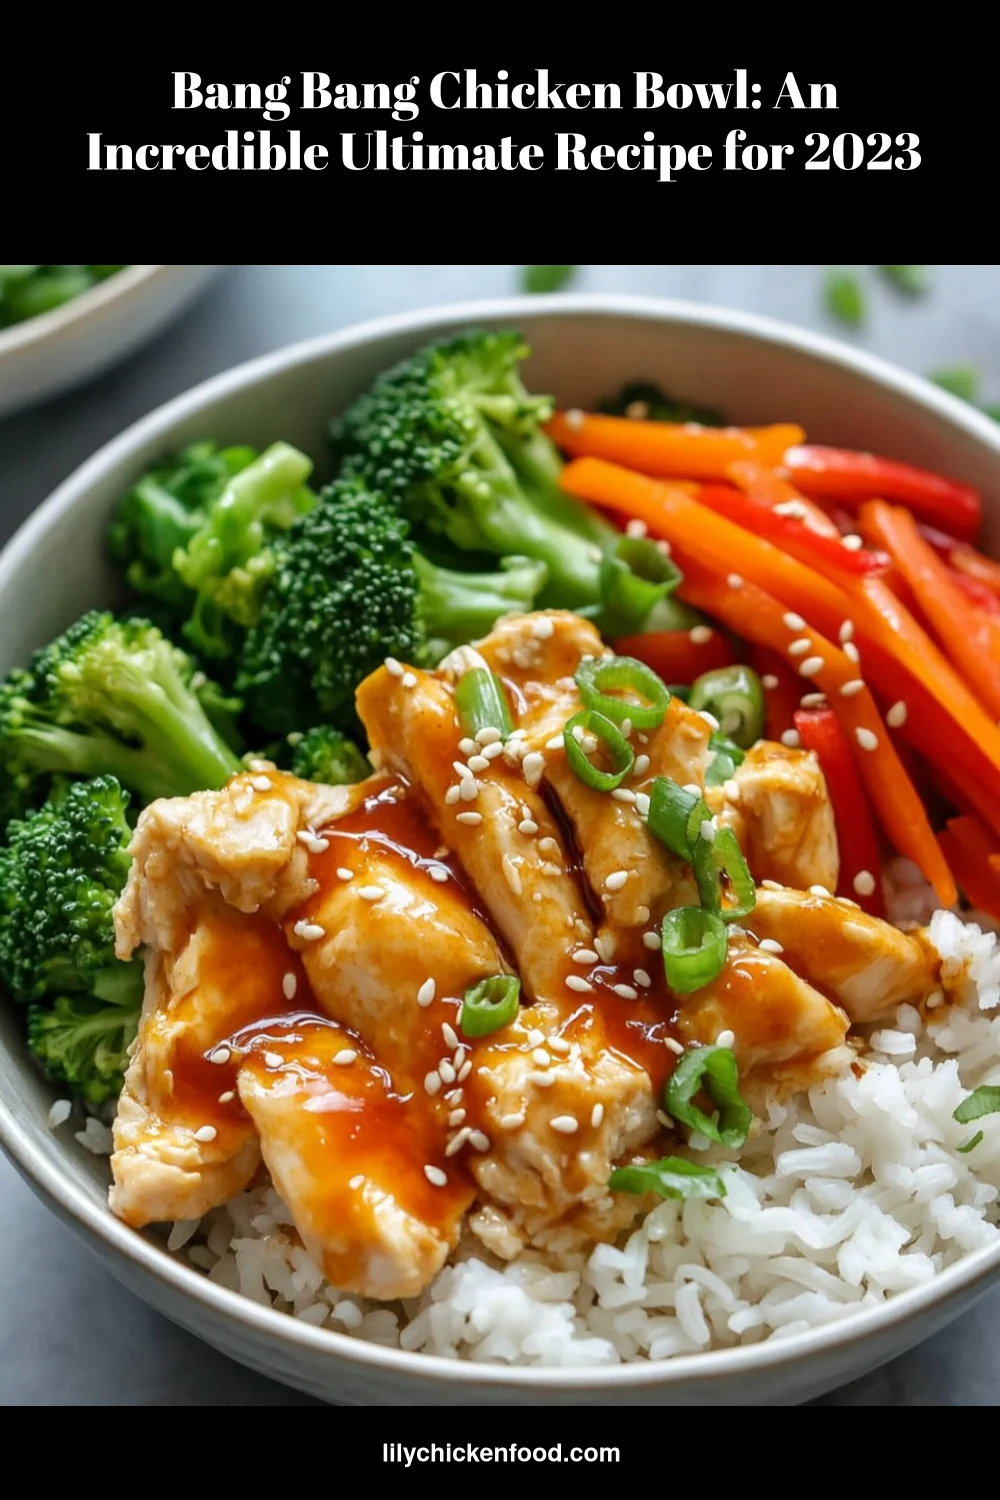
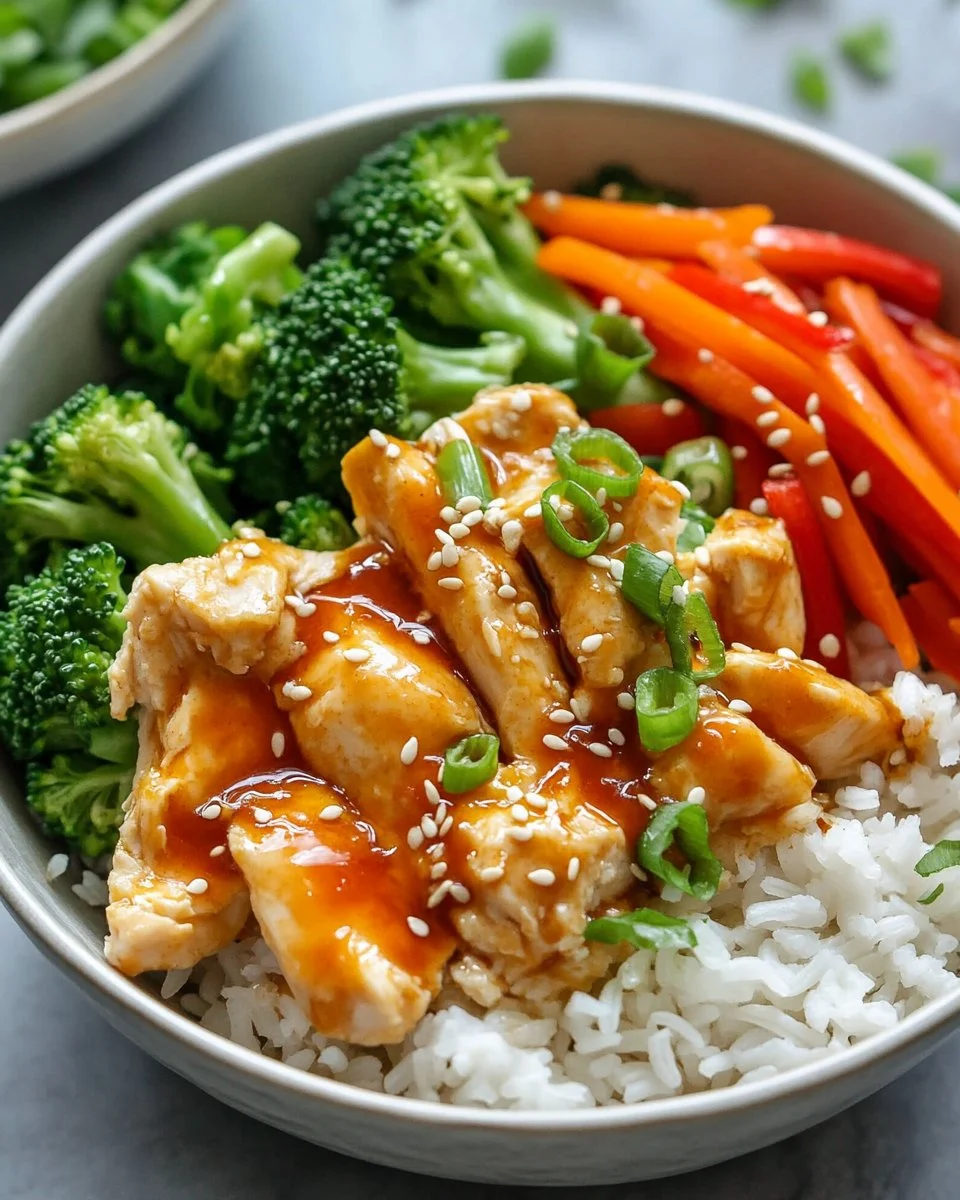
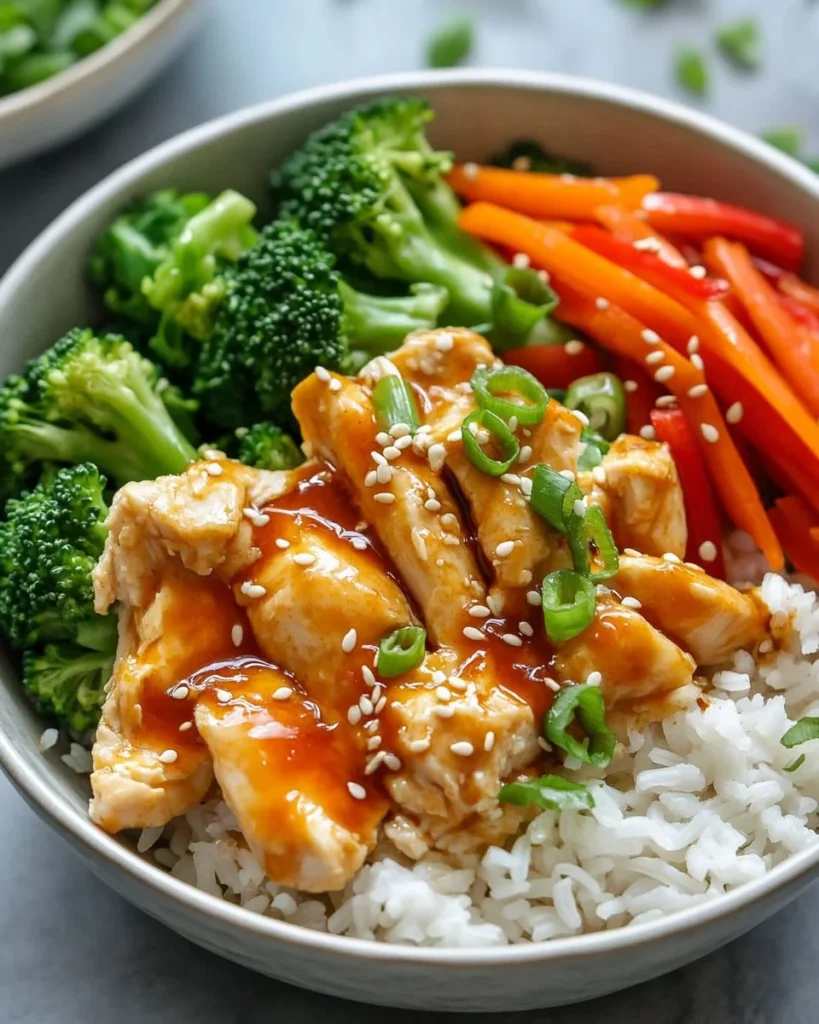
This bowl works because it balances sweet, spicy, creamy, and fresh textures in one easy plate. The sauce clings to every bite. The vegetables add color and crispness. The rice soaks up the sauce and makes it a satisfying meal.

It saves time. You can cook the chicken and the vegetables in one skillet while the rice heats. For even faster prep, check recipes in my air fryer chicken recipes collection for shortcut ideas that fit family schedules.

It stretches well for leftovers. Make a double batch and use it for lunches or easy weeknight meals. My family loves how it reheats without losing flavor.

Process Overview

“This is where the magic happens—when the aroma fills the kitchen.”

Start with good mise en place. Chop the vegetables, measure the sauce, and have your rice ready. When you return to the skillet, everything moves quickly and the flavors come together in minutes.

If you want to know more about how I test and write recipes, you can read about my journey and recipe approach on my author page, where I share family-tested tips and real cooking wins and mishaps: about my recipes and experience.
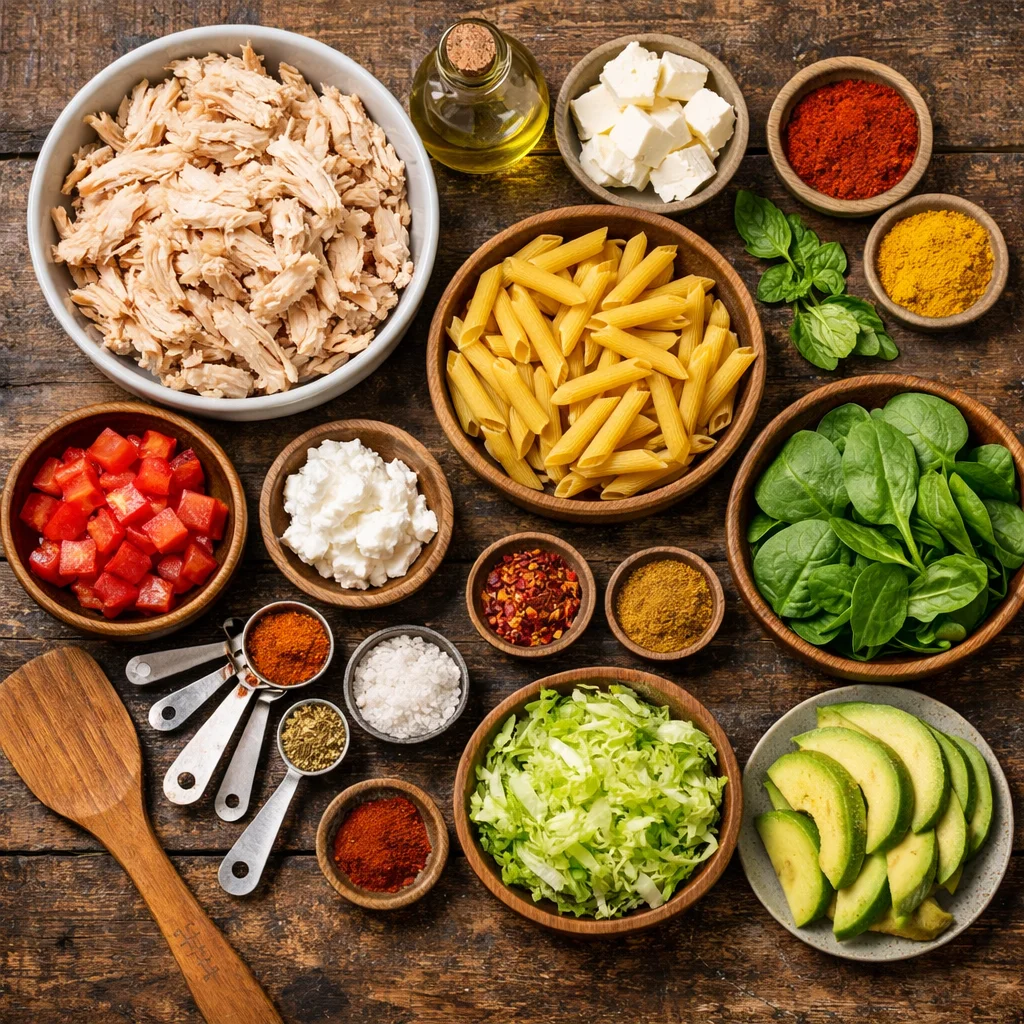
Ingredients

Below are the ingredients and my quick tips for each one. I add a short note so you can substitute easily or make prep simpler.

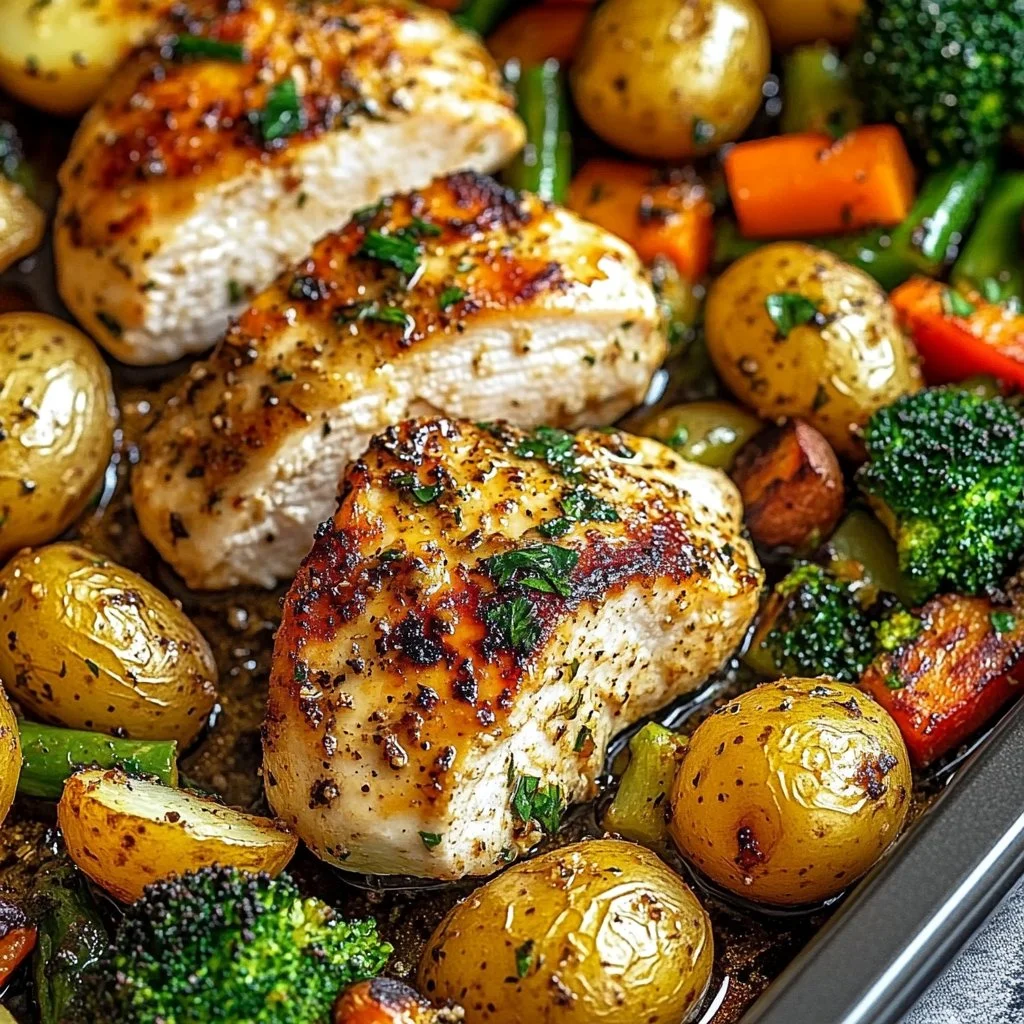
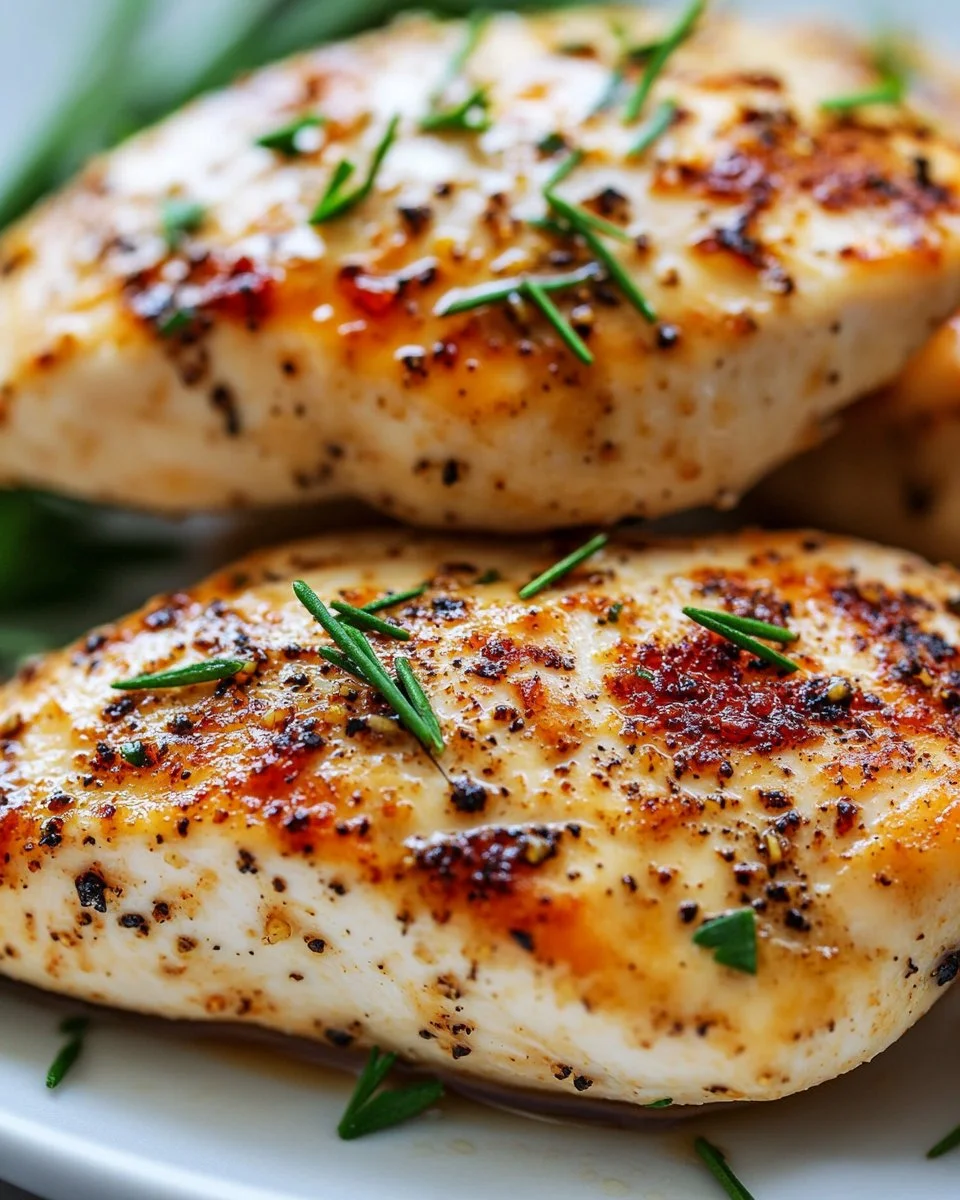
– 1 pound boneless, skinless chicken breasts — Tip: Pound them slightly if one is thick so pieces cook evenly. Cut into bite-sized pieces for quick cooking.

– 2 cups cooked rice (white or brown) — Tip: Use day-old rice or pre-cooked rice to save time. For extra flavor, cook rice in chicken broth.

– 1 cup broccoli florets — Tip: Cut into small florets so they cook quickly and stay crisp for kids who prefer crunch.

– 1 red bell pepper, sliced — Tip: Red adds sweetness. Green is fine, but red gives a brighter flavor kids usually like.

– 1 carrot, julienned — Tip: Use a peeler to make thin ribbons if you do not have a julienne tool. They soften fast.

– 3 green onions, chopped — Tip: Save some white parts for cooking and use the green tops as a fresh garnish.

– ½ cup mayonnaise — Tip: Use a good-quality mayo for a smooth, rich sauce. For lighter bowls, try half mayo and half plain Greek yogurt.

– 2 tablespoons sweet chili sauce — Tip: This is the backbone of the sauce’s sweetness. Adjust to taste.

– 1 tablespoon Sriracha sauce (adjust for spice level) — Tip: Start with less if kids are eating. You can always add more at the table.

– 1 tablespoon soy sauce — Tip: Use low-sodium soy sauce if you watch salt. It still gives great umami.

– Salt and pepper to taste — Tip: Salt lightly during cooking and taste before serving. A final pinch brightens everything.

– 2 tablespoons oil (for cooking) — Tip: Use vegetable oil or avocado oil for high-heat cooking and a neutral flavor.

– Sesame seeds (for garnishing) — Tip: Toast them briefly in a dry pan for a nutty touch.

If you prefer a one-pan alternative for some steps, see my quick and easy ideas in the quick and easy chicken section.

Directions

Follow these simple steps to create your delicious Bang Bang Chicken Bowl:

  1. Start by cutting the chicken breasts into bite-sized pieces and season them with salt and pepper.
    Encouraging note: Take a deep breath and enjoy the simple act of prepping. Small pieces cook fast, and kids love the bite-sized pieces.

  2. Cook the Chicken: Heat oil in a large skillet over medium heat. Add the chicken pieces and cook until golden brown and cooked through, about 5-7 minutes. Remove from the skillet and set aside.
    Encouraging note: Keep the pan hot but not smoking. If the chicken is golden, you nailed it. Set it aside while you do the vegetables.

  3. Sauté the Vegetables: In the same skillet, add broccoli, red bell pepper, and carrot. Sauté for about 3–5 minutes, until they are tender yet crisp.
    Encouraging note: Stir often so everything cooks evenly. The colors should pop but still have a little bite.

  4. In a small bowl, mix together mayonnaise, sweet chili sauce, Sriracha, and soy sauce until well combined.
    Encouraging note: Taste the sauce and adjust spice and sweetness. This is your chance to make it fit your family’s palate.

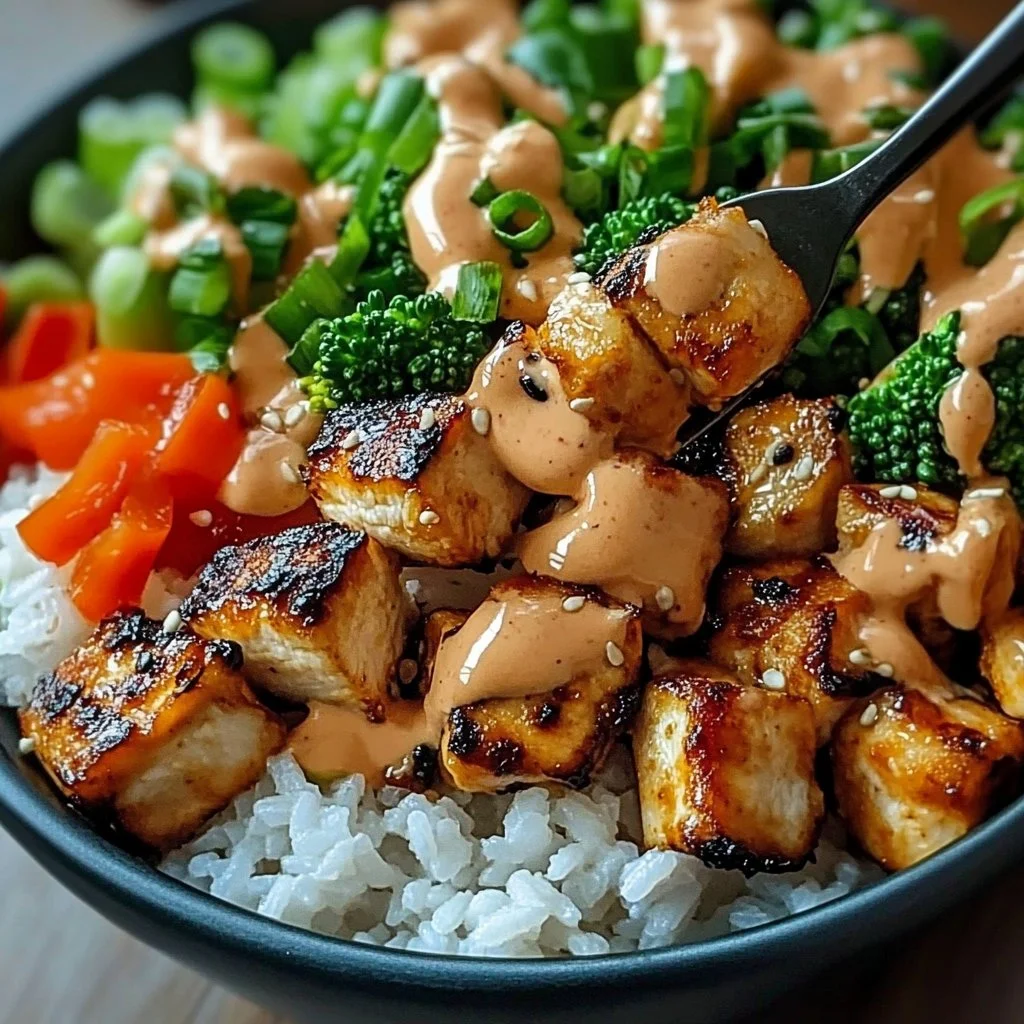
  5. Return the cooked chicken to the skillet with the sautéed vegetables. Pour the sauce over everything and stir well to coat evenly.
    Encouraging note: Let the sauce warm with the chicken for a minute. It should thicken slightly and cling to the pieces.

  6. Prepare the Rice: In serving bowls, place a layer of cooked rice as the base.
    Encouraging note: Use warmed rice for the best comfort factor. Spoon a little sauce on the rice so every bite has flavor.

  7. Assemble the Bowls: Spoon the chicken and vegetable mixture over the rice.
    Encouraging note: Make each bowl pretty. A colorful plate invites family members to dig in.

  8. Garnish: Top each bowl with chopped green onions and a sprinkle of sesame seeds for an added touch.
    Encouraging note: The garnish is fast but makes the dish feel special. Let each person add more Sriracha if they like heat.

  9. Serve Immediately: Enjoy your Bang Bang Chicken Bowl while it’s fresh and hot!
    Encouraging note: Sit down together if you can. I find the meal tastes even better when someone shares the first bite story.

For more family-friendly twists and sides that go well with this bowl, I often pair it with crunchy snacks or a simple soup. You can also try a similar crispy method in my crunchy air fryer chicken mozzarella wraps when you want a different texture.

Serving

Bang Bang Chicken Bowl: An Incredible Ultimate Recipe for 2023

I like to serve this Bang Bang Chicken Bowl family-style. Place a big platter of rice in the middle and keep the chicken and vegetables in the skillet for people to spoon from. Put small bowls of extra sauce, Sriracha, and chopped green onions on the table.

Kids can build their own bowls, which keeps picky eaters happy. For a Sunday dinner, add a simple cucumber salad to the side to cut the richness and add brightness.

If you prefer plated service, spoon rice into shallow bowls, top with chicken and vegetables, and finish with a sprinkle of sesame seeds. This presentation works great for guests.

Storage

Refrigerator: Store leftovers in an airtight container for up to 3 days. Keep rice and chicken together if you plan to reheat them at once. For longer life, separate rice and chicken.

Freezing: I do not recommend freezing the assembled bowl. Freeze the chicken mixture in a baking-safe container for up to 2 months. Thaw overnight in the refrigerator before reheating.

Reheat tips: Warm gently in a skillet over medium heat. Add a splash of water or chicken broth if the sauce seems dry. For microwaving, cover and heat in 60-second intervals, stirring in between.

Packed lunches: Put rice and chicken in separate compartments or containers. Add fresh green onions and sesame seeds just before eating.

Kitchen Notes

  • Shortcut: Use rotisserie chicken to skip the cooking step. Chop it and finish in the skillet with sauce and vegetables.
  • Swap: Greek yogurt can replace half the mayo for a lighter sauce with a little tang.
  • Meal prep: Cook rice and chop vegetables ahead of time. Store in the fridge for 3 days for quick assembly.
  • Make it gluten-free: Use tamari instead of soy sauce and double-check the sweet chili sauce label.
  • Flavor boost: Add a squeeze of lime or a splash of rice vinegar at the end for brightness.

Variations

  • Kid-friendly: Reduce or omit Sriracha and serve the sauce on the side. Add a little honey to soften flavors for young palates.
  • Low-carb: Serve over cauliflower rice or a bed of mixed greens.
  • Vegetarian: Swap chicken for chickpeas or crispy tofu. For a vegan bang bang idea, check how others use plant-based proteins for a similar flavor profile.
  • Meal-prep bowls: Double the recipe and store in containers for easy lunches. Add fresh herbs before eating.
  • Spicy lovers: Increase Sriracha or add a pinch of chili flakes to the sauce for a deeper kick.

FAQ

Q: Can I use thighs instead of breasts?
A: Yes. Boneless, skinless thighs are juicier and more forgiving. Cut them into bite-sized pieces and cook until just cooked through.

Q: Is there a dairy-free version of the sauce?
A: Yes. Replace mayonnaise with vegan mayo or use a mixture of mashed avocado and a little olive oil for creaminess.

Q: How do I keep vegetables crisp?
A: Sauté only until tender yet crisp. Cook them over medium heat and do not overcrowd the pan. A quick toss is enough.

Q: Can I make the sauce ahead of time?
A: Absolutely. The sauce keeps in the refrigerator for up to 5 days. Stir before using, as it may separate slightly.

Q: What side dishes go well with this bowl?
A: Simple sides like steamed edamame, cucumber salad, or quick pickled vegetables complement the flavors well.

Conclusion

Thanks for spending time in my kitchen. I hope this Bang Bang Chicken Bowl becomes a weeknight favorite for your family the way it did for mine. If you want a fun dessert to finish the evening, I enjoy pairing family dinners with treats from my baking inspiration, like the classic Smitten Kitchen crispy chewy chocolate chip cookies. If you are exploring plant-based options that keep the bang bang spirit, take a look at this creative Vegan Bang Bang Chickpeas recipe for a great alternative.

Happy cooking, and remember that meals taste best when they are shared.

Bang Bang Chicken Bowl

Prep Time 15 minutes
Cook Time 15 minutes
Total Time 30 minutes
Servings 4 servings
Calories 600
A delicious and comforting recipe that combines sweet, spicy, creamy, and fresh textures all in one bowl, perfect for picky eaters and busy parents.

Ingredients

For the Chicken

  • 1 pound boneless, skinless chicken breasts (Pound them slightly if thick for even cooking.)

For the Rice

  • 2 cups cooked rice (white or brown) (Use day-old or pre-cooked rice to save time.)

For the Vegetables

  • 1 cup broccoli florets (Cut into small florets for quick cooking.)
  • 1 medium red bell pepper, sliced (Red adds sweetness; green is fine but red is preferred.)
  • 1 medium carrot, julienned (Use a peeler to make thin ribbons.)
  • 3 medium green onions, chopped (Save some white parts for cooking.)

For the Sauce

  • ½ cup mayonnaise (Use a good-quality mayo for a rich sauce.)
  • 2 tablespoons sweet chili sauce (Adjust to taste for sweetness.)
  • 1 tablespoon Sriracha sauce (Adjust for spice level.)
  • 1 tablespoon soy sauce (Use low-sodium if watching salt.)
  • to taste salt and pepper (Salt lightly while cooking.)

For Cooking

  • 2 tablespoons oil (Use vegetable or avocado oil for cooking.)
  • to taste sesame seeds (Toast briefly for a nutty touch.)

Instructions 

Preparation

  • Cut the chicken breasts into bite-sized pieces and season with salt and pepper.
  • Chop the vegetables and measure the sauce ingredients.

Cooking Chicken

  • Heat oil in a large skillet over medium heat. Add the chicken pieces and cook until golden brown and cooked through, about 5-7 minutes. Remove from skillet and set aside.

Cooking Vegetables

  • In the same skillet, add broccoli, red bell pepper, and carrot. Sauté for about 3–5 minutes, until tender yet crisp.

Making Sauce

  • In a small bowl, mix together mayonnaise, sweet chili sauce, Sriracha, and soy sauce until well combined.

Combining

  • Return the cooked chicken to the skillet with the sautéed vegetables, pour the sauce over everything and stir well to coat evenly.

Assembling

  • In serving bowls, place a layer of cooked rice, then spoon the chicken and vegetable mixture over the rice.
  • Garnish with chopped green onions and sesame seeds.

Serving

  • Enjoy your Bang Bang Chicken Bowl while it’s fresh and hot!

Notes

Store leftovers in an airtight container for up to 3 days. Reheat gently to retain flavor. For gluten-free, replace soy sauce with tamari.
Calories: 600kcal
Course: Dinner, Main Course
Cuisine: American, Asian
Keyword: Bang Bang Chicken, Chicken Bowl, Comfort Food, Easy Recipe, Family Dinner

Garlic Herb Chicken

The kitchen fills with the warm scent of garlic and butter. I hear the soft sizzle as the chicken hits the hot pan and feel a small thrill that dinner is coming together.

This recipe is the kind that turns a busy weeknight into a cozy family moment. The sounds, smells, and the sticky glaze make everyone pause and take notice. Let me show you how to make a dish your people will ask for again and again.

Why this works

Garlic Herb Chicken

Family meals need to be easy and reliable. This Garlic Herb Chicken gives you both. The sear locks in juices quickly, so the chicken stays tender without long cook times. The pan sauce uses the drippings to make big flavor from simple steps.

It saves time and cleanup. You sear, make the sauce in the same pan, and serve on mashed potatoes for a one-skillet feel with a comfort-food finish. It is also flexible for picky eaters and busy schedules.

This is a go-to weeknight recipe that still feels a little special. You can prep ahead or finish at the last minute while everyone sets the table.

Process Overview

“This is where the magic happens—when the aroma fills the kitchen.”

I like to think of the process as three simple parts. Season and sear, make the sauce, and pair with creamy mashed potatoes. Each step builds flavor, and the pan sauce brings everything together.

Work confidently. Follow the steps and trust your senses. A quick temperature check and a few minutes of attention will reward you with juicy chicken and a glossy glaze.

Ingredients

  • 4 boneless skinless chicken breasts

    • Tip: If breasts are uneven, pound them to even thickness so they cook at the same rate. That keeps the center from drying out.
  • 3 tablespoons olive oil

    • Tip: Use a good quality olive oil for searing and flavor. Heat until shimmering before adding the chicken to get a golden crust.
  • 4 cloves garlic, minced

    • Tip: Mince fresh garlic or press it for more aroma. Add it to the herb rub rather than the hot oil to avoid burning.
  • 2 tablespoons fresh parsley, chopped

    • Tip: Chop parsley just before using for bright color and fresh flavor. Save a little for garnish.
  • 1 tablespoon fresh thyme leaves

    • Tip: Strip thyme leaves from the stems with your fingers. Fresh thyme gives a subtle earthy lift that pairs well with garlic.
  • 2 tablespoons butter

    • Tip: Add butter toward the end of searing for basting. Clarified butter can handle higher heat but regular butter adds a lovely nutty browning.
  • 1 cup chicken broth

    • Tip: Use low-sodium broth so you control the salt. If you only have bouillon, dissolve a small amount in hot water.
  • 2 pounds russet potatoes

    • Tip: Russets make creamy, fluffy mashed potatoes. Cut to even chunks so they cook evenly.
  • 1/2 cup heavy cream

    • Tip: Warm the cream slightly before adding to the potatoes for a silkier mash and to avoid cooling them down.
  • 2 tablespoons brown sugar

    • Tip: Brown sugar helps balance the balsamic and gives a sticky, caramelized finish. Use light or dark based on your taste.
  • 1 tablespoon balsamic vinegar

    • Tip: A good balsamic adds bright acidity to the sauce. Add it slowly and taste as the sauce reduces.

Each ingredient plays a clear role. The herbs season the meat, the butter enriches the sauce, and the potatoes create the cozy base. You can find most of these at any grocery store, and they keep well if you want to batch prep.

Directions

  1. Pat the chicken breasts dry with paper towels and season generously with salt and pepper on both sides. In a small bowl, combine minced garlic, chopped parsley, and thyme leaves. Rub this herb mixture all over the chicken breasts, pressing gently so it adheres to the meat. Let the chicken rest at room temperature for 10 minutes to allow the flavors to penetrate.

    • Encouragement: This short rest makes a big difference. Take a moment to breathe and set the table.
  2. Heat olive oil in a large skillet over medium-high heat until shimmering. Carefully place the chicken breasts in the pan and sear without moving them for 5-6 minutes until a deep golden-brown crust forms.

    • Encouragement: Let the pan do the work. A steady sear creates that beautiful color and flavor.
  3. Flip the chicken and cook for another 5-6 minutes. Add butter to the pan and baste the chicken with the melted butter and pan juices. Once the internal temperature reaches 165 degrees Fahrenheit, transfer chicken to a plate and tent with foil.

    • Encouragement: Use a quick-read thermometer. When it hits 165 degrees Fahrenheit, you know it is safe and juicy. Tenting helps the juices settle.
  4. In the same skillet with the remaining drippings, add brown sugar and balsamic vinegar. Stir continuously over medium heat until the sugar dissolves and begins to caramelize, about 2 minutes. Pour in chicken broth and scrape up any browned bits from the bottom of the pan. Bring to a simmer and cook for 5-7 minutes until the sauce reduces by half and becomes slightly syrupy. Taste and adjust seasoning with salt and pepper.

    • Encouragement: Scraping up the browned bits transforms the sauce. Keep an eye on the reduction so it does not get too thick.
  5. While the chicken cooks, peel and cut the potatoes into evenly sized chunks. Place them in a large pot and cover with cold salted water. Bring to a boil over high heat, then reduce to a simmer and cook for 15-20 minutes until the potatoes are fork-tender. Drain thoroughly and return the potatoes to the pot. Add butter and heavy cream, then mash until smooth and creamy. Season with salt and pepper to taste.

    • Encouragement: Taste the potatoes as you season them. A final little pinch of salt can brighten the whole dish.
  6. Spoon a generous portion of mashed potatoes onto each plate, creating a bed for the chicken. Place one chicken breast on top of the mashed potatoes. Drizzle the reduced pan sauce generously over the chicken and around the plate. Garnish with additional fresh herbs if desired. Serve immediately while hot, ensuring each guest gets plenty of that delicious sticky glaze.

    • Encouragement: Serve hot and smile. This meal brings comfort and cheers at the table.

Follow these steps and you will have tender chicken, a glossy sauce, and creamy potatoes in about 40 minutes total. The sauce is the finish that makes it feel special.

Serving

Garlic Herb Chicken

Serve family-style on a large platter or plate individually over mashed potatoes. Place the mashed potatoes on the platter first, then arrange the chicken breasts on top. Spoon the sauce over everything so the glaze pools around the potatoes.

For a weeknight, set the platter in the center of the table and let everyone help themselves. For a small gathering, plate individually and add a sprig of parsley for color.

Add a simple side of steamed green beans or a crisp salad to round the meal. Warm dinner rolls or crusty bread are perfect for soaking up extra sauce.

Storage

Keep leftovers in an airtight container in the refrigerator for up to 3 days. Store sauce in a separate container if possible. This makes reheating easier and prevents the potatoes from soaking up too much sauce.

To reheat the chicken, place it in a skillet over low heat with a splash of chicken broth. Cover and warm gently until heated through. This keeps the meat tender better than the microwave.

Reheat mashed potatoes in a pot with a splash of cream or milk over low heat. Stir often until warmed. If using the microwave, add a little cream and cover to retain moisture.

Freeze cooked chicken and sauce in a freezer-safe container for up to 2 months. Thaw overnight in the refrigerator before reheating.

Kitchen Notes

  • Use a heavy-bottomed skillet for even searing and easy deglazing.
  • If chicken breasts are thick, halve them horizontally for faster cooking.
  • Warm the plates in the oven for a few minutes to keep the meal hot a little longer.
  • Swap russets for Yukon Golds if you prefer a naturally creamier potato.
  • Make the sauce ahead and reheat gently to save time on busy nights.

Variations

  • For picky eaters: Leave the herbs out of half the chicken or serve the sauce on the side.
  • Low-carb option: Skip the mashed potatoes and serve over roasted cauliflower mash.
  • Creamy version: Stir a spoonful of cream into the pan sauce for a richer finish.
  • Herb swap: Use rosemary instead of thyme for a woodsy flavor.
  • Make it spicy: Add a pinch of red pepper flakes to the herb rub or sauce for heat.

These variations keep the core recipe intact while letting you adapt to tastes and diets. Small swaps can make a big difference in how the family receives the dish.

FAQ

Q: Can I use bone-in chicken?
A: Yes. Bone-in will take longer to cook. Allow extra time and check the temperature near the bone for 165 degrees Fahrenheit.

Q: How do I prevent the garlic from burning?
A: Keep garlic in the herb rub and add it to the pan at a lower heat if you want to cook it in oil. Burning occurs at high heat, so watch closely.

Q: Can I make the sauce without sugar?
A: Yes. Omit the brown sugar and add a touch more balsamic for acidity. The sauce will be less caramelized but still flavorful.

Q: Is there a gluten-free version?
A: Absolutely. All ingredients here are naturally gluten-free. Just verify your chicken broth if you buy commercial brands.

Q: How do I know when the sauce is done?
A: It should reduce until it lightly coats the back of a spoon and has a glossy, slightly syrupy texture.

Conclusion

I hope this Garlic Herb Chicken brings warmth to your table. It is simple enough for a busy weeknight and special enough for guests. The pan sauce and mashed potatoes make it feel like a full meal with minimal fuss.

If you want a quicker creamy take, I like this 15-minute creamy garlic herb chicken from My Life In An Apron for when time is tight. For another lovely version that uses a garlic herb butter sauce, see the recipe at Chisel & Fork for extra inspiration.

Thank you for cooking with me. Gather your people, set the table, and enjoy a warm meal made with care.

Garlic Herb Chicken

Prep Time 10 minutes
Cook Time 30 minutes
Total Time 40 minutes
Servings 4 servings
Calories 540
A cozy, easy weeknight meal featuring tender chicken breasts seared to perfection and served over creamy mashed potatoes with a sticky pan sauce.

Ingredients

For the Chicken

  • 4 pieces boneless skinless chicken breasts (If breasts are uneven, pound them to even thickness.)
  • 3 tablespoons olive oil (Use a good quality olive oil for flavor.)
  • 4 cloves garlic, minced (Mince fresh garlic or press it for more aroma.)
  • 2 tablespoons fresh parsley, chopped (Chop just before using for bright color.)
  • 1 tablespoon fresh thyme leaves (Fresh thyme gives a subtle earthy lift.)
  • 2 tablespoons butter (Add toward the end of searing for basting.)
  • 1 cup chicken broth (Use low-sodium broth for better control of salt.)

For the Mashed Potatoes

  • 2 pounds russet potatoes (Cut into even chunks to cook evenly.)
  • 1/2 cup heavy cream (Warm slightly before adding for a silkier mash.)
  • 2 tablespoons brown sugar (Helps balance the balsamic and gives a sticky finish.)
  • 1 tablespoon balsamic vinegar (Adds bright acidity to the sauce.)

Instructions 

Preparation

  • Pat the chicken breasts dry with paper towels and season with salt and pepper on both sides.
  • In a small bowl, combine minced garlic, chopped parsley, and thyme leaves. Rub this herb mixture all over the chicken breasts.
  • Let the chicken rest at room temperature for 10 minutes.

Cooking the Chicken

  • Heat olive oil in a large skillet over medium-high heat until shimmering.
  • Place the chicken breasts in the pan and sear for 5-6 minutes until golden brown.
  • Flip and cook for another 5-6 minutes. Add butter and baste the chicken.
  • Check internal temperature; once it reaches 165°F, transfer to a plate and tent with foil.

Making the Sauce

  • In the same skillet, add brown sugar and balsamic vinegar. Stir until the sugar dissolves.
  • Pour in chicken broth, scrape browned bits, and bring to a simmer. Cook for 5-7 minutes until slightly syrupy.

Preparing the Mashed Potatoes

  • Peel and cut the potatoes into chunks and boil in salted water for 15-20 minutes until fork-tender.
  • Drain and return potatoes to the pot. Add butter and heavy cream, then mash until smooth.
  • Season with salt and pepper to taste.

Serving

  • Spoon a generous portion of mashed potatoes onto each plate, place chicken on top, and drizzle with sauce.
  • Garnish with fresh herbs if desired and serve immediately.

Notes

Leftovers can be stored in the refrigerator for up to 3 days. Sauce can be stored separately for reheating.
Calories: 540kcal
Course: Dinner, Main Course
Cuisine: American
Keyword: Comfort Food, Easy weeknight meal, Family Dinner, Garlic Herb Chicken, One-skillet meal

Sheet Pan Garlic Butter Chicken and Veggies

I can smell the garlic and butter as soon as I open the oven. The soft sizzle of potatoes hitting hot pan makes the whole kitchen feel cozy. That warmth is what I love about a simple sheet pan dinner.

This Sheet Pan Garlic Butter Chicken and Veggies recipe is one of those weeknight lifesavers. It fills the house with a comforting aroma and gives you a full meal with almost no fuss. If you like easy dinners, you might enjoy my Bang Bang Chicken Sliders too for another family-friendly option.

Why this works

Sheet Pan Garlic Butter Chicken and Veggies

This recipe brings a few smart ideas together. Chicken cooks quickly and stays juicy when surrounded by vegetables. The garlic butter gives everything a uniform, irresistible flavor. Roasting everything together saves time and reduces dishes, so you can focus on your family.

If you are short on time, this sheet pan meal lets you prep, pop it in the oven, and check on it only once. For more one-pan chicken ideas, I often turn to resources in my quick and easy chicken collection for inspiration.

Process Overview

“This is where the magic happens—when the aroma fills the kitchen.”

The process is very straightforward. You arrange the chicken, tuck the veggies around it, drizzle garlic butter, season, and roast. The heat caramelizes the vegetables and seals juices in the chicken so everything is tender, flavorful, and ready in about 30 minutes.

If you like a crisp finish, give the sheet pan a quick broil for 2 minutes at the end. I use the broiler sparingly, but it adds a nice color when you want that golden look. For more tips on sheet pan finishing, check out a few of my favorite air fryer tricks in this post about air fryer chicken recipes that translate well to oven cooking.

Ingredients

  • 4 chicken breasts
    • Lily’s tip: Use even-sized breasts so everything cooks at the same rate. If they are large, pound them gently to uniform thickness.
  • 4 tablespoons garlic butter
    • Lily’s tip: Real butter with fresh garlic gives the best flavor. If you want lighter, use 3 tablespoons butter and 1 tablespoon olive oil.
  • 1 pound baby potatoes, halved
    • Lily’s tip: Choose small, firm potatoes and halve them so they roast quickly. Toss them cut side down for better browning.
  • 2 cups mixed vegetables (such as bell peppers, carrots, and broccoli)
    • Lily’s tip: Cut vegetables into similar-sized pieces. Denser veggies like carrots may need a slightly smaller dice so everything finishes together.
  • Salt and pepper to taste
    • Lily’s tip: Season in layers. A little on the chicken and vegetables before roasting, then a pinch when you finish.
  • 1 teaspoon Italian seasoning (optional)
    • Lily’s tip: Italian seasoning adds a herby note. Use fresh herbs if you have them on hand, or skip it for a simpler buttery garlic flavor.

I like to prep everything on a single cutting board and measure the butter ahead of time. Having the garlic butter ready to melt saves those few extra minutes when you want to get the pan in the oven.

Directions

  1. Preheat your oven to 400°F (200°C).
    • Encouragement: A warm oven makes the kitchen smell like dinner is already happening. While the oven heats, take a breath and enjoy the moment.
  2. Arrange the chicken breasts on a sheet pan.
    • Encouragement: Give each breast a bit of space so air can circulate. If you feel overwhelmed, know this step is simple and forgiving.
  3. Surround the chicken with halved baby potatoes and mixed veggies.
    • Encouragement: Tuck carrots and peppers close but leave broccoli a little looser so it crisps. Picture the colors on the pan—it makes the meal feel special.
  4. Melt the garlic butter and drizzle it over the chicken and veggies.
    • Encouragement: Pour slowly so the butter covers everything. The aroma is a reward right away and a little taste test is encouraged.
  5. Season everything with salt, pepper, and Italian seasoning if desired.
    • Encouragement: Seasoning is where the magic balances. Taste and adjust if you like bolder flavors. Little tweaks here make it yours.
  6. Bake in the oven for 25-30 minutes, or until the chicken is cooked through and veggies are tender.
    • Encouragement: Use a meat thermometer for peace of mind; chicken should reach 165°F. If the potatoes need more time, remove the chicken and roast a few extra minutes.
  7. Serve warm and enjoy your easy one-pan dinner!
    • Encouragement: Let the pan rest for a couple minutes before serving. Call the family to the table and share that first happy bite.

If you want a crispier top, pop the pan under the broiler for 1 to 2 minutes at the end. Watch it closely so it does not burn.

Serving

Sheet Pan Garlic Butter Chicken and Veggies

This dish is perfect for family-style serving. Place the sheet pan in the center of the table and let everyone help themselves. I like to offer simple sides like a leafy green salad or warm crusty bread.

For kids who love to customize, set out small bowls of grated cheese, lemon wedges, or a mild dipping sauce. If you want a fancier presentation, carve the chicken on a cutting board and arrange the vegetables around it. Serving family-style keeps things relaxed and lively.

If you enjoy family meals with similar crowd-pleasing flavors, my crispy mozzarella wraps are a hit on busy nights and make a great companion recipe to offer variety at the table: Crunchy Crispy Air Fryer Chicken Mozzarella Wraps.

Storage

Refrigerator

  • Store leftovers in an airtight container within two hours of cooking.
  • They will keep well for up to 3 days.

Reheating

  • Reheat in a 350°F oven for 10 to 15 minutes to preserve the roast texture.
  • For speed, microwave individual portions for 1 to 2 minutes, then crisp in a hot skillet for a minute if you like the potatoes crisp.

Freezing

  • I do not recommend freezing whole cooked potatoes and vegetables as texture changes. You can freeze cooked chicken breasts separately for up to 2 months and thaw overnight before reheating.

A quick tip: keep a small dab of butter or a splash of water with the leftovers when reheating to keep things moist.

Kitchen Notes

  • Use parchment paper or a silicone baking mat to make cleanup faster.
  • If you are short on time, buy pre-cut vegetables from the grocery store.
  • Swap garlic butter with garlic-infused olive oil if dairy is a concern.
  • If your oven runs hot, rotate the pan halfway through baking for even browning.
  • Line up vegetables by cook time: potatoes and carrots on one side, tender peppers and broccoli added later if needed.

These shortcuts help busy families get dinner on the table without stress. I keep a small jar of garlic butter in the fridge to speed things along on hectic nights.

Variations

  • For picky eaters: Serve veggies on the side or roast them separately with a different seasoning so each person gets what they like.
  • Low carb: Replace potatoes with more broccoli and cauliflower or use 1 medium sweet potato sliced thin.
  • Gluten free: This recipe is naturally gluten free if you use certified gluten-free butter and seasoning blends.
  • Dairy free: Use garlic-infused olive oil or a dairy-free buttery spread instead of butter.
  • Spicy version: Add 1/2 teaspoon red pepper flakes to the garlic butter or finish with a drizzle of hot honey for a sweet-heat twist.

Small changes like swapping one vegetable or adding a favorite spice make this dish adaptable to many tastes and diets.

FAQ

Q: Can I use bone-in chicken pieces instead of breasts?
A: Yes. Bone-in pieces will take longer to cook. Increase bake time to 35 to 40 minutes and check that the internal temperature reaches 165°F.

Q: Can I prepare this ahead of time?
A: You can assemble the pan ahead and refrigerate it for up to 24 hours. Let it sit at room temperature 20 minutes before baking and expect a few extra minutes of oven time.

Q: What if my potatoes are not tender when the chicken is done?
A: Remove the chicken to a cutting board and continue roasting the potatoes for 5 to 10 minutes. You can also parboil the potatoes for 5 minutes before roasting to speed things up.

Q: Can I make this in an air fryer?
A: Yes. Use a large air fryer that fits the ingredients in a single layer. Cook at 375°F for about 18 to 22 minutes, checking halfway and shaking the basket for even browning.

Q: How do I know the chicken is cooked through without a thermometer?
A: Cut into the thickest part of the breast; the juices should run clear and the meat should be white with no pink. A thermometer is the safest method when you can use one.

Conclusion

I hope this Sheet Pan Garlic Butter Chicken and Veggies becomes a go-to in your weeknight rotation. It is simple, forgiving, and full of the comforting flavors families love.

If you want a slightly different take or more ideas for one-pan dinners, this Sheet Pan Garlic Butter Chicken Meal from The Country Cook has a lovely spin. You might also enjoy comparing notes with this sister recipe for a one-pan dinner at One-Pan Garlic Butter Chicken and Veggies on Simply Stacie.

Thanks for cooking with me tonight. Gather around the table, enjoy the aroma, and tell the family the kitchen smells like love.

Sheet Pan Garlic Butter Chicken and Veggies

Prep Time 10 minutes
Cook Time 30 minutes
Total Time 40 minutes
Servings 4 servings
Calories 450
A cozy and simple weeknight dinner featuring juicy chicken breasts, garlic butter, and colorful roasted vegetables, all cooked on one sheet pan.

Ingredients

Main Ingredients

  • 4 pieces chicken breasts (Use even-sized breasts for uniform cooking.)
  • 4 tablespoons garlic butter (Real butter with fresh garlic gives the best flavor.)
  • 1 pound baby potatoes, halved (Choose small, firm potatoes and halve them for quick roasting.)
  • 2 cups mixed vegetables (such as bell peppers, carrots, and broccoli) (Cut vegetables into similar-sized pieces for even cooking.)
  • to taste salt and pepper (Season in layers for better flavor.)
  • 1 teaspoon Italian seasoning (optional) (Adds a herby note; use fresh herbs if possible.)

Instructions 

Preparation

  • Preheat your oven to 400°F (200°C).
  • Arrange the chicken breasts on a sheet pan, giving each breast a bit of space.
  • Surround the chicken with halved baby potatoes and mixed veggies.

Cooking

  • Melt the garlic butter and drizzle it over the chicken and veggies.
  • Season everything with salt, pepper, and Italian seasoning if desired.
  • Bake in the oven for 25-30 minutes, or until the chicken is cooked through and veggies are tender.
  • If you want a crispier top, pop the pan under the broiler for 1 to 2 minutes at the end.

Serving

  • Serve warm and enjoy your easy one-pan dinner!

Notes

This dish is perfect for family-style serving. Offer simple sides like a leafy green salad or warm crusty bread. For added variety, customize with dipping sauces or cheese.
Calories: 450kcal
Course: Dinner, Main Course
Cuisine: American, Comfort Food
Keyword: Easy Dinner, Family Meal, Garlic Butter Chicken, Sheet Pan Chicken

Air Fryer Chicken Breasts

The kitchen smells warm and inviting. You can hear the soft sizzle when the seasoning hits the hot air fryer basket. That sound means dinner is on its way, and the whole house perks up.

I remember the first time I used an air fryer for a weeknight chicken dinner. The kids came running for the smell. The chicken came out juicy, with a light crisp on the outside, and we had time to sit down together without rushing. That simple victory is what I want to share with you.

Why this works

Air Fryer Chicken Breasts

Air frying is a family-friendly way to cook chicken breasts that saves time and keeps things simple. The air fryer uses hot circulating air to create a crispy outside and a tender inside. That means less oil, less mess, and faster clean up.

I test recipes in my home kitchen with my family. Over the years I have found the right temperatures and timing that give consistent results. This method keeps the centers juicy while giving a pleasant golden exterior that everyone at the table will love.

This recipe is perfect for busy nights. You can season the chicken ahead, pop it in the basket, and get side dishes ready while it cooks. It gives you more time to talk, set the table, and enjoy the meal together.

Process Overview

“This is where the magic happens—when the aroma fills the kitchen.”

The process is straightforward. You preheat the air fryer, season the chicken, place it in a single layer, and cook until the internal temperature reaches 165°F. The cooking window is short enough to keep the meat juicy and long enough to develop a nice color.

I recommend using an instant read thermometer. It is the most reliable way to know your chicken is done. Resting the chicken for a few minutes after cooking lets the juices redistribute. That small pause makes a noticeable difference.

Quick timeline

  • Prep and seasoning: 5 to 10 minutes.
  • Cook time: 12 to 15 minutes depending on thickness.
  • Rest: 3 to 5 minutes.
  • Total time: About 25 minutes from start to table.

Ingredients

  • 4 chicken breasts
    • Tip: Use even-sized breasts for even cooking. If one is much thicker, pound it gently to match the others.
  • 2 tablespoons olive oil
    • Tip: Olive oil helps the seasoning stick and promotes browning. You only need a light coating.
  • 1 teaspoon garlic powder
    • Tip: Garlic powder gives a steady savory base. For fresh garlic, use one small clove minced, but remember it browns faster.
  • 1 teaspoon onion powder
    • Tip: Onion powder adds depth without adding moisture. It blends well with the garlic and paprika.
  • 1 teaspoon paprika
    • Tip: Paprika gives color and a mild smoky flavor. Use smoked paprika for a deeper taste, or sweet paprika if you prefer mildness.
  • Salt and pepper to taste
    • Tip: I use about 3/4 teaspoon kosher salt and 1/4 teaspoon black pepper for four breasts, then adjust to personal taste. Season both sides.

Personal note: I often double the seasoning when I make extra chicken for salads or meal prep. It holds up well in leftovers and freezes nicely.

Directions

  1. Preheat the air fryer to 380°F (190°C).

    • Encouragement: Preheating gives you a consistent start and helps the outside crisp quickly. Take a moment to set the table or chop a quick side salad.
  2. In a bowl, mix the olive oil, garlic powder, onion powder, paprika, salt, and pepper.

    • Encouragement: Use your hands or a spoon to combine until it looks spreadable. Smelling the seasoning mix is one of my favorite parts.
  3. Coat the chicken breasts evenly with the seasoning mixture.

    • Encouragement: Rub the mixture into both sides. A little patience here means every bite will be flavorful.
  4. Place the chicken breasts in the air fryer basket in a single layer.

    • Encouragement: Give each breast a little room. Crowding the basket can reduce air flow and affect crisping. If needed, cook in batches.
  5. Cook for 12-15 minutes, flipping halfway through, until the chicken is cooked through and reaches an internal temperature of 165°F (75°C).

    • Encouragement: Check with an instant read thermometer. When it hits 165°F, you know it is safe and perfectly juicy. Thicker breasts may need the full 15 minutes.
  6. Allow to rest for a few minutes before slicing and serving.

    • Encouragement: Resting is not wasted time. It allows the juices to redistribute so the slices remain moist. Use those few minutes to finish a side or pour drinks.

Serving

Air Fryer Chicken Breasts

Slice the chicken against the grain and place it on a large platter for family-style serving. This way everyone can take the number of slices they prefer. It makes dinner feel relaxed and communal.

Pairings I love:

  • Steamed green beans and roasted sweet potatoes for a balanced plate.
  • Mixed greens with a lemon vinaigrette for a lighter meal.
  • Rice bowls with roasted vegetables and a drizzle of your favorite sauce for a kid-friendly option.

For picky eaters, keep a small bowl of ketchup or BBQ sauce on the table. For adults, offer a light chimichurri or garlic yogurt sauce on the side. Let everyone customize their plate. That way the meal is flexible and everyone gets something they enjoy.

Storage

Cool the chicken to room temperature for no more than two hours before refrigerating. Store in an airtight container.

Refrigerator: Keeps well for 3 to 4 days. Slice it before storing for quick reheating or to use in salads and sandwiches.

Freezer: Wrap each breast tightly in plastic wrap and place in a freezer bag. Freeze up to 3 months. Thaw overnight in the refrigerator before reheating.

Reheat tips:

  • Air fryer: 350°F for 3 to 5 minutes. This restores some crispness while keeping the inside moist.
  • Oven: 325°F for about 10 minutes covered with foil, depending on thickness.
  • Microwave: Use short 20 to 30 second bursts to avoid drying. Add a splash of water and cover with a microwave-safe lid to retain moisture.

Label containers with the date so you always know what is freshest. I keep a small permanent marker and masking tape handy for quick labeling.

Kitchen Notes

  • Use an instant read thermometer for consistent results.
  • If breasts are uneven, fold the thin end under to even the thickness or gently pound to match.
  • Lightly oil the basket or spray with a nonstick spray if your model tends to stick.
  • Cook in one layer. If you must cook in batches, keep finished pieces loosely tented with foil to stay warm.
  • Try to handle the chicken as little as possible after cooking to preserve juices.

Variations

  • Kid-friendly mild: Reduce the paprika and add a pinch of brown sugar for a slightly sweet glaze kids enjoy.
  • BBQ style: Brush with 2 tablespoons of your favorite BBQ sauce in the last 2 minutes of cooking for a sticky finish.
  • Lemon herb: Add 1 teaspoon dried oregano and replace paprika with lemon zest for a bright flavor.
  • Spicy: Add 1/2 teaspoon cayenne pepper or 1 teaspoon chili powder to the seasoning mix for heat.
  • Keto and low carb: Serve over cauliflower rice or with roasted broccoli for a filling low-carb meal.
  • Gluten-free: This recipe is naturally gluten-free. Check your seasonings and sauces to confirm they are labeled gluten-free if sensitivity is a concern.

Mix and match these tweaks to suit your family. Small changes can keep this recipe fresh and interesting over time.

FAQ

Q: Can I use frozen chicken breasts?
A: It is better to thaw before cooking for the most even result. If you must cook from frozen, increase the time and check the internal temperature often. Make sure it reaches 165°F.

Q: How do I stop chicken from drying out?
A: Use even thickness, do not overcook, and rest the chicken after cooking. An instant read thermometer is the best tool to prevent overcooking.

Q: Can I bread the chicken for a crunchy coating?
A: Yes. Lightly coat the breasts in a beaten egg and then a mixture of panko and seasonings. Spray the breading with oil and air fry at the same temperature, watching closely for browning.

Q: What if my air fryer runs hot or cool?
A: All air fryers run a little differently. Start checking at the lower end of the time range. Make notes of timing for your model so you get consistent results.

Q: Can I double the recipe for a larger family?
A: Yes, but do not crowd the basket. Cook in batches if needed. Keep finished pieces loosely covered to stay warm while the next batch cooks.

Conclusion

I hope this recipe becomes a go-to for your family weeknights. It is simple, reliable, and flexible enough to please kids and adults alike. Cooking should make you smile, not add stress, and this air fryer method gives you more time together around the table.

For another take on juicy air fryer chicken, I often reference this helpful guide from a fellow recipe tester at Air Fryer Chicken Breast Recipe (Tender & Juicy!). If you enjoy rich, family-tested variations, take a look at this popular collection from a well-known food writer at Best Air Fryer Chicken Breasts Recipe – The Pioneer Woman.

Happy cooking from my kitchen to yours. If your family loves it, come back and tell me how you served it.

Juicy Air Fryer Chicken Breasts

Prep Time 10 minutes
Cook Time 15 minutes
Total Time 25 minutes
Servings 4 servings
Calories 230
This air fryer chicken recipe delivers juicy, tender chicken breasts with a crispy exterior, perfect for family dinners with quick prep and cook times.

Ingredients

Main ingredients

  • 4 pieces chicken breasts (Use even-sized breasts for even cooking. If one is much thicker, pound it gently to match the others.)
  • 2 tablespoons olive oil (Helps the seasoning stick and promotes browning. You only need a light coating.)
  • 1 teaspoon garlic powder (Gives a steady savory base. For fresh garlic, use one small clove minced.)
  • 1 teaspoon onion powder (Adds depth without adding moisture.)
  • 1 teaspoon paprika (For color and mild smoky flavor.)
  • to taste salt and pepper (Use about 3/4 teaspoon kosher salt and 1/4 teaspoon black pepper for four breasts.)

Instructions 

Preparation

  • Preheat the air fryer to 380°F (190°C).
  • In a bowl, mix the olive oil, garlic powder, onion powder, paprika, salt, and pepper.
  • Coat the chicken breasts evenly with the seasoning mixture.
  • Place the chicken breasts in the air fryer basket in a single layer.

Cooking

  • Cook for 12-15 minutes, flipping halfway through, until the chicken is cooked through and reaches an internal temperature of 165°F (75°C).
  • Allow to rest for a few minutes before slicing and serving.

Serving

  • Slice the chicken against the grain and place it on a large platter for family-style serving.

Notes

Cool the chicken to room temperature for no more than two hours before refrigerating. Store in an airtight container for 3-4 days. For freezing, wrap each breast tightly and freeze up to 3 months.
Calories: 230kcal
Course: Dinner, Main Course
Cuisine: American
Keyword: air fryer chicken, Easy Chicken Dinner, family-friendly recipe, juicy chicken recipe, quick weeknight meal

Chicken Shawarma with Garlic Sauce

The smell of warm spices hits you first. Cumin and paprika rise as the chicken sizzles and the kitchen comes alive. You hear the gentle hiss from the skillet and the soft chatter of family in the next room.

This Chicken Shawarma with Garlic Sauce recipe is one of my favorites to make for a busy weeknight or a relaxed Sunday dinner. As a professional food blogger and mom, I love a dish that brings my family together and fills the house with inviting aromas. If you are short on time but want full flavor, you are in the right place. For more fast family meals, I often draw inspiration from my collection of quick weeknight chicken ideas here.

Why this works

Chicken Shawarma with Garlic Sauce

This version of chicken shawarma keeps things simple and reliable. The spice mix is warm and familiar, and the olive oil helps the spices cling to the chicken so every bite is flavored. It is a time-saver because the marinade needs only 30 minutes for great results, and the chicken cooks quickly.

Family-style meals are at the heart of this recipe. Set out pita, veggies, and garlic sauce and let everyone build their own wraps. It makes dinner interactive and stress-free. If you love crispy edges on your chicken, you can also check my favorite air fryer tricks for getting great texture here.

Process Overview

“This is where the magic happens—when the aroma fills the kitchen.”

The method is straightforward. Marinate, cook, rest, slice, warm pita, and assemble. Each step is quick and rewarding, and the garlic sauce pulls everything together. For a playful twist that kids love, try serving smaller sandwich sliders inspired by my Bang Bang Chicken Sliders recipe here.

Ingredients

  • 1 lb chicken thighs, boneless and skinless
    Tip: Thighs stay juicy and handle the high heat well. Trim excess fat and pat dry for better browning.

  • 2 tablespoons olive oil
    Tip: Extra virgin olive oil adds fruitiness. Use a neutral oil if you plan to cook on very high heat.

  • 2 teaspoons ground cumin
    Tip: Toast in a dry pan for 30 seconds if you want a deeper aroma before mixing into the marinade.

  • 2 teaspoons ground paprika
    Tip: Sweet paprika gives color. Use smoked paprika for a smoky note if your kids tolerate it.

  • 1 teaspoon ground turmeric
    Tip: Turmeric adds color and warmth. Use fresh turmeric powder for the brightest hue.

  • 1 teaspoon ground coriander
    Tip: Coriander adds citrusy notes. If possible, grind whole seeds for more fragrance.

  • Salt and pepper, to taste
    Tip: I use 1 teaspoon kosher salt for this amount of chicken, then adjust after tasting.

  • 4 pita breads
    Tip: Warm them briefly on the skillet to make them more pliable and aromatic.

  • 1 cup lettuce, shredded
    Tip: Romaine or green leaf stay crisp and give a nice crunch.

  • 1 tomato, diced
    Tip: Choose a ripe, firm tomato. Drain excess seeds if you want less moisture.

  • 1/2 cucumber, sliced
    Tip: English cucumbers need no peeling. For extra crunch, slice thin and salt lightly.

  • 1/2 red onion, thinly sliced
    Tip: Soak sliced onion in cold water for 10 minutes if you want a milder bite.

  • 1/2 cup garlic sauce
    Tip: A creamy garlic sauce is essential. I often use a homemade toum or a jarred version on busy nights. For my preferred garlic method and extra tips, check my crunchy mozzarella wrap inspiration and sauce ideas here.

Directions

  1. In a bowl, mix olive oil, cumin, paprika, turmeric, coriander, salt, and pepper. Add chicken and coat well. Marinate for at least 30 minutes.
    Encouraging note: Even a short 30-minute soak lets the spices do their work. If you have more time, marinate overnight for deeper flavor.

  2. Preheat grill or skillet over medium-high heat. Cook chicken until browned and cooked through, about 5-7 minutes per side.
    Encouraging note: Use a hot pan for good color. You want a nice sear without overcooking, so keep an eye on the edges.

  3. Remove chicken and let rest for a few minutes, then slice.
    Encouraging note: Resting keeps the juices inside. Slice against the grain for tender pieces that are easier for kids to eat.

  4. Warm pita breads on the grill or in a skillet.
    Encouraging note: Warm, soft pita wraps better and smells amazing. Wrap stacked pitas in foil to keep them warm while you finish.

  5. Assemble shawarma by adding sliced chicken, lettuce, tomato, cucumber, and red onion to pita.
    Encouraging note: Let everyone choose their toppings. This is a great way to involve kids in assembly and reduce mealtime fuss.

  6. Drizzle garlic sauce on top and serve.
    Encouraging note: Finish with a squeeze of lemon or a sprinkle of parsley for brightness. Serve family-style and enjoy the smiles.

If you prefer to cook in the air fryer, you can adapt step 2 by checking my air fryer tips for cook times and crisping options here.

Serving

Chicken Shawarma with Garlic Sauce

Serve this shawarma family-style on a large board or platter. Place the warm pita in a basket or wrapped in foil, set the sliced chicken in the center, and bowl the garlic sauce, lettuce, tomatoes, cucumbers, and onions around it. This makes it easy for everyone to build their own wrap.

Add simple sides like a light salad, roasted potatoes, or pickled vegetables. For kids, cut the pita into smaller pieces and offer cucumber sticks on the side. A communal setup keeps dinner relaxed and friendly.

Storage

Leftovers store well and make great lunches. Place cooled chicken in an airtight container and refrigerate for up to 3 days. Keep the garlic sauce separate to prevent the pita from getting soggy.

To reheat, warm slices gently in a skillet over medium heat for 2 to 3 minutes, or pop them in the oven at 350° F for 5 to 7 minutes. If using an air fryer, 3 to 4 minutes at 350° F will refresh the edges without drying the meat. Reheat pita wrapped in foil or briefly on a hot skillet.

If you plan to meal prep, assemble bowls instead of wraps. Layer rice or greens, add warmed sliced chicken, and top with veggies and garlic sauce when ready to eat. For more make-ahead chicken ideas, I recommend my air fryer favorites here.

Kitchen Notes

  • Use boneless skinless thighs for juiciness and forgiving cooking times.
  • If you prefer white meat, chicken breasts work fine but reduce cook time slightly.
  • Make the garlic sauce in advance. It keeps the meal assembly quick.
  • Swap pita for flatbreads, wraps, or a simple rice bowl if you have picky eaters.
  • Double the recipe for easy leftovers that reheat well for lunches.

Variations

  • For picky eaters: Offer plain grilled chicken pieces alongside the spiced version. Serve toppings on the side so each person customizes their pita.
  • For low-carb: Serve over greens or cauliflower rice instead of pita. The flavors are unchanged and satisfying.
  • For a smoky twist: Use smoked paprika and finish the chicken with a quick broil to add char.
  • For spicy lovers: Add 1/4 teaspoon cayenne or a drizzle of hot sauce to the marinade.
  • For vegetarian guests: Swap chicken with grilled halloumi or roasted chickpeas seasoned with the same spice mix.

FAQ

Q: Can I use chicken breasts instead of thighs?
A: Yes. Chicken breasts will cook faster and can dry out if overcooked. Reduce cook time and check internal temperature for doneness.

Q: How long can I keep the garlic sauce in the fridge?
A: Homemade garlic sauce lasts about 1 week refrigerated. Store-bought brands often have longer shelf life; follow the label.

Q: Is this recipe spicy?
A: Not by default. The spices are aromatic rather than hot. You can add cayenne or chili flakes to the marinade for heat.

Q: Can I marinate the chicken overnight?
A: Absolutely. Overnight marinating deepens the flavor and is great for meal prep. Keep it covered in the fridge.

Q: Can I make this ahead for a party?
A: Yes. Cook the chicken ahead, slice, and warm just before serving. Set up a build-your-own station so guests can assemble wraps.

Conclusion

Thank you for cooking with me today. I hope this Chicken Shawarma with Garlic Sauce becomes a fast favorite in your weekly rotation. If you want a tried-and-true garlic sauce technique, I love the detailed toum method at Homemade Lebanese Toum recipe at Feel Good Foodie. For another reliable shawarma reference and extra inspiration, see the classic Chicken Shawarma guide at Chicken Shawarma recipe at RecipeTin Eats.

From my kitchen to yours, happy cooking and warm dinners around your table. — Lily

Chicken Shawarma with Garlic Sauce

Prep Time 30 minutes
Cook Time 15 minutes
Total Time 45 minutes
Servings 4 servings
Calories 450
A simple and flavorful chicken shawarma recipe served with garlic sauce, perfect for family-style meals.

Ingredients

Marinade Ingredients

  • 1 lb chicken thighs, boneless and skinless (Trim excess fat and pat dry for better browning.)
  • 2 tablespoons olive oil (Use extra virgin olive oil for added flavor.)
  • 2 teaspoons ground cumin (Toast in a dry pan for a deeper aroma.)
  • 2 teaspoons ground paprika (Sweet or smoked paprika can be used.)
  • 1 teaspoon ground turmeric (Use fresh turmeric powder for a brighter hue.)
  • 1 teaspoon ground coriander (Grind whole seeds for more fragrance.)
  • 1 teaspoon salt (Adjust after tasting.)
  • to taste none pepper (Use as per preference.)

Wrap Ingredients

  • 4 pieces pita breads (Warm them briefly for better folding.)
  • 1 cup lettuce, shredded (Romaine or green leaf recommended.)
  • 1 piece tomato, diced (Choose a ripe, firm one.)
  • 1/2 piece cucumber, sliced (English cucumbers need no peeling.)
  • 1/2 piece red onion, thinly sliced (Soak in cold water for a milder bite.)
  • 1/2 cup garlic sauce (Use homemade or jarred for convenience.)

Instructions 

Marinating Chicken

  • In a bowl, mix olive oil, cumin, paprika, turmeric, coriander, salt, and pepper. Add chicken and coat well. Marinate for at least 30 minutes.

Cooking Chicken

  • Preheat grill or skillet over medium-high heat. Cook chicken until browned and cooked through, about 5-7 minutes per side.
  • Remove chicken and let rest for a few minutes, then slice.

Preparing Pita

  • Warm pita breads on the grill or in a skillet.

Assembling Shawarma

  • Assemble shawarma by adding sliced chicken, lettuce, tomato, cucumber, and red onion to pita.
  • Drizzle garlic sauce on top and serve.

Notes

Leftovers store well for up to 3 days. Reheat gently for the best results. Involve kids in wrapping to reduce mealtime fuss. Can also adapt for air fryer cooking.
Calories: 450kcal
Course: Dinner, Main Course
Cuisine: Mediterranean, Middle Eastern
Keyword: chicken shawarma, Family Meal, garlic sauce, quick recipe, Weeknight Dinner

If you're anything like me, there's nothing quite as satisfying as a dish that tantalizes your taste buds and fills your kitchen with the irresistible aroma of garlic. I’ve rounded up my top nine garlic chicken recipes that are not only bursting with flavor but also incredibly easy to prepare. Whether you're in the mood for something cheesy, creamy, or packed with herbs, I've got you covered! Each recipe promises to transform your everyday meals into something special, so get ready to impress your family and friends with delicious, flavor-packed dishes that you'll want to make again and again.

1. Cheesy Garlic Chicken Wraps

Cheesy Garlic Chicken Wraps

There's nothing quite like the comforting aroma of garlic and butter wafting through the kitchen, especially on a rainy evening filled with laughter and love. Dive into the world of Cheesy Garlic Chicken Wraps—a recipe that brings a cozy vibe straight to your dining table. With gooey, melted cheese and savory chicken enveloped in warm tortillas, these wraps are not just a meal; they’re a hug for your taste buds. Join me as we explore how this recipe can transform your family dinners into delightful memories, packed with flavor and nostalgia.

View Recipe →

2. Chicken Shawarma with Garlic Sauce

Chicken Shawarma with Garlic Sauce

If you’re craving a dish that brims with flavor and brings the family together, look no further than Chicken Shawarma with Garlic Sauce! This recipe transforms busy weeknights into culinary adventures, filling your kitchen with the irresistible aroma of spices while making dinner a breeze. With tender, grilled chicken and a creamy garlic sauce that packs a punch, you’ll discover how easy it is to enjoy a taste of Middle Eastern cuisine right at home—perfect for quick meals or leisurely Sunday feasts. Dive into the full recipe and elevate your next dinner experience!

View Recipe →

3. Cheesy Garlic Chicken Wraps

Cheesy Garlic Chicken Wraps

If you're searching for a dish that combines comfort with quick preparation, look no further than Cheesy Garlic Chicken Wraps! This delightful recipe brings the warmth of your kitchen to the dinner table, making it an easy favorite for families of all sizes. With the irresistible aroma of garlic and melting cheese mingling in the air, you'll quickly discover why this meal will have everyone eagerly requesting it again. Dive into this article for a tasty solution that promises not just flavor, but also the joy of family togetherness over a simple yet special dinner.

View Recipe →

4. Sheet Pan Garlic Butter Chicken and Veggies

Sheet Pan Garlic Butter Chicken and Veggies

Imagine opening your oven to the rich aroma of garlic and butter wafting through your kitchen, instantly warming your heart and home. This Sheet Pan Garlic Butter Chicken and Veggies is not just a meal; it's a weeknight lifesaver that marries convenience with comfort, offering a delightful blend of tender chicken and vibrant roasted vegetables—all in one easy-to-clean pan! Dive into this recipe to discover how to create a comforting family dinner that will have everyone asking for seconds. Plus, don't miss out on other quick and tasty options like Bang Bang Chicken Sliders for your next culinary adventure!

View Recipe →

5. Garlic Herb Chicken

Garlic Herb Chicken

Imagine a bustling weeknight transformed into a cozy family gathering with just one simple recipe: Garlic Herb Chicken. This succulent dish fills your kitchen with the mouthwatering aromas of garlic and butter while delivering flavors that will make everyone at the table smile. With its easy preparation and comforting taste, this meal not only makes dinner a breeze but also creates lasting memories. Ready to turn your next dinner into a cherished family moment? Dive into our guide to discover how to whip up this crowd-pleaser that will have your loved ones asking for seconds!

View Recipe →

6. Garlic Butter Chicken Crockpot Recipe: 6-Hour Magic for Tender Bliss

Garlic Butter Chicken Crockpot Recipe: 6-Hour Magic for Tender Bliss

Are you ready to transform your weeknight dinners into a culinary delight with minimal effort? This Garlic Butter Chicken Crockpot Recipe promises just that—tender, flavorful chicken swimming in a luscious garlic-butter sauce, all achieved with the magic of slow cooking. Perfect for busy families, this dish will have your kitchen smelling divine and your loved ones gathering around the table for a heartwarming meal. Dive into this easy, comforting recipe that brings together taste and convenience, and discover why it's bound to become a staple in your household!

View Recipe →

7. Creamy Garlic Parmesan Chicken Breast

Creamy Garlic Parmesan Chicken Breast

Imagine stepping into your kitchen and being enveloped by the enticing aroma of garlic and butter, all while creating a dinner that feels like a warm hug. This Creamy Garlic Parmesan Chicken Breast recipe is your ticket to a quick yet indulgent meal, where tender chicken and a luscious sauce come together effortlessly in one pan. With its blend of comforting flavors and speedy preparation, this dish promises to become a favorite that will draw friends and family to the table, eager to savor every bite. Ready to elevate your weeknight dinners? Dive into this recipe for a delightful, home-cooked experience!

View Recipe →

8. Creamy Garlic Mushroom Chicken Thighs

Creamy Garlic Mushroom Chicken Thighs

Imagine stepping into your kitchen and being enveloped by the irresistible aroma of garlic and butter, hinting at a delightful family dinner waiting to happen. With this Creamy Garlic Mushroom Chicken Thighs recipe, you'll create a comforting meal that's not just easy to whip up but also feels indulgent enough for a special occasion. In just a few simple steps, you can have a dish that wraps your loved ones in warmth and flavor, making it a perfect addition to your weekly dinner rotation. Ready to impress? Let’s dive in!

View Recipe →

9. Crockpot Garlic Parmesan Chicken Thighs

Crockpot Garlic Parmesan Chicken Thighs

Imagine stepping into your kitchen to the warm, inviting aroma of garlic and butter, signaling that dinner is about to become a comforting reality. This Crockpot Garlic Parmesan Chicken Thighs recipe not only makes your home smell incredible but also brings your family closer together as they reach for seconds at the dining table. Perfect for busy evenings, this dish does most of the work while you enjoy quality time with your loved ones, making mealtime a breeze. Get ready to impress everyone with minimal effort—let’s dive into this easy, delicious recipe that promises a satisfying dining experience for all!

View Recipe →

The Only Cajun Chicken Pasta My Kids Actually Eat

The kitchen is alive with the sounds of sizzling chicken and the warm, inviting aroma of garlic and spices. As the Cajun seasoning dances through the air, you can almost taste the bold flavors that await. Creamy Cajun chicken pasta is the perfect dish for family dinners, bringing everyone to the table with its rich and vibrant taste. This dish not only pleases the palate but also saves time for busy evenings, allowing you to whip up a restaurant-quality meal at home.

Why This Works

Creamy Cajun Chicken Pasta: A Bold, Flavor-Packed Dinner

Creamy Cajun chicken pasta is a fantastic choice for families looking for a quick, delicious meal that doesn’t skimp on flavor. With a few simple ingredients and straightforward steps, you can have a dinner that feels special without spending hours in the kitchen.

This recipe utilizes chicken breasts that are quick to cook and soak up all the delicious flavors. The creaminess of the sauce envelops the pasta, providing a comforting embrace that the whole family will appreciate. Plus, the vibrant Cajun spices add an exciting kick that keeps everyone coming back for more.

Process Overview

“This is where the magic happens—when the aroma fills the kitchen.”

The joy of cooking is in the process, and that’s especially true with this dish. You’ll start by perfectly seasoning and cooking the chicken. While it rests, the pasta will boil, and then we’ll create a creamy Cajun sauce that brings everything together beautifully. In no time, you’ll serve a meal that not only tastes great but also warms your heart.

Ingredients

Here’s what you need to create this delightful dish:

  • 2 boneless, skinless chicken breasts
  • Chicken breasts are quick to cook and absorb the Cajun seasoning well. You could also use thighs for more flavor.
  • 1 tablespoon olive oil
  • For cooking the chicken. Olive oil adds a mild flavor and helps sear the chicken evenly.
  • 1 tablespoon Cajun seasoning
  • This is the key to the dish’s bold flavor. You can either use store-bought Cajun seasoning or make your own blend.
  • Salt and pepper, to taste
  • Essential for seasoning the chicken and ensuring it has enough flavor.
  • 12 oz penne, fettuccine, or spaghetti
  • Any long or short pasta will work, but penne and fettuccine are great choices for creamy sauces.
  • Salt, for the pasta water
  • Seasoning the pasta water enhances the flavor of the pasta.
  • 2 tablespoons unsalted butter
  • The butter forms the base of the creamy sauce, adding richness and flavor.
  • 4 cloves garlic, minced
  • Fresh garlic brings aromatic depth to the sauce.
  • 1 tablespoon Cajun seasoning
  • Adding Cajun seasoning to the sauce intensifies the dish’s flavor profile.
  • 1 teaspoon smoked paprika
  • For a smoky flavor that complements the Cajun seasoning and adds depth to the sauce.
  • 1 cup heavy cream
  • The heavy cream makes the sauce velvety and rich, balancing the heat from the Cajun spices.
  • ½ cup chicken broth
  • Chicken broth adds a savory base to the sauce and helps thin it out slightly for a smoother texture.
  • ¼ cup grated Parmesan cheese
  • Parmesan adds a salty, umami depth to the sauce, making it extra flavorful.
  • Fresh parsley, chopped (optional)
  • For garnish and added freshness.
  • Red pepper flakes
  • For an extra kick of heat, sprinkle some red pepper flakes on top.
  • Fresh lemon juice
  • A squeeze of lemon just before serving will brighten the dish and balance the richness.
  • Sautéed vegetables (optional)
  • Add sautéed bell peppers, onions, spinach, or mushrooms for extra flavor and nutrition.
  • Shrimp (optional)
  • Substitute the chicken with shrimp for a seafood twist on this Cajun pasta.

Lily’s Tips:

  • For a milder flavor, reduce the Cajun seasoning or skip the red pepper flakes.
  • Don’t rush cooking the chicken. A good sear locks in the juices and flavor.
  • Feel free to adjust the amount of heavy cream for a lighter sauce.

Directions

First Step: Prepare the Chicken

Start by seasoning both sides of the chicken breasts with the Cajun seasoning, salt, and pepper. Heat the olive oil in a skillet over medium-high heat, and cook the chicken for about 5-7 minutes on each side, or until golden brown and fully cooked. The chicken should reach an internal temperature of 165°F. Once done, remove it from the skillet and let it rest. This will keep it juicy and flavorful.

Second Step: Cook the Pasta

In a large pot, bring water to a boil. Add a generous amount of salt, followed by your pasta of choice. Cook according to package instructions until al dente. Once cooked, reserve a cup of the pasta water, then drain the pasta and set it aside. The salty pasta will enhance the dish and act as a great base layer.

Third Step: Make the Cajun Cream Sauce

In the same skillet used for the chicken, melt the butter over medium heat. Add minced garlic and sauté until fragrant, about 30 seconds. Add another tablespoon of Cajun seasoning and smoked paprika, stirring to combine. Slowly pour in the heavy cream and chicken broth, stirring continuously until smooth. Let it simmer for about 2-3 minutes to thicken, then stir in the Parmesan cheese, allowing it to melt into the sauce.

Fourth Step: Combine the Pasta, Chicken, and Sauce

Slice the rested chicken and return it to the skillet with the sauce. Add the cooked pasta and toss everything together gently. If the sauce is too thick, you can add some reserved pasta water until you reach your desired consistency. Taste and adjust with more Cajun seasoning, salt, or pepper as needed. Don’t forget to sprinkle with fresh parsley before serving!

Serving

Creamy Cajun Chicken Pasta: A Bold, Flavor-Packed Dinner

For a warm family-style presentation, serve the creamy Cajun chicken pasta in a large bowl at the center of the table. This encourages everyone to dig in and enjoy together. Pair it with a fresh salad or garlic bread for a complete meal. Lastly, a squeeze of fresh lemon juice over the top just before serving brightens up all those bold flavors.

Storage

Leftovers can be stored in an airtight container in the fridge for up to three days. To reheat, gently warm the pasta on the stove over low heat, adding a splash of chicken broth or cream to prevent it from drying out. You can also microwave it in short intervals, stirring in between until heated through.

Kitchen Notes

  • Pre-cut your vegetables ahead of time to save on cooking time.
  • Use frozen shrimp for a quick protein option—just thaw and toss in during the last minutes of cooking.
  • Opt for a pasta pot with a built-in strainer for easy draining.
  • Make the sauce while the pasta cooks to speed up the process.
  • If you like spice, keep Cajun seasoning handy for sprinkling on top when serving.

Variations

  • Vegetarian: Swap chicken for sautéed mushrooms or add vegetables like zucchini and spinach for a hearty veggie option.
  • Gluten-Free: Substitute regular pasta with gluten-free alternatives.
  • Seafood Twist: Try shrimp or even crawfish for a delicious seafood version of the dish.
  • Cream-Free Version: For a lighter dish, replace the heavy cream with Greek yogurt or pureed cashews for a creamy consistency without the calories.
  • Picky Eaters: If someone in your family is hesitant about the spices, serve the pasta with a light, plain sauce on the side for them to mix in.

FAQ

1. Can I prepare this dish in advance?

Yes, you can prep the chicken and make the sauce ahead of time. Just store everything separately in the fridge and combine when ready to eat.

2. Is it possible to freeze the leftovers?

Yes, you can freeze the pasta in an airtight container, but the cream sauce may separate a bit upon thawing.

3. What other proteins can I use in this recipe?

Feel free to substitute the chicken with shrimp, sausage, or tofu for a vegetarian option.

4. Is there a vegetarian alternative to the heavy cream?

Yes, consider using coconut cream or a cashew cream for a dairy-free option.

5. How can I reduce the spiciness?

Use less Cajun seasoning or substitute it with a milder blend. You can also omit the red pepper flakes.

As you gather around the table to enjoy this creamy Cajun chicken pasta, remember that cooking is not just about the ingredients. It’s about the time spent together and the memories you create. Embrace the flavors, the laughter, and the joy of family meals. You’ve crafted something special, and that is worth celebrating. Happy cooking!

Creamy Cajun Chicken Pasta

Prep Time 15 minutes
Cook Time 20 minutes
Total Time 35 minutes
Servings 4 servings
Calories 500
A quick and delicious creamy Cajun chicken pasta that packs bold flavors for a comforting family meal.

Ingredients

For the Chicken

  • 2 pieces boneless, skinless chicken breasts (Chicken breasts are quick to cook and absorb the Cajun seasoning well.)
  • 1 tablespoon olive oil (For cooking the chicken.)
  • 1 tablespoon Cajun seasoning (This is the key to the dish’s bold flavor.)
  • to taste salt and pepper (Essential for seasoning the chicken.)

For the Pasta

  • 12 oz penne, fettuccine, or spaghetti (Any long or short pasta will work.)
  • to taste salt (For the pasta water.)

For the Cream Sauce

  • 2 tablespoons unsalted butter (The butter forms the base of the creamy sauce.)
  • 4 cloves garlic, minced (Fresh garlic brings aromatic depth.)
  • 1 tablespoon Cajun seasoning (Adding Cajun seasoning to the sauce intensifies flavor.)
  • 1 teaspoon smoked paprika (For a smoky flavor.)
  • 1 cup heavy cream (Makes the sauce velvety and rich.)
  • ½ cup chicken broth (Adds a savory base to the sauce.)
  • ¼ cup grated Parmesan cheese (Adds salty, umami depth.)
  • to taste red pepper flakes (For an extra kick of heat.)
  • juice of 1 lemon fresh lemon juice (Brightens the dish.)
  • Fresh parsley, chopped (optional) (For garnish.)

Instructions 

Preparation

  • Season both sides of the chicken breasts with Cajun seasoning, salt, and pepper.
  • Heat olive oil in a skillet over medium-high heat and cook the chicken for about 5-7 minutes on each side, or until golden brown and fully cooked.
  • Remove the chicken from the skillet and let it rest.

Cooking the Pasta

  • In a large pot, bring water to a boil and add a generous amount of salt.
  • Add the pasta and cook according to package instructions until al dente.
  • Reserve a cup of the pasta water, then drain the pasta and set aside.

Making the Cajun Cream Sauce

  • In the same skillet, melt butter over medium heat.
  • Add minced garlic and sauté until fragrant, about 30 seconds.
  • Add Cajun seasoning and smoked paprika, stirring to combine.
  • Slowly pour in heavy cream and chicken broth, stirring until smooth.
  • Let it simmer for 2-3 minutes to thicken, then stir in Parmesan cheese.

Combining Everything

  • Slice the rested chicken and return it to the skillet with the sauce.
  • Add the cooked pasta and toss everything together gently.
  • If the sauce is too thick, add reserved pasta water to reach desired consistency.
  • Taste and adjust with more Cajun seasoning, salt, or pepper as needed.
  • Sprinkle with fresh parsley before serving.

Notes

Leftovers can be stored in an airtight container in the fridge for up to three days. Reheat gently over low heat to prevent drying out.
Calories: 500kcal
Course: Dinner, Main Course
Cuisine: Cajun, Southern
Keyword: Comfort Food, Creamy Cajun chicken pasta, easy pasta, Family Dinner, Quick Meal

Texas Sheet Cake

I remember the sound of my daughter running in from the back porch, sneakers squeaking, right as the kitchen filled with the warm smell of chocolate and butter. The tray of cake was just sliding into the oven and the whole house seemed to pause for a second, like everyone was holding their breath for dessert. That small hush before the first forkful is one of my favorite kitchen moments.

Why This Texas Sheet Cake Feels Like Home

This cake puts chocolate and ease together in a way that feels familiar and right. It bakes in one large pan, so there is less washing and more time to sit with family. The top becomes glossy with that classic fudgy frosting while the crumb stays moist and tender.

I love how it feeds a crowd without fuss. It’s the kind of recipe I make when friends drop by or when we need a quick dessert after a week of busy nights.
Texas Sheet Cake

There are memories folded into every bite. My grandmother used to make a version of this that smelled like Sunday afternoons. I keep one eye on the oven and another on the clock, because it always feels faster than the calendar says.

How to Make Texas Sheet Cake, The Heartwarming Way

Here’s the short, friendly version of how this happens: mix dry and wet, add hot water to melt the cocoa and make the batter silk, bake until a toothpick comes out clean, then pour glossy, buttery frosting over the warm cake so it sets into a crackly top.

“This is where the magic happens—when the aroma fills the kitchen and my kids come running in, asking ‘Is it ready yet?’”

You will notice the batter looks loose after you add boiling water. That is correct. The batter thins and becomes glossy, which helps the cake stay moist and bake evenly. When it’s in the oven watch for a dark, even color across the top and a little spring when you touch it gently. Those are the signs you’re on track.

Ingredients You’ll Need

2 cups all-purpose flour
2 cups sugar
1/2 teaspoon salt
1 teaspoon baking soda
1 cup unsweetened cocoa powder
1 cup buttermilk
1 cup vegetable oil
4 large eggs
2 teaspoons vanilla extract
1 cup boiling water
1/2 cup unsalted butter
1/4 cup milk
3 1/2 cups powdered sugar
1 teaspoon vanilla extract
1/2 cup chopped nuts (optional)

Friendly note: Don’t stress if you do not have buttermilk. A quick swap is 1 cup milk with 1 tablespoon white vinegar or lemon juice, stirred and left to sit for 5 minutes. Use what’s in your fridge; this cake is forgiving and made for real life.

Step-by-Step Directions

  1. Preheat your oven to 350°F (175°C). Grease and flour a large sheet pan.
    Make sure the pan is truly large—this cake spreads thin. I use a rimmed cookie sheet and it works great.

  2. In a large bowl, combine flour, sugar, salt, baking soda, and cocoa powder.
    Whisk well so the cocoa dissolves into the dry mix and there are no lumps.

  3. In another bowl, mix together buttermilk, vegetable oil, eggs, and vanilla.
    Whisk until smooth and the eggs are fully incorporated.

  4. Gradually add wet ingredients to dry ingredients, mixing until just combined.
    Don’t overmix here; a few small streaks are okay. Overworking will make a tougher cake.

  5. Finally, stir in boiling water until the batter is smooth.
    The batter will be thin. That’s how we get a tender, moist crumb—this is intentional.

  6. Pour the batter into the prepared pan and bake for 30-35 minutes or until a toothpick inserted in the center comes out clean.
    Rotate the pan halfway through if your oven has hot spots. The cake browns quickly at the edges.

  7. While the cake is baking, prepare the frosting by melting butter in a saucepan. Stir in cocoa powder and milk, bring to a boil.
    Boiling helps the sugars dissolve and gives the frosting that glossy texture. Watch it closely so it does not scorch.

  8. Remove from heat and add powdered sugar and vanilla, whisking until smooth.
    If the frosting seems thick, add a splash more milk. If too thin, whisk in a tablespoon more powdered sugar.

  9. Once the cake has cooled slightly, pour the frosting over the cake and sprinkle with chopped nuts if desired.
    Pour when the cake is still warm so the frosting sets up with those classic cracks and glossy peaks.

  10. Allow the cake to cool before serving.
    Cooling lets the frosting firm a bit so you get clean slices. If you can, wait 20-30 minutes—it’s worth it.

Quick tip: Let the kids help with step 8. They love watching the frosting thicken and you get a moment to breathe.

Texas Sheet Cake

Serving Texas Sheet Cake with Love

I serve this cake family-style on the counter so everyone can help themselves. A wide spatula and small plates work better than forks for neat pieces. It’s such a crowd-pleaser that there is rarely a piece left unclaimed.

Pair it with simple sides like vanilla ice cream, a spoon of whipped cream, or a few fresh berries to cut the richness. My son loves his with cold milk; my partner prefers a scoop of vanilla over a warm piece. The cake is flexible and welcomes these small rituals.

If you want to be a little fancy, sprinkle flaky sea salt over the frosting right after you pour it. The salt highlights the chocolate and makes each bite sing.

Texas Sheet Cake

Storage & Reheat Tips (Keeping the Goodness)

Store leftover cake in an airtight container at room temperature for up to 3 days. If your kitchen is warm, place it in the fridge to stop the frosting from getting sticky. It will still be moist the next day.

For longer keeping, wrap slices tightly and freeze for up to 2 months. Thaw in the fridge overnight, and bring to room temperature before serving.

Reheat a single slice in the microwave for 10-15 seconds for a quick, cozy treat. For a near-just-baked feel, warm a slice in a 300°F oven for 5-7 minutes. The oven revives that freshly-baked texture and lifts the aroma back into the room.

My Kitchen Notes & Shortcuts

  • Use boxed cake mix in a pinch: mix with a cup of strong brewed coffee instead of water and follow the rest of the steps for a faster weeknight version.
  • Prep ahead: make the frosting a day early and store in the fridge; warm gently before pouring over warm cake.
  • Nuts are optional: chopped pecans are classic, but skip them if someone in your family has allergies.
  • Pan swap: if you prefer a thicker cake, use a 9×13 pan and extend the bake time by 8-10 minutes. Check with a toothpick.
  • Kid-friendly step: give the kids the powdered sugar for step 8. It is safe and they love the cloud of sugar.

These small tricks keep the process manageable while keeping the soul of the recipe intact.

Family-Friendly Variations

Want to make it your own? Here are a few gentle twists that our family tries now and then.

  • Nut-free: omit nuts and add a handful of mini chocolate chips to the batter for extra pockets of chocolate.
  • Lighter: swap half the oil for applesauce. The texture shifts slightly but it still feels indulgent.
  • Boozy twist for grown-ups: stir a tablespoon of coffee liqueur into the frosting for depth. Keep kids out of the mixing for that one.
  • Peanut butter topping: drizzle warmed peanut butter over the frosted cake for a southern twist my kids adore.
  • Glazed berries: top slices with a quick compote of berries and a teaspoon of sugar for a bright contrast to the chocolate.

Invite your family to suggest their favorite change. This cake was meant to be shared and rewritten over time.

FAQs About Texas Sheet Cake

Q: Can I make this ahead for a busy week?
A: Absolutely. Bake a day ahead and store it covered at room temperature or in the fridge. Let it sit an hour before serving so flavors settle.

Q: My frosting looks grainy. What went wrong?
A: Often that is from adding cold powdered sugar to a hot mix too fast. Whisk slowly and heat gently, or add a teaspoon of milk at a time to smooth it out.

Q: The cake was dry. How can I fix that next time?
A: Make sure you add the boiling water and do not overbake. Ovens vary, so start checking at 25 minutes. A few moist crumbs on the toothpick mean you are done.

Q: Can I use Dutch-process cocoa instead of natural cocoa?
A: Yes, but adjust expectations: Dutch-process is less acidic and can shift the flavor slightly. If you swap, use high-quality cocoa and do not worry—your cake will still be delicious.

Q: How do I get those glossy cracks on top of the frosting?
A: Pour the frosting over warm cake. The contrast of warm cake and cooling frosting makes the top set with that lovely crackle.

One Final Thought from My Kitchen

This cake is more than a dessert. It is an invitation to slow down for a few minutes, pass plates around, and make a small memory. I have pulled it out for birthdays, late homework nights, and surprise guests. Each time, it returns the same kind of quiet joy to the table.

Give it a try even on a Tuesday. Let the hot chocolate smell fill your house and listen for the footsteps that mean family is coming. You might be surprised how a simple tray of cake can knit everyone together for a little while.

Conclusion

If you want a deeper walk through a classic Texas Sheet Cake method, I like the clear, step-by-step notes in this Texas Sheet Cake guide from Tastes Better From Scratch for comparison and inspiration. For a rich, very chocolate-forward take that families have loved, see the helpful breakdown in The Pioneer Woman’s Best Chocolate Sheet Cake.

Until next time, happy baking. If this cake finds its way into your family stories, know that a little kitchen magic just made someone smile.

Texas Sheet Cake

Prep Time 20 minutes
Cook Time 35 minutes
Total Time 55 minutes
Servings 20 servings
Calories 350
A crowd-pleasing dessert that combines chocolate and ease, baked in one large pan with a fudgy frosting on top, perfect for family gatherings.

Ingredients

Cake Ingredients

  • 2 cups all-purpose flour
  • 2 cups sugar
  • 1/2 teaspoon salt
  • 1 teaspoon baking soda
  • 1 cup unsweetened cocoa powder
  • 1 cup buttermilk
  • 1 cup vegetable oil
  • 4 large eggs
  • 2 teaspoons vanilla extract
  • 1 cup boiling water

Frosting Ingredients

  • 1/2 cup unsalted butter
  • 1/4 cup milk
  • 3 1/2 cups powdered sugar
  • 1 teaspoon vanilla extract
  • 1/2 cup chopped nuts (optional)

Instructions 

Preparation

  • Preheat your oven to 350°F (175°C). Grease and flour a large sheet pan.
  • In a large bowl, combine flour, sugar, salt, baking soda, and cocoa powder. Whisk well so the cocoa dissolves into the dry mix.
  • In another bowl, mix together buttermilk, vegetable oil, eggs, and vanilla. Whisk until smooth.
  • Gradually add wet ingredients to dry ingredients, mixing until just combined. Do not overmix.
  • Stir in boiling water until the batter is smooth. The batter will be thin.

Baking

  • Pour the batter into the prepared pan and bake for 30-35 minutes or until a toothpick inserted in the center comes out clean.

Frosting

  • While the cake is baking, prepare the frosting by melting butter in a saucepan. Stir in cocoa powder and milk, bring to a boil.
  • Remove from heat and add powdered sugar and vanilla, whisking until smooth.
  • Once the cake has cooled slightly, pour the frosting over the cake and sprinkle with chopped nuts if desired.

Cooling and Serving

  • Allow the cake to cool before serving, letting the frosting firm a bit.
  • Serve family-style and pair with vanilla ice cream, whipped cream, or fresh berries.

Notes

You can use boxed cake mix for a quicker version. If you don’t have buttermilk, use a mixture of milk and vinegar. Nuts are optional and can be substituted with mini chocolate chips.
Calories: 350kcal
Course: Dessert
Cuisine: American
Keyword: Chocolate Cake, Crowd-Pleaser, Easy Dessert, Family Recipe, Texas Sheet Cake

rotisserie chicken recipes have saved my weeknight dinners more times than I can count. You know those days when you walk in the door tired, everyone is hungry, and the thought of cooking from scratch feels like a bad joke? Yep, that. A warm store bought chicken is basically a shortcut to a real meal that still feels homemade. I keep one in the fridge like it is my little safety net. If you are busy, feeding a family, or just trying to eat something better than cereal, you are in the right place.
Deliciously Easy Rotisserie Chicken Recipes for Busy Weeknights

Why You’ll Love Rotisserie Chicken

First of all, it is already cooked. That is the big win. You get tender meat, a little bit of seasoning, and enough flavor to carry a dish without doing much work.

I also love that it is flexible. One chicken can turn into tacos, soup, pasta, and lunch the next day without anyone feeling like they are eating the same thing over and over.

Here are a few reasons it works so well on busy nights:

  • Fast dinners in 15 to 30 minutes because the protein is done
  • Budget friendly since it stretches across multiple meals
  • Beginner proof because you are mostly assembling, not “chef level” cooking
  • Kid friendly and easy to adjust for picky eaters

One small personal tip: when I get home, I pull the meat off while it is still a little warm. It is way easier, and then future you will feel very smug when dinner takes five minutes of effort.

Deliciously Easy Rotisserie Chicken Recipes for Busy Weeknights

Top Rotisserie Chicken Recipes for Easy Dinners

This is the part where rotisserie chicken recipes really shine. These are my go to dinners when I need something reliable that tastes like I tried harder than I did.

1) Creamy Chicken Pesto Pasta

This one is comfort food that still feels fresh. The pesto does most of the heavy lifting, and the chicken makes it filling.

What you’ll need:

  • 2 to 3 cups shredded rotisserie chicken
  • 8 oz pasta (penne or spaghetti both work)
  • 3 to 4 tablespoons pesto
  • 1 splash of cream or half and half (or a spoon of cream cheese)
  • Handful of spinach (optional but nice)
  • Salt, pepper, and parmesan

How I make it: Cook the pasta. Before you drain it, save a half cup of the pasta water. Toss pasta with pesto and a splash of cream. Add chicken and spinach, then loosen it with a bit of pasta water until it looks silky. Finish with parmesan and black pepper.

2) Weeknight Chicken Tacos

These are the “everyone can build their own” dinner, which means fewer complaints at the table. I warm shredded chicken in a pan with a little salsa or taco seasoning and a splash of water. Then I set out tortillas and toppings.

Quick topping ideas: shredded lettuce, diced tomatoes, avocado, cheese, sour cream, lime wedges, hot sauce. If you have time, heat tortillas in a dry pan for that toasty flavor.

3) Cozy Chicken and Rice Soup

If you are tired or the weather is gloomy, this is the answer. I saute a little onion and carrot in a pot, add chicken broth, toss in shredded chicken, and add cooked rice. If I have lemon, I squeeze some in at the end. It wakes everything up. This soup tastes even better the next day, which feels like a small life victory.

When I’m deciding which dinner to make, I think about what I have in the fridge and what mood we are in. Pasta night feels like a treat. Taco night feels fun. Soup night feels calming. Either way, the chicken gets you there fast.

“I tried your taco idea with rotisserie chicken and it seriously saved my Tuesday. My kids ate it without negotiating, which never happens.”

Healthy and Creative Uses for Rotisserie Chicken

If your brain goes straight to heavy meals, I get it. But rotisserie chicken recipes can be lighter too. The trick is pairing the chicken with crunchy veggies, bright sauces, and simple grains.

One of my favorites is a big chopped salad that does not feel sad. I do romaine, cucumbers, cherry tomatoes, red onion, a little feta, and chicken. Then I drizzle a quick dressing with olive oil, lemon, salt, pepper, and a tiny spoon of mustard. It is the kind of meal that makes you feel like you are taking care of yourself.

Here are more healthy ideas that still taste exciting:

Lettuce wrap bowls: Chicken, shredded carrots, cucumber, and a quick sauce like soy sauce plus a little honey and lime.

Buffalo chicken sweet potatoes: Bake or microwave sweet potatoes, top with chicken tossed in buffalo sauce, add Greek yogurt and green onions.

Protein packed breakfast scramble: Add a handful of chicken to eggs with spinach and a little cheese. It sounds odd until you try it, and then you are hooked.

Creative tip: mix shredded chicken with a spoon of hummus or mashed avocado instead of mayo for a quick sandwich filling. It is creamy, it holds together, and it feels fresher.

Meal Prep Ideas with Rotisserie Chicken

If you want your week to feel easier, do a little meal prep right after you bring the chicken home. Nothing intense. Just small steps that make future meals almost automatic.

Here is my simple routine:

Step 1: Pull off all the meat and separate it into light and dark if you care, or just toss it together if you do not.

Step 2: Portion it into containers. I like doing 2 cup portions because that is about right for one dinner recipe.

Step 3: Save the bones and skin in a bag for broth. If you will not make broth, it is totally fine to toss, but homemade broth is a nice bonus if you have time on the weekend.

Some easy prep combos that make lunches and dinners fast:

Chicken and grain boxes: cooked rice or quinoa, chicken, roasted veggies, and a sauce like salsa verde or tzatziki.

Wrap kit: shredded chicken, tortillas, shredded lettuce, shredded cheese, and a jar of salsa. Then dinner is just assembly.

Soup starter: portion chicken with chopped celery and carrots in a container so soup is a dump and heat situation later.

One more thing: label your containers. I have played the “is this chicken from Monday or Thursday” game, and I do not recommend it.

Tips for Storing and Reheating Rotisserie Chicken

This part matters because nobody wants dry, sad chicken. A little care goes a long way.

How to store it:

Get the meat off the bones within a day if you can. Store it in an airtight container in the fridge. It is usually best within 3 to 4 days. If you will not use it in that time, freeze it. I freeze in small portions so I can grab just what I need.

How to reheat it:

The goal is gentle heat and a bit of moisture. My favorite way is in a skillet with a splash of broth or water and a lid for a couple minutes. For the microwave, cover it with a damp paper towel and heat in short bursts so it does not turn tough.

Bonus: make quick broth:

If you saved the carcass, toss it in a pot with water, a chunk of onion, and a pinch of salt. Simmer for an hour or two. Strain it. Now you have broth that makes your next soup taste like you worked all day.

Common Questions

How much meat is on a rotisserie chicken?
Most average ones give you about 3 to 4 cups of shredded meat. Bigger chickens can give more, but I plan around 3 cups to be safe.

Can I freeze rotisserie chicken?
Yes. Freeze it in airtight bags or containers, ideally in meal sized portions. It is best within 2 to 3 months for good flavor and texture.

What is the easiest dinner to make with it?
Tacos, hands down. Warm the chicken with salsa or seasoning, then set out toppings. Dinner feels fun and it is done fast.

How do I keep reheated chicken from drying out?
Add moisture and do not overheat it. A splash of broth in a pan, or a damp paper towel in the microwave, makes a big difference.

Is rotisserie chicken already seasoned?
Usually yes, but every store does it differently. Taste a piece first, then decide if your recipe needs extra salt or seasoning.

Your New Weeknight Shortcut

When life gets busy, rotisserie chicken recipes are the kind of practical help that still tastes good and feels comforting. You can spin one chicken into pasta, tacos, soup, salads, and easy meal prep without getting stuck in the kitchen all night. Keep a few sauces and veggies around, and you will always have a plan. If you try one idea this week, start with the tacos or the pesto pasta and make it your own. Let me know what you end up making, because I am always looking for the next easy dinner win.
rotisserie chicken recipes

Rotisserie Chicken Recipes

Prep Time 15 minutes
Cook Time 15 minutes
Total Time 30 minutes
Servings 4 servings
Calories 400
Discover versatile and quick recipes using rotisserie chicken that save time and deliver comfort food, perfect for busy weeknights.

Ingredients

For Creamy Chicken Pesto Pasta

  • 2-3 cups shredded rotisserie chicken
  • 8 oz pasta (penne or spaghetti)
  • 3-4 tablespoons pesto
  • 1 splash cream or half and half ((or a spoon of cream cheese))
  • 1 handful spinach ((optional))
  • to taste salt and pepper
  • to taste parmesan

For Weeknight Chicken Tacos

  • 2 cups shredded rotisserie chicken
  • to taste salsa or taco seasoning
  • 1 splash water
  • to taste toppings such as shredded lettuce, diced tomatoes, avocado, cheese, sour cream, lime wedges, hot sauce

For Cozy Chicken and Rice Soup

  • 2 cups shredded rotisserie chicken
  • 4 cups chicken broth
  • 1 onion (diced)
  • 1 carrot (diced)
  • 2 cups cooked rice
  • to taste lemon juice ((if available))

Instructions 

Creamy Chicken Pesto Pasta

  • Cook the pasta according to package instructions.
  • Before draining, reserve half a cup of pasta water.
  • Toss the cooked pasta with pesto and a splash of cream.
  • Add in the shredded chicken and optional spinach, loosening the mixture with reserved pasta water until smooth.
  • Finish with parmesan and black pepper.

Weeknight Chicken Tacos

  • Warm shredded chicken in a pan with salsa or taco seasoning and a splash of water.
  • Set out tortillas and toppings for everyone to build their own tacos.

Cozy Chicken and Rice Soup

  • Sauté diced onion and carrot in a pot.
  • Add chicken broth and shredded chicken; bring to a simmer.
  • Stir in cooked rice.
  • If using, squeeze in lemon juice before serving.

Notes

These recipes are designed to be quick and adaptable. Feel free to customize them based on your preferences and what you have available in your pantry.
Calories: 400kcal
Course: Dinner, Main Course
Cuisine: American
Keyword: Comfort Food, easy recipes, meal prep, quick dinners, rotisserie chicken

Cheesy Garlic Chicken Wraps

I remember one evening when the rain tapped on the kitchen window and my kids were folding napkins at the table, humming to a silly song they learned at school. The smell of garlic and butter filled the room and something warm bubbled in the skillet. That small, cozy chaos is where these Cheesy Garlic Chicken Wraps were born, between laughter and a quick, satisfied sigh when everyone took the first bite.

Why This Cheesy Garlic Chicken Wraps Feels Like Home

There is something about garlic and melty cheese that instantly feels like comfort on a plate. These Cheesy Garlic Chicken Wraps taste like a warm hug after a long day. They combine tender chicken, creamy cheeses, and a touch of parsley to brighten things up.

This recipe is forgiving and flexible, which is why I reach for it on busy weeknights. It uses simple pantry items, cooks fast, and the assembly is almost meditative if you let it be. Meanwhile, the golden crust from a quick sear in the pan gives texture that kids and adults both adore.
Cheesy Garlic Chicken Wraps

I like to think of it as the bridge between a sandwich and a cozy casserole. It feeds the family without fuss and leaves time for homework help or a quick phone call to a friend. It is the sort of meal that keeps conversation flowing at the table.

How to Make Cheesy Garlic Chicken Wraps, The Heartwarming Way

“This is where the magic happens—when the aroma fills the kitchen and my kids come running in, asking ‘Is it ready yet?’”

The process is simple and comforting. You mix tender cooked chicken with cheeses and gentle seasonings until the filling is creamy and cohesive. Then you wrap, brush with garlic butter, and toast until the wrap is crisp and the cheese inside is luxuriously melted.

Watch for visual cues: the filling should be creamy and slightly glossy. When toasting, look for a warm golden brown on the tortilla and tiny spots where cheese bubbles through. The aroma of garlic and melted cheese is your best sign that dinner is moments away.

Step-by-Step Overview: Keeping It Simple

  1. In a mixing bowl, combine chicken, garlic powder, onion powder, salt, pepper, mozzarella, cheddar, cream cheese, mayonnaise, and parsley. Mix until creamy and cohesive.
    A little stirring helps the cream cheese warm and bind everything. This is where the flavors get friendly with each other.

  2. Place tortillas on a flat surface. Spoon 1/4 of the filling into the center of each. Add optional vegetables if desired. Fold sides inward and roll tightly from the bottom to form wraps.
    Keep the filling centered and compact so the wrap rolls neatly. It keeps the filling from escaping while toasting.

  3. In a small bowl, mix melted butter with minced garlic. Brush the outside of each wrap generously with the mixture.
    Don’t be shy with the garlic butter. It browns beautifully and adds a buttery, savory crunch.

  4. Heat a skillet over medium heat. Toast each wrap seam-side down for 2–3 minutes per side until golden and crisp, and the cheese is melted inside.
    A little browning builds flavor, just like my grandmother showed me. Watch the pan so they do not burn.

  5. Slice each wrap in half and serve warm with a dipping sauce of choice such as ranch or garlic aioli.
    Let them rest for a minute so the filling settles. Then slice and share. The kids love dipping; I love the smiles.

Cheesy Garlic Chicken Wraps

Ingredients You’ll Need

2 cups cooked shredded or chopped chicken
1 tablespoon olive oil
1 teaspoon garlic powder
1/2 teaspoon onion powder
Salt and black pepper, to taste
1 1/2 cups shredded mozzarella cheese
1/2 cup shredded cheddar cheese
1/4 cup softened cream cheese
2 tablespoons mayonnaise
2 tablespoons chopped fresh parsley or 1 teaspoon dried
4 large flour tortillas
2 tablespoons melted butter
1 teaspoon minced garlic
Optional: Baby spinach
Optional: Shredded lettuce
Optional: Sliced tomatoes

Don’t skip the fresh herbs when you can. They lift the whole dish. But if your fridge is missing parsley, dried will do. Use what’s in your fridge; this is about creativity, not perfection. If you are feeding little ones, take out the tomatoes or leave them on the table for individual choice.

Serving Cheesy Garlic Chicken Wraps with Love

We usually set the wraps in the middle of the table on a large platter. Everyone helps themselves and the first round never lasts long. I like to offer a small bowl of ranch, a jar of store-bought garlic aioli, and a simple salsa for those who want a tangy contrast.

Sides that make this shine: a crisp green salad, a tray of carrot sticks, or a warm bowl of roasted potatoes. For a lighter weeknight, pair the wraps with a lemony arugula salad; for busy nights, a bagged coleslaw makes a perfect companion. My husband always reaches for extra parsley and a little hot sauce. It’s beautiful watching each person make the wrap their own.

Before the kids were older, we would each add our own veggies and then fold. Now they crowd the table and argue playfully over the last half. It’s part of the ritual.
Cheesy Garlic Chicken Wraps

Storage & Reheat Tips (Keeping the Goodness)

Store leftover wraps in an airtight container in the refrigerator for up to 3 days. If you need to freeze them, wrap individually in foil and place in a freezer bag; they keep well for up to 2 months.

To reheat, the oven or toaster oven is best. Preheat to 350 F, unwrap any foil, and warm for 10 to 15 minutes until heated through and crisp on the outside. The oven brings back that just-made warmth and texture.

For a quicker option, the microwave works for a quick lunch. Heat on medium power for 45 to 60 seconds, then finish in a hot skillet for 1 minute per side to restore the crisp. Honest and practical advice: the microwave is fine for convenience, but the skillet or oven will give you the crunchy finish that makes my family cheer.

My Kitchen Notes & Shortcuts

  • Use rotisserie chicken to save time. It adds flavor and speeds up prep without sacrificing taste.
  • Mix the filling a little ahead and refrigerate for up to an hour to let flavors meld. It makes assembly faster and less frantic.
  • If you want a lighter version, swap mayo for plain Greek yogurt. The texture stays creamy and it adds a subtle tang.
  • Get the kids involved with folding or brushing the garlic butter. It is their favorite job and it makes dinner a shared moment.
  • For extra crunch, add thinly sliced bell peppers or cucumbers after toasting.

These small hacks keep the heart of the recipe while shaving off the extra minutes that busy nights demand.

Family-Friendly Variations

Make it your own with these small changes that each tell a different story at the table.

  • Lighter version: Use low-fat cheeses and Greek yogurt instead of mayonnaise. Add extra baby spinach for color.
  • Spicy twist: Stir in a tablespoon of chipotle in adobo or sprinkle crushed red pepper into the filling. Serve with lime wedges.
  • Kid-approved cheesy: Increase the mozzarella and leave out the parsley for picky eaters. Serve with their favorite dipping sauce.
  • Mediterranean spin: Add chopped sun-dried tomatoes and a sprinkle of oregano. Swap cheddar for feta and serve with tzatziki.
  • Veggie-forward: Replace half the chicken with sautéed mushrooms or roasted cauliflower for a more plant-forward meal.

Invite your family to pick a variation each week. It keeps dinner exciting and gives everyone a voice.

FAQs About Cheesy Garlic Chicken Wraps

Cheesy Garlic Chicken Wraps

Can I make this ahead for a busy week?
Absolutely. You can assemble the filling a day ahead and store it in the fridge. Fill and roll the wraps right before toasting for the best texture. Letting it sit for an hour lets the flavors get to know each other, just like an old family recipe.

What type of chicken is best?
Cooked, shredded rotisserie chicken is the easiest and tastiest shortcut. Leftover baked or grilled chicken also works well. Aim for tender, shredded pieces so the filling mixes evenly.

Can I freeze these?
Yes. Wrap each wrap tightly in foil and then put them into a freezer bag. They keep for up to two months. Reheat from frozen by baking at 350 F for about 20 to 25 minutes, or until heated through.

How do I keep the tortillas from getting soggy?
Brush the outside with garlic butter and toast them seam-side down first. That seals the seam and gives a protective, flavorful crust. Also, avoid watery fillings; drain any wet vegetables before adding.

Is there a low-carb version?
You can use low-carb tortillas or large collard leaves as a wrap. Toast gently in a skillet to warm and seal, though the texture will be slightly different from a flour tortilla.

One Final Thought from My Kitchen

I hope these Cheesy Garlic Chicken Wraps find their way into your weekly rotation. They are easy, forgiving, and full of the sort of flavors that invite conversation. Give the kids a job, set the timer, and let the aroma do the rest. It is easier than it looks, and the result is often better than you expect.

Conclusion

If you want a recipe to turn to when life is full and you still want dinner to feel special, try this Cheesy Garlic Chicken Wraps recipe and see how it fits in your family’s stories. For an extra reference and a slightly different take, I sometimes look at other versions like Cheesy Garlic Chicken Wraps – Cooked & Loved for inspiration, and I also enjoy comparing flavors and techniques in Cheesy Chicken Wraps | Spicedblog. Until next time, happy cooking and may your kitchen be full of warmth and laughter.

Cheesy Garlic Chicken Wraps

Prep Time 15 minutes
Cook Time 10 minutes
Total Time 25 minutes
Servings 4 servings
Calories 450
A comforting dish combining tender chicken, creamy cheeses, and fragrant garlic, perfect for family dinners.

Ingredients

Filling Ingredients

  • 2 cups cooked shredded or chopped chicken (Use rotisserie chicken to save time.)
  • 1 tablespoon olive oil
  • 1 teaspoon garlic powder
  • 1/2 teaspoon onion powder
  • 1 1/2 cups shredded mozzarella cheese (Increase for kid-approved version.)
  • 1/2 cup shredded cheddar cheese (Can be swapped for feta in a Mediterranean version.)
  • 1/4 cup softened cream cheese (For creaminess in filling.)
  • 2 tablespoons mayonnaise (Can substitute with Greek yogurt.)
  • 2 tablespoons chopped fresh parsley (Use dried if fresh is unavailable.)

Wrap Ingredients

  • 4 large flour tortillas
  • 2 tablespoons melted butter (Brush on wraps for toast.)
  • 1 teaspoon minced garlic (Mixed with melted butter.)
  • Optional baby spinach, shredded lettuce, sliced tomatoes (Add for veggie variety.)

Instructions 

Preparation

  • In a mixing bowl, combine chicken, garlic powder, onion powder, salt, pepper, mozzarella, cheddar, cream cheese, mayonnaise, and parsley. Mix until creamy and cohesive.
  • Place tortillas on a flat surface. Spoon 1/4 of the filling into the center of each. Add optional vegetables if desired. Fold sides inward and roll tightly from the bottom to form wraps.
  • In a small bowl, mix melted butter with minced garlic. Brush the outside of each wrap generously with the mixture.

Cooking

  • Heat a skillet over medium heat. Toast each wrap seam-side down for 2–3 minutes per side until golden and crisp, and the cheese is melted inside.
  • Slice each wrap in half and serve warm with a dipping sauce of choice such as ranch or garlic aioli.

Notes

Store leftover wraps in an airtight container in the refrigerator for up to 3 days. For freezing, wrap individually in foil and place in a freezer bag; they keep well for up to 2 months. Reheat in the oven for the best texture.
Calories: 450kcal
Course: Dinner, Main Course
Cuisine: American, Comfort Food
Keyword: Cheesy Garlic Chicken Wraps, Easy Dinner Recipe, Family Meal