Category

Uncategorized

Category

This post contains affiliate links. As an Amazon Associate, I earn from qualifying purchases. This comes at no extra cost to you.


Kool-Aid Grapes Recipe

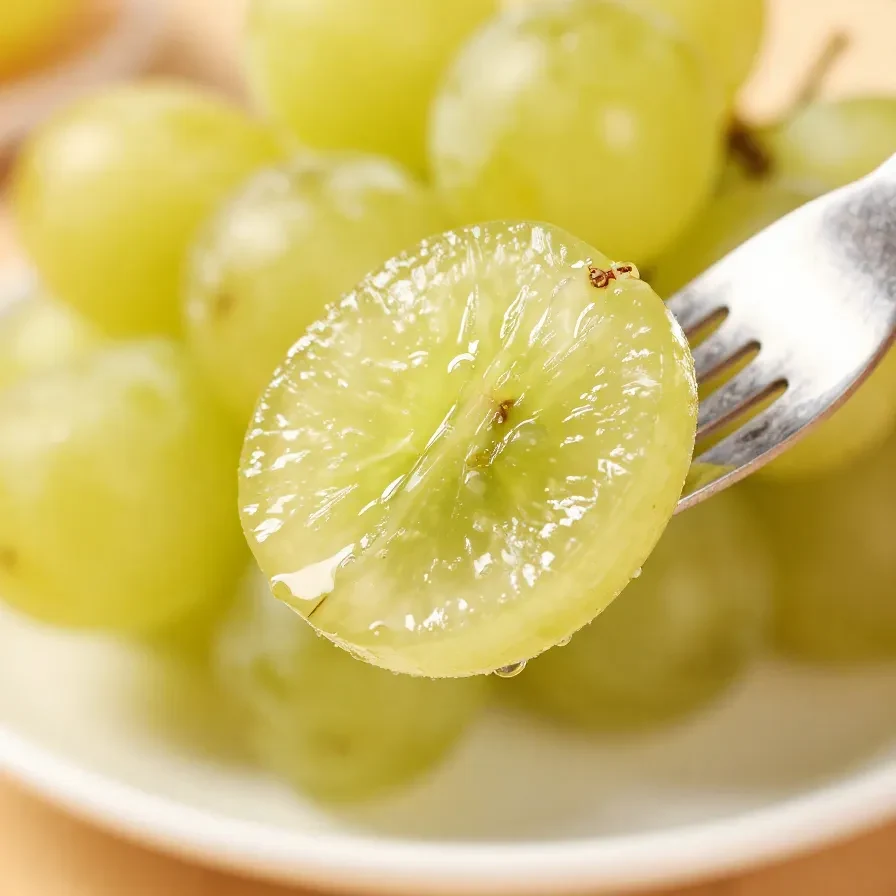
Kool-Aid Grapes bring together the crisp texture of fresh fruit with a bright, tangy coating that bursts with flavor. These colorful, candy-like grapes are made by rolling seedless grapes in Kool-Aid powder, creating a snack that’s as exciting to look at as it is to eat. Perfect for parties or kids’ game days, this no-cook treat is quick to prepare and endlessly customizable.

Table of Contents

Why Kool-Aid Grapes Are Perfect for Busy Families

  • Effortless preparation: With no cooking required, Kool-Aid Grapes come together in minutes, making them ideal for busy schedules.
  • Kid-friendly fun: Their vibrant colors and sweet, tangy flavor excite kids, especially during game days or birthday parties.
  • Customizable flavors: Choose from a wide variety of Kool Aid flavors to match your theme or preference.
  • Creative presentation: These grapes double as a fun table decoration thanks to their eye-catching, candy-like coating.

Everything You Need for Kool-Aid Grapes

The Kool-Aid powder is the star ingredient, delivering bright, fruity bursts of flavor while transforming every grape into a colorful treat. Mixing the powder with sugar (optional) adds an extra layer of sweetness for those craving a candy-like bite.

How To Make Kool-Aid Grapes Step by Step

  1. Wash the grapes thoroughly under cold running water and drain them well using a colander. Pat them dry gently with a paper towel to remove excess moisture.
  2. Pour the Kool-Aid powder into a shallow dish or bowl. If desired, mix the Kool-Aid powder with 1/4 cup of granulated sugar for a sweeter coating.
  3. Take a handful of grapes and roll them individually in the Kool-Aid mixture until evenly coated. Alternatively, toss several grapes at once for quicker preparation.
  4. A close-up of vibrant purple grapes coated with Kool-Aid powder for a sweet and tangy treat.

    OXO Good Grips Mixing Bowl Set

    Essential CookwareOXO Good Grips Mixing Bowl Set

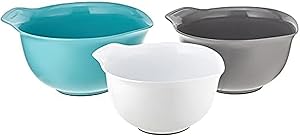
    Durable, non-slip mixing bowls perfect for preparing Kool-Aid mixtures.

    View on Amazon →

  5. Line a plate or tray with parchment paper to prevent sticking, and place the coated grapes onto it.
  6. Refrigerate the tray for at least 30 minutes to let the coating adhere and enhance the flavors.
  7. Serve the chilled Kool-Aid-coated grapes as a playful snack or colorful dessert for any occasion.

Quick Ingredient Swaps

  • If you don’t have granulated sugar, powdered sugar can work as a fine replacement for an extra-smooth finish.
  • Swap Kool-Aid powder for flavored gelatin powder to explore slightly different textures and sweetness levels.
  • Use frozen grapes for an extra-cool, candy-like bite that’s perfect for warm days.

Common Mistakes to Avoid

  • Skipping the drying step: Moist grapes will prevent the Kool-Aid powder from sticking evenly. Always pat them dry before starting.
  • Overloading flavors: Mixing too many Kool Aid flavors can lead to an overpowering taste. Stick to one packet per batch for a balanced snack.
  • Under-refrigerating: The coating needs time in the fridge to set properly. Refrigerate for at least 30 minutes before serving.

Where Did Kool-Aid Grapes Come From?

Kool-Aid Grapes are a modern twist on a classic ingredient, celebrating the vibrant flavors and colors of Kool-Aid powder in an unexpected way. While Kool-Aid has been a pantry staple for decades, this recipe shows how it can be used to transform fruit into a playful, candy-like snack.

Over the years, Kool-Aid has become synonymous with fun and creativity, making it the perfect addition to snacks designed to entertain and delight kids. The trend of Kool-Aid-coated treats reflects a simple yet imaginative approach to creating edible excitement.

Pro Tips for Perfect Kool-Aid Grapes

  • Use parchment paper or wax paper to prevent sticking and ensure easy cleanup when handling the coated grapes.
  • For extra flavor depth, try selecting Kool Aid flavors that complement the grape variety, like tropical flavors for green grapes.
  • Prepare these up to a day in advance and refrigerate in an airtight container to keep them fresh and flavorful.
  • Serve in themed bowls or trays to make them extra appealing for kids’ parties or game day gatherings.


Kool-Aid Grapes

Prep Time 10 minutes
Total Time 10 minutes
Servings 4 servings
Calories 150
A fun and colorful snack made by coating grapes with Kool-Aid powder for a sweet and tangy treat.

Ingredients

Instructions 

  • Wash the grapes thoroughly under cold running water and drain them well using a colander. Pat them dry with a paper towel.
  • Pour the Kool-Aid powder into a shallow dish or bowl. If you prefer a sweeter coating, mix the Kool-Aid powder with granulated sugar in the same dish.
  • Take each grape and roll it in the Kool-Aid powder mixture until evenly coated. You can do this individually or toss several grapes at a time for quicker preparation.
  • Place the coated grapes on a plate or tray lined with parchment paper to prevent sticking.
  • Refrigerate the Kool-Aid-coated grapes for at least 30 minutes to allow the flavors to set and the coating to adhere properly.
  • Serve the chilled Kool-Aid grapes as a fun, colorful snack or dessert!

Notes

You can experiment with different Kool-Aid flavors to create a variety of colorful and tasty grapes. For a healthier option, skip the sugar.
Calories: 150kcal
Cost: $5
Course: Dessert, Snack
Cuisine: American
Keyword: Easy Dessert, grape snack, Kool-Aid grapes

A close-up of vibrant purple grapes coated with Kool-Aid powder for a sweet and tangy treat.

Loved this recipe? Save it to your favorite Pinterest board so you can easily find it later! ✨

This post contains affiliate links. As an Amazon Associate, I earn from qualifying purchases. This comes at no extra cost to you.


Pumpkin Cream Cheese Muffins Recipe

Pumpkin Cream Cheese Muffins combine a moist pumpkin spice batter with a rich, creamy center and a hint of sweet cinnamon-sugar topping. Each bite delivers a perfect balance of warm seasonal spices and decadent texture. These muffins are ideal for breakfast, dessert, or a midday pick-me-up.

Table of Contents

Why Pumpkin Cream Cheese Muffins Are Perfect for You

  • Quick and easy to prepare for busy mornings or gatherings. The recipe requires only 15 minutes of prep time, making it accessible even for novice bakers.
  • Perfect for seasonal cravings. The warm flavors of cinnamon, nutmeg, and cloves bring autumn directly to your plate.
  • Customizable cream cheese filling enhances flavor and texture. With a smooth center, these muffins feel indulgent but remain light enough for any time of day.
  • Great for make-ahead treats. These muffins stay fresh and moist, making them ideal for meal prepping or entertaining guests.

Everything You Need for Pumpkin Cream Cheese Muffins

The pumpkin puree is the star ingredient, delivering that bold seasonal flavor while keeping the muffins moist. Ground cinnamon, nutmeg, and cloves form the aromatic spice base, essential for creating the iconic pumpkin profile.

How To Make Pumpkin Cream Cheese Muffins Step by Step

  1. Preheat your oven to 350°F (175°C) and line a muffin tin with paper liners.
  2. In a medium bowl, whisk together the flour, baking powder, baking soda, salt, cinnamon, nutmeg, and cloves. Set aside.
  3. In a large bowl, combine the pumpkin puree, granulated sugar, brown sugar, eggs, vegetable oil, and vanilla extract. Mix until smooth.
  4. Gradually add the dry ingredients to the wet ingredients, stirring until just combined. Avoid overmixing, as it can create dense muffins.
  5. In a small bowl, make the cream cheese filling by mixing the softened cream cheese, ¼ cup granulated sugar, and ½ teaspoon vanilla extract until smooth.
  6. In another small bowl, prepare the topping by combining ¼ cup granulated sugar and ½ teaspoon ground cinnamon.
  7. Fill each muffin liner about halfway with the pumpkin batter. Add a dollop (approximately 1 teaspoon) of the cream cheese filling to the center of each muffin, then cover with more pumpkin batter until the liner is about ¾ full.
  8. Close-up of freshly baked pumpkin cream cheese muffins on a wooden table.

    KitchenAid Artisan Stand Mixer

    Kitchen ApplianceKitchenAid Artisan Stand Mixer

    Makes mixing dough and batters effortless — a kitchen game-changer for baking enthusiasts.

    View on Amazon →

    OXO Good Grips Mixing Bowl Set

    Essential CookwareOXO Good Grips Mixing Bowl Set

    Durable and versatile mixing bowls for combining wet and dry ingredients seamlessly.

    View on Amazon →

  9. Sprinkle the cinnamon-sugar topping evenly over each muffin.
  10. Bake for 18-22 minutes, or until a toothpick inserted into the muffin (avoiding the cream cheese filling) comes out clean.
  11. Allow the muffins to cool in the pan for 5 minutes, then transfer them to a wire rack to cool completely.

Expert Tips for Perfect Muffins

  • Room temperature cream cheese ensures a smooth filling. Cold cream cheese can lead to lumps in the mixture.
  • Do not overmix the batter to maintain light and fluffy muffins. Excessive mixing activates gluten, making the texture dense.
  • Use a cookie scoop for even muffin portions. This ensures consistent baking and presentation.
  • If your oven has hot spots, rotate the muffin tin halfway through baking. This promotes even cooking for all muffins.

The History of Pumpkin Cream Cheese Muffins

Pumpkin-based baked goods have roots in early American cooking, where seasonal produce like pumpkins became staples in pies and breads. Adding cream cheese filling is a modern twist, inspired by recipes that gained popularity in the 1980s and 1990s.

This combination marries traditional pumpkin spice flavors with the richness of cream cheese, reflecting the ingenuity of home bakers experimenting with contrasting textures and tastes.

Frequently Asked Questions

  • Can I use canned pumpkin puree? Yes, canned pumpkin puree works perfectly for this recipe. Avoid using pumpkin pie filling, as it contains added spices and sugar.
  • Can these muffins be frozen? Absolutely. Wrap them tightly in plastic wrap and store in an airtight container in the freezer for up to 3 months.
  • What’s the best way to store leftovers? Keep leftover muffins in an airtight container at room temperature for up to 3 days, or refrigerate for up to 1 week.

Serving Suggestions

  • Pair with a cup of spiced chai for a cohesive, autumn-inspired flavor experience.
  • Serve alongside a dollop of whipped cream for added indulgence during dessert hour.
  • Enjoy with a side of fresh fruit for a balanced breakfast option.
  • Complement these muffins with a savory dish like scrambled eggs to round out your meal.


Pumpkin Cream Cheese Muffins

Prep Time 20 minutes
Cook Time 22 minutes
Total Time 42 minutes
Servings 12 servings
Calories 210
Delicious pumpkin muffins with a creamy center and a cinnamon-sugar topping, perfect for fall.

Ingredients

Instructions 

  • Preheat your oven to 350°F (175°C) and line a muffin tin with paper liners.
  • In a medium bowl, whisk together the flour, baking powder, baking soda, salt, cinnamon, nutmeg, and cloves. Set aside.
  • In a large bowl, combine the pumpkin puree, granulated sugar, brown sugar, eggs, vegetable oil, and vanilla extract. Mix until smooth.
  • Gradually add the dry ingredients to the wet ingredients, stirring until just combined. Do not overmix.
  • In a small bowl, make the cream cheese filling by mixing the softened cream cheese, ¼ cup granulated sugar, and ½ teaspoon vanilla extract until smooth.
  • In another small bowl, prepare the topping by combining ¼ cup granulated sugar and ½ teaspoon ground cinnamon.
  • Fill each muffin liner about halfway with the pumpkin batter. Add a small dollop (about 1 teaspoon) of the cream cheese filling to the center of each muffin, then cover with more pumpkin batter until the liner is about ¾ full.
  • Sprinkle the cinnamon-sugar topping evenly over each muffin.
  • Bake for 18-22 minutes, or until a toothpick inserted into the muffin (avoiding the cream cheese filling) comes out clean.
  • Allow the muffins to cool in the pan for 5 minutes, then transfer them to a wire rack to cool completely.

Notes

For best results, use room-temperature cream cheese for the filling. Store leftovers in an airtight container in the refrigerator.
Calories: 210kcal
Cost: $8
Course: Dessert
Cuisine: American
Keyword: cream cheese filling, pumpkin muffins

Close-up of freshly baked pumpkin cream cheese muffins on a wooden table.

Loved this recipe? Save it to your favorite Pinterest board so you can easily find it later! ✨

This post contains affiliate links. As an Amazon Associate, I earn from qualifying purchases. This comes at no extra cost to you.

Starbucks Pumpkin Cream Cheese Muffins bring together warm autumn spices, creamy tangy filling, and crunchy pepitas for a bakery-style treat. Their moist pumpkin base perfectly complements the swirl of sweetened cream cheese in the center. This recipe recreates the iconic muffin experience right in your own kitchen, delivering the signature texture and balanced flavors people love.

Table of Contents

Why This Recipe Is Perfect for Fall

  • Perfectly spiced: Filled with cinnamon, nutmeg, ginger, and cloves, these muffins embody the cozy warmth of fall flavors.
  • Easy to make: This recipe simplifies the process for creating bakery-quality treats at home, no specialty equipment required.
  • Customizable sweetness: You can adjust the cream cheese filling to your preferred level of tanginess or sweetness.
  • Ideal for gatherings: These muffins are impressive enough for guests but equally suited to a casual breakfast or snack.

Everything You Need for Starbucks Pumpkin Cream Cheese Muffins

Pumpkin puree is the star ingredient here, adding moisture and earthy sweetness to the muffins. The pepitas bring texture and a nutty finish to balance the creamy filling.

How To Make Starbucks Pumpkin Cream Cheese Muffins Step by Step

  1. Preheat your oven to 350°F (175°C) and line a muffin tin with paper liners.
  2. In a large mixing bowl, whisk together the flour, granulated sugar, baking soda, baking powder, salt, cinnamon, nutmeg, ginger, and cloves.
  3. In a separate bowl, whisk together the eggs, pumpkin puree, vegetable oil, and vanilla extract until well combined.
  4. Gradually add the wet ingredients to the dry ingredients, stirring until just combined. Do not overmix.
  5. A freshly baked Starbucks Pumpkin Cream Cheese Muffin with a creamy center on a white plate.

    KitchenAid Artisan Stand Mixer

    Kitchen ApplianceKitchenAid Artisan Stand Mixer

    Makes mixing dough and batters effortless — a kitchen game-changer.

    View on Amazon →

    USA Pan Muffin Pan 12-Well

    Essential CookwareUSA Pan Muffin Pan 12-Well

    High-quality nonstick muffin pan for even baking and easy cleanup.

    View on Amazon →

  6. In a small bowl, beat the cream cheese and powdered sugar together until smooth. Transfer the mixture to a piping bag or spoon it into a small zip-top bag and cut off a corner for piping.
  7. Fill each muffin liner about 3/4 full with the pumpkin batter. Pipe a small dollop (about 1 teaspoon) of the cream cheese mixture into the center of each muffin. Use a toothpick or knife to slightly swirl the cream cheese into the batter.
  8. Sprinkle the tops of the muffins with pepitas (pumpkin seeds).
  9. Bake for 18-22 minutes, or until a toothpick inserted into the muffin (avoiding the cream cheese center) comes out clean.
  10. Let the muffins cool in the pan for 5 minutes, then transfer them to a wire rack to cool completely before serving.

Simple Ingredient Swaps

  • Swap granulated sugar for brown sugar to add a deeper molasses flavor.
  • Replace vegetable oil with melted coconut oil for a subtle tropical note.
  • Use mascarpone instead of cream cheese for a slightly milder and creamier filling.

Each swap alters the flavor or texture slightly, letting you customize while staying true to the original recipe structure.

Frequently Asked Questions

  • Can these muffins be frozen? Yes, wrap them tightly in plastic wrap and store in an airtight container for up to 3 months. Thaw in the fridge overnight for best texture.
  • Can I make them gluten-free? Yes, replace the all-purpose flour with a 1:1 gluten-free baking flour blend.
  • Do I need to refrigerate these muffins? Due to the cream cheese filling, it’s best to store them in the fridge if not consumed within 24 hours.

Expert Tips to Nail Starbucks Pumpkin Cream Cheese Muffins

  • Use room-temperature cream cheese to ensure a smooth filling without lumps.
  • Do not overmix the batter to prevent dense and gummy muffins.
  • Spoon the batter into the liners evenly to avoid domed tops that bake unevenly.
  • Sprinkle pepitas evenly to ensure consistent crunch and aesthetic appeal.

These tips ensure your muffins have the signature texture and visual charm of the Starbucks classic.

Storing and Reheating Muffins

To store, place cooled muffins in an airtight container and refrigerate for up to five days. For freezing, wrap each muffin individually in plastic wrap and store in a freezer-safe bag for up to three months.

To reheat, warm them in a 300°F (150°C) oven for about 5 minutes, or microwave each muffin for 20 seconds. Avoid overheating to preserve the cream cheese filling’s texture.

Starbucks Pumpkin Cream Cheese Muffins

Prep Time 15 minutes
Cook Time 22 minutes
Total Time 37 minutes
Servings 12 servings
Calories 250
Delicious pumpkin muffins with a creamy center, topped with crunchy pepitas.

Ingredients

Instructions 

  • Preheat your oven to 350°F (175°C) and line a muffin tin with paper liners.
  • In a large mixing bowl, whisk together the flour, granulated sugar, baking soda, baking powder, salt, cinnamon, nutmeg, ginger, and cloves.
  • In a separate bowl, whisk together the eggs, pumpkin puree, vegetable oil, and vanilla extract until well combined.
  • Gradually add the wet ingredients to the dry ingredients, stirring until just combined. Do not overmix.
  • In a small bowl, beat the cream cheese and powdered sugar together until smooth. Transfer the mixture to a piping bag or spoon it into a small zip-top bag and cut off a corner for piping.
  • Fill each muffin liner about 3/4 full with the pumpkin batter. Pipe a small dollop (about 1 teaspoon) of the cream cheese mixture into the center of each muffin. Use a toothpick or knife to slightly swirl the cream cheese into the batter.
  • Sprinkle the tops of the muffins with pepitas (pumpkin seeds).
  • Bake for 18-22 minutes, or until a toothpick inserted into the muffin (avoiding the cream cheese center) comes out clean.
  • Let the muffins cool in the pan for 5 minutes, then transfer them to a wire rack to cool completely before serving.

Notes

For best results, use room-temperature cream cheese. You can substitute pepitas with chopped nuts if desired.
Calories: 250kcal
Cost: $10
Course: Dessert
Cuisine: American
Keyword: cream cheese muffins, pumpkin muffins
A freshly baked Starbucks Pumpkin Cream Cheese Muffin with a creamy center on a white plate.

Loved this recipe? Save it to your favorite Pinterest board so you can easily find it later! ✨

This post contains affiliate links. As an Amazon Associate, I earn from qualifying purchases. This comes at no extra cost to you.

These Pumpkin Cream Cheese Muffins (Starbucks Dupe) are a delightful way to bring the cozy flavors of fall into your kitchen. The moist pumpkin-spiced base pairs perfectly with a creamy cheesecake center, creating an irresistible combination. With an optional pepita topping for crunch, they mimic the Starbucks version beautifully and are easy to make at home.

Table of Contents

Why Make This Pumpkin Cream Cheese Muffins (Starbucks Dupe)?

  • Save money by skipping the coffee shop. These muffins taste just like the Starbucks version but cost a fraction to make at home.
  • Skip additives and preservatives. Unlike store-bought versions, this homemade recipe uses fresh ingredients for a cleaner treat.
  • Perfect for fall gatherings or cozy mornings. Their pumpkin spice notes set the mood for autumn while the creamy center feels indulgent.
  • Easy to customize. You can add pepitas for crunch or skip them altogether, making the recipe flexible to your preferences.

Everything You Need for Pumpkin Cream Cheese Muffins (Starbucks Dupe)

The canned pumpkin puree adds moisture and rich pumpkin flavor, which is key to achieving the signature texture of these muffins. Ground cinnamon ties all the spices together, giving the dish its warm, aromatic character.

How To Make Pumpkin Cream Cheese Muffins (Starbucks Dupe) Step by Step

  1. Preheat your oven to 350°F (175°C) and line a muffin tin with paper liners.
  2. In a medium bowl, whisk together the flour, baking soda, baking powder, salt, cinnamon, nutmeg, ginger, and cloves. Set aside.
  3. In a large bowl, combine the pumpkin puree, granulated sugar, brown sugar, vegetable oil, eggs, and vanilla extract. Mix until smooth and well combined.
  4. Gradually add the dry ingredients to the wet ingredients, stirring just until incorporated. Be careful not to overmix.
  5. In a small bowl, beat the softened cream cheese, granulated sugar (for cream cheese mixture), and vanilla extract (for cream cheese mixture) until smooth and creamy.
  6. Scoop the pumpkin batter into the muffin liners, filling each about 2/3 full.
  7. Add a small dollop (around 1 teaspoon) of the cream cheese mixture to the center of each muffin, pressing it gently to partially submerge it in the batter.
  8. If desired, sprinkle pepitas on top of each muffin for added texture and flavor.
  9. Bake the muffins for 18-22 minutes, or until a toothpick inserted into the muffin (avoiding the cream cheese center) comes out clean.
  10. Allow the muffins to cool in the tin for 5 minutes, then transfer them to a wire rack to cool completely.
Close-up of homemade pumpkin cream cheese muffins on a white plate, resembling Starbucks' version.

KitchenAid Artisan Stand Mixer

Kitchen ApplianceKitchenAid Artisan Stand Mixer

Makes mixing batters and cream cheese filling effortless — a kitchen game-changer for baking enthusiasts.

View on Amazon →

Wilton Non-Stick Muffin Pan 12-Cup

Essential CookwareWilton Non-Stick Muffin Pan 12-Cup

Essential for baking muffins evenly and without sticking — a must-have for this recipe.

View on Amazon →

Serving Ideas for Pumpkin Cream Cheese Muffins

  • Pair them with a chai latte. The warm spices in the muffin complement the subtle spice of chai tea perfectly.
  • Serve them at brunch alongside fresh fruit. Their cream cheese center adds richness to a light spread of fruits.
  • Enjoy them as an afternoon snack with herbal tea. The pumpkin flavor shines when paired with calming teas like chamomile.
  • Add them to a dessert platter with cookies and brownies. Their balance of sweet and spice offers variety to the spread.

Expert Tips for Perfect Muffins

  • Let the cream cheese soften entirely before mixing. This ensures your filling is smooth and lump-free.
  • Do not overmix the batter. Overmixing activates gluten, which can make your muffins dense instead of moist.
  • Use a cookie scoop for consistent muffin sizes. Even portions ensure they bake evenly in the oven.
  • Press the cream cheese filling gently. Submerging the dollop a bit helps integrate the flavors during baking.

Common Mistakes to Avoid

  • Skipping the paper liners. Without them, your muffins may stick to the pan and break apart.
  • Overbaking the muffins. This can dry out the pumpkin base — take them out as soon as the toothpick comes out clean.
  • Using low-fat cream cheese. Full-fat cream cheese creates the richest and creamiest filling.

Frequently Asked Questions About Pumpkin Cream Cheese Muffins

  • Can I freeze these muffins? Yes, wrap them tightly in plastic wrap or an airtight container for up to 3 months.
  • How do I store leftovers? Store cooled muffins in an airtight container in the fridge for up to 5 days to maintain freshness.
  • Can I skip the pepitas? Absolutely. They are optional and won’t affect the flavor or baking process.

Pumpkin Cream Cheese Muffins (Starbucks Dupe)

Prep Time 15 minutes
Cook Time 22 minutes
Total Time 37 minutes
Servings 12 servings
Calories 250
Delicious pumpkin muffins with a creamy center, perfect for fall and inspired by Starbucks.

Ingredients

Instructions 

  • Preheat your oven to 350°F (175°C) and line a muffin tin with paper liners.
  • In a medium bowl, whisk together the flour, baking soda, baking powder, salt, cinnamon, nutmeg, ginger, and cloves. Set aside.
  • In a large bowl, combine the pumpkin puree, granulated sugar, brown sugar, vegetable oil, eggs, and vanilla extract. Mix until smooth and well combined.
  • Gradually add the dry ingredients to the wet ingredients, stirring just until incorporated. Be careful not to overmix.
  • In a small bowl, beat the softened cream cheese, granulated sugar (for cream cheese mixture), and vanilla extract (for cream cheese mixture) until smooth and creamy.
  • Scoop the pumpkin batter into the muffin liners, filling each about 2/3 full.
  • Add a small dollop (around 1 teaspoon) of the cream cheese mixture to the center of each muffin, pressing it gently to partially submerge it in the batter.
  • If desired, sprinkle pepitas on top of each muffin for added texture and flavor.
  • Bake the muffins for 18-22 minutes, or until a toothpick inserted into the muffin (avoiding the cream cheese center) comes out clean.
  • Allow the muffins to cool in the tin for 5 minutes, then transfer them to a wire rack to cool completely.

Notes

For best results, use room-temperature cream cheese and eggs. Store leftovers in an airtight container in the refrigerator for up to 5 days.
Calories: 250kcal
Cost: $10
Course: Dessert, Snack
Cuisine: American
Keyword: cream cheese muffins, pumpkin muffins, Starbucks dupe
Close-up of homemade pumpkin cream cheese muffins on a white plate, resembling Starbucks' version.

Loved this recipe? Save it to your favorite Pinterest board so you can easily find it later! ✨

This post contains affiliate links. As an Amazon Associate, I earn from qualifying purchases. This comes at no extra cost to you.


Pumpkin Cream Cheese Swirl Muffins

Pumpkin Cream Cheese Swirl Muffins combine the warm, spiced flavors of pumpkin with a tangy and creamy swirl of cream cheese for a perfect autumn treat. The moist, tender crumb of the muffins complements the rich and smooth cream cheese topping beautifully. Whether you’re enjoying them for breakfast or as an afternoon snack, these muffins are bursting with flavor and texture in every bite.

Table of Contents

Why Pumpkin Cream Cheese Swirl Muffins Are Perfect for You

  • The warm spices of these muffins make them ideal for autumn flavors, adding depth to every bite.
  • The cream cheese swirl not only enhances the taste but also gives a bakery-style appearance that’s sure to impress.
  • The recipe is simple and straightforward, making it perfect for beginner bakers who want to assemble a sophisticated treat.
  • These muffins stay moist and tender for days, making them great for meal prep or enjoying throughout the week.

Everything You Need for Pumpkin Cream Cheese Swirl Muffins

The pumpkin puree is essential for the moist texture these muffins are known for, while the cream cheese adds a rich and tangy contrast to the warm spices.

How To Make Pumpkin Cream Cheese Swirl Muffins Step by Step

  1. Preheat your oven to 375°F (190°C). Line a 12-cup muffin tin with paper liners or lightly grease the cups.
  2. In a large mixing bowl, whisk together the flour, baking soda, baking powder, salt, cinnamon, nutmeg, and cloves until evenly combined.
  3. In a separate bowl, mix the granulated sugar, brown sugar, eggs, pumpkin puree, vegetable oil, and vanilla extract until smooth and homogeneous.
  4. Gradually fold the dry ingredients into the wet mixture, stirring just until combined. Do not overmix to maintain a tender crumb.
  5. Freshly baked pumpkin cream cheese swirl muffins on a wooden table.

    KitchenAid Artisan Stand Mixer

    Kitchen ApplianceKitchenAid Artisan Stand Mixer

    Makes mixing dough and batters effortless — a kitchen game-changer for baking enthusiasts.

    View on Amazon →

    OXO Good Grips Mixing Bowl Set

    Essential CookwareOXO Good Grips Mixing Bowl Set

    Durable and versatile mixing bowls for combining wet and dry ingredients effortlessly.

    View on Amazon →

  6. In another bowl, beat the softened cream cheese, granulated sugar, egg yolk, and vanilla extract until smooth and creamy.
  7. Fill each muffin cup about 3/4 full with the pumpkin batter. Add a dollop (about 1 teaspoon) of the cream cheese mixture on top of each cup.
  8. Use a toothpick or skewer to swirl the cream cheese mixture gently into the pumpkin batter without overmixing.
  9. Bake for 18-22 minutes, or until a toothpick inserted into the center of a muffin comes out clean.
  10. Remove the muffins from the oven and let them cool in the pan for 5 minutes. Transfer them to a wire rack to cool completely before serving.

Common Questions About Pumpkin Cream Cheese Swirl Muffins

  • Can I use canned pumpkin puree? Yes, ensure it is unsweetened and not pumpkin pie filling for best results.
  • How do I store these muffins? Store in an airtight container at room temperature for up to 2 days or refrigerate for up to 5 days.
  • Can these muffins be frozen? Absolutely! Wrap them individually and store in the freezer for up to 3 months. Thaw overnight in the fridge before serving.

Expert Tips for Perfect Muffins

  • Room temperature cream cheese ensures the swirl mixes smoothly without lumps.
  • Do not overmix the batter as it can lead to dense muffins instead of a light and fluffy texture.
  • Swirl the cream cheese lightly for a visually appealing marbled effect on top of each muffin.
  • Use precise measurements for spices to achieve a balanced flavor profile without overpowering the cream cheese topping.

Avoid These Common Mistakes When Baking

  • Skipping muffin liners or greasing the tin can cause sticking, making it difficult to remove the muffins cleanly.
  • Using cold ingredients can result in uneven mixing and less effective baking, so ensure your eggs and cream cheese are room temperature.
  • Failing to check your oven temperature can lead to undercooked or overbaked muffins, so use an oven thermometer for accuracy.


Pumpkin Cream Cheese Swirl Muffins

Prep Time 15 minutes
Cook Time 22 minutes
Total Time 37 minutes
Servings 12 servings
Calories 210
Delicious pumpkin muffins with a creamy, tangy cream cheese swirl. Perfect for fall baking!

Ingredients

Instructions 

  • Preheat your oven to 375°F (190°C). Line a 12-cup muffin tin with paper liners or grease the cups lightly.
  • In a large mixing bowl, whisk together the flour, baking soda, baking powder, salt, cinnamon, nutmeg, and cloves.
  • In a separate bowl, combine the granulated sugar, brown sugar, eggs, pumpkin puree, vegetable oil, and vanilla extract. Mix until smooth.
  • Gradually add the dry ingredients to the wet ingredients and stir until just combined. Avoid overmixing.
  • In another bowl, prepare the cream cheese swirl mixture by beating the softened cream cheese, granulated sugar, egg yolk, and vanilla extract until smooth and creamy.
  • Fill each muffin cup about 3/4 full with the pumpkin batter. Add a small dollop (about 1 teaspoon) of the cream cheese mixture on top of each muffin.
  • Use a toothpick or skewer to gently swirl the cream cheese mixture into the pumpkin batter without overmixing.
  • Bake the muffins in the preheated oven for 18-22 minutes, or until a toothpick inserted into the center of a muffin comes out clean.
  • Remove the muffins from the oven and let them cool in the muffin tin for about 5 minutes. Transfer them to a wire rack to cool completely before serving.

Notes

For best results, use room-temperature cream cheese and avoid overmixing the batter to keep the muffins light and fluffy.
Calories: 210kcal
Cost: $10
Course: Dessert
Cuisine: American
Keyword: cream cheese swirl, fall baking, pumpkin muffins

Freshly baked pumpkin cream cheese swirl muffins on a wooden table.

Loved this recipe? Save it to your favorite Pinterest board so you can easily find it later! ✨

This post contains affiliate links. As an Amazon Associate, I earn from qualifying purchases. This comes at no extra cost to you.


Hearty Slow Cooker Lentil Soup

This Hearty Slow Cooker Lentil Soup is a simple yet satisfying dish, brimming with tender lentils, vibrant vegetables, and warm, aromatic spices. The slow cooker method brings out the natural earthiness of the lentils and melds it beautifully with the smoky undertones of paprika. It’s a wholesome soup that’s perfect for busy days, offering a nutritious and halal-friendly meal with minimal effort.

Each spoonful is a delightful medley of textures, from the softness of the lentils to the chunks of sweet potato and savory garlic-infused broth. With subtle hints of cumin and thyme, this dish delivers a flavorful depth that feels both hearty and light. Whether you’re serving it for lunch or dinner, this soup is guaranteed to satisfy.

Table of Contents

Why This Hearty Slow Cooker Lentil Soup Will Save Your Weeknights

  • Lentil soups like this one require minimal prep time, making them excellent for busy schedules. With only 10 minutes of chopping and rinsing, your slow cooker takes care of the rest.
  • This dish includes an array of vegetables and protein-packed lentils, making it a complete meal. You don’t need to prepare side dishes—it’s hearty enough on its own.
  • The slow cooker method locks in flavor and tenderizes every ingredient evenly. No monitoring or stirring is needed, so you can focus on other tasks while it cooks.
  • It’s an affordable recipe using simple pantry staples. Lentils and vegetables are cost-effective yet deliver rich, complex flavors when paired with the spices.

Everything You Need for Hearty Slow Cooker Lentil Soup

The lentils are the star of the show, offering a rich, earthy foundation for this soup. Smoked paprika adds depth and a subtle smokiness that enhances every bite.

How To Make Hearty Slow Cooker Lentil Soup Step by Step

  1. Prepare the ingredients by rinsing the lentils, dicing the vegetables, and mincing the garlic.
  2. In the slow cooker, combine the lentils, carrots, celery, onion, garlic, potato, and canned diced tomatoes.
  3. Pour in the halal vegetable broth and stir to mix the ingredients evenly.
  4. Add the ground cumin, smoked paprika, ground turmeric, dried thyme, bay leaf, salt, and black pepper. Stir to combine the spices with the mixture.
  5. A bowl of hearty lentil soup garnished with fresh parsley, served on a wooden table.

    Crock-Pot 6-Quart Slow Cooker

    Essential CookwareCrock-Pot 6-Quart Slow Cooker

    A reliable slow cooker perfect for making soups, stews, and more with minimal effort.

    View on Amazon →

  6. Drizzle the olive oil over the soup mixture and give it a final stir.
  7. Cover the slow cooker with its lid and cook on low heat for 6-8 hours or on high heat for 3-4 hours, until the lentils and vegetables are tender.
  8. Once the soup is cooked, discard the bay leaf and taste for seasoning. Adjust the salt and pepper if needed.
  9. Serve the soup warm in bowls. Optionally, drizzle with lemon juice and garnish with chopped fresh parsley for added brightness.

Common Mistakes to Avoid When Making Lentil Soup

  • Skipping the step to rinse the lentils can lead to a murky broth. Always rinse them thoroughly to remove debris and excess starch.
  • Adding salt early in the cooking process can toughen the lentils. Season the soup with salt at the end for best results.
  • Using overly large vegetable chunks can result in uneven cooking. Dice the vegetables uniformly to ensure they cook evenly with the lentils.

The Cultural Significance of Lentil Soup

Lentil soup has been a staple in many cuisines across the globe, often prized for its simplicity and nutritional value. In regions like the Middle East and South Asia, lentils are celebrated as a versatile ingredient that complements a wide variety of spices.

This recipe draws on those traditions with its use of cumin, turmeric, and paprika, creating a dish that feels connected to global flavors. Its adaptability makes it a favorite in households seeking hearty and halal-friendly meals.

Easy Ingredient Swaps and Substitutions

  • If you don’t have smoked paprika, substitute with regular paprika and a pinch of chili powder for a similar smoky heat.
  • Sweet potatoes can replace regular potatoes for a hint of sweetness and added nutrients.
  • If vegetable broth isn’t available, use water with a bouillon cube for comparable flavor.

Meal Prep, Storage, and Reheating Tips

Store leftovers in an airtight container in the fridge for up to 4 days. For longer storage, freeze the soup in individual portions for up to 3 months.

Reheat refrigerated soup on the stovetop over low heat, stirring occasionally. For frozen portions, thaw overnight in the fridge before reheating, or warm directly on the stovetop.

To prevent over-thickening during reheating, add a splash of water or broth to restore the soup’s consistency.


Hearty Slow Cooker Lentil Soup

Prep Time 15 minutes
Cook Time 4 hours
Total Time 4 hours 15 minutes
Servings 6 servings
Calories 250
A comforting and nutritious lentil soup made in the slow cooker, perfect for chilly days.

Ingredients

Instructions 

  • Prepare the ingredients by rinsing the lentils, dicing the vegetables, and mincing the garlic.
  • In the slow cooker, combine the lentils, carrots, celery, onion, garlic, potato, and canned diced tomatoes.
  • Pour in the halal vegetable broth and stir to mix the ingredients evenly.
  • Add the ground cumin, smoked paprika, ground turmeric, dried thyme, bay leaf, salt, and black pepper. Stir to combine the spices with the mixture.
  • Drizzle the olive oil over the soup mixture and give it a final stir.
  • Cover the slow cooker with its lid and cook on low heat for 6-8 hours or on high heat for 3-4 hours, until the lentils and vegetables are tender.
  • Once the soup is cooked, discard the bay leaf and taste for seasoning. Adjust the salt and pepper if needed.
  • Serve the soup warm in bowls. Optionally, drizzle with lemon juice and garnish with chopped fresh parsley for added brightness.

Notes

For a thicker soup, blend a portion of the cooked soup and stir it back in. You can substitute sweet potatoes for regular potatoes for a sweeter flavor.
Calories: 250kcal
Cost: $10
Course: Soup
Cuisine: Mediterranean
Keyword: lentil soup, Slow Cooker, vegetarian

A bowl of hearty lentil soup garnished with fresh parsley, served on a wooden table.

Loved this recipe? Save it to your favorite Pinterest board so you can easily find it later! ✨

This post contains affiliate links. As an Amazon Associate, I earn from qualifying purchases. This comes at no extra cost to you.

This Hearty Taco Soup Recipe combines tender halal-certified meat, hearty beans, and sweet corn with bold spices for a flavor-packed dish that’s ready in under an hour. The smoky aroma of cumin and paprika blends perfectly with zesty tomatoes and chilies, making it irresistibly satisfying. Topped with creamy cheese and crunchy tortilla chips, it’s a meal you’ll savor every time.

Table of Contents

Why This Hearty Taco Soup Recipe Will Save Your Weeknights

  • This recipe is quick to prepare, with just 10 minutes of active prep time. Perfect for busy nights, it’s ready to serve in under 40 minutes.
  • Using pantry staples like canned beans and corn keeps it budget-friendly without compromising flavor. You’ll love how easy it is to use ingredients you already have.
  • With customizable toppings, it caters to every palate. Switch up the cheese, add more heat, or keep it mild for the kids.
  • The halal-friendly ingredients make it accessible for everyone, ensuring inclusivity at any gathering. No specialized shopping trips required!

Everything You Need for Hearty Taco Soup Recipe

The diced tomatoes with green chilies offer a subtle kick that sets this dish apart. Smoked paprika adds depth, enhancing the smoky undertones of the taco seasoning.

How To Make Hearty Taco Soup Recipe Step by Step

  1. Heat olive oil in a large pot or Dutch oven over medium heat.
  2. Add the ground halal beef or chicken and cook until browned, breaking it into crumbles with a spoon. Drain any excess fat if necessary to keep the soup light.
  3. Add the diced onion and minced garlic to the pot. Sauté for about 2-3 minutes until fragrant and softened, stirring often to prevent burning.
  4. Stir in the taco seasoning, ground cumin, smoked paprika, salt, and pepper. Cook for 1 minute to toast the spices and release their aroma.
  5. Add the black beans, kidney beans, corn kernels, diced tomatoes, diced tomatoes with green chilies, and halal-certified broth. Stir to combine.
  6. Bring the mixture to a boil, then reduce the heat to low. Simmer the soup uncovered for about 25-30 minutes, stirring occasionally to ensure even cooking.
  7. Taste and adjust seasoning as needed. Add more salt or pepper based on your preference.
  8. Ladle the soup into bowls and serve hot with optional toppings such as shredded cheddar cheese, sour cream, chopped cilantro, sliced jalapeños, tortilla chips, or lime wedges.
A bowl of hearty taco soup topped with shredded cheese, sour cream, and fresh cilantro.

Instant Pot Duo 7-in-1 Electric Pressure Cooker

Kitchen ApplianceInstant Pot Duo 7-in-1 Electric Pressure Cooker

Speeds up cooking time and enhances flavors — great for soups and stews.

View on Amazon →

Lodge Cast Iron Dutch Oven 6 Quart

Essential CookwareLodge Cast Iron Dutch Oven 6 Quart

Ideal for simmering soups and stews evenly — perfect for this recipe.

View on Amazon →

Common Mistakes and How to Avoid Them

  • Skipping the step to toast spices can result in muted flavors. Always cook them for a minute to maximize their fragrance.
  • Using low-quality broth can make the soup taste bland. Opt for halal-certified broth with robust flavor.
  • Overcooking the vegetables can cause them to lose texture. Stick to the recommended simmering time for perfect results.

Serving Suggestions and Pairings

  • Pair with crispy tortilla chips for a crunchy complement to the smooth soup.
  • Serve alongside a chicken taco marinade dish for a complete Tex-Mex-inspired meal.
  • Add lime wedges for a bright, tangy touch that enhances the smoky flavors of the soup.
  • Offer fresh guacamole on the side for an extra layer of creaminess and richness.

Expert Tips and Time-Saving Tricks

  • Cook the meat in advance and refrigerate it for up to 2 days to save time on weeknights.
  • Double the recipe and freeze leftovers for up to 3 months. Thaw in the refrigerator overnight for a quick reheated meal.
  • Use pre-minced garlic and pre-diced onion to speed up prep while maintaining flavor.
  • Opt for fire-roasted diced tomatoes for an added smoky aroma that elevates the soup’s taste.

Simple Ingredient Swaps You’ll Love

  • Swap ground halal beef for ground halal turkey for a leaner option. Turkey offers a lighter texture while maintaining the bold flavors of the seasoning.
  • Substitute black beans with pinto beans for a creamier texture. This works well if you prefer a milder bean flavor.
  • Replace fresh corn kernels with frozen ones if canned varieties aren’t available. They retain their sweetness and vibrant color under heat.

Hearty Taco Soup Recipe

Prep Time 10 minutes
Cook Time 30 minutes
Total Time 40 minutes
Servings 6 servings
Calories 320
A hearty and flavorful taco soup made with halal-certified ingredients, perfect for a comforting meal.

Ingredients

Instructions 

  • Heat olive oil in a large pot or Dutch oven over medium heat.
  • Add the ground halal beef or chicken and cook until browned, breaking it into crumbles with a spoon. Drain any excess fat if necessary.
  • Add the diced onion and minced garlic to the pot. Sauté for about 2-3 minutes, until fragrant and softened.
  • Stir in the taco seasoning, ground cumin, smoked paprika, salt, and pepper. Cook for 1 minute to toast the spices.
  • Add the black beans, kidney beans, corn kernels, diced tomatoes, diced tomatoes with green chilies, and halal-certified broth. Stir to combine.
  • Bring the mixture to a boil, then reduce the heat to low. Simmer the soup uncovered for about 25-30 minutes, stirring occasionally.
  • Taste and adjust seasoning as needed. Add more salt or pepper if desired.
  • Ladle the soup into bowls and serve hot with optional toppings such as shredded cheddar cheese, sour cream, chopped cilantro, sliced jalapeños, tortilla chips, or lime wedges.

Notes

For a spicier soup, add extra diced jalapeños or a pinch of cayenne pepper. You can substitute ground halal turkey for the beef or chicken.
Calories: 320kcal
Cost: $15
Course: Main Course
Cuisine: Mexican
Keyword: Taco Soup
A bowl of hearty taco soup topped with shredded cheese, sour cream, and fresh cilantro.

Loved this recipe? Save it to your favorite Pinterest board so you can easily find it later! ✨

This post contains affiliate links. As an Amazon Associate, I earn from qualifying purchases. This comes at no extra cost to you.

This Crock Pot Lentil Soup With Kielbasa is a hearty and flavorful dish that combines tender lentils, smoky halal kielbasa, aromatic vegetables, and warm spices into a comforting meal. Its rich and savory aroma fills your kitchen as it slow cooks, making every spoonful a satisfying delight. Perfect for busy days, this recipe is a set-it-and-forget-it dinner that delivers incredible depth of flavor with minimal effort.

Table of Contents

Why Crock Pot Lentil Soup With Kielbasa Will Save Your Weeknights

  • This dish requires only 15 minutes of prep time, making it ideal for those juggling busy schedules. Simply add everything to the crock pot and let it cook while you focus on other tasks.
  • Packed with protein-rich lentils and flavorful halal kielbasa, this soup is both nutritious and satisfying. It’s a complete meal that doesn’t require elaborate sides or extra fuss.
  • The slow cooker method ensures layers of flavor develop over hours, creating a rich and deeply aromatic soup. It’s perfect for cooler weather when hearty meals are most appreciated.
  • This recipe is versatile and accommodates dietary preferences by using halal meat and dairy-free ingredients. Feel confident serving it to guests with diverse needs.

Everything You Need for Crock Pot Lentil Soup With Kielbasa

The halal kielbasa adds smokiness and depth to this soup, complementing the earthy flavor of lentils. Ground cumin and smoked paprika enhance the warmth and complexity of the broth, making it irresistibly aromatic.

How To Make Crock Pot Lentil Soup With Kielbasa Step by Step

  1. Prepare all ingredients by slicing the kielbasa, chopping the onion, carrots, and celery, and rinsing the lentils thoroughly.
  2. Add the sliced kielbasa, lentils, diced onion, carrots, celery, minced garlic, and drained diced tomatoes into the crock pot.
  3. Pour in the halal vegetable or chicken broth and 1 cup of water to ensure the soup has the right consistency.
  4. A bowl of hearty lentil soup with sliced kielbasa served on a wooden table.

    Instant Pot Duo 7-in-1 Electric Pressure Cooker

    Kitchen ApplianceInstant Pot Duo 7-in-1 Electric Pressure Cooker

    A versatile appliance that combines slow cooking, pressure cooking, and more for ultimate convenience.

    View on Amazon →

    Hamilton Beach Portable 6-Quart Slow Cooker

    Essential CookwareHamilton Beach Portable 6-Quart Slow Cooker

    Ideal for slow-cooking soups and stews with programmable settings for convenience.

    View on Amazon →

  5. Season the mixture with ground cumin, smoked paprika, dried thyme, and a bay leaf, then add salt and black pepper to taste.
  6. Stir all the ingredients together to combine evenly before placing the lid on the crock pot.
  7. Set the crock pot to cook on low for 7-8 hours or high for 4-5 hours, depending on your schedule.
  8. Check the tenderness of the lentils before serving and remove the bay leaf. Adjust seasoning with additional salt or pepper if necessary.
  9. Serve hot, optionally garnished with fresh parsley, and pair with crusty bread or rice for a complete meal.

Expert Tips and Pro Shortcuts

  • To avoid mushy lentils, rinse them thoroughly before adding them to the crock pot. This removes excess starch and helps maintain their texture during cooking.
  • If you prefer a thicker soup, mash a portion of the cooked lentils with a spoon or immersion blender before serving. This creates a creamier consistency without additional ingredients.
  • For an extra smoky flavor, choose kielbasa smoked with natural hardwoods, which adds depth and enhances the savory profile.
  • Prep ingredients such as chopping vegetables and slicing kielbasa the night before to save time in the morning. Store them in airtight containers in the refrigerator until ready to cook.

Meal Prep, Storage, and Reheating

Crock Pot Lentil Soup With Kielbasa is perfect for meal prep as it stores well in both the refrigerator and freezer. Allow the soup to cool completely before transferring it to airtight containers.

Store in the fridge for up to 4 days, or freeze for up to 3 months. Reheat in a pot over medium heat, adding a splash of water or broth if needed, until warmed through.

Common Mistakes To Avoid

  • Don’t skip draining the canned diced tomatoes; excess liquid can dilute the flavor of the soup base. Properly draining ensures a robust and concentrated broth.
  • Avoid over-salting at the beginning. Lentils absorb salt as they cook, so it’s better to adjust seasoning at the end for more precise control.
  • Be sure to stir the ingredients evenly before cooking. Uneven distribution could lead to inconsistent textures and flavors in the final dish.

Crock Pot Lentil Soup With Kielbasa

Prep Time 15 minutes
Cook Time 8 hours
Total Time 8 hours 15 minutes
Servings 6 servings
Calories 250
A hearty and flavorful lentil soup made with halal kielbasa, fresh vegetables, and warm spices, perfect for a comforting meal.

Ingredients

Instructions 

  • Prepare all ingredients by slicing the kielbasa, chopping the vegetables, and rinsing the lentils.
  • In a crock pot, combine the sliced halal kielbasa, lentils, diced onion, carrots, celery, minced garlic, drained diced tomatoes, vegetable or chicken broth, and water.
  • Add ground cumin, smoked paprika, dried thyme, bay leaf, salt, and black pepper to the crock pot.
  • Stir the ingredients well to ensure they are evenly distributed.
  • Cover the crock pot with a lid and set it to cook on low for 7-8 hours or high for 4-5 hours.
  • Check the lentils for tenderness before serving. Remove the bay leaf and adjust seasoning with additional salt or pepper if needed.
  • Serve hot, garnished with fresh parsley if desired, alongside crusty bread or rice for a complete meal.

Notes

You can substitute kielbasa with any halal sausage or omit it for a vegetarian version. Adjust spices to taste.
Calories: 250kcal
Cost: $15
Course: Main Course
Cuisine: American
Keyword: Crock Pot, kielbasa, lentil soup
A bowl of hearty lentil soup with sliced kielbasa served on a wooden table.

Loved this recipe? Save it to your favorite Pinterest board so you can easily find it later! ✨

This post contains affiliate links. As an Amazon Associate, I earn from qualifying purchases. This comes at no extra cost to you.


Slow Cooker Tom Kha Soup


Slow Cooker Tom Kha Soup is a rich and aromatic Thai coconut chicken soup crafted effortlessly using a slow cooker. The blend of creamy coconut milk, tangy lime, and fragrant lemongrass creates a comforting bowl of flavors perfect for any occasion. This hands-off recipe allows the slow cooker to work its magic, infusing each ingredient to produce a tantalizing meal for your table.

Table of Contents

Why Slow Cooker Tom Kha Soup Is Perfect for You

  • This recipe is ideal for busy lifestyles because the slow cooker handles the hard work while you focus on other tasks. Simply prep the ingredients, set it up, and come back to a flavorful meal.
  • It’s packed with aromatic herbs and spices that deliver bold, authentic Thai flavors without requiring extensive effort. The coconut milk provides a creamy, comforting texture to balance the tangy lime and spicy chili paste.
  • Using halal-certified chicken ensures this dish is suitable for various dietary preferences, making it accessible and inclusive. It’s a thoughtful choice for gatherings with diverse guests or family members.
  • The hands-off cooking method means fewer dishes to wash and a stress-free dinner experience. With your slow cooker, you can enjoy restaurant-quality soup without spending hours in the kitchen.

Everything You Need for Slow Cooker Tom Kha Soup

The lemongrass and kaffir lime leaves are key to achieving the traditional flavors of Tom Kha soup. Their bold, citrusy aroma is unmistakable and sets this dish apart from other coconut-based soups.

How To Make Slow Cooker Tom Kha Soup Step by Step

  1. Add the chicken broth, coconut milk, lemongrass, kaffir lime leaves, and ginger to your slow cooker. Stir gently to combine the liquids and distribute the aromatics evenly.
  2. Add the sliced mushrooms and chicken breast pieces to the slow cooker, ensuring the chicken is submerged in the liquid. The slow cooker will slowly infuse the flavors into the chicken.
  3. Cover the slow cooker with its lid and set it to cook on low for 4-5 hours. The long cooking time ensures the chicken turns tender while the flavors meld together beautifully.
  4. Once cooking is complete, remove the lemongrass stalks and ginger slices using a slotted spoon. This step prevents the soup from becoming overly fibrous or pungent.
  5. Stir in the fish sauce, lime juice, brown sugar, and chili paste, if desired. Taste the soup and adjust seasoning as needed for a perfect balance of salty, tangy, and spicy flavors.
  6. Add the halved cherry tomatoes and chopped cilantro leaves to the soup, stirring gently. Let the soup heat for an additional 5-10 minutes to blend the fresh ingredients.
  7. Ladle the soup into bowls and garnish with sliced red chili and extra cilantro leaves, if desired. Serve hot and enjoy the comforting richness of authentic Thai flavors!
A bowl of homemade Thai Tom Kha Soup served with fresh cilantro and lime wedges.

Instant Pot Duo 7-in-1 Electric Pressure Cooker

Kitchen ApplianceInstant Pot Duo 7-in-1 Electric Pressure Cooker

A versatile appliance that can function as a slow cooker, pressure cooker, and more — ideal for simplifying recipes like Tom Kha Soup.

View on Amazon →

Crock-Pot 6-Quart Slow Cooker

Essential CookwareCrock-Pot 6-Quart Slow Cooker

Essential for hands-off cooking — perfect for making soups like Tom Kha effortlessly.

View on Amazon →

Ingredient Swaps and Substitutions

  • If kaffir lime leaves are unavailable, substitute with lime zest for a similar citrusy note. While less aromatic, it still enhances the soup’s brightness.
  • Galangal can be hard to find in some regions, so fresh ginger is a suitable alternative. Though slightly milder, it complements the other flavors well.
  • For a vegetarian option, replace chicken with tofu cubes and chicken broth with vegetable stock. The soup retains its creamy texture and aromatic profile.

Serving Ideas for Your Tom Kha Soup

  • Pair Slow Cooker Tom Kha Soup with steamed jasmine rice for a heartier meal. The rice absorbs the soup’s rich flavors, making each bite satisfying.
  • Include a side of Thai spring rolls for a complete dining experience. Their crunchy exterior contrasts beautifully with the creamy soup.
  • Serve the soup with slices of crusty bread to mop up every drop of the flavorful broth. This pairing works well for casual dinner settings.
  • Add a Thai-style cucumber salad to your meal to balance the soup’s richness with refreshing, crisp textures and tangy dressing.

Common Mistakes to Avoid When Making Tom Kha Soup

  • Skipping the step of bruising the lemongrass can result in muted flavors. Gently crush it with the back of a knife to release its essential oils.
  • Overcooking the chicken can make it tough and less enjoyable. Stick to the recommended cooking time for tender, juicy results.
  • Neglecting to taste and adjust seasoning near the end may lead to an unbalanced flavor. Always sample and tweak lime juice, fish sauce, and chili paste for the perfect finish.

Expert Tips for Perfect Slow Cooker Tom Kha Soup

  • Use full-fat coconut milk for the creamiest texture and richest flavor. Avoid light versions as they may dilute the soup.
  • Layer the ingredients strategically, adding mushrooms and chicken after the aromatics for even cooking and optimal flavor infusion.
  • For an extra kick, toast the red chili slices briefly before garnishing. This adds a smoky dimension to the spice.
  • Prepare the soup ahead of time and refrigerate overnight to allow the flavors to intensify. Reheat gently before serving for a more robust taste.


Slow Cooker Tom Kha Soup

Prep Time 15 minutes
Cook Time 5 hours
Total Time 5 hours 15 minutes
Servings 4 servings
Calories 250
A creamy and flavorful Thai-inspired soup made with coconut milk, chicken, and aromatic herbs, perfect for slow cooking.

Ingredients

Instructions 

  • Add the chicken broth, coconut milk, lemongrass, kaffir lime leaves, and ginger to your slow cooker.
  • Add the sliced mushrooms and chicken pieces to the slow cooker and stir gently to combine.
  • Cover and cook on low for 4-5 hours, or until the chicken is fully cooked and tender.
  • Once cooked, remove the lemongrass stalks and ginger slices using a slotted spoon.
  • Stir in the fish sauce, lime juice, brown sugar, and chili paste (if using). Taste and adjust seasoning as needed.
  • Add the cherry tomatoes and cilantro to the soup, stirring gently to combine. Let it heat for 5-10 minutes.
  • Ladle the soup into bowls and garnish with sliced red chili and additional cilantro, if desired.

Notes

For a vegetarian version, substitute chicken with tofu and use vegetable broth instead of chicken broth.
Calories: 250kcal
Cost: $15
Course: Soup
Cuisine: Thai
Keyword: halal, Slow Cooker, Tom Kha Soup

A bowl of homemade Thai Tom Kha Soup served with fresh cilantro and lime wedges.

Loved this recipe? Save it to your favorite Pinterest board so you can easily find it later! ✨

This post contains affiliate links. As an Amazon Associate, I earn from qualifying purchases. This comes at no extra cost to you.

This Hearty Macaroni Soup with Beef is the ultimate combination of tender vegetables, flavorful spices, and perfectly cooked macaroni in a rich beef broth. The aroma of sautéed garlic and onions blends beautifully with the earthy notes of oregano and thyme, creating a heartwarming bowl of soup. Garnished with fresh parsley, this dish is satisfying, delicious, and ideal for busy weeknights or leisurely weekends.

Table of Contents

Why This Hearty Macaroni Soup with Beef Will Save Your Weeknights

  • This soup is incredibly simple to prepare with everyday ingredients. Even beginners will find the instructions easy to follow.
  • With a cook time of just 35 minutes, it’s the perfect quick meal solution for busy evenings. You’ll have a hearty and nourishing dish ready in no time.
  • Its one-pot cooking method minimizes cleanup, making life easier after a long day. Less mess means more time to enjoy the meal.
  • The combination of beef, macaroni, and vegetables makes it versatile and filling. It’s an all-in-one dish you can serve without needing additional sides.

Everything You Need for Hearty Macaroni Soup with Beef

The halal-certified ground beef is the star of this dish, providing a robust and savory foundation. Meanwhile, the dried oregano and paprika enrich the broth with aromatic depth and subtle heat.

How To Make Hearty Macaroni Soup with Beef Step by Step

  1. Heat the olive oil in a large pot over medium heat.
  2. Add the ground beef and cook until browned, breaking it apart with a spoon. Drain excess fat if necessary.
  3. Add the chopped onion, garlic, carrots, and celery to the pot. Sauté for 5–7 minutes, stirring occasionally, until the vegetables are softened.
  4. A bowl of hearty macaroni soup with tender beef chunks, carrots, and celery in a savory broth.

    Instant Pot Duo 7-in-1 Electric Pressure Cooker

    Kitchen ApplianceInstant Pot Duo 7-in-1 Electric Pressure Cooker

    Speeds up cooking time and allows for easy one-pot meals — great for soups like this.

    View on Amazon →

    Lodge Dutch Oven 6 Quart

    Essential CookwareLodge Dutch Oven 6 Quart

    Ideal for simmering soups and stews with even heat distribution — perfect for this recipe.

    View on Amazon →

  5. Stir in the canned diced tomatoes, halal-certified beef broth, and water.
  6. Season the soup with oregano, thyme, black pepper, paprika, and salt to taste. Bring the mixture to a boil.
  7. Reduce the heat to low and let the soup simmer for 15 minutes to allow the flavors to meld together.
  8. Add the macaroni pasta to the pot and cook for 8–10 minutes, or until the pasta is tender.
  9. Stir in the frozen peas and cook for an additional 2–3 minutes.
  10. Taste and adjust seasoning if necessary. Remove from heat.
  11. Ladle the soup into bowls and garnish with fresh parsley before serving.

Origins and History of This Dish

Macaroni soup has roots in various culinary traditions, often combining pasta with seasonal vegetables and hearty proteins. This particular version with beef takes inspiration from comforting European soups, marrying rich flavors with simple preparation techniques. Over time, it has become a beloved household favorite for its satisfying balance of taste and texture.

Easy Ingredient Swaps for Hearty Macaroni Soup

  • Swap ground beef for ground turkey or chicken for a lighter alternative. The flavor will be milder, but the soup will still retain its hearty qualities.
  • Use gluten-free macaroni to cater to dietary preferences. Ensure you adjust the cooking time according to the brand’s instructions.
  • If fresh parsley isn’t available, dried parsley can be used for garnish. Its flavor is slightly subtler but still adds a touch of freshness.

Serving Ideas and Perfect Pairings

  • Serve this soup with warm crusty bread to soak up the rich broth. The bread complements the hearty texture of the dish.
  • A green side salad with a tangy vinaigrette pairs beautifully with the flavors in the soup, adding a burst of freshness and acidity.
  • Pair it with grated Parmesan cheese sprinkled on top for an extra layer of savory richness.
  • If you’re craving more vegetables, roasted zucchini or steamed broccoli would make excellent accompaniments.

Meal Prep, Storage, and Reheating Tips

Store leftover soup in an airtight container in the refrigerator for up to 3 days. For longer storage, freeze individual portions in freezer-safe containers for up to 2 months.

To reheat, warm the soup in a pot over medium heat, adding a splash of water or broth if it has thickened too much. Alternatively, microwave individual servings in a microwave-safe bowl, stirring halfway through to ensure even heating.

When freezing, avoid adding the macaroni beforehand, as it may become mushy. Instead, cook and add fresh pasta after thawing and reheating the soup.

Hearty Macaroni Soup with Beef

Prep Time 15 minutes
Cook Time 30 minutes
Total Time 45 minutes
Servings 6 servings
Calories 320
A comforting and hearty soup made with macaroni, beef, and vegetables, perfect for a satisfying meal.

Ingredients

Instructions 

  • Heat the olive oil in a large pot over medium heat.
  • Add the ground beef and cook until browned, breaking it apart with a spoon. Drain excess fat if necessary.
  • Add the chopped onion, garlic, carrots, and celery to the pot. Sauté for 5–7 minutes, stirring occasionally, until the vegetables are softened.
  • Stir in the canned diced tomatoes, halal-certified beef broth, and water.
  • Season the soup with oregano, thyme, black pepper, paprika, and salt to taste. Bring the mixture to a boil.
  • Reduce the heat to low and let the soup simmer for 15 minutes to allow the flavors to meld together.
  • Add the macaroni pasta to the pot and cook for 8–10 minutes, or until the pasta is tender.
  • Stir in the frozen peas and cook for an additional 2–3 minutes.
  • Taste and adjust seasoning if necessary. Remove from heat.
  • Ladle the soup into bowls and garnish with fresh parsley before serving.

Notes

You can substitute ground beef with ground turkey or chicken for a lighter option. Adjust the seasoning to your preference.
Calories: 320kcal
Cost: $15
Course: Main Course
Cuisine: American
Keyword: beef soup, hearty soup, macaroni soup
A bowl of hearty macaroni soup with tender beef chunks, carrots, and celery in a savory broth.

Loved this recipe? Save it to your favorite Pinterest board so you can easily find it later! ✨