Tag

healthy recipes

Browsing

Chicken Kofta Garlic Yogurt Sauce

There’s something magical about the sounds of my family gathering around the dinner table, the gentle clinking of forks and plates harmonizing with laughter and playful banter. At that moment, the stress of the day melts away. I can smell the warm spices of Chicken Kofta in the air, blending harmoniously with the creamy garlic yogurt sauce that brings it all together. This dish weaves memories and flavors into a cozy, welcoming experience that feels just like home.

Why This Chicken Kofta Garlic Yogurt Sauce Feels Like Home

This Chicken Kofta with Garlic Yogurt Sauce doesn’t just fill our bellies; it fills our hearts. In our family kitchen, meals are not strict rituals but lively gatherings filled with love, laughter, and shared experiences. Chicken Kofta lands on our dinner table as a beloved tradition that honors both flavor and togetherness.

The aroma wafting from the grill brings nostalgia. I remember watching my grandmother effortlessly prepare koftas, her hands expertly molding the meat into perfect little shapes. This technique, combined with a vibrant, zesty yogurt sauce, creates an unbeatable duo. It feels special, yet it’s simple enough for a weeknight meal. As I serve this dish, I remind my kids about those warm kitchen memories—we’re not just cooking; we are creating lasting connections.

Why Chicken Kofta Garlic Yogurt Sauce is Our New Family Favorite

What makes this dish truly shine is its adaptability. Chicken Kofta Garlic Yogurt Sauce has swiftly become our go-to for busy weeknights and family gatherings. Together, we laugh, chat, and wrap up our busy day with this flavorful meal that’s simple yet satisfying.

Even my picky eaters find joy in this dish. The koftas are tender, and the garlic yogurt sauce is a delightful complement, bringing a fresh contrast that balances everything beautifully. I often get compliments from my kids, who ask if they can help make “the kofta with the tasty white sauce.” What more could a home cook ask for?

The Simple Magic Behind Chicken Kofta Garlic Yogurt Sauce

The beauty of Chicken Kofta lies in its simplicity. With just a handful of ingredients, it turns into something extraordinary. How can a dish made from ground chicken, spices, and a side of yogurt create such joy? The secret lies in the cooking process and how these flavors intertwine.

Not to mention, preparing this dish means minimal cleanup—an essential factor when I have little helpers around. The koftas can be grilled, baked, or pan-fried, whichever way suits your preference. Shaping and cooking them becomes an adventure for the kids, making it a fantastic activity to bond through food.

Why This Recipe Works for Our Busy, Joyful Nights

Life can get hectic, but this Chicken Kofta recipe is an absolute lifesaver. With a preparation time of about 20 minutes and cooking time around 12, you have a hearty meal ready in no time. This dish also allows me to be flexible. If I’m pressed for time, I make the kofta mixture earlier in the day and simply grill them when we’re ready to eat.

The great thing about this meal is it feels effortless yet looks impressive. Whether you have unexpected guests or simply want to enjoy a cozy family dinner, Chicken Kofta Garlic Yogurt Sauce can elevate any occasion without making you feel worn out.

Chicken Kofta Garlic Yogurt Sauce

How to Make Chicken Kofta Garlic Yogurt Sauce, The Heartwarming Way

Step-by-Step Overview: Keeping It Simple

Each time I make Chicken Kofta, I can’t help but feel a bit nostalgic. It’s a recipe filled with warmth, flavor, and stories shared around the table. As you prepare to follow along, know that it’s all about trusting your instincts. Cooking is about feeling the mixture in your hands, watching the colors come together, and anticipating the delicious aroma that will soon fill your kitchen.

Let me walk you through this delightful process. As you work your way through each step, pay attention to the texture and smell. They are signposts that guide you along the way, much like my grandmother’s kitchen always guided me.

“This is where the magic happens—when the aroma fills the kitchen and my kids come running in, asking ‘Is it ready yet?’”

Ingredients You’ll Need

Let’s gather what you need to make this delicious Chicken Kofta with Garlic Yogurt Sauce. Here’s a list of the simple ingredients that will bring this dish to life:

  • 500 grams ground chicken
  • 1 medium onion, finely chopped
  • 3 garlic cloves, minced
  • 1/4 cup fresh parsley, finely chopped
  • 1 teaspoon ground cumin
  • 1 teaspoon ground coriander
  • 1 teaspoon salt
  • 1/2 teaspoon ground black pepper
  • 1 cup plain yogurt
  • 2 tablespoons freshly squeezed lemon juice
  • Pinch of salt
  • 2 tablespoons olive oil

Don’t skip on the fresh herbs; they are absolutely the soul of this dish. The vibrant taste of parsley adds a refreshing note, while the spices work their magic. Use what you have on hand. This dish embraces creativity—it’s about enjoying the process and making it your own.

Step-by-Step Directions

  1. In a large bowl, combine the ground chicken, chopped onion, minced garlic, parsley, cumin, coriander, salt, and black pepper. Mix well until all the ingredients are thoroughly incorporated.
  2. Form the mixture into small oval-shaped koftas. Don’t worry if they’re not perfect. The love you put into shaping them is what truly matters.
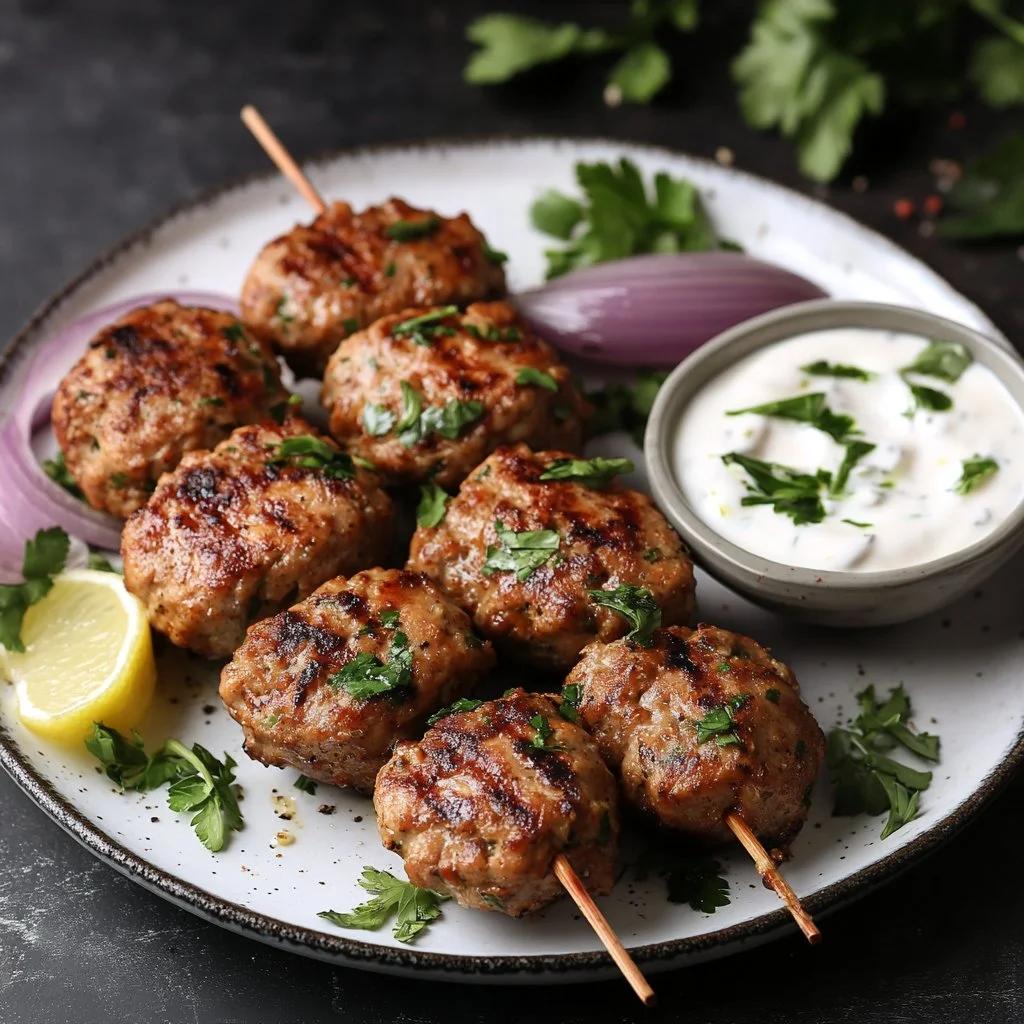
  3. Preheat your grill, and brush it with olive oil to prevent sticking. This step is important; it helps those koftas develop a lovely golden brown crust—you’ll be surprised by how much flavor that brings.
  4. Grill the koftas for about 10–12 minutes. Turn them occasionally to ensure even cooking. You’ll know they’re done when they’re firm and take on a beautiful golden color.
  5. Meanwhile, in a separate bowl, mix the yogurt, lemon juice, and a pinch of salt to prepare the garlic yogurt sauce. This creamy sauce adds the perfect zest.
  6. Serve the grilled koftas with the garlic yogurt sauce on the side, inviting everyone to help themselves.

Each step is an opportunity to connect—mixing together, shaping the kofta, and enjoying the cooking process.

Serving Chicken Kofta Garlic Yogurt Sauce with Love

When it comes to serving Chicken Kofta, a family-style operation feels right. I like to place everything in the center of the table—platter of koftas, a bowl of the garlic yogurt sauce, maybe a few pita breads, and some vibrant veggies on the side. It’s an invitation for everyone to dive in.

Those first bites are often filled with laughter as we try to see who can make the best ‘kofta wrap’ using pita and sauce. It’s so much more than just food; it’s a moment of joy shared together. Each of my kids has their preferences—one loves extra sauce, while another can’t resist piling up fresh salad greens.

Chicken Kofta Garlic Yogurt Sauce

Storage & Reheat Tips (Keeping the Goodness)

If you find yourself with leftovers (if you can believe it), storing and reheating the Chicken Kofta is straightforward. Allow the koftas to cool completely before transferring them to an airtight container. They can be kept in the refrigerator for up to three days.

When you’re ready to enjoy them again, the microwave works for a quick lunch, but I recommend reheating them in the oven for a more satisfying texture. Heat your oven to 180°C (350°F) and place the koftas on a baking sheet for about 10 minutes, until warmed through. This helps retain that delightful juiciness without making them rubbery.

My Kitchen Notes & Shortcuts

Here are a few kitchen notes and tricks that I’ve picked up over time while making this recipe:

  • If you’re short on fresh herbs, dried herbs work. Use one-third of the amount as they are more concentrated in flavor.
  • To save time, consider making the kofta mixture ahead. It can last in the fridge for up to two days. The flavors only get better!
  • Let the kids help shape the koftas. It’s a fun way to get them involved in cooking and encourages their creativity.
  • If you want to tone down the garlic in the sauce, you can add a pinch of garlic powder instead, creating a milder flavor profile.
  • Experiment with spices. A dash of smoked paprika or chili powder can bring a new level of excitement to the flavor.

Family-Friendly Variations

Chicken Kofta Garlic Yogurt Sauce is versatile. Here are a few variations we love:

  • For a lighter version, swap ground chicken for turkey—a leaner option that holds up beautifully.
  • Have some leftover cooked vegetables? Chop them finely and mix them into the kofta for added nutrition and fiber.
  • Kids prefer meatballs? Shape the mixture into balls instead of oval koftas and bake them in a sauce for a twist.
  • Want to jazz it up? Add diced feta to the meat mixture for a tangy surprise inside each kofta.

Feel free to play with any of these ideas—this is your kitchen, and it’s all about bringing your family’s tastes into the mix.

FAQs About Chicken Kofta Garlic Yogurt Sauce

Can I make this ahead for a busy week?

Absolutely! You can prepare the kofta mixture a day early, allowing the flavors to deepen. If you know your week is hectic, forming them into koftas and freezing them can work wonders.

What if I don’t have ground chicken?

No worries! Ground turkey or even beef can be an excellent alternative. Just adjust the cooking times accordingly, as they may vary slightly.

Can I grill this on a stovetop grill pan?

Sure! A stovetop grill pan works just fine; just remember to keep the heat medium to prevent burning while you get those beautiful grill marks.

How can I make this dish spicier?

If your family enjoys heat, add a pinch of crushed red pepper flakes or a splash of hot sauce to the yogurt sauce. It brings a delightful kick.

Are leftovers good for lunch?

Definitely! The flavors hold up well, and they make for a quick and satisfying lunch option. Just serve them in a wrap or on a salad.

One Final Thought from My Kitchen

As you gather around the table to share this Chicken Kofta with Garlic Yogurt Sauce, remember that it’s more than just a recipe—it’s a chance to create memories, deepen connections, and fill your home with warmth. I hope this dish finds its way into your family’s laughter and stories. If it does, my grandmother’s kitchen is smiling.

Stay curious, stay creative, and happy cooking!

Chicken Kofta with Garlic Yogurt Sauce

Prep Time 20 minutes
Cook Time 12 minutes
Total Time 32 minutes
Servings 4 servings
Calories 450
This Chicken Kofta with Garlic Yogurt Sauce is a heartwarming family favorite, seamlessly blending tender spiced chicken and zesty yogurt sauce for a comforting meal.

Ingredients

For the Kofta

  • 500 grams ground chicken (The primary protein.)
  • 1 medium onion, finely chopped (Adds flavor and moisture.)
  • 3 cloves garlic, minced (For aromatic flavor.)
  • 1/4 cup fresh parsley, finely chopped (Provides freshness.)
  • 1 teaspoon ground cumin (Adds warmth to the dish.)
  • 1 teaspoon ground coriander (Enhances the flavor.)
  • 1 teaspoon salt
  • 1/2 teaspoon ground black pepper
  • 2 tablespoons olive oil (For grilling and moisture.)

For the Garlic Yogurt Sauce

  • 1 cup plain yogurt (Base for the sauce.)
  • 2 tablespoons freshly squeezed lemon juice (Adds acidity for brightness.)
  • 1 pinch salt (To taste.)

Instructions 

Preparation

  • In a large bowl, combine the ground chicken, chopped onion, minced garlic, parsley, cumin, coriander, salt, and black pepper. Mix well until all the ingredients are thoroughly incorporated.
  • Form the mixture into small oval-shaped koftas.

Cooking

  • Preheat your grill, and brush it with olive oil to prevent sticking.
  • Grill the koftas for about 10–12 minutes, turning them occasionally to ensure even cooking. They are done when firm and golden.

Making the Sauce

  • In a separate bowl, mix the yogurt, lemon juice, and a pinch of salt to prepare the sauce.

Serving

  • Serve the grilled koftas with the garlic yogurt sauce on the side.

Notes

Store leftovers in an airtight container in the refrigerator for up to three days. Reheat in the oven for optimal texture.
Calories: 450kcal
Course: Dinner, Main Course
Cuisine: Mediterranean
Keyword: Chicken Kofta, Comfort Food, Family Recipe, Garlic Yogurt Sauce, Grilled Chicken

Chicken and Sweet Potato Meal Prep

The smell of roasted sweet potatoes and seasoned chicken fills the air. You can hear the sizzling of the chicken as it cooks in the oven, bringing a sense of comfort and warmth. This is not just a meal; it’s a family gathering around the dinner table. Today, I’m excited to share a Chicken and Sweet Potato Meal Prep that is perfect for busy weeks. Not only is this dish delicious, but it’s also packed with nutrients, making it a family favorite that you’ll want to make again and again.

Why This Works

Chicken and Sweet Potato Meal Prep

This Chicken and Sweet Potato Meal Prep recipe is a lifesaver. Between busy schedules, after-school activities, and the rush of daily life, who has time to cook every single night? This recipe allows you to cook once and enjoy delicious meals throughout the week.

The combination of chicken and sweet potatoes is not only satisfying but also nutritious. Sweet potatoes are rich in vitamins and minerals, while chicken is a great source of protein. This meal prep is perfect for families who want to eat healthy without sacrificing flavor or time. You can store your meals in individual containers, making it easy to grab and go when you need to.

Process Overview

“This is where the magic happens—when the aroma fills the kitchen.”

Meal prep is all about making life simpler in the kitchen. You can take an hour or so to prepare this dish, and the rewards will last you all week. Roasting the chicken and sweet potatoes together promotes flavor melding, and the broccoli adds a pop of green to your meals.

Your kitchen will transform into a haven of scents that will get the whole family excited about eating healthy.

Ingredients

Gather these simple ingredients for a hassle-free cooking experience:

  • 2 pounds chicken breast, diced
    Tip: Choose fresh chicken for the best flavor. If using frozen, be sure to thaw thoroughly before cooking.
  • 4 medium sweet potatoes, cubed
    Tip: Be sure to peel them for a smoother texture, or leave the skin on for additional nutrients.
  • 1 tablespoon olive oil
    Tip: A good quality olive oil enhances the flavor of the chicken and sweet potatoes.
  • 1 teaspoon garlic powder
    Tip: Garlic powder is a quick way to add flavor. If you have fresh garlic, use that for an even stronger taste.
  • 1 teaspoon paprika
    Tip: Smoked paprika can add a nice smoky flavor, which pairs beautifully with sweet potatoes.
  • 1 teaspoon salt
    Tip: Adjust the salt based on your family’s taste preferences; you can always add more later.
  • 1/2 teaspoon black pepper
    Tip: Freshly ground black pepper is more flavorful than pre-ground.
  • 2 cups broccoli florets
    Tip: Fresh or frozen broccoli works; just adjust the cooking time slightly if using frozen.
  • 1/4 cup fresh parsley, chopped
    Tip: Fresh herbs brighten up any dish. You can substitute with cilantro or thyme if you prefer.

Directions

  1. Preheat your oven to 400°F (200°C).
    This is the first step to ensuring your meal cooks evenly.
  2. In a large bowl, combine the diced chicken, cubed sweet potatoes, olive oil, garlic powder, paprika, salt, and black pepper. Mix well.
    Get your hands in there! This is part of the fun.
  3. Spread the mixture onto a baking sheet in a single layer.
    A single layer ensures even cooking and browning.
  4. Bake for 25-30 minutes or until the chicken is cooked through and sweet potatoes are tender.
    You want to see that lovely golden brown color on the edges.
  5. In the last 10 minutes of baking, add the broccoli florets to the baking sheet.
    This way, the broccoli stays bright and crisp, which adds color to your meal.
  6. Remove from the oven, garnish with chopped parsley, and let cool before portioning.
    Letting it cool makes it easier to pack away into containers.

Serving

Chicken and Sweet Potato Meal Prep

To serve this meal, I recommend family-style plating. You can set everything out on the table, letting everyone fill their plates. This fosters a sense of togetherness and allows your family members to choose their portions.

Pair this meal with a light salad or some whole-grain bread if you like. It’s all about making it a complete and satisfying dinner for everyone to enjoy.

Storage

For proper storage, let the meal cool completely before transferring it to airtight containers. You can keep these meals in the fridge for up to five days. When reheating, simply microwave them for about 2-3 minutes until they are warmed through.

If you want to freeze some portions, it’s best to do so before adding the broccoli. Freeze in single-serve containers, and they’ll last for about 3 months. To reheat, defrost in the fridge overnight and then microwave.

Kitchen Notes

  • Pre-chop the sweet potatoes and chicken the night before to save time on cooking day.
  • Use parchment paper on your baking sheet for easy cleanup.
  • Experiment with spices according to your family’s preferences.
  • Swap out the veggies based on what’s in season or on sale.
  • Invest in good-quality meal prep containers for better storage.

Variations

Are there picky eaters in your family? No problem! Here are some tweaks to make this dish more appealing:

  • Substitute chicken with turkey or even firm tofu for a vegetarian option.
  • Try different protein options like shrimp or sausage.
  • For the sweet potatoes, use butternut squash or pumpkin for a different flavor.
  • If broccoli isn’t a hit, add green beans or snap peas instead.
  • For a spicier kick, add chili powder or red pepper flakes in the mix.

FAQ

1. Can I use other vegetables?
Absolutely! Feel free to mix in your family’s favorite veggies. Carrots and bell peppers work great, too.

2. How can I make this gluten-free?
This recipe is naturally gluten-free, just ensure any spices used are gluten-free as well.

3. Can I prep this dish in advance?
Yes, it’s perfect for meal prep! Just prepare ahead of time and store in the fridge.

4. Can I use frozen chicken?
You can, but make sure it’s thawed completely for even cooking.

5. How do I know when the chicken is fully cooked?
The internal temperature should reach 165°F. Use a meat thermometer for accuracy.

Conclusion

Cooking doesn’t have to be a chore. With this Chicken and Sweet Potato Meal Prep, you’re not just making a meal; you’re creating a wonderful family experience. Your kitchen will fill with delightful aromas, and your family will gather around the table, enjoying nourishing food together. So, roll up your sleeves and enjoy the process. Happy cooking!

Chicken and Sweet Potato Meal Prep

Prep Time 15 minutes
Cook Time 30 minutes
Total Time 45 minutes
Servings 4 servings
Calories 400
This nutritious Chicken and Sweet Potato Meal Prep is perfect for busy weeks, allowing you to enjoy healthy meals without sacrificing flavor.

Ingredients

Main Ingredients

  • 2 pounds chicken breast, diced (Choose fresh chicken for the best flavor. If using frozen, be sure to thaw thoroughly before cooking.)
  • 4 medium sweet potatoes, cubed (Peel for a smoother texture, or leave skin on for additional nutrients.)
  • 1 tablespoon olive oil (A good quality olive oil enhances flavor.)
  • 1 teaspoon garlic powder (Use fresh garlic for an even stronger taste.)
  • 1 teaspoon paprika (Smoked paprika can add a nice smoky flavor.)
  • 1 teaspoon salt (Adjust based on taste preferences.)
  • 1/2 teaspoon black pepper (Freshly ground is more flavorful.)
  • 2 cups broccoli florets (Fresh or frozen works; adjust cooking time if using frozen.)
  • 1/4 cup fresh parsley, chopped (Substitute with cilantro or thyme if preferred.)

Instructions 

Preparation

  • Preheat your oven to 400°F (200°C).
  • In a large bowl, combine the diced chicken, cubed sweet potatoes, olive oil, garlic powder, paprika, salt, and black pepper. Mix well.
  • Spread the mixture onto a baking sheet in a single layer.

Cooking

  • Bake for 25-30 minutes or until the chicken is cooked through and sweet potatoes are tender.
  • In the last 10 minutes of baking, add the broccoli florets to the baking sheet.
  • Remove from the oven, garnish with chopped parsley, and let cool before portioning.

Notes

For proper storage, let the meal cool completely before transferring to airtight containers. Store in fridge for up to 5 days or freeze portions for about 3 months. Experiment with spices and substitute veggies based on what's in season.
Calories: 400kcal
Course: Dinner, Main Course
Cuisine: American, Healthy
Keyword: Chicken, Family Recipe, Healthy Dinner, meal prep, Sweet Potatoes

Bang Bang Chicken Crispy Rice Salad

Bang Bang Chicken Crispy Rice Salad is about to charm your family with its enticing aroma and vibrant colors. As you sauté and bake, the sound of sizzling chicken and the crunch of crispy rice fill the kitchen. You’ll find the perfect balance of flavors in each bite, bringing everyone together around the dinner table.

Why This Works

Bang Bang Chicken Crispy Rice Salad

This recipe is a great family meal because it’s simple and quick to prepare. With only a few ingredients and minimal cooking time, you can put a wholesome dish on the table. The crispy rice adds a delightful crunch, while the chicken and fresh veggies provide a satisfying bite. Plus, you can customize it to suit your family’s tastes.

This salad is not only delicious but also a time-saver. It allows you to pack in flavors and textures without spending all evening in the kitchen. You can prepare the ingredients while the rice and chicken are cooking, making this a truly efficient meal solution for busy nights.

Process Overview

“This is where the magic happens—when the aroma fills the kitchen.”

Creating this Bang Bang Chicken Crispy Rice Salad involves a few straightforward steps. You’ll start by cooking the rice then move on to preparing the chicken and veggies. The dressing ties everything together beautifully. Each step is quick, ensuring that you can enjoy your time in the kitchen without it feeling overwhelming.

Ingredients

Here’s what you need to create this tasty dish:

  • 1 cup uncooked rice

    • Tip: Jasmine rice works beautifully for its fragrant aroma.
  • 2 tbsp olive oil

    • Tip: Use extra virgin olive oil for a richer flavor.
  • 2 tbsp soy sauce

    • Tip: Low-sodium soy sauce can help balance salt levels if preferred.
  • 1 tbsp chili oil

    • Tip: Adjust the amount based on family spice preferences.
  • 5 chicken tenders

    • Tip: You can also use rotisserie chicken for a quicker option.
  • 3 baby cucumbers

    • Tip: Use English cucumbers for fewer seeds and better crunch.
  • 1 medium carrot, julienned

    • Tip: A vegetable peeler can make julienning easier!
  • ½ red onion (pickled or regular)

    • Tip: Pickled onions add an extra zing to the salad.
  • 1 avocado

    • Tip: Choose a ripe avocado for creaminess, but not overripe.
  • ¼ cup cilantro

    • Tip: Fresh cilantro adds a burst of flavor; it’s worth it to use fresh.
  • ¼ cup mayo

    • Tip: Substitute with avocado mayo for a healthier twist.
  • ¼ cup Greek yogurt

    • Tip: Greek yogurt adds creaminess and is lower in calories.
  • ¼ cup sweet chili sauce

    • Tip: Look for a brand with no added preservatives for a cleaner option.
  • 1 tbsp sriracha (skip if you’re spice-sensitive)

    • Tip: You can adjust the amount for your family’s spice tolerance.
  • 1 lime, juiced

    • Tip: Fresh lime juice brightens the dish and balances flavors.
  • Sesame seeds (for topping)

    • Tip: Toast your sesame seeds for extra flavor.

Directions

  1. Begin by cooking your rice according to package instructions. This is the foundation of your salad, so give it the attention it deserves!

  2. Once the rice has cooled, spread it on a parchment-lined baking sheet. Drizzle with olive oil, soy sauce, and chili oil. Mix well and bake at 425°F for 30-45 minutes, flipping halfway until crispy to your liking. This step creates the enjoyable crunch that will contrast beautifully with the other ingredients.

  3. Meanwhile, add the chicken tenders to another baking sheet. Cook according to package instructions. For an extra kick, toss in sweet chili sauce after cooking and cut the chicken into small pieces. Remember to keep it juicy!

  4. Slice the cucumbers, julienne the carrot, slice the onion into half-moons, cube the avocado, and mince the cilantro. Add all of these fresh ingredients to a large salad bowl. Freshness is key to a great salad.

  5. Make the dressing by mixing mayonnaise, Greek yogurt, sweet chili sauce, sriracha, and lime juice in a separate bowl. Taste and adjust as needed. This creamy dressing brings everything together.

  6. Add the sliced chicken to the large bowl along with the crispy rice. Pour in the dressing, toss until well combined, and finish with a sprinkle of sesame seeds. Enjoy this masterpiece with your family!

Serving

Bang Bang Chicken Crispy Rice Salad

Serving this dish family-style makes it even more enjoyable. Set the bowl in the center of the table and let everyone help themselves. This encourages conversation and connection, which is what family meals are all about. Add a side of lime wedges for extra zest, and offer additional sesame seeds if anyone wants to top their portion even more.

Storage

Leftovers can be stored in an airtight container in the refrigerator for up to three days. To reheat, place the crispy rice on a baking sheet and bake at 350°F until warm and crispy again. The veggies and chicken can be reheated gently in the microwave. This way, you can enjoy the dish on busy days without sacrificing flavor.

Kitchen Notes

  • Make rice in advance and store it in the fridge for quick assembly.
  • Use rotisserie chicken to save even more time.
  • Prep veggies ahead of time and keep them in the fridge.
  • Bake extra crispy rice to use as a topping on other dishes throughout the week.
  • Double the dressing recipe and use it as a dip for fresh veggies or chips.

Variations

This Bang Bang Chicken Crispy Rice Salad is versatile. Here are some great tweaks:

  • For picky eaters, swap out the veggies for ones they prefer, like diced bell peppers or cherry tomatoes.
  • If someone is avoiding dairy, replace the mayo and Greek yogurt with a vegan alternative.
  • Add nuts or seeds to the salad for extra crunch, like peanuts or sunflower seeds.
  • For a hearty version, mix in black beans or chickpeas.
  • Use tofu instead of chicken for a vegetarian option.

FAQ

  1. Can I prepare this salad in advance?
    Yes, you can prep everything and assemble right before serving to keep the rice crispy.

  2. What can I use in place of rice?
    Cauliflower rice or quinoa makes great alternatives for a low-carb version.

  3. How do I keep the avocado from browning?
    Use fresh lemon or lime juice on the avocado right before serving to help preserve its color.

  4. Can I freeze the salad?
    It’s not recommended to freeze once combined, but you can freeze the crispy rice separately.

  5. What other proteins can be used?
    Shrimp or beef strips can also work well in this recipe for a different flavor.

In conclusion, I hope you enjoy making and sharing this Bang Bang Chicken Crispy Rice Salad with your loved ones. It’s more than just a meal; it’s about coming together, enjoying each other’s company, and creating memories around the dinner table. Happy cooking!

Bang Bang Chicken Crispy Rice Salad

Prep Time 15 minutes
Cook Time 45 minutes
Total Time 1 hour
Servings 4 servings
Calories 450
A delightful and flavorful salad featuring crispy rice, tender chicken, and fresh veggies, topped with a creamy dressing.

Ingredients

Rice and Cooking Oil

  • 1 cup uncooked rice (Jasmine rice works beautifully for its fragrant aroma.)
  • 2 tbsp olive oil (Use extra virgin olive oil for a richer flavor.)
  • 2 tbsp soy sauce (Low-sodium soy sauce can help balance salt levels if preferred.)
  • 1 tbsp chili oil (Adjust the amount based on family spice preferences.)

Chicken

  • 5 pieces chicken tenders (You can also use rotisserie chicken for a quicker option.)

Fresh Vegetables

  • 3 pieces baby cucumbers (Use English cucumbers for fewer seeds and better crunch.)
  • 1 medium carrot, julienned (A vegetable peeler can make julienning easier!)
  • ½ piece red onion (Pickled or regular; pickled onions add an extra zing.)
  • 1 piece avocado (Choose a ripe avocado for creaminess, but not overripe.)
  • ¼ cup cilantro (Fresh cilantro adds a burst of flavor; it’s worth it to use fresh.)

Dressing

  • ¼ cup mayo (Substitute with avocado mayo for a healthier twist.)
  • ¼ cup Greek yogurt (Adds creaminess and is lower in calories.)
  • ¼ cup sweet chili sauce (Look for a brand with no added preservatives for a cleaner option.)
  • 1 tbsp sriracha (Skip if you’re spice-sensitive; adjust for family spice tolerance.)
  • 1 piece lime, juiced (Fresh lime juice brightens the dish and balances flavors.)

Toppings

  • sesame seeds (Toast your sesame seeds for extra flavor.)

Instructions 

Preparing the Rice

  • Begin by cooking your rice according to package instructions.
  • Once the rice has cooled, spread it on a parchment-lined baking sheet.
  • Drizzle with olive oil, soy sauce, and chili oil. Mix well and bake at 425°F for 30-45 minutes, flipping halfway until crispy.

Cooking Chicken

  • Add the chicken tenders to another baking sheet and cook according to package instructions.
  • For an extra kick, toss in sweet chili sauce after cooking and cut the chicken into small pieces.

Preparing Fresh Ingredients

  • Slice the cucumbers, julienne the carrot, slice the onion, cube the avocado, and mince the cilantro.
  • Add all of these fresh ingredients to a large salad bowl.

Making the Dressing

  • In a separate bowl, mix mayonnaise, Greek yogurt, sweet chili sauce, sriracha, and lime juice. Taste and adjust as needed.

Combining the Salad

  • Add the sliced chicken to the bowl along with the crispy rice.
  • Pour in the dressing, toss until well combined, and finish with a sprinkle of sesame seeds.

Notes

Serving this dish family-style encourages conversation and connection. Add a side of lime wedges and extra sesame seeds.
Calories: 450kcal
Course: Dinner, Main Course, Salad
Cuisine: Asian, Fusion
Keyword: Bang Bang Chicken, Crispy Rice Salad, Flavorful Salad, Healthy Dinner, Quick Family Meal

Cranberry Chicken Salad

The kitchen is alive with the savory sound of chopping and the hearty scent of roast chicken mingling with sweet, tart cranberries. It’s a delightful blend that hints at something special in the works. As you mix together the ingredients, you can feel the warmth of family gatherings on the horizon. Today, we’re crafting a Cranberry Chicken Salad that is not just a meal but a celebration of loved ones coming together around the table.

Why This Works

Cranberry Chicken Salad

Cranberry Chicken Salad is a perfect dish for families. It combines flavors and textures that everyone can enjoy. This recipe is also a time-saver. You can whip it up in less than 30 minutes. Make it in advance, and you have a satisfying meal ready for lunch or dinner. The balance of succulent chicken, crunchy veggies, and sweet cranberries makes it a delightful choice for any occasion.

Process Overview

“This is where the magic happens—when the aroma fills the kitchen.”

As you begin to prepare this dish, each step will unfold delicious layers of flavor. With just a little prep time, you’ll have a nourishing meal that brings smiles all around. It’s as easy as gathering the ingredients, mixing them together, and letting the aromas do their magic.

Ingredients

  • 2 cups shredded chicken: Use store-bought rotisserie chicken for convenience. It saves time and is packed with flavor.
  • 2 stalks celery, chopped: Celery adds a satisfying crunch that contrasts nicely with the tenderness of the chicken.
  • ¼ cup fresh chives, chopped: Chives lend a mild onion flavor while adding a beautiful green hue.
  • ½ red onion, finely chopped: For a bit of bite, the red onion enhances the overall flavor without overpowering.
  • ½ cup roasted pecans, chopped: The roasted pecans introduce a wonderful nutty flavor and extra crunch to the salad.
  • ¾ cup dried cranberries: Their natural sweetness complements the savory chicken and salty pecans beautifully.
  • ½ cup mayonnaise: This creamy base binds the ingredients together. Consider using Greek yogurt for a lighter option.
  • 1 tablespoon honey: Honey brings a hint of sweetness that balances the tart cranberries.
  • 1 tablespoon Dijon mustard: The mustard adds a subtle tang that elevates the flavor of the dressing.

Directions

  1. In a large bowl, combine shredded chicken, chopped celery, chives, and red onion. Take care to fold the ingredients gently, ensuring everything is evenly distributed.
  2. Add roasted pecans and dried cranberries. These ingredients bring great texture and flavor contrast.
  3. In a separate bowl, mix together mayonnaise, honey, and Dijon mustard. Taste it as you go—this is your dressing after all.
  4. Pour the dressing over the chicken mixture and toss until well combined. Imagine how those flavors will meld together as you mix.
  5. Serve chilled as a salad or in a sandwich. This versatile dish is perfect for any meal; let your family choose their favorite way to enjoy it.

Serving

Cranberry Chicken Salad

Cranberry Chicken Salad is delightful served family-style. Place the bowl of salad in the center of the table and let everyone help themselves. Offer a variety of options—serve it on fresh bread, on a bed of greens, or even in leafy lettuce wraps. The choice is yours, and it invites everyone to build their own perfect bite.

Storage

Leftovers stay fresh in the fridge for up to three days. Keep the salad in an airtight container to maintain its flavor and texture. If you prefer to enjoy it warm, consider briefly warming it in a microwave or on the stove. Just be mindful not to overheat; you want to preserve the salad’s delicious qualities.

Kitchen Notes

  • Use a store-bought rotisserie chicken to save time.
  • Opt for Greek yogurt instead of mayonnaise for a healthier option.
  • Feel free to substitute walnuts or almonds for pecans if that’s what you have on hand.
  • Chopp the ingredients in advance; they can be stored separately and mixed right before serving.
  • Add a pinch of salt and pepper to taste before serving for an extra flavor boost.

Variations

Picky eaters or specific diets need not feel left out. Here are some simple tweaks:

  • For a low-carb version, substitute chicken for chickpeas.
  • For a nut-free option, skip the pecans and add sunflower seeds for crunch.
  • Replace mayonnaise with avocado for a creamy texture that is also dairy-free.
  • Toss in diced apples or grapes for a fruity twist that kids often love.
  • For a vegan version, use plant-based chicken, vegan mayo, and honey alternatives.

FAQ

1. Can I use canned chicken instead of shredded chicken?
Yes, canned chicken works well if you are short on time. Just be sure to drain and rinse it before using.

2. How long does the chicken salad last in the fridge?
Cranberry Chicken Salad lasts about three days in the fridge. Store it in an airtight container.

3. Can I freeze the Cranberry Chicken Salad?
This salad isn’t ideal for freezing due to the mayonnaise. It’s best served fresh.

4. What can I serve with Cranberry Chicken Salad?
It pairs beautifully with whole-grain crackers, vegetable sticks, or a simple green side salad.

5. Can I prepare this salad ahead of time?
Absolutely! You can prepare the ingredients and mix them the night before. Just keep the dressing separate until you are ready to serve.

In this fast-paced world, taking time to gather your family for a meal can be a joy. Crafting a delicious dish like Cranberry Chicken Salad brings the family together. Each bite not only brings nourishment but also memories of shared laughter and love. So, gather your loved ones, and enjoy this delightful meal. Consider this an open invitation to create, share, and cherish every moment around the table.

Cranberry Chicken Salad

Prep Time 15 minutes
Total Time 15 minutes
Servings 4 servings
Calories 400
A delightful blend of shredded chicken, crunchy veggies, and sweet cranberries, perfect for family gatherings and quick meals.

Ingredients

Main Ingredients

  • 2 cups shredded chicken (Use store-bought rotisserie chicken for convenience.)
  • 2 stalks celery, chopped (Adds crunch to the salad.)
  • ¼ cup fresh chives, chopped (Lends a mild onion flavor.)
  • ½ medium red onion, finely chopped (Enhances overall flavor.)
  • ½ cup roasted pecans, chopped (Introduces a nutty flavor.)
  • ¾ cup dried cranberries (Natural sweetness compliments chicken.)
  • ½ cup mayonnaise (Consider Greek yogurt for a lighter option.)
  • 1 tablespoon honey (Balances tartness of cranberries.)
  • 1 tablespoon Dijon mustard (Adds a tangy flavor to the dressing.)

Instructions 

Preparation

  • In a large bowl, combine shredded chicken, chopped celery, chives, and red onion. Fold gently to ensure even distribution.
  • Add roasted pecans and dried cranberries for texture and flavor contrast.
  • In a separate bowl, mix mayonnaise, honey, and Dijon mustard. Adjust seasoning to taste.
  • Pour the dressing over the chicken mixture and toss gently until well combined.
  • Serve chilled as a salad or in a sandwich.

Notes

Leftovers stay fresh in the fridge for up to three days. Consider warming briefly if preferred.
Calories: 400kcal
Course: Main Course, Salad
Cuisine: American
Keyword: Chicken Salad, Cranberry Chicken Salad, Family Recipe, Healthy Salad, Quick Meal

Cranberry Chicken Wraps

There’s something magical about the smell of a warm kitchen filled with the aroma of delicious food. The sound of chopping, simmering, and sizzling fills the air, creating a cozy atmosphere that beckons families to come together. Today, I want to share with you a wonderful recipe that captures that essence beautifully: Cranberry Chicken Wraps. These wraps are not only flavorful and satisfying but also quick to prepare, making them perfect for busy weeknights.

Why This Works

Cranberry Chicken Wraps

Cranberry Chicken Wraps are an ideal family meal for many reasons. First, they offer a delightful combination of flavors and textures. The sweet tang of cranberries pairs with tender chicken, crunchy apple, and crispy celery, all wrapped up in a fresh lettuce leaf or a soft tortilla.

Plus, the best part is how quick they are to put together. You can whip up these wraps in under 30 minutes. This means more time spent with your loved ones rather than in the kitchen. Everybody can pitch in and help, making it a fun, collaborative meal prep experience.

Process Overview

“This is where the magic happens—when the aroma fills the kitchen.”

As you gather the ingredients, imagine the excitement of your family as they anticipate a delicious dinner. The process is straightforward: mix, wrap, and serve. Let’s dive into those mouthwatering ingredients that make these wraps sing.

Ingredients

  • 2 cups cooked chicken, shredded
  • 1/2 cup dried cranberries
  • 1 apple, diced
  • 1/2 cup celery, chopped
  • 1/4 cup mayonnaise
  • 1 teaspoon Dijon mustard
  • Salt and pepper to taste
  • 4 large lettuce leaves or tortillas (Lily’s Tip: If using lettuce, try romaine for a sturdy wrap. If tortillas, consider whole grain for added fiber.)

These ingredients not only offer a fabulous taste but also provide a healthy balance of protein, fruit, and vegetables.

Directions

  1. In a bowl, combine the shredded chicken, cranberries, diced apple, and chopped celery. Mix well.

    • Encouragement: This step is a great opportunity for kids to practice their mixing skills!
  2. In another bowl, mix together the mayonnaise, Dijon mustard, salt, and pepper.

    • Encouragement: Don’t worry if a little mustard stains the bowl. That just means you’re getting creative!
  3. Pour the dressing over the chicken mixture and toss to combine.

    • Encouragement: Give it a good toss! You want every piece to be coated with that creamy goodness.
  4. Place a portion of the mixture in the center of each lettuce leaf or tortilla.

    • Encouragement: Think of it like building a nest for the filling. Keeping it in the center helps with rolling.
  5. Roll up tightly, then slice in half and serve.

    • Encouragement: You can do this! The wraps will hold together beautifully and look impressive on your dinner table.

Serving

Cranberry Chicken Wraps

For a family-style presentation, arrange the wraps on a large platter. You can serve them alongside a fresh green salad for a complete meal.

Consider placing a few extra toppings in small bowls on the side, like sliced almonds or extra cranberries. This way, everyone can customize their wraps to their liking. Family meals should be all about togetherness and personal touch.

Storage

If you happen to have any leftovers (which is rare but can happen), store them in an airtight container in the refrigerator. They can typically last for about 2-3 days.

Reheating is quite simple. While the chicken wrap filling can be enjoyed cold, if you prefer it warm, place it in the microwave for about 30 seconds to a minute. Just watch that you don’t heat it too long; you want it warm but not overcooked!

Kitchen Notes

  • Use leftover chicken for a time-saver.
  • Add a splash of lemon juice to the chicken mixture for extra freshness.
  • Swap out the mayonnaise for Greek yogurt for a lighter option.
  • Make it gluten-free by using lettuce wraps instead of tortillas.
  • Get creative with your add-ins, using whatever veggies you have on hand!

Variations

If you have picky eaters, there are plenty of ways to customize the recipe. For a creamier wrap, you can add avocado slices inside. If someone prefers a spicier twist, try adding some salsa or diced jalapeños.

For those following a specific diet, consider using a protein like tofu instead of chicken or substituting the apples with diced pears for a different flavor twist.

FAQ

  1. Can I use rotisserie chicken?

    • Absolutely! It’s a great shortcut and adds delicious flavor.
  2. How do I make this recipe vegan?

    • Substitute chicken with chickpeas or tofu and use vegan mayonnaise.
  3. What kind of tortillas work best?

    • Whole wheat or spinach tortillas add added flavor and nutrition.
  4. Can I freeze these wraps?

    • While the filling freezes well, it’s best to wrap them fresh as the textures will change once frozen.
  5. How do I add more veggies?

    • Chopped bell peppers or shredded carrots work beautifully in this recipe!

Conclusion

As you gather around the table to enjoy these Cranberry Chicken Wraps, remember that food is more than just a meal; it’s a way to connect with one another. These wraps are simple yet full of flavor, making them a perfect choice for any family dinner.

I hope you enjoy making and sharing these wraps with your loved ones. Happy cooking!

Cranberry Chicken Wraps

Prep Time 15 minutes
Cook Time 15 minutes
Total Time 30 minutes
Servings 4 wraps
Calories 320
Quick and flavorful Cranberry Chicken Wraps that combine tender chicken with sweet cranberries, crunchy apple, and crispy celery, all wrapped in lettuce or tortillas. Perfect for busy weeknights.

Ingredients

Main Ingredients

  • 2 cups cooked chicken, shredded (Use leftover chicken for a time-saver.)
  • 1/2 cup dried cranberries
  • 1 unit apple, diced (Consider dicing pears for a variation.)
  • 1/2 cup celery, chopped (Chopped bell peppers or shredded carrots work beautifully.)
  • 1/4 cup mayonnaise (Greek yogurt can be used for a lighter option.)
  • 1 teaspoon Dijon mustard
  • to taste Salt and pepper
  • 4 large lettuce leaves or tortillas (If using lettuce, romaine works well; for tortillas, consider whole grain.)

Instructions 

Preparation

  • In a bowl, combine the shredded chicken, cranberries, diced apple, and chopped celery. Mix well.
  • In another bowl, mix together the mayonnaise, Dijon mustard, salt, and pepper.
  • Pour the dressing over the chicken mixture and toss to combine.
  • Place a portion of the mixture in the center of each lettuce leaf or tortilla.
  • Roll up tightly, then slice in half and serve.

Notes

For family-style presentation, arrange the wraps on a platter with toppings on the side. Store leftovers in an airtight container; they last 2-3 days in the fridge. Microwave for warming if desired.
Calories: 320kcal
Course: Dinner, Main Course
Cuisine: American
Keyword: Cranberry Chicken Wraps, Easy Recipe, Family Meal, Healthy Wraps, Quick Dinner

Cottage Cheese Chicken Salad

The delicious scent of chicken salad wafts through the air, drawing everyone into the kitchen. You hear the soft chopping of veggies and the satisfying mix of ingredients clinking together in a bowl. It’s a warm, inviting sound that feels like home.

Why This Works

Cottage Cheese Chicken Salad

This Cottage Cheese Chicken Salad is not only easy to make but is also a wonderful way to bring the family together. It’s a dish that saves time and provides a healthy meal option everyone will enjoy. The creamy cottage cheese replaces some of the mayonnaise typically found in chicken salads, making it a lighter choice without sacrificing flavor.

Imagine coming home after a long day and having this ready in just a few minutes. With simple ingredients and minimal prep time, this recipe allows you to spend more time with your loved ones at the table instead of slaving away in the kitchen.

Process Overview

“This is where the magic happens—when the aroma fills the kitchen.”

With just a few simple steps, you can create a meal that not only looks great but tastes wonderful too. The blending of flavors brings a burst of freshness with every bite. Let’s dive into how to make this delicious salad!

Ingredients

  • 2 cups cooked chicken, shredded
  • 1 cup cottage cheese
  • 1/2 cup celery, chopped
  • 1/4 cup red onion, diced
  • 1/2 cup grapes or apples, chopped (optional)
  • 1/4 cup nuts (e.g., walnuts or almonds, optional)
  • Salt and pepper to taste
  • Lettuce leaves or bread for serving

Lily’s Tips:

  • Use leftover rotisserie chicken to save time.
  • Greek yogurt can be a substitute for cottage cheese if preferred.
  • Experiment with different nuts for added texture.

Directions

  1. In a large bowl, combine the shredded chicken, cottage cheese, celery, red onion, and any optional ingredients like grapes or nuts. Mixing everything in one bowl makes for easy cleanup!

  2. Mix well until combined. Take your time to ensure everything is well-blended for maximum flavor.

  3. Season with salt and pepper to taste. Tasting as you go is a great way to ensure the salad is just right for your family.

  4. Serve on lettuce leaves, in sandwiches, or wraps. Enjoy your healthier chicken salad! This dish is very versatile—serve it however your family likes best!

Serving

Cottage Cheese Chicken Salad

Serving this Cottage Cheese Chicken Salad family-style can make mealtime even more enjoyable. Place the salad in a large bowl at the center of the table. Lay out lettuce leaves or bread on the side, allowing everyone to create their own plates. This way, each family member can customize their meal just the way they like it.

Kids will love having their mini sandwiches, while adults might prefer a refreshing salad on a crispy leaf of lettuce.

Storage

Store any leftover chicken salad in an airtight container in the refrigerator. It can stay fresh for about 3 days. When ready to enjoy, give it a quick stir and check the seasoning again. If it feels a bit dry, you can add a spoonful of cottage cheese to bring back its creaminess.

Kitchen Notes

  • Use pre-cooked chicken from the supermarket to save more time.
  • Substitute with non-fat cottage cheese for a lighter version.
  • Add herbs like dill or parsley for an extra layer of flavor.
  • Consider using a food processor for quicker chopping of veggies.
  • Prepare ingredients ahead of time for a meal that comes together even faster!

Variations

Not everyone likes the same things. Here are some ideas to cater to picky eaters or different diets:

  • For a veggie-packed version, add chopped bell peppers, carrots, or spinach.
  • If you’re avoiding dairy, try a vegan mayonnaise or avocado in place of cottage cheese.
  • Swap in BBQ sauce for a tangy twist if your family prefers a different flavor profile.
  • Use spiced nuts for an extra kick of flavor.
  • For gluten-free options, serve the salad in lettuce wraps or on gluten-free bread.

FAQ

1. Can I make this salad ahead of time?
Yes, you can prepare it a day in advance. It tastes even better after sitting for a few hours.

2. Is this salad keto-friendly?
Yes, it is low in carbs and high in protein, which makes it a good option for a keto diet.

3. Can I use canned chicken instead of cooked chicken?
Absolutely! Canned chicken works well and is a great time-saver.

4. What dressing can I add if I want more flavor?
Consider adding a splash of lemon juice or a dollop of mustard for extra zing.

5. How can I make this dish more filling?
Add quinoa or whole grains like brown rice for a heartier meal.

Conclusion

Gathering around the dining table, sharing stories over a bowl of creamy Cottage Cheese Chicken Salad, is a lovely way to reconnect with family. Each bite is not only filled with flavor but also packed with love—your love for cooking and your love for your family. Sending my warmest wishes for delicious family dinners ahead!

Cottage Cheese Chicken Salad

Prep Time 10 minutes
Total Time 10 minutes
Servings 4 servings
Calories 300
A healthy and easy-to-make chicken salad that uses cottage cheese for a lighter, yet flavorful dish, perfect for family gatherings.

Ingredients

Main Ingredients

  • 2 cups cooked chicken, shredded (Use leftover rotisserie chicken to save time.)
  • 1 cup cottage cheese (Greek yogurt can be a substitute for a different texture.)
  • 1/2 cup celery, chopped
  • 1/4 cup red onion, diced
  • 1/2 cup grapes or apples, chopped (Optional.)
  • 1/4 cup nuts (e.g., walnuts or almonds) (Optional; experiment with different nuts for added texture.)
  • Salt and pepper to taste (Taste as you go to ensure proper seasoning.)
  • Lettuce leaves or bread for serving (Serve family-style for more enjoyment.)

Instructions 

Preparation

  • In a large bowl, combine the shredded chicken, cottage cheese, celery, red onion, and any optional ingredients like grapes or nuts.
  • Mix well until combined.
  • Season with salt and pepper to taste.
  • Serve on lettuce leaves, in sandwiches, or wraps.

Notes

Store any leftover chicken salad in an airtight container in the refrigerator for about 3 days. Stir and check seasoning before serving.
Calories: 300kcal
Course: Dinner, Lunch, Salad
Cuisine: American
Keyword: Chicken Salad, Cottage Cheese, Easy Salad, Family Meal, Healthy Recipe

Avocado Chicken Egg Salad

The kitchen is alive with the delightful sound of chopping and the warm, rich aroma of fresh ingredients. As you gather the components for your latest culinary adventure, the quick click of knives on cutting boards rings like music. Today, we’re making a dish that truly brings the family together: Avocado Chicken Egg Salad. This is not just any salad; it’s a comforting blend of flavors that will remind you of home.

Why This Works

Avocado Chicken Egg Salad

This recipe excels at bringing families together while saving precious time. With simple ingredients like canned chicken, hard-boiled eggs, and creamy avocado, you can whip up a delightful meal in just minutes. It’s perfect for busy weeknights or laid-back weekends.

What makes this dish truly special is its versatility. You can serve it in so many ways—on lettuce leaves for a fresh crunch, as a delightful sandwich filling, or atop crispy crackers. Everyone in your family will love it, and it encourages you to get creative in the kitchen. Plus, it’s a healthy option filled with protein and healthy fats.

Process Overview

“This is where the magic happens—when the aroma fills the kitchen.”

Creating this avocado chicken egg salad is a process that takes a little time but rewards you with delicious results. Gather your ingredients, simply mix them together, and before you know it, a wholesome meal is ready for you and your loved ones.

Ingredients

To make this Avocado Chicken Egg Salad, you will need:

  • 1 can of chicken, drained
    Tip: Use high-quality canned chicken for the best flavor. Look for options that are free of additives.

  • 2 hard-boiled eggs, chopped
    Tip: Hard-boil eggs in advance. They can be stored in the fridge to save time.

  • 1 avocado, mashed
    Tip: Choose ripe avocados for a creamy texture. The skin should yield slightly to pressure.

  • 1 tablespoon mayonnaise (optional)
    Tip: Use Greek yogurt for a lighter alternative if desired.

  • 1 tablespoon lemon juice
    Tip: Fresh lemon juice brightens up the flavors and keeps the avocado from browning.

  • Salt and pepper to taste
    Tip: Use a pinch of sea salt for enhanced flavor.

  • Chopped celery or green onions (optional)
    Tip: Adding these can give your salad a satisfying crunch. They are also great for texture.

Directions

Follow these simple steps to create your Avocado Chicken Egg Salad:

  1. In a large bowl, combine the canned chicken, chopped hard-boiled eggs, and mashed avocado.
    Encouragement: This is the fun part. Get your hands in there and mix it up. The textures will blend beautifully!

  2. Add mayonnaise, lemon juice, salt, and pepper to the mixture and stir until well combined.
    Encouragement: Don’t hesitate to taste as you go! Adjust the seasonings to match your family’s preference.

  3. If using, mix in chopped celery or green onions for added crunch.
    Encouragement: Adding these gives your salad a refreshing twist. It’s all about personalizing it for your family.

  4. Serve on lettuce leaves, in a sandwich, or on crackers. Enjoy your protein-packed salad!
    Encouragement: Think about how everyone in the family will enjoy it, from the little ones to adults. The possibilities are endless!

Serving

Avocado Chicken Egg Salad

For a family-style serving, think about a lovely platter filled with lettuce leaves for wraps, a bowl of salad in the center, and an array of crackers on the side. This encourages everyone to customize their meals, making it a fun, interactive dining experience. Enlist the kids to help prepare their own plates; they will love it!

Storage

To keep your Avocado Chicken Egg Salad fresh, store it in an airtight container in the refrigerator. It should last for up to three days. If you need to reheat the salad, avoid using a microwave, as this can alter its texture. Instead, serve it cold or at room temperature.

Kitchen Notes

If you’re looking to save time or streamline the cooking process, consider these shortcuts:

  • Use pre-cooked or canned chicken for quick assembly.
  • Hard-boil eggs in advance and store them in the fridge.
  • Mash your avocado right before serving to maintain its vibrant color.
  • Chop celery or green onions ahead of time and keep them in the fridge for easy use.
  • Experiment with flavors by adding spices like paprika or dill to your salad.

Variations

Family members may have different tastes. Here are some tweaks you can make for picky eaters or specific diets:

  • Paleo-Friendly: Omit mayonnaise and add extra avocado for creaminess.
  • Vegetarian Option: Substitute chickpeas for the chicken for a protein boost.
  • Spicy Kick: Add diced jalapeños or a splash of hot sauce if your family enjoys heat.
  • Herb Infusion: Try mixing in fresh herbs like dill or cilantro for added freshness.
  • Crunchy Alternative: Substitute the crushed hard-boiled eggs with diced apples for a sweet crunch.

FAQ

Q1: Can I use fresh chicken instead of canned?
A: Yes, cooked shredded chicken is a great alternative. Just make sure to season it well.

Q2: How do I make hard-boiled eggs?
A: Place eggs in a pot, cover with water, bring to a boil, then cover and remove from heat. Let sit for 12 minutes before cooling in ice water.

Q3: Is this salad gluten-free?
A: Yes! When served on gluten-free crackers or lettuce leaves, this salad is perfect for a gluten-free diet.

Q4: How can I keep the avocado from browning?
A: The lemon juice helps prevent browning. Storing the salad in an airtight container also helps.

Q5: Can I make this salad ahead of time?
A: Yes! It is perfect for meal prep. Just serve it fresh by adding the avocado soon before eating to maintain its fresh taste.

Conclusion

Avocado Chicken Egg Salad is more than just a meal; it’s an opportunity to connect with family and enjoy good food together. It’s easy to prepare, customize, and share. So roll up those sleeves, gather your loved ones, and create a dish that embodies warmth and togetherness. Enjoy the process, the flavors, and the smiles around the dinner table. Happy cooking!

Avocado Chicken Egg Salad

Prep Time 10 minutes
Total Time 10 minutes
Servings 4 servings
Calories 240
A comforting blend of canned chicken, hard-boiled eggs, and creamy avocado, perfect for busy nights or laid-back weekends.

Ingredients

Main ingredients

  • 1 can canned chicken, drained (Use high-quality canned chicken for the best flavor. Look for options that are free of additives.)
  • 2 pieces hard-boiled eggs, chopped (Hard-boil eggs in advance. They can be stored in the fridge to save time.)
  • 1 whole avocado, mashed (Choose ripe avocados for a creamy texture. The skin should yield slightly to pressure.)
  • 1 tablespoon mayonnaise (optional) (Use Greek yogurt for a lighter alternative if desired.)
  • 1 tablespoon lemon juice (Fresh lemon juice brightens up the flavors and keeps the avocado from browning.)
  • to taste salt and pepper (Use a pinch of sea salt for enhanced flavor.)
  • to taste chopped celery or green onions (optional) (Adding these can give your salad a satisfying crunch. They are also great for texture.)

Instructions 

Preparation

  • In a large bowl, combine the canned chicken, chopped hard-boiled eggs, and mashed avocado.
  • Add mayonnaise, lemon juice, salt, and pepper to the mixture and stir until well combined.
  • If using, mix in chopped celery or green onions for added crunch.
  • Serve on lettuce leaves, in a sandwich, or on crackers. Enjoy your protein-packed salad!

Notes

To keep your Avocado Chicken Egg Salad fresh, store it in an airtight container in the refrigerator. It should last for up to three days. If you need to reheat the salad, avoid using a microwave, as this can alter its texture. Instead, serve it cold or at room temperature. Experiment with flavors by adding spices like paprika or dill to your salad.
Calories: 240kcal
Course: Main Course, Salad
Cuisine: American
Keyword: Avocado Chicken Egg Salad, easy recipes, Healthy Meal, Quick Meal, Salad

Thai Chicken Salad

If you could bottle the smells of a warm kitchen, you would want to keep them forever. Picture the savory scent of shredded chicken mingling with the crunch of fresh cabbage. The sound of chopping vegetables fills the air as you prepare a dish that sings of vibrant flavors. That’s the magic behind a Thai Chicken Salad—a recipe that not only delights the senses but also brings families together at the dinner table.

Why This Works

Thai Chicken Salad

This Thai Chicken Salad is a delightful combination of flavors and textures that your family will love. It is an easy-to-make dish that saves you time. The ingredients come together quickly, making it perfect for busy weeknights or laid-back weekends.

Plus, it’s a versatile recipe. You can use leftover chicken, which cuts preparation time significantly. The kids can also get involved in the kitchen, making it a fun family activity. Cooking together fosters connections and teaches important culinary skills.

Process Overview

“This is where the magic happens—when the aroma fills the kitchen.”

Getting started is simple. You will combine fresh, vibrant ingredients with a creamy peanut dressing. As you chop and mix, the tantalizing smells will draw your family in.

Gather your ingredients, and let’s dive into the tasty process of making this salad that never fails to please.

Ingredients

Here’s what you need for this delightful Thai Chicken Salad:

  • 2 cups shredded chicken
    • Lily’s tip: Use rotisserie chicken for convenience and extra flavor.
  • 4 cups chopped cabbage
    • Lily’s tip: You can mix green and purple cabbage for a colorful presentation.
  • 1 cup chopped carrots
    • Lily’s tip: Shred them for better texture and taste.
  • 1/2 cup chopped green onions
    • Lily’s tip: Slice them thinly to enhance the flavor distribution.
  • 1/2 cup chopped cilantro
    • Lily’s tip: If you have picky eaters, serve it on the side for optional use.
  • 1/2 cup roasted peanuts
    • Lily’s tip: Use unsalted peanuts to control the saltiness of the dish.
  • 1/2 cup peanut butter
    • Lily’s tip: Creamy or crunchy is up to your preference for added texture.
  • 2 tablespoons soy sauce
    • Lily’s tip: Use low-sodium soy sauce to keep it healthier.
  • 2 tablespoons lime juice
    • Lily’s tip: Freshly squeezed lime juice adds the best flavor.
  • 1 tablespoon honey
    • Lily’s tip: This balances the savory and tart flavors beautifully.
  • 1 teaspoon sesame oil
    • Lily’s tip: A little goes a long way to enhance depth of flavor.
  • Salt and pepper to taste
    • Lily’s tip: Adjust these to meet your family’s preferences.

Directions

  1. In a large bowl, combine the shredded chicken, cabbage, carrots, green onions, cilantro, and peanuts.

    • It’s delightful to see the different colors come together!
  2. In a separate bowl, whisk together the peanut butter, soy sauce, lime juice, honey, and sesame oil until smooth.

    • You’ll love how that dressing comes together.
  3. Pour the dressing over the salad and toss until well combined.

    • Make sure every bite gets that delicious flavor!
  4. Season with salt and pepper to taste.

    • Keep tasting as you go. Adjust to your family’s liking.
  5. Serve immediately or chill in the refrigerator for about 30 minutes before serving.

    • This allows the flavors to meld beautifully.

Serving

Thai Chicken Salad

To serve this salad family-style, place the salad in a large bowl at the center of the table. This invites everyone to dig in and serve themselves. You could also provide additional lime wedges for a fresh kick and more peanuts for those who want a crunchier texture. It sparks conversation and sharing, making mealtime feel special.

Storage

Thai Chicken Salad can be stored in an airtight container in the refrigerator for up to three days. If you have leftovers, keep the dressing separate if possible. This prevents the salad from getting soggy and helps maintain freshness. To enjoy the salad anew, simply toss with fresh ingredients or enjoy it in a wrap or sandwich.

Kitchen Notes

  1. Use leftover chicken for a quick meal on busy evenings.
  2. Pre-chop your veggies on the weekend to save time during the week.
  3. Consider using a pre-made salad dressing if you need extra speed. Choose one that complements Asian flavors.
  4. Involve your kids in meal prep to teach them kitchen skills while having fun.
  5. Always have your fresh ingredients ready. It helps prevent last-minute runs to the grocery store.

Variations

Feel free to tweak this salad to suit your family’s taste preferences. Here are some ideas:

  • For picky eaters: Serve the dressing on the side.
  • For a vegetarian option: Replace the chicken with grilled tofu or chickpeas.
  • For gluten-free diets: Check that your soy sauce is gluten-free or substitute with coconut aminos.
  • Add fruits: Consider adding mandarin oranges for a sweet twist or mango for a tropical flair.
  • Experiment with different nuts: Try walnuts or cashews if peanuts are not your thing.

FAQ

1. Can I meal prep this salad?
Yes! It holds up well for a few days in the refrigerator. Keep the dressing separate to keep it fresh longer.

2. How do I make this salad spicier?
Feel free to add red chili flakes or a dash of sriracha to the dressing for heat.

3. Can I use another protein?
Absolutely! Grilled shrimp or beef slices work wonderfully, too.

4. What if my kids don’t like cilantro?
You can easily skip it or substitute with parsley for a different flavor.

5. Is this salad good as a work lunch?
Definitely! Just keep the dressing separate until you’re ready to eat.

Creating delicious meals doesn’t have to be complicated. Thai Chicken Salad is a vibrant dish filled with nutrients and flavor. It’s perfect for busy families looking for both quality and taste. Remember, cooking together is not just about making food; it’s about creating memories.

So gather your loved ones in the kitchen and enjoy the delightful smells and sounds of cooking together. Happy eating!

Thai Chicken Salad

Prep Time 15 minutes
Total Time 15 minutes
Servings 4 servings
Calories 350
A vibrant and flavorful salad featuring shredded chicken, crisp vegetables, and a creamy peanut dressing, perfect for busy weeknights and family gatherings.

Ingredients

Main Ingredients

  • 2 cups shredded chicken (Use rotisserie chicken for convenience and extra flavor.)
  • 4 cups chopped cabbage (You can mix green and purple cabbage for a colorful presentation.)
  • 1 cup chopped carrots (Shred them for better texture and taste.)
  • 1/2 cup chopped green onions (Slice them thinly to enhance the flavor distribution.)
  • 1/2 cup chopped cilantro (If you have picky eaters, serve it on the side for optional use.)
  • 1/2 cup roasted peanuts (Use unsalted peanuts to control the saltiness of the dish.)

Dressing Ingredients

  • 1/2 cup peanut butter (Creamy or crunchy is up to your preference for added texture.)
  • 2 tablespoons soy sauce (Use low-sodium soy sauce to keep it healthier.)
  • 2 tablespoons lime juice (Freshly squeezed lime juice adds the best flavor.)
  • 1 tablespoon honey (This balances the savory and tart flavors beautifully.)
  • 1 teaspoon sesame oil (A little goes a long way to enhance depth of flavor.)
  • to taste salt and pepper (Adjust these to meet your family’s preferences.)

Instructions 

Preparation

  • In a large bowl, combine the shredded chicken, cabbage, carrots, green onions, cilantro, and peanuts.
  • In a separate bowl, whisk together the peanut butter, soy sauce, lime juice, honey, and sesame oil until smooth.
  • Pour the dressing over the salad and toss until well combined.
  • Season with salt and pepper to taste.
  • Serve immediately or chill in the refrigerator for about 30 minutes before serving.

Notes

To serve this salad family-style, place it in a large bowl at the center of the table. This sparks conversation and sharing, making mealtime feel special. Store leftovers in an airtight container in the refrigerator for up to three days. Keep the dressing separate to prevent sogginess. You can also enjoy this salad in a wrap or sandwich.
Calories: 350kcal
Course: Main Course, Salad
Cuisine: Asian, Thai
Keyword: Family Meal, Healthy Salad, meal prep, Quick Dinner, Thai Chicken Salad

Southwest Chicken Salad

There’s something truly special about entering the kitchen where fresh ingredients are coming together. The sound of sizzling chicken fills the air, mingling with the scent of spices and fresh vegetables. It’s that inviting experience that makes cooking feel like a warm embrace, especially when you know a delightful meal is on the way. Today, I want to share a recipe that not only tastes incredible but also brings your family together: a refreshing Southwest Chicken Salad.

Why This Works

Southwest Chicken Salad

This Southwest Chicken Salad is a wonderful blend of flavors and ingredients that make mealtimes feel just a bit more special. One of the things I love most about this dish is how it brings my family together, even on busy days. It’s easy to prepare and showcases colorful vegetables that anyone will enjoy.

The beauty of this salad lies in its ability to be prepared in advance. You can whip it up in no time, allowing you to spend more moments with your loved ones. Whether you’re enjoying a cozy dinner at home or packing lunches for the week, this salad will save you time while still delivering on taste.

Process Overview

“This is where the magic happens—when the aroma fills the kitchen.”

Creating this salad is as enjoyable as eating it. Picture yourself grilling chicken and chopping vibrant vegetables. The freshness of each ingredient comes together to create a dish that is visually appealing and bursting with flavor.

Fear not if you are a beginner in the kitchen; I encourage you every step of the way. Let’s dive into the details and bring this recipe to life.

Ingredients

Here’s what you will need for your Southwest Chicken Salad:

  • Grilled Chicken: 2 cups, sliced (I recommend using boneless, skinless chicken breasts. For added flavor, marinate it in lime juice and spices.)
  • Black Beans: 1 can (15 oz), drained and rinsed (They are a great source of protein and fiber.)
  • Sweet Corn: 1 cup, canned or frozen (Corn adds a lovely sweetness to balance the salad’s flavors.)
  • Romaine Lettuce: 4 cups, chopped (This gives a nice crunch; feel free to use mixed greens for extra texture.)
  • Avocado: 1 large, diced (Avocado brings creaminess and healthy fats.)
  • Cherry Tomatoes: 1 cup, halved (These burst with flavor and color.)
  • Chipotle-Lime Dressing: 1/2 cup (You can make your own or use a store-bought version. Adding a bit of extra lime juice can brighten the flavors even more.)

Directions

  1. Start by grilling the chicken until fully cooked and sliced. This step may take about 6-8 minutes on each side over medium heat. The smoky flavor from grilling will enhance the entire salad.

  2. In a large bowl, combine black beans, sweet corn, chopped romaine lettuce, diced avocado, and halved cherry tomatoes. The combination of colors is beautiful, and I encourage you to involve your kids in this step. They will love mixing it all together.

  3. Add the grilled chicken to the salad mixture. Making sure everything is combined helps each ingredient shine, allowing their flavors to mingle deliciously.

  4. Drizzle with chipotle-lime dressing and toss everything together until well mixed. If you want to involve the kids again, let them take turns tossing the salad. It’s so much fun!

  5. Serve immediately or prepare in advance for meal prep. This salad can be covered and stored in the fridge for a couple of days, making it a fantastic option for quick lunches.

Serving

Southwest Chicken Salad

To serve your beautiful Southwest Chicken Salad family-style, transfer it to a large serving bowl. This way, everyone can help themselves. Add some tortilla chips on the side for an extra crunch. You can also keep a bowl of extra dressing nearby for those who like a little more flavor. Your dining table will feel like a vibrant feast!

Storage

This salad is perfect for meal prep, but you want to store it correctly to keep everything fresh. If you’re saving it for later, here are a few tips:

  • Store the salad components separately, especially the dressing. This way, everything stays crisp and fresh.
  • Keep the avocado and dressed salad in airtight containers to minimize browning and maintain texture.
  • The salad can be kept in the fridge for up to three days, though for the best taste, enjoy it within two days.

Kitchen Notes

  • Cook extra chicken on a night you’re grilling for an easy addition to this salad.
  • You can use leftover grilled chicken from another meal for a quicker prep time.
  • Instead of grilling, you can bake or sauté your chicken—both methods work well.
  • Pre-chopped veggies save time if you’re in a hurry.
  • Use a store-bought dressing if you prefer convenience, but consider jazzing it up with some extra lime juice or herbs.

Variations

This salad is wonderfully customizable. Here are some tweaks for picky eaters or different diets:

  • For Vegans: Replace the chicken with grilled tofu or tempeh.
  • For Gluten-Free: This salad is naturally gluten-free, but always check the dressing to ensure no gluten ingredients.
  • For Lower-Carb Diets: Substitute black beans with sliced cucumber and add some nuts for crunch.
  • For Kids: Let them choose their favorite ingredients. They might like to add shredded cheese or omit some components they are unsure about.

FAQ

  1. Can I make this salad in advance?
    Yes, you can prepare the components ahead of time and assemble just before serving.

  2. What can I substitute for chicken?
    You can use chickpeas, shrimp, or grilled vegetables as alternatives.

  3. Is there a way to make this salad spicy?
    Yes, add jalapeños or extra chipotle sauce to the dressing for some heat.

  4. Can I use frozen corn?
    Absolutely! Just thaw and drain before adding it to the salad.

  5. How can I keep the avocado from browning?
    Squeeze a little lime juice over the diced avocado before mixing it into the salad.

Conclusion

As you gather in your kitchen to create this Southwest Chicken Salad, remember that the best meals are those shared with loved ones. This recipe provides not just a healthy and delicious option, but also an opportunity to bond over food. I encourage you to try this at home, and I promise, you will savor each bite as you create wonderful memories around the dinner table. Happy cooking!

Southwest Chicken Salad

Prep Time 15 minutes
Cook Time 15 minutes
Total Time 30 minutes
Servings 6 servings
Calories 350
A refreshing and flavorful Southwest Chicken Salad featuring grilled chicken, colorful vegetables, and a zesty chipotle-lime dressing, perfect for family gatherings and meal prep.

Ingredients

Main Ingredients

  • 2 cups Grilled Chicken, sliced (boneless, skinless breasts recommended) (Marinate in lime juice and spices for added flavor.)
  • 1 can (15 oz) Black Beans, drained and rinsed (Great source of protein and fiber.)
  • 1 cup Sweet Corn, canned or frozen (Adds a lovely sweetness.)
  • 4 cups Romaine Lettuce, chopped (Can use mixed greens for extra texture.)
  • 1 large Avocado, diced (Brings creaminess and healthy fats.)
  • 1 cup Cherry Tomatoes, halved (For flavor and color.)
  • 1/2 cup Chipotle-Lime Dressing (Add extra lime juice for brightness.)

Instructions 

Preparation

  • Grill the chicken until fully cooked, about 6-8 minutes on each side over medium heat.
  • In a large bowl, combine black beans, sweet corn, chopped romaine lettuce, diced avocado, and halved cherry tomatoes.
  • Add the grilled chicken to the salad mixture and combine well.
  • Drizzle with chipotle-lime dressing and toss until well mixed.
  • Serve immediately or prepare in advance for meal prep.

Notes

Store salad components separately to keep them fresh. Enjoy within two days for the best taste.
Calories: 350kcal
Course: Main Course, Salad
Cuisine: American, Mexican
Keyword: Family Dinner, Grilled Chicken, Healthy Salad, meal prep, Southwest Chicken Salad

Keto Chicken Salad

There’s something magical about the sound of a kitchen in full swing. The soft sound of chopping vegetables, the gentle sizzle of ingredients coming together, and the warm aroma wafting through the air. This is where comfort meets creativity, and when my family is gathered around the table, I know I have something special to share.

Today, I’m excited to introduce you to a dish that has become a staple in our home: Keto Chicken Salad. This recipe not only delights the taste buds, but it also nurtures busy lives with its simplicity and ease. Let’s dive into why this dish works so wonderfully.

Why This Works

Keto Chicken Salad

Keto Chicken Salad is a fantastic dish for the family. It combines wholesome ingredients that come together quickly, making it ideal for busy weeknights. The beauty of this recipe is that it saves time in both the kitchen and at the dinner table.

With just a few ingredients, you have a nourishing meal that everyone will love. You can prepare it ahead of time, making it perfect for meal prep. Serving it in lettuce leaves or as a wrap brings a fun twist that makes mealtime enjoyable for kids and adults alike.

Process Overview

“This is where the magic happens—when the aroma fills the kitchen.”

When you make this Keto Chicken Salad, you’ll create a dish that is satisfying, healthy, and full of flavor. The combination of the creamy dressing, crunchy vegetables, and tender chicken creates a delightful texture that your family will crave. In just a few simple steps, you’ll be on your way to a delicious meal.

Ingredients

To make this Keto Chicken Salad, you will need the following ingredients:

  • 2 cups cooked chicken, shredded
  • 1/2 cup mayonnaise
  • 1/4 cup chopped celery
  • 1/4 cup chopped red onion
  • 1 tablespoon Dijon mustard
  • Salt and pepper to taste
  • Lettuce leaves for serving

Here are some personal tips for each ingredient:

  1. Chicken: Use leftover rotisserie chicken for convenience. It adds flavor and saves time.
  2. Mayonnaise: Use a high-quality or homemade mayonnaise to elevate the dish. If you prefer a lighter option, opt for Greek yogurt.
  3. Celery: This adds a nice crunch. You can also use diced bell peppers for additional color and flavor.
  4. Red Onion: For a milder taste, soak the chopped onions in cold water for a few minutes before adding them to the salad.
  5. Dijon Mustard: This adds a tangy kick. Adjust the amount to your taste preference.

Directions

  1. In a bowl, combine the shredded chicken, mayonnaise, celery, red onion, and Dijon mustard.
    Tip: Use a fork to shred leftover chicken easily. This makes for a quicker prep step!

  2. Mix until well combined.
    Note: Be gentle here; you want a creamy texture without over-mixing.

  3. Season with salt and pepper to taste.
    Tip: Start with a little salt, mix, and taste. You can always add more!

  4. Serve on lettuce leaves or in a wrap as desired.
    Encouragement: Get creative with the presentation; it makes the meal more inviting for the family!

Serving

Keto Chicken Salad

Serving Keto Chicken Salad can be fun and interactive for the whole family. Set up a salad bar with lettuce leaves, different types of wraps, and extra toppings like avocado, cheese, or sunflower seeds. This way, everyone can build their perfect bite.

Serve it alongside a light soup or a fresh garden salad for a complete meal. Emphasize the importance of family time by gathering everyone around the table to share their creations!

Storage

To keep your Keto Chicken Salad fresh, store it in an airtight container in the refrigerator. It will last for about 3-4 days. If you want to prepare it ahead, consider storing the chicken and dressing separately and mixing them just before serving.

For reheating, gently warm the chicken in the microwave for about 30 seconds, then mix it with the cold ingredients. This way, you maintain the salad’s freshness.

Kitchen Notes

Here are some shortcuts for making this recipe even easier:

  • Use pre-cooked chicken from the deli or leftover roast chicken.
  • Chopped veggies can be bought pre-cut to save time.
  • Make a double batch of the salad; it keeps well in the fridge.
  • Store unopened mayonnaise in your pantry for quick meals anytime.
  • Experiment by adding rotisserie seasoning for extra flavor.

Variations

Don’t worry if someone in your family has specific dietary needs or preferences. Here are some tweaks you can make:

  • For Picky Eaters: Leave out the onions or celery. Add fruit like grapes or apples for a sweeter touch.
  • For Dairy-Free: Replace mayonnaise with avocado or coconut cream.
  • For More Fiber: Mix in chickpeas or diced cucumbers for added texture.
  • For A Spicy Kick: Add a dash of hot sauce or diced jalapeños.
  • For Low-FODMAP: Substitute with green onions instead of red onions.

FAQ

  1. Can I use canned chicken?

    • Yes, canned chicken can work in a pinch. Just drain well before using.
  2. Is this recipe gluten-free?

    • Yes, all ingredients are naturally gluten-free.
  3. How can I make this salad ahead of time?

    • Prepare your ingredients ahead but mix the dressing just before serving to maintain freshness.
  4. What can I substitute for mayonnaise?

    • Greek yogurt or avocado are great alternatives for a different flavor profile.
  5. Can I freeze the chicken salad?

    • It’s best not to freeze the dressed salad, as the texture may change. Freezing the chicken itself is fine; just dress fresh after thawing.

Conclusion

Keto Chicken Salad is a loving creation in our kitchen, filled with flavors that remind us of family gatherings and shared meals. It’s quick, simple, and adaptable, making it perfect for any occasion. I hope you give this recipe a try and enjoy sharing it with your loved ones around the dinner table. Embrace the joy of cooking and let it bring your family closer together. Happy cooking!

Keto Chicken Salad

Prep Time 10 minutes
Total Time 10 minutes
Servings 4 servings
Calories 300
A quick and delicious Keto Chicken Salad that combines shredded chicken, a creamy dressing, and fresh vegetables, perfect for a family meal.

Ingredients

Main Ingredients

  • 2 cups cooked chicken, shredded (Use leftover rotisserie chicken for convenience.)
  • 1/2 cup mayonnaise (Use a high-quality or homemade mayonnaise to elevate the dish.)
  • 1/4 cup chopped celery (This adds a nice crunch. Diced bell peppers can also be used.)
  • 1/4 cup chopped red onion (Soak in cold water for a milder taste.)
  • 1 tablespoon Dijon mustard (This adds a tangy kick; adjust to taste.)
  • to taste Salt and pepper (Start with a little salt, mix, and taste.)
  • as needed leaves Lettuce leaves for serving (Can also be served in wraps.)

Instructions 

Preparation

  • In a bowl, combine the shredded chicken, mayonnaise, celery, red onion, and Dijon mustard.
  • Mix until well combined, being gentle to maintain a creamy texture.
  • Season with salt and pepper to taste.
  • Serve on lettuce leaves or in a wrap as desired.

Notes

For serving, create a salad bar with various wraps, toppings, and emphasize family time around the table. Store salad in an airtight container in the refrigerator for 3-4 days, storing chicken and dressing separately if prepared ahead.
Calories: 300kcal
Course: Main Course, Salad
Cuisine: American, Keto
Keyword: Family Dinner, Healthy Salad, Keto Chicken Salad, meal prep, Quick Meal