Tag

easy recipes

Browsing

This White Chicken Chili recipe is easy to make on the Stove Top or in the Slow Cooker!

The kitchen smells like cumin and garlic, warm and comforting as a family Sunday. Pots clink softly on the stove. A cozy rhythm settles in while the whole house waits for dinner.

This White Chicken Chili is one of those recipes that fills the room with a promise. It is simple, forgiving, and made for busy families who still want a homemade meal. If you love hands-off dinners and big, comforting flavors, you will want this in your weekly rotation. For more quick chicken ideas, I often turn to a few of my favorite tried and true recipes like chicken breast recipes to try tonight when planning meals for the week.

Why this works

This White Chicken Chili recipe is easy to make on the Stove Top or in the Slow Cooker!

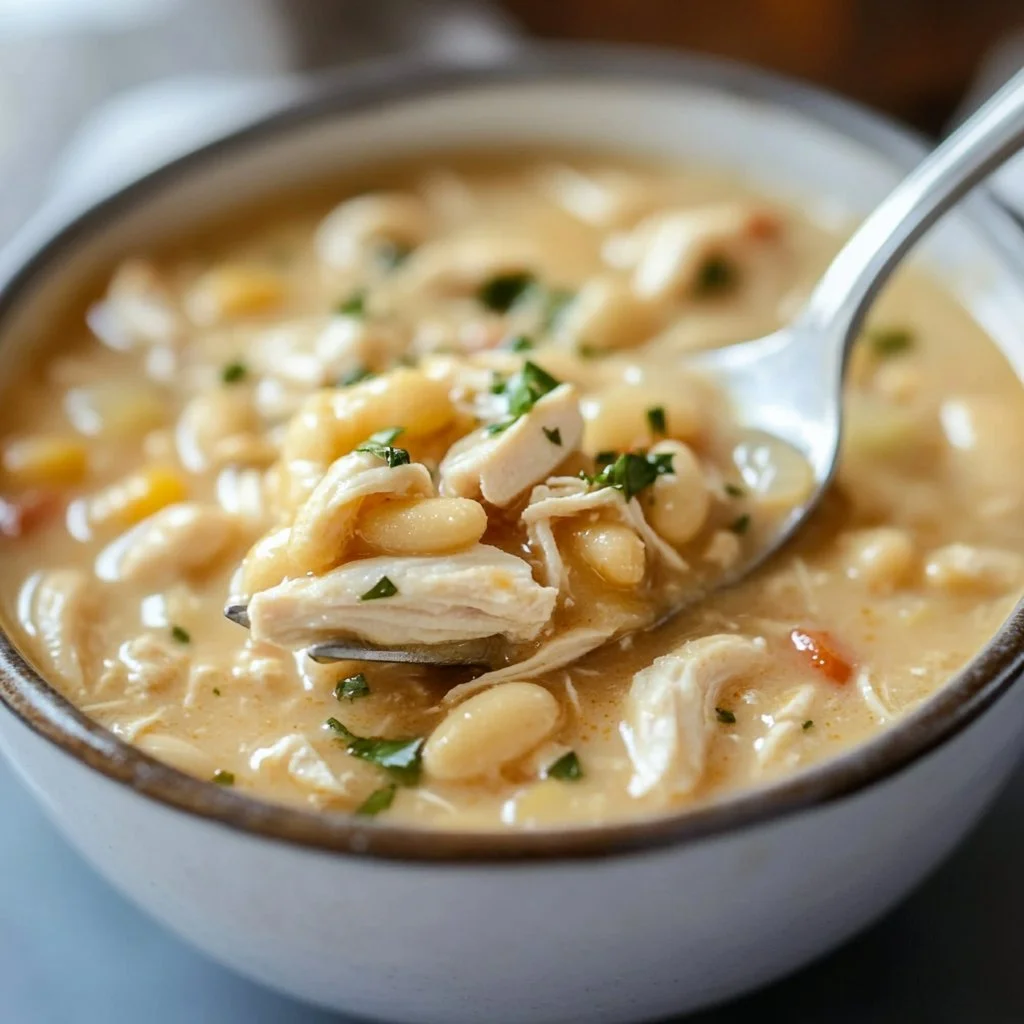
This chili balances creamy texture with bright flavors from green chiles and lime. It is thick without being heavy. The beans add body and fiber, while the tender chicken makes it a filling family meal.

It saves time because you can use leftover chicken or a rotisserie bird. That makes it perfect for weeknights when homework and activities crowd the evening. If you need more shortcuts for busy nights, check out my round up of rotisserie chicken recipes for busy weeknights to inspire quick swaps.

This recipe adapts to both the stove top and the slow cooker without losing flavor. You get the same warm, satisfying bowl of chili whether you simmer it an hour on the stove or let it cook all day on low.

Process Overview

“This is where the magic happens—when the aroma fills the kitchen.”

Start by sautéing aromatics so they bloom and taste more vibrant. Then add liquids, beans, chiles, and shredded chicken. Simmer gently to let flavors meld.

For the slow cooker, you combine everything and let time do the work. The result is tender chicken and a creamy, cozy soup that tastes like a hug. If you want more hearty family ideas, see my post about chicken and spinach recipes everyone will love for other comforting meals.
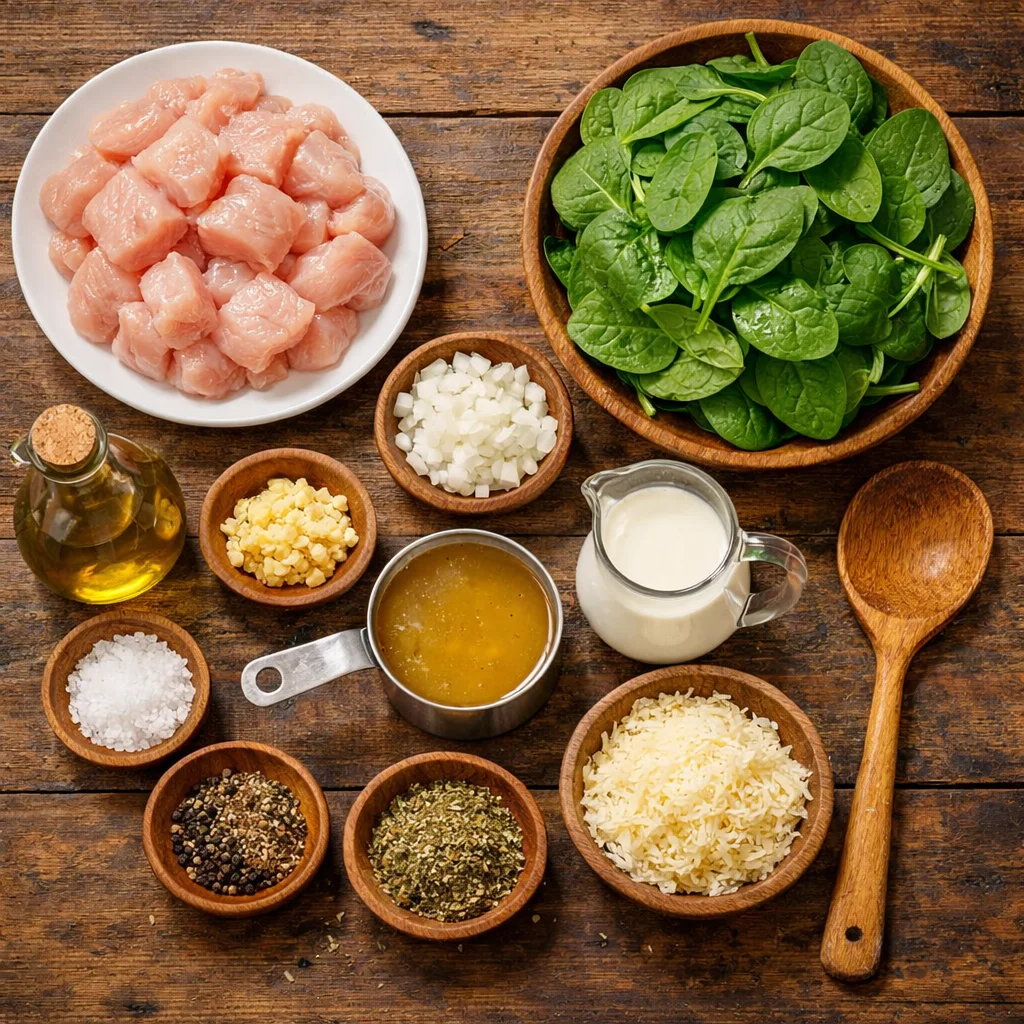
Ingredients

  • 2 Tablespoons olive oil
    • Lily’s tip: Use a neutral olive oil. It heats well and gives a gentle background flavor.
  • 1 medium onion, finely chopped
    • Tip: Yellow onion has the best balance of sweetness and bite for this dish.
  • 3 cloves garlic, minced
    • Tip: Smash and mince fresh garlic for better texture and aroma.
  • 1 teaspoon ground cumin
    • Tip: Toast cumin in the pan for 30 seconds with the oil for more depth.
  • 1 teaspoon dried oregano
    • Tip: Oregano rounds out the flavor. Use Mexican oregano if you have it.
  • 1/2 teaspoon chili powder
    • Tip: Adjust down for kids or mild palates.
  • 4 cups low-sodium chicken broth
    • Tip: Low-sodium gives you control. Taste and salt at the end.
  • 2 (15 oz) cans white beans, drained and rinsed
    • Tip: Great Northern or cannellini both work. Rinse to remove extra sodium.
  • 2 (4 oz) cans diced green chiles, mild or medium
    • Tip: Mild is family-friendly. Use medium for a little heat.
  • 2 cups cooked chicken, shredded (about 1 lb)
    • Tip: Leftover roasted chicken or a store rotisserie bird makes this so easy.
  • 1 cup frozen corn (optional)
    • Tip: Adds color and a touch of sweetness that kids often like.
  • 4 oz cream cheese, softened
    • Tip: Softening ahead helps it blend smoothly. You can substitute Greek yogurt for a lighter version.
  • 1/2 cup heavy cream or 1 cup milk for a lighter version
    • Tip: Heavy cream makes it richer. Milk keeps it comfortable for weeknights.
  • Salt and black pepper to taste
    • Tip: Add in stages. Beans and broth add sodium too.
  • Juice of 1 lime
    • Tip: Brightens every spoonful. Always add just before serving.
  • Fresh cilantro, chopped for garnish
    • Tip: Add at the end so it stays bright and fresh.

For slow cooker directions, everything goes in and cooks low and slow. If you want more crock pot inspiration, I rely on ideas from my collection of best crock pot chicken recipes for effortless dinners when I plan busy day meals.

Directions

  1. Heat oil in a large pot over medium heat.
    • Encourage: You will smell the oil get warm. That means building flavor for the whole pot.
  2. Add the onion and cook until soft, about 5 minutes.
    • Encourage: Stir often. A translucent onion gives a sweet base to the chili.
  3. Add garlic, cumin, oregano, and chili powder. Cook 1 minute until fragrant.
    • Encourage: The kitchen will fill with warm, toasty aromas. This step makes a big difference.
  4. Pour in the chicken broth, add the beans and green chiles.
    • Encourage: Use low-sodium broth and adjust salt later. Bring to a gentle simmer.
  5. Stir in shredded chicken and frozen corn if using. Simmer 10 to 15 minutes.
    • Encourage: Let flavors mingle. This keeps the chicken moist and the beans tender.
  6. Reduce heat to low and add softened cream cheese, stirring until fully incorporated.
    • Encourage: Take a moment to whisk the cheese smooth. This turns the chili creamy.
  7. Stir in heavy cream or milk, then taste and season with salt and pepper.
    • Encourage: Taste as you go. Small adjustments here make it family favorite worthy.
  8. Finish with lime juice and chopped cilantro just before serving.
    • Encourage: The lime wakes up the dish. Add it at the end for brightness.

Slow Cooker Option

  1. In a skillet, sauté onion and spices until soft and fragrant. Transfer to slow cooker.
    • Encourage: Browning the onion first boosts flavor even in the slow cooker.
  2. Add beans, chiles, shredded chicken, broth, and corn to the slow cooker. Stir.
    • Encourage: Simple layering here keeps the process tidy.
  3. Cook on low 4 to 6 hours or high 2 to 3 hours.
    • Encourage: Low and slow gives the most tender result.
  4. Stir in softened cream cheese and heavy cream, then finish with lime and cilantro.
    • Encourage: Do this at the end for a creamy, fresh finish.

For more weeknight chicken ideas that go from pot to plate fast, try my list of best 5 easy chicken recipes for weeknight dinners to keep your menu fresh.

Serving

This White Chicken Chili recipe is easy to make on the Stove Top or in the Slow Cooker!

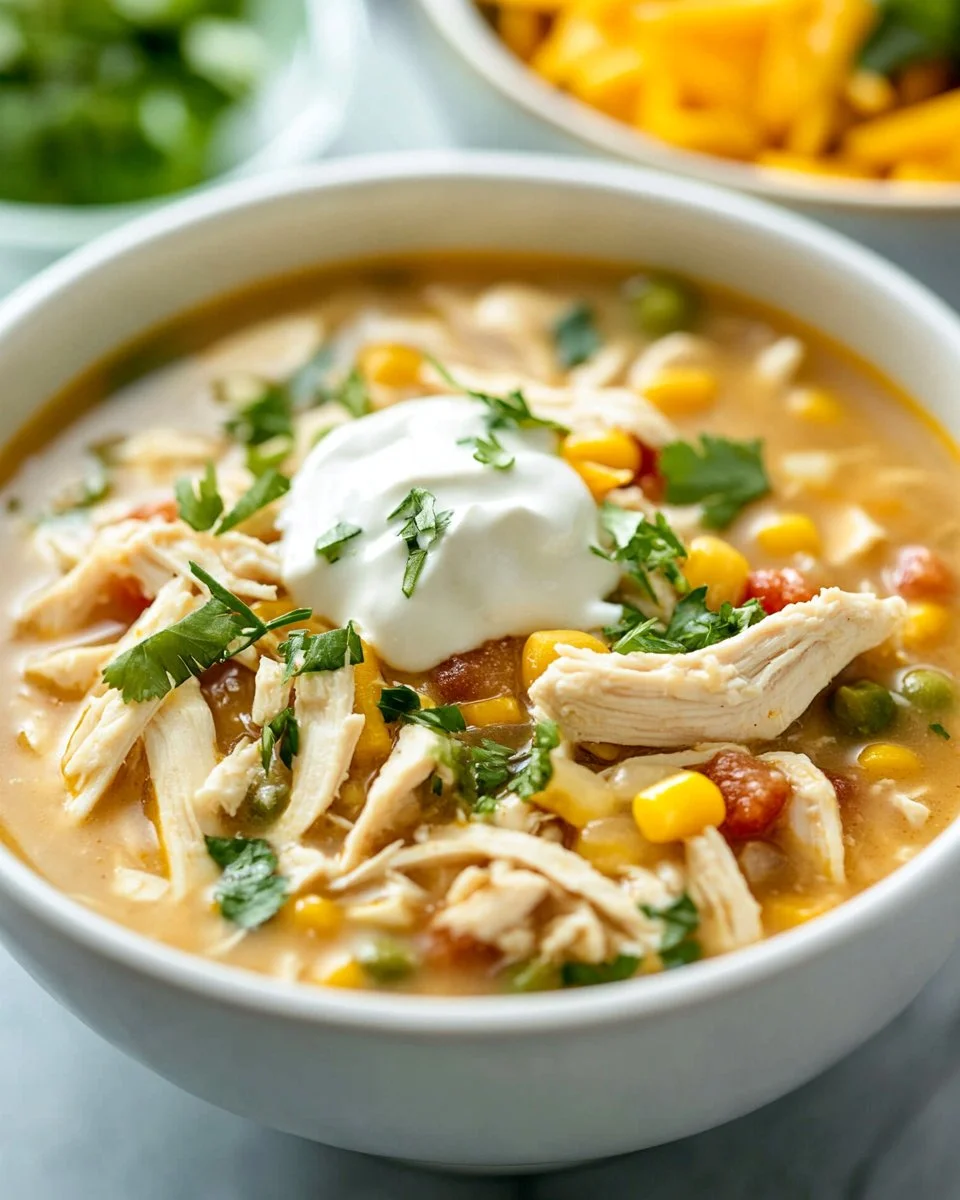
Serve this chili family-style in a deep pot or in a slow cooker on the table. Let everyone ladle their bowl and add toppings.

I love to offer a small spread on the side: shredded cheddar, sliced avocado, extra lime wedges, chopped green onions, and crushed tortilla chips. Kids can choose their favorites and it becomes a fun dinner ritual.

This dish pairs well with warm cornbread or simple green salad. It keeps the meal balanced and helps stretch the pot to feed more hungry hands.

Storage

Cool the chili to room temperature before refrigerating. Store in an airtight container in the fridge for up to 4 days.

Reheat gently on the stove over low heat. Add a splash of broth or milk to refresh the texture if needed. Microwave in single servings and stir halfway through to heat evenly.

You can freeze this chili in freezer-safe containers for up to 3 months. Thaw overnight in the fridge and reheat slowly on the stove. If you plan to freeze, use milk instead of heavy cream until after reheating, then stir in cream or cream cheese at the end.

For a quick reheat tip, warm a single bowl in the microwave for 2 minutes, stir, then heat in 30 second increments until it reaches a safe temperature. I find adding a squeeze of lime and a sprinkle of cilantro after reheating really brings the flavors back to life.

Kitchen Notes

  • Use pre-cooked chicken to cut prep time in half.
  • Swap cream cheese for Greek yogurt for a lighter version at the end.
  • Toast spices in the pan for 30 seconds to deepen flavor quickly.
  • Double the recipe and freeze half for an easy future meal.
  • Use a potato masher to break some beans for a thicker, creamier base.

Variations

  • For picky eaters: Omit chiles and reduce chili powder. Serve plain with toppings on the side so everyone customizes their bowl.
  • For a vegetarian version: Replace chicken with roasted sweet potatoes and use vegetable broth. Add extra beans for protein.
  • For dairy-free: Substitute the cream cheese with a dairy-free cream cheese or mashed white beans blended smooth to provide creaminess.
  • For a spicier bowl: Add diced jalapeño with the onions and a pinch of cayenne pepper.
  • For low-carb: Skip the beans and add extra shredded chicken and chopped zucchini to keep the bulk and texture.

FAQ

H3: Can I use canned chicken?

Yes. Canned chicken works in a pinch. Drain well and add it toward the end to avoid drying. It will taste slightly different but still comforting.

H3: How can I thicken the chili if it is too thin?

Simmer uncovered on low until it reduces, or mash a cup of the beans and stir back in. A quick roux of 1 Tablespoon flour mixed with a little water and whisked in will also thicken.

H3: Is this freezer friendly?

Yes. Cool completely, then freeze in airtight containers for up to 3 months. Thaw overnight and reheat gently on the stove.

H3: Can I make this spicy for adults only?

Absolutely. Add diced jalapeños, a can of diced tomatoes with green chiles, or a dash of cayenne. Offer mild bowls to kids and spicy toppings on the side for adults.

H3: What if I do not have cream cheese?

Stir in a cup of plain Greek yogurt off the heat for creaminess. If you prefer no dairy, blend a cup of beans with a little broth and stir it back in.

Conclusion

I hope this White Chicken Chili becomes a comforting weeknight go-to for your family. It is forgiving, easy to customize, and feeds a crowd without fuss. If you want a variation that cooks all day, I recommend the slow cooker version I often use: Slow Cooker White Chicken Chili (Creamy + Easy!). For another slow cooker favorite with a different twist, I like the recipe from The Chunky Chef: Crockpot White Chicken Chili (Contest Winning!) – The Chunky Chef.

Thanks for cooking with me. From my kitchen to yours, may dinner be warm, simple, and full of good conversation.

White Chicken Chili

Prep Time 15 minutes
Cook Time 30 minutes
Total Time 45 minutes
Servings 6 servings
Calories 350
A warm and comforting white chicken chili that balances creamy texture with bright flavors, perfect for busy families who want a homemade meal.

Ingredients

For the chili base

  • 2 Tablespoons olive oil (Use a neutral olive oil.)
  • 1 medium onion, finely chopped (Yellow onion has the best balance of sweetness and bite.)
  • 3 cloves garlic, minced (Smash and mince fresh garlic for better texture.)
  • 1 teaspoon ground cumin (Toast cumin in the pan for more depth.)
  • 1 teaspoon dried oregano (Use Mexican oregano if you have it.)
  • 1/2 teaspoon chili powder (Adjust down for kids.)
  • 4 cups low-sodium chicken broth (Gives control over salt content.)
  • 2 (15 oz) cans white beans, drained and rinsed (Great Northern or cannellini both work.)
  • 2 (4 oz) cans diced green chiles, mild or medium (Mild is family-friendly.)
  • 2 cups cooked chicken, shredded (about 1 lb) (Leftover roasted chicken or rotisserie bird makes this easy.)
  • 1 cup frozen corn (optional) (Adds sweetness kids often like.)
  • 4 oz cream cheese, softened (Softening ahead helps it blend smoothly.)
  • 1/2 cup heavy cream or 1 cup milk (Heavy cream makes it richer.)
  • to taste Salt and black pepper (Add in stages.)
  • Juice of 1 lime (Brightens every spoonful.)
  • to taste Fresh cilantro, chopped for garnish (Add at the end so it stays bright.)

For serving

  • Shredded cheddar, sliced avocado, extra lime wedges, chopped green onions, crushed tortilla chips (Kids can choose their favorites.)

Instructions 

Preparation

  • Heat oil in a large pot over medium heat.
  • Add the onion and cook until soft, about 5 minutes.
  • Add garlic, cumin, oregano, and chili powder. Cook 1 minute until fragrant.
  • Pour in the chicken broth, add the beans and green chiles.
  • Stir in shredded chicken and frozen corn if using. Simmer for 10 to 15 minutes.
  • Reduce heat to low and add softened cream cheese, stirring until fully incorporated.
  • Stir in heavy cream or milk, then taste and season with salt and pepper.
  • Finish with lime juice and chopped cilantro just before serving.

Slow Cooker Instructions

  • In a skillet, sauté onion and spices until soft and fragrant. Transfer to slow cooker.
  • Add beans, chiles, shredded chicken, broth, and corn to the slow cooker. Stir.
  • Cook on low for 4 to 6 hours or high for 2 to 3 hours.
  • Stir in softened cream cheese and heavy cream, then finish with lime and cilantro.

Notes

Store chili in an airtight container in the fridge for up to 4 days. It can be frozen in freezer-safe containers for up to 3 months. Reheat gently and add a splash of broth or milk to refresh the texture if needed.
Calories: 350kcal
Course: Dinner, Main Course
Cuisine: American
Keyword: Comfort Food, Easy Dinner, Family Recipe, Slow Cooker, White Chicken Chili

Delicious Chicken Chimichanga

The kitchen smells like warm tortillas and melted cheese. I hear the gentle sizzle as the filling comes together on the stove. Little hands tap on the counter and a timer ticks while everyone waits with happy patience.

I love this moment. It is the kind of cooking that turns a weekday into something special. The sound of the oven door closing always feels like the start of a small celebration in our home.

Why this works

Delicious Chicken Chimichanga

This recipe works because it is simple, fast, and fits into family life. You can use leftover chicken from a roast, a rotisserie bird, or a quick batch of poached breasts. That saves time and keeps costs down.

It is also easy to scale. Make a few for a small dinner, or a dozen for a weekend gathering. Kids and adults both love the crispy outside and the creamy, cheesy inside.

I designed this dish to be forgiving. The flavors are familiar, and the steps are straightforward. You do not need special skills, just some basic pantry items and a bit of confidence.

Family and time-saving benefits

I constantly test recipes in a real family kitchen. I keep my pantry stocked with tortillas, canned chilies, and shredded cheese for nights when time runs short.

Prep ahead by shredding chicken on Sunday and storing it in the fridge. On busy weeknights, assembly takes about 10 minutes and the oven does the rest. That is why chimichangas become a go-to weeknight meal at our house.

Process Overview

“This is where the magic happens—when the aroma fills the kitchen.”

This is a hands-on recipe that feels special but moves quickly. The filling is a simple mix of shredded chicken, cheese, mild green chilies, sour cream, and taco seasoning.

You build each chimichanga like a small present. Folding the tortilla around the filling keeps everything neat and helps the outside get golden and crisp. Baking gives you the texture you want without deep frying.

I encourage you to let the oven time be your friend. While the chimichangas bake, set the table, chop fresh toppings, and let everyone pick a salsa or garnish.

Ingredients

  • 2 cups cooked chicken, shredded
    • Lily’s tip: Use rotisserie chicken to save time. If you poach, shred while still warm for easier pulling.
  • 1 cup shredded cheese (cheddar or Mexican blend)
    • Lily’s tip: Use a blend for softer, melty texture. Grate fresh cheese for the best melt and flavor.
  • 1 can (4 oz) mild green chilies, drained
    • Lily’s tip: Rinse quickly to reduce salt if your canned chilies seem very salty.
  • 8 large flour tortillas
    • Lily’s tip: Look for tortillas labeled "burrito size" or 10 inch for easy rolling. Warm them briefly to prevent cracking.
  • 1/4 cup sour cream
    • Lily’s tip: Full fat sour cream gives the creamiest filling. For a lighter version, use plain Greek yogurt.
  • 1 teaspoon taco seasoning
    • Lily’s tip: Use your favorite store mix or my homemade blend of chili powder, cumin, garlic powder, and a pinch of salt.
  • Cooking spray
    • Lily’s tip: Use an oil spray for an even crisp without excess oil. Light coverage works best.
  • Salsa, for serving
    • Lily’s tip: Offer a mild and a spicy salsa so everyone can choose. Fresh pico de gallo is a nice option.

Each ingredient is chosen to be pantry-friendly and family approved. The quantities here are designed to feed four to six people, depending on appetite.

Directions

  1. Preheat the oven to 375°F (190°C).

    • Encouraging note: Let the oven fully heat while you assemble. A hot oven gives the best crisp on the tortilla.
  2. In a mixing bowl, combine cooked chicken, cheese, green chilies, sour cream, and taco seasoning.

    • Encouraging note: Taste a small pinch of the filling. Adjust seasoning with a little salt or extra taco mix if you like more zip.
  3. Place about 1/3 cup of the chicken mixture in the center of each tortilla.

    • Encouraging note: Less is more here. Overfilling can make rolling tricky. Keep the edges clear for a tight seam.
  4. Fold the sides of the tortilla over the filling, then roll it up to form a burrito.

    • Encouraging note: Fold the sides first, then roll snugly from one end. If a tortilla cracks, use a little water on the edge to seal it.
  5. Place the chimichangas seam side down on a baking sheet.

    • Encouraging note: Line the baking sheet with foil or parchment for easy cleanup. Leave space between each chimichanga so they crisp evenly.
  6. Spray the tops lightly with cooking spray.

    • Encouraging note: A light spray is all you need. It helps the tortillas brown and get that golden, crunchy texture.
  7. Bake for about 25-30 minutes or until golden and crispy.

    • Encouraging note: Check at 20 minutes if your oven runs hot. Rotate the sheet halfway through for even browning. The tops should be deeply golden.
  8. Serve with salsa.

    • Encouraging note: Transfer to a platter and let them rest for a couple of minutes. Serve with warm salsa, extra sour cream, and your favorite toppings.

These steps are simple. Take them at your pace. Invite kids to help with filling or arranging the chimichangas on the sheet. This dish is a great way to include little helpers.

Serving

Delicious Chicken Chimichanga

Serve chimichangas family-style right from the center of the table. Arrange them on a large platter and offer small bowls of salsa, guacamole, and sour cream.

I like to add chopped cilantro, lime wedges, and a few slices of fresh jalapeño for the adults. For kids, offer shredded lettuce and diced tomatoes so they can build their own plate.

A side of rice and beans makes the meal feel complete. For a lighter dinner, pair the chimichangas with a crisp green salad and a squeeze of lime.

Presentation tip: Cut one open so the melted cheese and chicken are visible. That warm, cheesy center invites everyone to dig in.

Storage

Refrigerator
Store leftover chimichangas in an airtight container for up to 3 days. Place a sheet of parchment between layers if you stack them.

Reheating in the oven
Reheat at 350°F (175°C) for 10 to 15 minutes. This method brings back the crispness and keeps the filling warm without drying it out.

Reheating in the microwave
Microwave for 60 to 90 seconds if you are short on time. The tortilla will be softer. To restore crispness, pop it under the broiler for 1 to 2 minutes afterward, watching carefully.

Freezing
Wrap each chimichanga tightly in foil and store in a freezer bag for up to 2 months. Reheat from frozen at 375°F (190°C) for 30 to 40 minutes until heated through and crisp.

Food safety tip: Make sure shredded chicken is cooled quickly before refrigerating. Store within two hours of cooking to keep your family safe.

Kitchen Notes

  • Shortcut: Use rotisserie chicken to save time and add flavor.
  • Meal prep: Assemble chimichangas ahead and keep them covered in the fridge for up to 24 hours before baking.
  • Crisp tip: A light spray of oil is better than brushing. It yields an even crunch without excess grease.
  • Double batch: This recipe doubles easily. Use two baking sheets and rotate them in the oven for even baking.
  • Kid helper: Give children a spoon for filling placement and a small spatula for rolling. It keeps things tidy and fun.

These notes come from many evenings cooking with family around me. Small shortcuts make the difference when weeknights get busy.

Variations

  • For picky eaters: Leave out the green chilies and use a mild cheese. Serve salsa on the side so everyone can choose how much to add.
  • Vegetarian: Swap the chicken for a mix of black beans and corn. Add a little cumin and lime for brightness.
  • Low carb: Use large romaine leaves as wraps and bake very briefly to warm the filling, then enjoy a lighter crunch.
  • Spicy version: Add a diced chipotle pepper or a teaspoon of adobo sauce to the filling. Offer cooling toppings like sour cream and avocado.
  • Dairy-free: Use a dairy-free sour cream and a plant-based shredded cheese. Bake the same way for a family-friendly alternative.

Experiment with what your family likes. These chimichangas accept many changes and still deliver comfort.

FAQ

Q: Can I freeze chimichangas before baking?
A: Yes. Wrap each chimichanga tightly in foil or plastic wrap and freeze for up to 2 months. Bake from frozen at 375°F (190°C) for 30 to 40 minutes.

Q: Can I make these ahead of time for a party?
A: Absolutely. Assemble them and refrigerate until ready to bake. If you need to store for more than 24 hours, freeze them and bake when guests arrive.

Q: How do I keep chimichangas from getting soggy?
A: Avoid overfilling and keep the tortilla edges dry to seal them well. Bake on a wire rack set over a baking sheet if you have one, for extra airflow and crispness.

Q: What sides go well with chimichangas?
A: Rice, beans, fresh salad, or roasted vegetables are all great options. For a lighter meal, pair with a citrusy slaw or chopped tomato salad.

Q: Can kids help make chimichangas?
A: Yes. Kids can help measure, mix the filling, and place filling on tortillas. Supervise the rolling and oven steps for safety.

These answers reflect what I learned after testing this recipe multiple times in my home kitchen with my family. I aim to make this dish reliable and repeatable.

Conclusion

I hope this recipe brings warmth and ease to your family table. I use these chimichangas on busy nights and for casual weekend meals. They are a comforting, crowd-pleasing option that can be adapted to many tastes.

If you want more ideas for chicken chimichangas with different fillings, try the Chicken Chimichanga Recipe with Black Beans and Corn for a heartier twist.

For a classic take and extra tips on shaping and cooking, I also like this recipe guide from Homemade Chimichangas with Chicken – Carlsbad Cravings.

Thanks for cooking with me. Come back soon for more family-friendly recipes and simple kitchen joy.

Cheesy Chicken Chimichangas

Prep Time 10 minutes
Cook Time 30 minutes
Total Time 40 minutes
Servings 6 servings
Calories 300
These cheesy chicken chimichangas are a comforting, crowd-pleasing option that can be adapted to many tastes. Fried to golden perfection, they are easy to prepare and perfect for busy weeknights.

Ingredients

Filling Ingredients

  • 2 cups cooked chicken, shredded (Use rotisserie chicken to save time.)
  • 1 cup shredded cheese (cheddar or Mexican blend) (Use a blend for softer, melty texture. Grate fresh cheese for the best melt and flavor.)
  • 1 can (4 oz) mild green chilies, drained (Rinse quickly to reduce salt if your canned chilies seem very salty.)
  • 1/4 cup sour cream (Full fat sour cream gives the creamiest filling. For a lighter version, use plain Greek yogurt.)
  • 1 teaspoon taco seasoning (Use your favorite store mix or my homemade blend of chili powder, cumin, garlic powder, and a pinch of salt.)

Assembly Ingredients

  • 8 large flour tortillas (Look for tortillas labeled "burrito size" or 10 inch for easy rolling. Warm them briefly to prevent cracking.)
  • cooking spray Cooking spray (Use an oil spray for an even crisp without excess oil. Light coverage works best.)
  • Salsa, for serving (Offer a mild and a spicy salsa so everyone can choose.)

Instructions 

Preparation

  • Preheat the oven to 375°F (190°C).
  • In a mixing bowl, combine cooked chicken, cheese, green chilies, sour cream, and taco seasoning.

Assembling Chimichangas

  • Place about 1/3 cup of the chicken mixture in the center of each tortilla.
  • Fold the sides of the tortilla over the filling, then roll it up to form a burrito.
  • Place the chimichangas seam side down on a baking sheet.
  • Spray the tops lightly with cooking spray.

Baking

  • Bake for about 25-30 minutes or until golden and crispy.
  • Serve with salsa.

Notes

Store leftover chimichangas in an airtight container for up to 3 days. Reheat in the oven at 350°F (175°C) for 10-15 minutes or in the microwave for 60-90 seconds.
Calories: 300kcal
Course: Dinner, Main Course
Cuisine: Mexican
Keyword: cheesy, Chicken, Chimichangas, Easy Dinner, Family-Friendly

Easy Mexican Chicken Marinade

I can still smell it now. The bright scent of lime, the warm whisper of smoked paprika, and the soft sizzle as the chicken hits the pan. The kitchen hums with a familiar rhythm that tells me dinner is going to bring smiles.

I’m Lily, a home cook and food blogger who has fed many messy-handed kids and busy adults. I write simple, reliable recipes that families can trust. If you want a weeknight hero, my quick family chicken recipes are ready when you are.

Why this works

Easy Mexican Chicken Marinade

This marinade balances bright, smoky, and savory notes so every bite tastes lively but not overwhelming. The lime juice tenderizes the meat, the oil carries the spices, and the brown sugar softens the heat. Together, they give you juicy chicken in less time.

Using one marinade for multiple cooking methods saves time for busy families. Marinate in the morning, and you can grill, bake, or air fry by dinner. If your kids love sliders, try my Bang Bang Chicken Sliders recipe for another easy crowd-pleaser.

Process Overview

“This is where the magic happens—when the aroma fills the kitchen.”

In short, you whisk the spices with lime, oil, and a touch of brown sugar. Coat the chicken and give it time to absorb the flavors. Then cook using your preferred method. The steps are simple and forgiving.

For those who like using an air fryer, I’ve gathered tips and tricks in my air fryer chicken recipes to speed things up and keep the chicken juicy.

Ingredients

  • 500 g boneless chicken breast
    • Lily’s tip: Pound thicker breasts gently to an even thickness for even cooking. If you prefer thighs, they stay juicier and need slightly less time.
  • ½ Tablespoon Chili powder
    • Lily’s tip: Use mild or hot chili powder depending on your family. Start mild for kids and add more to the adults’ servings if you like.
  • 1 teaspoon Cumin
    • Lily’s tip: Toast cumin briefly in a dry skillet before adding if you want a deeper, earthier aroma.
  • ½ Tablespoon Smoked paprika
    • Lily’s tip: Smoked paprika gives that campfire flavor. If you only have regular paprika, add a tiny pinch of chipotle for smokiness.
  • 1 teaspoon oregano
    • Lily’s tip: Dried oregano works fine. If you have fresh, chop it and add at the end of mixing for the brightest flavor.
  • 1 Tablespoon fresh cilantro (finely chopped)
    • Lily’s tip: Add cilantro in the marinade for flavor and again fresh on top after cooking for color and brightness.
  • 2 Tablespoons Lime juice
    • Lily’s tip: Freshly squeezed is best. Bottled will work, but fresh brings a cleaner, brighter finish.
  • ½ teaspoon Brown sugar
    • Lily’s tip: Brown sugar balances acidity and heat. If avoiding sugar, try 1 teaspoon of honey instead.
  • 2 Tablespoons olive oil
    • Lily’s tip: Olive oil helps the marinade coat and keeps the chicken tender. For higher heat grilling, use a neutral oil like avocado.
  • Salt and black pepper
    • Lily’s tip: Season lightly at first. You can always add more after cooking. If you use kosher salt, measure by weight for consistent results.

If you want a cheesy air-fryer twist, try these Crunchy Crispy Air Fryer Chicken Mozzarella Wraps after you master this marinade.

Directions

  1. Make the marinade:

    • Into a bowl, add chili powder, cumin, smoked paprika, oregano, brown sugar, cilantro leaves, lime juice, olive oil, salt and black pepper. Mix all to combine.
    • Encouragement: Mix until the sugar dissolves and the spices smell fragrant. This step is quick and all about building flavor.
  2. Marinate the chicken:

    • Place the chicken breast or thighs in a shallow dish or a ziploc bag ( plastic bag ) and pour the marinade over the chicken. Mix it to combine. Cover the chicken with clingfilm and let it sit for at least 30 minutes or up to 24 hours in the fridge for the chicken to be well-infused.
    • Encouragement: If you are short on time, even 30 minutes helps. Overnight is best when you can plan ahead. The longer it sits, the more tender and flavorful the meat becomes.
  3. Cook:

    • You can bake, grill, air fry, or pan-fry the chicken as desired.The internal temperature of cooked chicken should register at least 165F/74C with an instant read thermometer.
    • Encouragement: Use a thermometer for confidence. If you prefer crosshatch grill marks, preheat the grill and oil the grates. For an air fryer, preheat to 380F and check around 10 minutes. For baking, 400F usually works for breasts in a single layer.
  4. Rest and slice:

    • Let the chicken rest for 5 minutes after cooking so juices redistribute. Slice thinly across the grain for the best texture.
    • Encouragement: This short pause makes a big difference. It gives you tender, juicy slices for tacos, salads, or bowls.

Serving

Easy Mexican Chicken Marinade

Serve family-style for easy sharing. Place sliced chicken in a warm platter with bowls of lime wedges, extra chopped cilantro, diced onions, and warm tortillas. Let everyone build their own tacos or bowls.

I like to offer a simple rice and bean side, a little shredded lettuce, and sliced avocado. Kids can assemble their own plates, which makes dinner more relaxed. For a lighter meal, serve over a big green salad or quinoa.

If you want more air fryer meal ideas to serve alongside, here are more air fryer ideas that pair nicely.

Storage

  • Refrigerator:

    • Store leftover cooked chicken in an airtight container for up to 4 days.
    • Tip: Slice before storing so you can quickly add it to salads, wraps, or lunch bowls.
  • Freezer:

    • Freeze cooked chicken in freezer-safe bags for up to 3 months. Label with the date.
    • Tip: Flash-freeze pieces on a tray before bagging to avoid clumping.
  • Reheating:

    • Gently reheat in a skillet with a splash of broth or water to keep it moist, or warm in the oven at 325F until heated through.
    • Tip: Avoid microwaving straight from the fridge without a cover. A short, covered reheat keeps moisture in.

Kitchen Notes

  • Use a shallow dish or ziploc for even coating and easy cleanup.
  • If using wooden skewers for grilling, soak them 30 minutes first to prevent burning.
  • For a smokier flavor, finish grilled chicken over a charcoal fire or add a small pinch of smoked salt.
  • If your family prefers milder food, reduce chili powder to ¼ Tablespoon and keep extra hot sauce on the side.
  • Double the marinade when cooking for guests so you have extra for basting or light drizzling before serving.

Variations

  • Kid-friendly:

    • Reduce chili powder and omit smoked paprika for a gentler flavor. Add a squeeze of honey for a sweet finish.
  • Low-carb:

    • Serve over a bed of cauliflower rice with avocado and shredded cabbage.
  • Keto:

    • Use avocado oil in the marinade and serve with a green salad topped with cheese and sour cream.
  • Vegetarian:

    • Replace chicken with firm tofu or portobello mushrooms. Press tofu first, then marinate and cook until edges are golden.
  • Spicy fans:

    • Add ¼ teaspoon cayenne or 1 chopped chipotle in adobo to the marinade for a smoky heat boost.

FAQ

Q: How long should I marinate the chicken for best flavor?
A: For noticeable flavor, marinate at least 30 minutes. For best results, marinate 4 to 12 hours. Overnight is fine, but try not to exceed 24 hours to avoid texture changes.

Q: Can I use frozen chicken?
A: It is best to thaw chicken before marinating so the flavors penetrate evenly. If pressed, thaw in the fridge overnight, then marinate.

Q: Is this safe for grilling on high heat?
A: Yes. Oil in the marinade helps prevent sticking. Grill on medium-high and watch closely to avoid burning the sugar. Lower heat works well for even cooking.

Q: Can I double the recipe?
A: Absolutely. Double the marinade proportions and use a larger dish or two bags to coat the chicken evenly. This is great for meal prep.

Q: What sides pair best with this chicken?
A: Think simple and family-friendly: warm tortillas, rice and beans, a green salad, roasted vegetables, or corn on the cob.

Conclusion

I hope this Easy Mexican Chicken Marinade becomes one of your family favorites. It is forgiving, quick to assemble, and versatile enough for tacos, bowls, salads, and sandwiches. For a similar take with different proportions and tips, I often look to recipes like Mexican Chicken Marinade for tacos, fajitas, and more! and a straightforward guide like Easy Mexican Chicken Marinade – The Dinner Bite for extra inspiration.

Thanks for cooking with me. When dinner is this simple and good, the whole family wins.

Easy Mexican Chicken Marinade

Prep Time 30 minutes
Cook Time 15 minutes
Total Time 45 minutes
Servings 4 servings
Calories 250
This versatile marinade combines lime, spices, and a touch of brown sugar to create juicy, flavorful chicken, perfect for grilling, baking, or air frying.

Ingredients

For the marinade

  • 500 g boneless chicken breast (Pound thicker breasts gently to an even thickness for even cooking.)
  • ½ Tablespoon Chili powder (Use mild or hot chili powder depending on your family.)
  • 1 teaspoon Cumin (Toast cumin briefly in a dry skillet for deeper aroma.)
  • ½ Tablespoon Smoked paprika (For a campfire flavor. Add a tiny pinch of chipotle for smokiness if using regular paprika.)
  • 1 teaspoon Oregano (Dried oregano works fine; fresh can be added at the end for brighter flavor.)
  • 1 Tablespoon fresh cilantro (finely chopped) (Add cilantro in the marinade for flavor and again fresh on top after cooking.)
  • 2 Tablespoons Lime juice (Freshly squeezed is best for a cleaner finish.)
  • ½ teaspoon Brown sugar (Balances acidity and heat. Can substitute with honey.)
  • 2 Tablespoons olive oil (Helps the marinade coat; use avocado oil for higher heat.)
  • Salt and black pepper to taste (Season lightly at first; adjust after cooking.)

Instructions 

Make the marinade

  • In a bowl, add chili powder, cumin, smoked paprika, oregano, brown sugar, cilantro, lime juice, olive oil, salt, and black pepper. Mix to combine until the sugar dissolves and spices smell fragrant.

Marinate the chicken

  • Place chicken in a shallow dish or zip-lock bag and pour the marinade over it. Mix to combine, cover with clingfilm, and let sit for at least 30 minutes or up to 24 hours in the fridge.

Cook

  • Cook the chicken by baking, grilling, air frying, or pan-frying. Ensure the internal temperature reaches at least 165F/74C.

Rest and slice

  • Let chicken rest for 5 minutes after cooking, then slice thinly across the grain.

Serving

  • Serve the sliced chicken with lime wedges, chopped cilantro, diced onions, and warm tortillas for family-style tacos or bowls.

Notes

Store leftovers in an airtight container for up to 4 days in the fridge, or freeze for up to 3 months. Label with the date. Reheat gently to maintain moisture.
Calories: 250kcal
Course: Dinner, Main Course
Cuisine: Mexican
Keyword: chicken marinade, Easy Chicken Recipe, Family Meal, grilling chicken, Mexican chicken

Bang Bang Chicken Bowl: An Incredible Ultimate Recipe for 2023

I can smell the ginger and garlic frying, and I hear the soft sizzle of chicken hitting a hot skillet. The kitchen feels warm and busy with small hands helping to chop and the family count-down to dinnertime. This Bang Bang Chicken Bowl is my go-to when I need a meal that comforts everyone and comes together quickly.

If you like recipes that please picky eaters and busy parents, you might also enjoy my bang bang chicken sliders recipe. I test everything in a home kitchen with hungry kids and friendly neighbors. That real-world testing matters to me and to your family.

Why this works

Bang Bang Chicken Bowl: An Incredible Ultimate Recipe for 2023

This bowl works because it balances sweet, spicy, creamy, and fresh textures in one easy plate. The sauce clings to every bite. The vegetables add color and crispness. The rice soaks up the sauce and makes it a satisfying meal.

It saves time. You can cook the chicken and the vegetables in one skillet while the rice heats. For even faster prep, check recipes in my air fryer chicken recipes collection for shortcut ideas that fit family schedules.

It stretches well for leftovers. Make a double batch and use it for lunches or easy weeknight meals. My family loves how it reheats without losing flavor.

Process Overview

“This is where the magic happens—when the aroma fills the kitchen.”

Start with good mise en place. Chop the vegetables, measure the sauce, and have your rice ready. When you return to the skillet, everything moves quickly and the flavors come together in minutes.

If you want to know more about how I test and write recipes, you can read about my journey and recipe approach on my author page, where I share family-tested tips and real cooking wins and mishaps: about my recipes and experience.

Ingredients

Below are the ingredients and my quick tips for each one. I add a short note so you can substitute easily or make prep simpler.

– 1 pound boneless, skinless chicken breasts — Tip: Pound them slightly if one is thick so pieces cook evenly. Cut into bite-sized pieces for quick cooking.

– 2 cups cooked rice (white or brown) — Tip: Use day-old rice or pre-cooked rice to save time. For extra flavor, cook rice in chicken broth.

– 1 cup broccoli florets — Tip: Cut into small florets so they cook quickly and stay crisp for kids who prefer crunch.

– 1 red bell pepper, sliced — Tip: Red adds sweetness. Green is fine, but red gives a brighter flavor kids usually like.

– 1 carrot, julienned — Tip: Use a peeler to make thin ribbons if you do not have a julienne tool. They soften fast.

– 3 green onions, chopped — Tip: Save some white parts for cooking and use the green tops as a fresh garnish.

– ½ cup mayonnaise — Tip: Use a good-quality mayo for a smooth, rich sauce. For lighter bowls, try half mayo and half plain Greek yogurt.

– 2 tablespoons sweet chili sauce — Tip: This is the backbone of the sauce’s sweetness. Adjust to taste.

– 1 tablespoon Sriracha sauce (adjust for spice level) — Tip: Start with less if kids are eating. You can always add more at the table.

– 1 tablespoon soy sauce — Tip: Use low-sodium soy sauce if you watch salt. It still gives great umami.

– Salt and pepper to taste — Tip: Salt lightly during cooking and taste before serving. A final pinch brightens everything.

– 2 tablespoons oil (for cooking) — Tip: Use vegetable oil or avocado oil for high-heat cooking and a neutral flavor.

– Sesame seeds (for garnishing) — Tip: Toast them briefly in a dry pan for a nutty touch.

If you prefer a one-pan alternative for some steps, see my quick and easy ideas in the quick and easy chicken section.

Directions

Follow these simple steps to create your delicious Bang Bang Chicken Bowl:

  1. Start by cutting the chicken breasts into bite-sized pieces and season them with salt and pepper.
    Encouraging note: Take a deep breath and enjoy the simple act of prepping. Small pieces cook fast, and kids love the bite-sized pieces.

  2. Cook the Chicken: Heat oil in a large skillet over medium heat. Add the chicken pieces and cook until golden brown and cooked through, about 5-7 minutes. Remove from the skillet and set aside.
    Encouraging note: Keep the pan hot but not smoking. If the chicken is golden, you nailed it. Set it aside while you do the vegetables.

  3. Sauté the Vegetables: In the same skillet, add broccoli, red bell pepper, and carrot. Sauté for about 3–5 minutes, until they are tender yet crisp.
    Encouraging note: Stir often so everything cooks evenly. The colors should pop but still have a little bite.

  4. In a small bowl, mix together mayonnaise, sweet chili sauce, Sriracha, and soy sauce until well combined.
    Encouraging note: Taste the sauce and adjust spice and sweetness. This is your chance to make it fit your family’s palate.

  5. Return the cooked chicken to the skillet with the sautéed vegetables. Pour the sauce over everything and stir well to coat evenly.
    Encouraging note: Let the sauce warm with the chicken for a minute. It should thicken slightly and cling to the pieces.

  6. Prepare the Rice: In serving bowls, place a layer of cooked rice as the base.
    Encouraging note: Use warmed rice for the best comfort factor. Spoon a little sauce on the rice so every bite has flavor.

  7. Assemble the Bowls: Spoon the chicken and vegetable mixture over the rice.
    Encouraging note: Make each bowl pretty. A colorful plate invites family members to dig in.

  8. Garnish: Top each bowl with chopped green onions and a sprinkle of sesame seeds for an added touch.
    Encouraging note: The garnish is fast but makes the dish feel special. Let each person add more Sriracha if they like heat.

  9. Serve Immediately: Enjoy your Bang Bang Chicken Bowl while it’s fresh and hot!
    Encouraging note: Sit down together if you can. I find the meal tastes even better when someone shares the first bite story.

For more family-friendly twists and sides that go well with this bowl, I often pair it with crunchy snacks or a simple soup. You can also try a similar crispy method in my crunchy air fryer chicken mozzarella wraps when you want a different texture.

Serving

Bang Bang Chicken Bowl: An Incredible Ultimate Recipe for 2023

I like to serve this Bang Bang Chicken Bowl family-style. Place a big platter of rice in the middle and keep the chicken and vegetables in the skillet for people to spoon from. Put small bowls of extra sauce, Sriracha, and chopped green onions on the table.

Kids can build their own bowls, which keeps picky eaters happy. For a Sunday dinner, add a simple cucumber salad to the side to cut the richness and add brightness.

If you prefer plated service, spoon rice into shallow bowls, top with chicken and vegetables, and finish with a sprinkle of sesame seeds. This presentation works great for guests.

Storage

Refrigerator: Store leftovers in an airtight container for up to 3 days. Keep rice and chicken together if you plan to reheat them at once. For longer life, separate rice and chicken.

Freezing: I do not recommend freezing the assembled bowl. Freeze the chicken mixture in a baking-safe container for up to 2 months. Thaw overnight in the refrigerator before reheating.

Reheat tips: Warm gently in a skillet over medium heat. Add a splash of water or chicken broth if the sauce seems dry. For microwaving, cover and heat in 60-second intervals, stirring in between.

Packed lunches: Put rice and chicken in separate compartments or containers. Add fresh green onions and sesame seeds just before eating.

Kitchen Notes

  • Shortcut: Use rotisserie chicken to skip the cooking step. Chop it and finish in the skillet with sauce and vegetables.
  • Swap: Greek yogurt can replace half the mayo for a lighter sauce with a little tang.
  • Meal prep: Cook rice and chop vegetables ahead of time. Store in the fridge for 3 days for quick assembly.
  • Make it gluten-free: Use tamari instead of soy sauce and double-check the sweet chili sauce label.
  • Flavor boost: Add a squeeze of lime or a splash of rice vinegar at the end for brightness.

Variations

  • Kid-friendly: Reduce or omit Sriracha and serve the sauce on the side. Add a little honey to soften flavors for young palates.
  • Low-carb: Serve over cauliflower rice or a bed of mixed greens.
  • Vegetarian: Swap chicken for chickpeas or crispy tofu. For a vegan bang bang idea, check how others use plant-based proteins for a similar flavor profile.
  • Meal-prep bowls: Double the recipe and store in containers for easy lunches. Add fresh herbs before eating.
  • Spicy lovers: Increase Sriracha or add a pinch of chili flakes to the sauce for a deeper kick.

FAQ

Q: Can I use thighs instead of breasts?
A: Yes. Boneless, skinless thighs are juicier and more forgiving. Cut them into bite-sized pieces and cook until just cooked through.

Q: Is there a dairy-free version of the sauce?
A: Yes. Replace mayonnaise with vegan mayo or use a mixture of mashed avocado and a little olive oil for creaminess.

Q: How do I keep vegetables crisp?
A: Sauté only until tender yet crisp. Cook them over medium heat and do not overcrowd the pan. A quick toss is enough.

Q: Can I make the sauce ahead of time?
A: Absolutely. The sauce keeps in the refrigerator for up to 5 days. Stir before using, as it may separate slightly.

Q: What side dishes go well with this bowl?
A: Simple sides like steamed edamame, cucumber salad, or quick pickled vegetables complement the flavors well.

Conclusion

Thanks for spending time in my kitchen. I hope this Bang Bang Chicken Bowl becomes a weeknight favorite for your family the way it did for mine. If you want a fun dessert to finish the evening, I enjoy pairing family dinners with treats from my baking inspiration, like the classic Smitten Kitchen crispy chewy chocolate chip cookies. If you are exploring plant-based options that keep the bang bang spirit, take a look at this creative Vegan Bang Bang Chickpeas recipe for a great alternative.

Happy cooking, and remember that meals taste best when they are shared.

Bang Bang Chicken Bowl

Prep Time 15 minutes
Cook Time 15 minutes
Total Time 30 minutes
Servings 4 servings
Calories 600
A delicious and comforting recipe that combines sweet, spicy, creamy, and fresh textures all in one bowl, perfect for picky eaters and busy parents.

Ingredients

For the Chicken

  • 1 pound boneless, skinless chicken breasts (Pound them slightly if thick for even cooking.)

For the Rice

  • 2 cups cooked rice (white or brown) (Use day-old or pre-cooked rice to save time.)

For the Vegetables

  • 1 cup broccoli florets (Cut into small florets for quick cooking.)
  • 1 medium red bell pepper, sliced (Red adds sweetness; green is fine but red is preferred.)
  • 1 medium carrot, julienned (Use a peeler to make thin ribbons.)
  • 3 medium green onions, chopped (Save some white parts for cooking.)

For the Sauce

  • ½ cup mayonnaise (Use a good-quality mayo for a rich sauce.)
  • 2 tablespoons sweet chili sauce (Adjust to taste for sweetness.)
  • 1 tablespoon Sriracha sauce (Adjust for spice level.)
  • 1 tablespoon soy sauce (Use low-sodium if watching salt.)
  • to taste salt and pepper (Salt lightly while cooking.)

For Cooking

  • 2 tablespoons oil (Use vegetable or avocado oil for cooking.)
  • to taste sesame seeds (Toast briefly for a nutty touch.)

Instructions 

Preparation

  • Cut the chicken breasts into bite-sized pieces and season with salt and pepper.
  • Chop the vegetables and measure the sauce ingredients.

Cooking Chicken

  • Heat oil in a large skillet over medium heat. Add the chicken pieces and cook until golden brown and cooked through, about 5-7 minutes. Remove from skillet and set aside.

Cooking Vegetables

  • In the same skillet, add broccoli, red bell pepper, and carrot. Sauté for about 3–5 minutes, until tender yet crisp.

Making Sauce

  • In a small bowl, mix together mayonnaise, sweet chili sauce, Sriracha, and soy sauce until well combined.

Combining

  • Return the cooked chicken to the skillet with the sautéed vegetables, pour the sauce over everything and stir well to coat evenly.

Assembling

  • In serving bowls, place a layer of cooked rice, then spoon the chicken and vegetable mixture over the rice.
  • Garnish with chopped green onions and sesame seeds.

Serving

  • Enjoy your Bang Bang Chicken Bowl while it’s fresh and hot!

Notes

Store leftovers in an airtight container for up to 3 days. Reheat gently to retain flavor. For gluten-free, replace soy sauce with tamari.
Calories: 600kcal
Course: Dinner, Main Course
Cuisine: American, Asian
Keyword: Bang Bang Chicken, Chicken Bowl, Comfort Food, Easy Recipe, Family Dinner

Sheet Pan Garlic Butter Chicken and Veggies

I can smell the garlic and butter as soon as I open the oven. The soft sizzle of potatoes hitting hot pan makes the whole kitchen feel cozy. That warmth is what I love about a simple sheet pan dinner.

This Sheet Pan Garlic Butter Chicken and Veggies recipe is one of those weeknight lifesavers. It fills the house with a comforting aroma and gives you a full meal with almost no fuss. If you like easy dinners, you might enjoy my Bang Bang Chicken Sliders too for another family-friendly option.

Why this works

Sheet Pan Garlic Butter Chicken and Veggies

This recipe brings a few smart ideas together. Chicken cooks quickly and stays juicy when surrounded by vegetables. The garlic butter gives everything a uniform, irresistible flavor. Roasting everything together saves time and reduces dishes, so you can focus on your family.

If you are short on time, this sheet pan meal lets you prep, pop it in the oven, and check on it only once. For more one-pan chicken ideas, I often turn to resources in my quick and easy chicken collection for inspiration.

Process Overview

“This is where the magic happens—when the aroma fills the kitchen.”

The process is very straightforward. You arrange the chicken, tuck the veggies around it, drizzle garlic butter, season, and roast. The heat caramelizes the vegetables and seals juices in the chicken so everything is tender, flavorful, and ready in about 30 minutes.

If you like a crisp finish, give the sheet pan a quick broil for 2 minutes at the end. I use the broiler sparingly, but it adds a nice color when you want that golden look. For more tips on sheet pan finishing, check out a few of my favorite air fryer tricks in this post about air fryer chicken recipes that translate well to oven cooking.

Ingredients

  • 4 chicken breasts
    • Lily’s tip: Use even-sized breasts so everything cooks at the same rate. If they are large, pound them gently to uniform thickness.
  • 4 tablespoons garlic butter
    • Lily’s tip: Real butter with fresh garlic gives the best flavor. If you want lighter, use 3 tablespoons butter and 1 tablespoon olive oil.
  • 1 pound baby potatoes, halved
    • Lily’s tip: Choose small, firm potatoes and halve them so they roast quickly. Toss them cut side down for better browning.
  • 2 cups mixed vegetables (such as bell peppers, carrots, and broccoli)
    • Lily’s tip: Cut vegetables into similar-sized pieces. Denser veggies like carrots may need a slightly smaller dice so everything finishes together.
  • Salt and pepper to taste
    • Lily’s tip: Season in layers. A little on the chicken and vegetables before roasting, then a pinch when you finish.
  • 1 teaspoon Italian seasoning (optional)
    • Lily’s tip: Italian seasoning adds a herby note. Use fresh herbs if you have them on hand, or skip it for a simpler buttery garlic flavor.

I like to prep everything on a single cutting board and measure the butter ahead of time. Having the garlic butter ready to melt saves those few extra minutes when you want to get the pan in the oven.

Directions

  1. Preheat your oven to 400°F (200°C).
    • Encouragement: A warm oven makes the kitchen smell like dinner is already happening. While the oven heats, take a breath and enjoy the moment.
  2. Arrange the chicken breasts on a sheet pan.
    • Encouragement: Give each breast a bit of space so air can circulate. If you feel overwhelmed, know this step is simple and forgiving.
  3. Surround the chicken with halved baby potatoes and mixed veggies.
    • Encouragement: Tuck carrots and peppers close but leave broccoli a little looser so it crisps. Picture the colors on the pan—it makes the meal feel special.
  4. Melt the garlic butter and drizzle it over the chicken and veggies.
    • Encouragement: Pour slowly so the butter covers everything. The aroma is a reward right away and a little taste test is encouraged.
  5. Season everything with salt, pepper, and Italian seasoning if desired.
    • Encouragement: Seasoning is where the magic balances. Taste and adjust if you like bolder flavors. Little tweaks here make it yours.
  6. Bake in the oven for 25-30 minutes, or until the chicken is cooked through and veggies are tender.
    • Encouragement: Use a meat thermometer for peace of mind; chicken should reach 165°F. If the potatoes need more time, remove the chicken and roast a few extra minutes.
  7. Serve warm and enjoy your easy one-pan dinner!
    • Encouragement: Let the pan rest for a couple minutes before serving. Call the family to the table and share that first happy bite.

If you want a crispier top, pop the pan under the broiler for 1 to 2 minutes at the end. Watch it closely so it does not burn.

Serving

Sheet Pan Garlic Butter Chicken and Veggies

This dish is perfect for family-style serving. Place the sheet pan in the center of the table and let everyone help themselves. I like to offer simple sides like a leafy green salad or warm crusty bread.

For kids who love to customize, set out small bowls of grated cheese, lemon wedges, or a mild dipping sauce. If you want a fancier presentation, carve the chicken on a cutting board and arrange the vegetables around it. Serving family-style keeps things relaxed and lively.

If you enjoy family meals with similar crowd-pleasing flavors, my crispy mozzarella wraps are a hit on busy nights and make a great companion recipe to offer variety at the table: Crunchy Crispy Air Fryer Chicken Mozzarella Wraps.

Storage

Refrigerator

  • Store leftovers in an airtight container within two hours of cooking.
  • They will keep well for up to 3 days.

Reheating

  • Reheat in a 350°F oven for 10 to 15 minutes to preserve the roast texture.
  • For speed, microwave individual portions for 1 to 2 minutes, then crisp in a hot skillet for a minute if you like the potatoes crisp.

Freezing

  • I do not recommend freezing whole cooked potatoes and vegetables as texture changes. You can freeze cooked chicken breasts separately for up to 2 months and thaw overnight before reheating.

A quick tip: keep a small dab of butter or a splash of water with the leftovers when reheating to keep things moist.

Kitchen Notes

  • Use parchment paper or a silicone baking mat to make cleanup faster.
  • If you are short on time, buy pre-cut vegetables from the grocery store.
  • Swap garlic butter with garlic-infused olive oil if dairy is a concern.
  • If your oven runs hot, rotate the pan halfway through baking for even browning.
  • Line up vegetables by cook time: potatoes and carrots on one side, tender peppers and broccoli added later if needed.

These shortcuts help busy families get dinner on the table without stress. I keep a small jar of garlic butter in the fridge to speed things along on hectic nights.

Variations

  • For picky eaters: Serve veggies on the side or roast them separately with a different seasoning so each person gets what they like.
  • Low carb: Replace potatoes with more broccoli and cauliflower or use 1 medium sweet potato sliced thin.
  • Gluten free: This recipe is naturally gluten free if you use certified gluten-free butter and seasoning blends.
  • Dairy free: Use garlic-infused olive oil or a dairy-free buttery spread instead of butter.
  • Spicy version: Add 1/2 teaspoon red pepper flakes to the garlic butter or finish with a drizzle of hot honey for a sweet-heat twist.

Small changes like swapping one vegetable or adding a favorite spice make this dish adaptable to many tastes and diets.

FAQ

Q: Can I use bone-in chicken pieces instead of breasts?
A: Yes. Bone-in pieces will take longer to cook. Increase bake time to 35 to 40 minutes and check that the internal temperature reaches 165°F.

Q: Can I prepare this ahead of time?
A: You can assemble the pan ahead and refrigerate it for up to 24 hours. Let it sit at room temperature 20 minutes before baking and expect a few extra minutes of oven time.

Q: What if my potatoes are not tender when the chicken is done?
A: Remove the chicken to a cutting board and continue roasting the potatoes for 5 to 10 minutes. You can also parboil the potatoes for 5 minutes before roasting to speed things up.

Q: Can I make this in an air fryer?
A: Yes. Use a large air fryer that fits the ingredients in a single layer. Cook at 375°F for about 18 to 22 minutes, checking halfway and shaking the basket for even browning.

Q: How do I know the chicken is cooked through without a thermometer?
A: Cut into the thickest part of the breast; the juices should run clear and the meat should be white with no pink. A thermometer is the safest method when you can use one.

Conclusion

I hope this Sheet Pan Garlic Butter Chicken and Veggies becomes a go-to in your weeknight rotation. It is simple, forgiving, and full of the comforting flavors families love.

If you want a slightly different take or more ideas for one-pan dinners, this Sheet Pan Garlic Butter Chicken Meal from The Country Cook has a lovely spin. You might also enjoy comparing notes with this sister recipe for a one-pan dinner at One-Pan Garlic Butter Chicken and Veggies on Simply Stacie.

Thanks for cooking with me tonight. Gather around the table, enjoy the aroma, and tell the family the kitchen smells like love.

Sheet Pan Garlic Butter Chicken and Veggies

Prep Time 10 minutes
Cook Time 30 minutes
Total Time 40 minutes
Servings 4 servings
Calories 450
A cozy and simple weeknight dinner featuring juicy chicken breasts, garlic butter, and colorful roasted vegetables, all cooked on one sheet pan.

Ingredients

Main Ingredients

  • 4 pieces chicken breasts (Use even-sized breasts for uniform cooking.)
  • 4 tablespoons garlic butter (Real butter with fresh garlic gives the best flavor.)
  • 1 pound baby potatoes, halved (Choose small, firm potatoes and halve them for quick roasting.)
  • 2 cups mixed vegetables (such as bell peppers, carrots, and broccoli) (Cut vegetables into similar-sized pieces for even cooking.)
  • to taste salt and pepper (Season in layers for better flavor.)
  • 1 teaspoon Italian seasoning (optional) (Adds a herby note; use fresh herbs if possible.)

Instructions 

Preparation

  • Preheat your oven to 400°F (200°C).
  • Arrange the chicken breasts on a sheet pan, giving each breast a bit of space.
  • Surround the chicken with halved baby potatoes and mixed veggies.

Cooking

  • Melt the garlic butter and drizzle it over the chicken and veggies.
  • Season everything with salt, pepper, and Italian seasoning if desired.
  • Bake in the oven for 25-30 minutes, or until the chicken is cooked through and veggies are tender.
  • If you want a crispier top, pop the pan under the broiler for 1 to 2 minutes at the end.

Serving

  • Serve warm and enjoy your easy one-pan dinner!

Notes

This dish is perfect for family-style serving. Offer simple sides like a leafy green salad or warm crusty bread. For added variety, customize with dipping sauces or cheese.
Calories: 450kcal
Course: Dinner, Main Course
Cuisine: American, Comfort Food
Keyword: Easy Dinner, Family Meal, Garlic Butter Chicken, Sheet Pan Chicken

Cheesy Garlic Chicken Wraps

I can smell garlic and butter as I walk into my kitchen. The sound of a skillet warming up makes the house feel cozy and familiar. Tonight feels like one of those easy family dinners that everyone will request again.

I first made these Cheesy Garlic Chicken Wraps years ago when my kids were small and I needed something quick and flavorful. If you love simple recipes that feel a little special, this one will be a go-to. For another hands-on wrap idea, I often pair the evening with a side from my crunchy collection, like my Crunchy Crispy Air Fryer Chicken Mozzarella Wraps.

Why this works

Cheesy Garlic Chicken Wraps

This wrap keeps family life in mind. It uses cooked chicken and simple pantry spices so you can assemble fast on busy nights. The cheese melts into pockets of goodness that kids and adults both love.

I tested this recipe over many weeknights. It holds up well for busy schedules and travel days when you need dinner ready fast. If you like sliders and small sandwiches, try pairing this idea with something fun from my recipe box, such as the Bang Bang Chicken Sliders Recipe for a party night.

This recipe saves time and reduces stress. You can prep the filling earlier, then crisp the wraps right before dinner. That small step makes the meal feel freshly cooked and satisfying.

Process Overview

“This is where the magic happens—when the aroma fills the kitchen.”

I like to think of this recipe as three quick stages: mix, assemble, and crisp. You mix the seasoned chicken filling, build the wrap with cheese, and sear it in a skillet until golden. The aroma is the reward that tells you dinner is almost ready.

If you want to speed things up further, use leftover rotisserie chicken or shredded deli chicken. It saves time and keeps flavor bright.

Ingredients

  • 2 cups cooked chicken, shredded
    Lily’s tip: Use rotisserie or leftover roasted chicken to save time. Shred it by hand for a rustic texture that catches the garlic and cheese.

  • 1 cup shredded cheese (cheddar or mozzarella)
    Lily’s tip: Sharp cheddar gives bold flavor. Mozzarella melts beautifully. Mix both if you like gooey stretch with a tang.

  • 2 tablespoons garlic, minced
    Lily’s tip: Fresh garlic gives the brightest flavor. If you must, use jarred minced garlic but add it a minute earlier in the skillet so it wakes up.

  • 1 teaspoon garlic powder
    Lily’s tip: A small amount boosts the garlic flavor without overpowering the fresh garlic.

  • 1 teaspoon onion powder
    Lily’s tip: Onion powder rounds out the filling. If you have a small sweet onion, you can swap one teaspoon of onion powder for a tablespoon of finely diced onion.

  • Salt and pepper to taste
    Lily’s tip: Start light and taste. If your chicken came seasoned, you may need less salt.

  • 4 large tortillas or wrap bread
    Lily’s tip: Flour tortillas with a bit of chew work best. Warm them briefly to make rolling easier.

  • 2 tablespoons olive oil or butter for frying
    Lily’s tip: Butter gives a richer crust; olive oil is lighter. Use a mix if you like both flavors.

  • Fresh parsley, chopped (for garnish)
    Lily’s tip: Parsley brightens the plate and adds a fresh finish. Sprinkle it just before serving.

For more ideas on air fryer meals that pair well with wraps, check out my collection of air fryer chicken recipes.

Directions

  1. In a bowl, mix together the shredded chicken, garlic, garlic powder, onion powder, salt, and pepper.
    Encouragement: Take a moment to really combine the spices with the chicken so every bite has flavor. If the mixture seems dry, add a teaspoon of olive oil.

  2. Place a tortilla on a flat surface and add a portion of the chicken mixture to the center, then top with shredded cheese.
    Encouragement: Don’t worry about perfection. Add enough cheese to get a good melt but leave space to fold the sides.

  3. Roll the tortilla tightly, folding in the sides as you go.
    Encouragement: Practice one or two wraps first. Once you get the tuck, the rest go quickly and look lovely.

  4. Heat olive oil or butter in a skillet over medium heat.
    Encouragement: Heat the pan until the oil shimmers. A hot skillet gives a crisp, golden exterior without drying the filling.

  5. Place the wraps seam-side down in the skillet and cook until golden brown, about 3-4 minutes on each side.
    Encouragement: Press gently with a spatula for even browning. Flip once and watch that gorgeous color develop.

  6. Remove from skillet, slice in half, and garnish with chopped parsley. Serve warm.
    Encouragement: Slice with a sharp knife and plate for quick family service. These are best hot and melty.

If you need a quick list of other family-friendly chicken ideas, see my quick and easy chicken ideas for more inspiration.

Serving

Cheesy Garlic Chicken Wraps

Serve these wraps family-style on a large platter. Cut each wrap in half and arrange them so everyone can grab a warm piece. Add small bowls of dipping sauce on the side.

My family likes ranch, plain Greek yogurt with a squeeze of lemon, or a mild hot sauce. For a simple side, serve a crisp green salad, carrot sticks, or oven fries. The warm cheese and garlic are the stars, so keep sides fresh and textural.

For a picnic or packed lunch, wrap each half in parchment and secure with a sticker. They travel well for short trips and still taste great at room temperature.

Storage

Fridge: Store finished wraps in an airtight container for up to 3 days. Keep them whole if you plan to reheat, which preserves moisture.

Reheat on stovetop: Heat a nonstick skillet over medium-low and crisp each wrap for 2-3 minutes per side. This restores the crunchy exterior and melty center.

Reheat in oven: Preheat to 350°F. Place wraps on a baking sheet and warm 8 to 10 minutes until heated through. Cover loosely with foil if you worry about too much browning.

Microwave: Use for speed. Microwave one wrap for 45 to 60 seconds. Then sear in a hot skillet for 30 seconds per side for a crisp finish.

Freezing: Wrap each cooked wrap tightly in plastic wrap and place in a freezer bag. Freeze up to 1 month. Thaw overnight in the fridge before reheating.

Kitchen Notes

  • Use rotisserie chicken to cut prep time in half. It keeps flavor and texture lively.
  • Warm tortillas on a dry skillet or in the microwave for 10 seconds. Warm wraps roll without cracking.
  • Grate your cheese fresh from a block for better melting and less starch.
  • Use a large skillet so you can cook two wraps at once and save time.
  • Double the filling and keep extra in the fridge for 2-3 days to make more wraps quickly.

I also like to tweak these notes depending on time and mood, and sometimes I pair this wrap with a crunchy recipe from my blog for busy nights.

Variations

  • For picky eaters: Omit onion powder and use mild cheddar. Add a thin spread of mayonnaise or cream cheese to encourage kids to eat the wrap.
  • Low-carb option: Use low-carb or large lettuce leaves instead of tortillas. Sear briefly in the skillet to warm the filling, then fold.
  • Spicy twist: Add 1/2 teaspoon chili powder or a few dashes of hot sauce to the chicken mix. Top with pickled jalapeños for zing.
  • Vegetarian swap: Replace chicken with shredded, seasoned cauliflower or a sauté of mushrooms and bell peppers. Keep the garlic and cheese for comfort.
  • Meal prep friendly: Make the filling in bulk and refrigerate. Assemble fresh or reheat filling and assemble then sear for dinner.

These small swaps make the recipe flexible and family-friendly. Adjust seasonings to taste and involve kids in choosing a variation for their plate.

FAQ

Q: Can I use raw chicken instead of cooked chicken?
A: Yes. If using raw chicken breast cut into small pieces, cook it in a skillet with the minced garlic and spices until it reaches 165°F internally. Let it cool slightly, shred if needed, then assemble wraps.

Q: What cheese melts best in these wraps?
A: Mozzarella melts smoothly and gives stringy texture. Sharp cheddar offers more flavor. A blend of both gives great melt and taste.

Q: Can I freeze the wraps before cooking?
A: You can freeze assembled wraps, but for best texture, freeze after cooking. If you freeze raw assembled wraps, thaw overnight in the fridge before cooking and crisp in a skillet.

Q: How do I keep the tortillas from falling apart when rolling?
A: Warm the tortillas for a few seconds to make them pliable. Avoid overfilling. Fold in the sides first, then roll tightly to secure the seam.

Q: Is this safe for kids with nut allergies?
A: Yes. This recipe contains no nuts by default. Always check ingredient labels on pre-shredded cheese and store-bought tortillas for cross-contamination warnings if allergies are severe.

Conclusion

I hope these Cheesy Garlic Chicken Wraps bring warmth to your table and make weeknights easier. They are a little bit of comfort and a lot of family-friendly flavor.

If you want another take on this idea, I sometimes compare notes with recipes like Cheesy Garlic Chicken Wraps – Cooked & Loved for inspiration. For a protein-focused option you might enjoy, check out the Cheesy Garlic Chicken Wrap | High Protein – Hummus Fit product page for ideas on packing more protein into a wrap.

Thanks for cooking with me. Come back soon for more simple, family-focused recipes that turn busy evenings into moments everyone remembers.

Cheesy Garlic Chicken Wraps

Prep Time 15 minutes
Cook Time 8 minutes
Total Time 23 minutes
Servings 4 servings
Calories 400
These flavorful and easy-to-make wraps are filled with seasoned chicken, garlic, and melted cheese, making them a perfect family-friendly dinner option.

Ingredients

Filling Ingredients

  • 2 cups cooked chicken, shredded (Use rotisserie or leftover roasted chicken to save time.)
  • 1 cup shredded cheese (cheddar or mozzarella) (Mix both for gooey stretch; sharp cheddar for bold flavor.)
  • 2 tablespoons garlic, minced (Fresh garlic gives the brightest flavor.)
  • 1 teaspoon garlic powder (Boosts garlic flavor without overpowering fresh garlic.)
  • 1 teaspoon onion powder (Can swap for diced onion.)
  • to taste none Salt and pepper (Start light and taste.)

Wrap Components

  • 4 large tortillas or wrap bread (Flour tortillas work best; warm briefly to roll easier.)
  • 2 tablespoons olive oil or butter for frying (Use a mix for richer flavor.)
  • 1/4 cup Fresh parsley, chopped (Garnish before serving.)

Instructions 

Preparation

  • In a bowl, mix together the shredded chicken, garlic, garlic powder, onion powder, salt, and pepper.
  • If the mixture seems dry, add a teaspoon of olive oil.

Assembling the Wraps

  • Place a tortilla on a flat surface and add a portion of the chicken mixture to the center, then top with shredded cheese.
  • Roll the tortilla tightly, folding in the sides as you go.

Cooking

  • Heat olive oil or butter in a skillet over medium heat.
  • Place the wraps seam-side down in the skillet and cook until golden brown, about 3-4 minutes on each side.
  • Remove from skillet, slice in half, and garnish with chopped parsley. Serve warm.

Notes

Store finished wraps in an airtight container for up to 3 days. Reheat on stovetop or oven for best results. Freezing options available.
Calories: 400kcal
Course: Dinner, Main Course
Cuisine: American, Family-Friendly
Keyword: Cheesy Garlic Chicken Wraps, Chicken Wraps, Easy Dinner, Family Dinner, Quick Meal

Chicken Shawarma with Garlic Sauce

The smell of warm spices hits you first. Cumin and paprika rise as the chicken sizzles and the kitchen comes alive. You hear the gentle hiss from the skillet and the soft chatter of family in the next room.

This Chicken Shawarma with Garlic Sauce recipe is one of my favorites to make for a busy weeknight or a relaxed Sunday dinner. As a professional food blogger and mom, I love a dish that brings my family together and fills the house with inviting aromas. If you are short on time but want full flavor, you are in the right place. For more fast family meals, I often draw inspiration from my collection of quick weeknight chicken ideas here.

Why this works

Chicken Shawarma with Garlic Sauce

This version of chicken shawarma keeps things simple and reliable. The spice mix is warm and familiar, and the olive oil helps the spices cling to the chicken so every bite is flavored. It is a time-saver because the marinade needs only 30 minutes for great results, and the chicken cooks quickly.

Family-style meals are at the heart of this recipe. Set out pita, veggies, and garlic sauce and let everyone build their own wraps. It makes dinner interactive and stress-free. If you love crispy edges on your chicken, you can also check my favorite air fryer tricks for getting great texture here.

Process Overview

“This is where the magic happens—when the aroma fills the kitchen.”

The method is straightforward. Marinate, cook, rest, slice, warm pita, and assemble. Each step is quick and rewarding, and the garlic sauce pulls everything together. For a playful twist that kids love, try serving smaller sandwich sliders inspired by my Bang Bang Chicken Sliders recipe here.

Ingredients

  • 1 lb chicken thighs, boneless and skinless
    Tip: Thighs stay juicy and handle the high heat well. Trim excess fat and pat dry for better browning.

  • 2 tablespoons olive oil
    Tip: Extra virgin olive oil adds fruitiness. Use a neutral oil if you plan to cook on very high heat.

  • 2 teaspoons ground cumin
    Tip: Toast in a dry pan for 30 seconds if you want a deeper aroma before mixing into the marinade.

  • 2 teaspoons ground paprika
    Tip: Sweet paprika gives color. Use smoked paprika for a smoky note if your kids tolerate it.

  • 1 teaspoon ground turmeric
    Tip: Turmeric adds color and warmth. Use fresh turmeric powder for the brightest hue.

  • 1 teaspoon ground coriander
    Tip: Coriander adds citrusy notes. If possible, grind whole seeds for more fragrance.

  • Salt and pepper, to taste
    Tip: I use 1 teaspoon kosher salt for this amount of chicken, then adjust after tasting.

  • 4 pita breads
    Tip: Warm them briefly on the skillet to make them more pliable and aromatic.

  • 1 cup lettuce, shredded
    Tip: Romaine or green leaf stay crisp and give a nice crunch.

  • 1 tomato, diced
    Tip: Choose a ripe, firm tomato. Drain excess seeds if you want less moisture.

  • 1/2 cucumber, sliced
    Tip: English cucumbers need no peeling. For extra crunch, slice thin and salt lightly.

  • 1/2 red onion, thinly sliced
    Tip: Soak sliced onion in cold water for 10 minutes if you want a milder bite.

  • 1/2 cup garlic sauce
    Tip: A creamy garlic sauce is essential. I often use a homemade toum or a jarred version on busy nights. For my preferred garlic method and extra tips, check my crunchy mozzarella wrap inspiration and sauce ideas here.

Directions

  1. In a bowl, mix olive oil, cumin, paprika, turmeric, coriander, salt, and pepper. Add chicken and coat well. Marinate for at least 30 minutes.
    Encouraging note: Even a short 30-minute soak lets the spices do their work. If you have more time, marinate overnight for deeper flavor.

  2. Preheat grill or skillet over medium-high heat. Cook chicken until browned and cooked through, about 5-7 minutes per side.
    Encouraging note: Use a hot pan for good color. You want a nice sear without overcooking, so keep an eye on the edges.

  3. Remove chicken and let rest for a few minutes, then slice.
    Encouraging note: Resting keeps the juices inside. Slice against the grain for tender pieces that are easier for kids to eat.

  4. Warm pita breads on the grill or in a skillet.
    Encouraging note: Warm, soft pita wraps better and smells amazing. Wrap stacked pitas in foil to keep them warm while you finish.

  5. Assemble shawarma by adding sliced chicken, lettuce, tomato, cucumber, and red onion to pita.
    Encouraging note: Let everyone choose their toppings. This is a great way to involve kids in assembly and reduce mealtime fuss.

  6. Drizzle garlic sauce on top and serve.
    Encouraging note: Finish with a squeeze of lemon or a sprinkle of parsley for brightness. Serve family-style and enjoy the smiles.

If you prefer to cook in the air fryer, you can adapt step 2 by checking my air fryer tips for cook times and crisping options here.

Serving

Chicken Shawarma with Garlic Sauce

Serve this shawarma family-style on a large board or platter. Place the warm pita in a basket or wrapped in foil, set the sliced chicken in the center, and bowl the garlic sauce, lettuce, tomatoes, cucumbers, and onions around it. This makes it easy for everyone to build their own wrap.

Add simple sides like a light salad, roasted potatoes, or pickled vegetables. For kids, cut the pita into smaller pieces and offer cucumber sticks on the side. A communal setup keeps dinner relaxed and friendly.

Storage

Leftovers store well and make great lunches. Place cooled chicken in an airtight container and refrigerate for up to 3 days. Keep the garlic sauce separate to prevent the pita from getting soggy.

To reheat, warm slices gently in a skillet over medium heat for 2 to 3 minutes, or pop them in the oven at 350° F for 5 to 7 minutes. If using an air fryer, 3 to 4 minutes at 350° F will refresh the edges without drying the meat. Reheat pita wrapped in foil or briefly on a hot skillet.

If you plan to meal prep, assemble bowls instead of wraps. Layer rice or greens, add warmed sliced chicken, and top with veggies and garlic sauce when ready to eat. For more make-ahead chicken ideas, I recommend my air fryer favorites here.

Kitchen Notes

  • Use boneless skinless thighs for juiciness and forgiving cooking times.
  • If you prefer white meat, chicken breasts work fine but reduce cook time slightly.
  • Make the garlic sauce in advance. It keeps the meal assembly quick.
  • Swap pita for flatbreads, wraps, or a simple rice bowl if you have picky eaters.
  • Double the recipe for easy leftovers that reheat well for lunches.

Variations

  • For picky eaters: Offer plain grilled chicken pieces alongside the spiced version. Serve toppings on the side so each person customizes their pita.
  • For low-carb: Serve over greens or cauliflower rice instead of pita. The flavors are unchanged and satisfying.
  • For a smoky twist: Use smoked paprika and finish the chicken with a quick broil to add char.
  • For spicy lovers: Add 1/4 teaspoon cayenne or a drizzle of hot sauce to the marinade.
  • For vegetarian guests: Swap chicken with grilled halloumi or roasted chickpeas seasoned with the same spice mix.

FAQ

Q: Can I use chicken breasts instead of thighs?
A: Yes. Chicken breasts will cook faster and can dry out if overcooked. Reduce cook time and check internal temperature for doneness.

Q: How long can I keep the garlic sauce in the fridge?
A: Homemade garlic sauce lasts about 1 week refrigerated. Store-bought brands often have longer shelf life; follow the label.

Q: Is this recipe spicy?
A: Not by default. The spices are aromatic rather than hot. You can add cayenne or chili flakes to the marinade for heat.

Q: Can I marinate the chicken overnight?
A: Absolutely. Overnight marinating deepens the flavor and is great for meal prep. Keep it covered in the fridge.

Q: Can I make this ahead for a party?
A: Yes. Cook the chicken ahead, slice, and warm just before serving. Set up a build-your-own station so guests can assemble wraps.

Conclusion

Thank you for cooking with me today. I hope this Chicken Shawarma with Garlic Sauce becomes a fast favorite in your weekly rotation. If you want a tried-and-true garlic sauce technique, I love the detailed toum method at Homemade Lebanese Toum recipe at Feel Good Foodie. For another reliable shawarma reference and extra inspiration, see the classic Chicken Shawarma guide at Chicken Shawarma recipe at RecipeTin Eats.

From my kitchen to yours, happy cooking and warm dinners around your table. — Lily

Chicken Shawarma with Garlic Sauce

Prep Time 30 minutes
Cook Time 15 minutes
Total Time 45 minutes
Servings 4 servings
Calories 450
A simple and flavorful chicken shawarma recipe served with garlic sauce, perfect for family-style meals.

Ingredients

Marinade Ingredients

  • 1 lb chicken thighs, boneless and skinless (Trim excess fat and pat dry for better browning.)
  • 2 tablespoons olive oil (Use extra virgin olive oil for added flavor.)
  • 2 teaspoons ground cumin (Toast in a dry pan for a deeper aroma.)
  • 2 teaspoons ground paprika (Sweet or smoked paprika can be used.)
  • 1 teaspoon ground turmeric (Use fresh turmeric powder for a brighter hue.)
  • 1 teaspoon ground coriander (Grind whole seeds for more fragrance.)
  • 1 teaspoon salt (Adjust after tasting.)
  • to taste none pepper (Use as per preference.)

Wrap Ingredients

  • 4 pieces pita breads (Warm them briefly for better folding.)
  • 1 cup lettuce, shredded (Romaine or green leaf recommended.)
  • 1 piece tomato, diced (Choose a ripe, firm one.)
  • 1/2 piece cucumber, sliced (English cucumbers need no peeling.)
  • 1/2 piece red onion, thinly sliced (Soak in cold water for a milder bite.)
  • 1/2 cup garlic sauce (Use homemade or jarred for convenience.)

Instructions 

Marinating Chicken

  • In a bowl, mix olive oil, cumin, paprika, turmeric, coriander, salt, and pepper. Add chicken and coat well. Marinate for at least 30 minutes.

Cooking Chicken

  • Preheat grill or skillet over medium-high heat. Cook chicken until browned and cooked through, about 5-7 minutes per side.
  • Remove chicken and let rest for a few minutes, then slice.

Preparing Pita

  • Warm pita breads on the grill or in a skillet.

Assembling Shawarma

  • Assemble shawarma by adding sliced chicken, lettuce, tomato, cucumber, and red onion to pita.
  • Drizzle garlic sauce on top and serve.

Notes

Leftovers store well for up to 3 days. Reheat gently for the best results. Involve kids in wrapping to reduce mealtime fuss. Can also adapt for air fryer cooking.
Calories: 450kcal
Course: Dinner, Main Course
Cuisine: Mediterranean, Middle Eastern
Keyword: chicken shawarma, Family Meal, garlic sauce, quick recipe, Weeknight Dinner

Mini Chicken Pot Pies

The warm smell of butter and cooked chicken always brings my kitchen to life. I hear little footsteps and soft chatter as the oven hums. A mini pot pie in hand can turn any day into a cozy family moment.

These mini pot pies are a small, comforting feast. They bake fast and feel special for kids and grown-ups alike. If you love easy, family-friendly chicken dishes, you might also enjoy my take on sliders for busy nights that the kids ask for again and again.

Why this works

Mini Chicken Pot Pies

Mini chicken pot pies work because they simplify comfort food without losing the heart of home cooking. The single-serve size keeps portions tidy and makes them perfect for lunchboxes, weeknight dinners, or potlucks.

They save time. You can use leftover roast or rotisserie chicken and a handful of mixed vegetables. If you want to make them ahead, they freeze beautifully. For more quick meal ideas that free up your weeknight schedule, check out my collection of air-fryer chicken recipes that help speed dinner along.

These mini pies also give kids a hands-on meal they can help assemble. Letting them spoon the filling or press the crust makes dinner feel like a family project. That shared time around the counter is a small but meaningful routine.

Process Overview

“This is where the magic happens—when the aroma fills the kitchen.”

I like to think of the process as a quick assembly line. You mix the filling, press the crust, fill the cups, top, and bake. The whole run flows easily and lets you stay present with family tasks or homework while the oven does its work.

If you want speed without sacrificing comfort, these pot pies are a go-to. They follow simple steps and use pantry-friendly items, and if you need more one-pan weeknight ideas, my quick and easy chicken recipes can give you more inspiration.

Ingredients

  • 1 cup cooked chicken, shredded
    • Lily’s tip: Use rotisserie chicken for fast prep and big flavor. Shred it finely so each bite has a balance of chicken and sauce.
  • 1 cup mixed vegetables (peas, carrots, corn)
    • Lily’s tip: Frozen mixed vegetables work great. Thaw slightly and pat dry to avoid watery filling.
  • 1/2 cup cream of chicken soup
    • Lily’s tip: Choose a lower-sodium option if you want better control of salt. You can thin with a splash of milk if your filling is very thick.
  • 1 teaspoon garlic powder
    • Lily’s tip: Garlic powder blends evenly and keeps a mild garlic flavor kids usually like.
  • 1 teaspoon onion powder
    • Lily’s tip: Onion powder adds savory depth without the onion texture that picky eaters avoid.
  • Salt and pepper to taste
    • Lily’s tip: Start with a little and taste the filling. Remember the crust adds a bit of salt too.
  • 1 package refrigerated pie crusts
    • Lily’s tip: Refrigerated crusts are convenient and flaky. Roll gently and keep them cool while you work to avoid tearing.
  • 1 egg, beaten (for egg wash)
    • Lily’s tip: Brush lightly for a golden top. If you want a softer top, use milk instead of egg.

If you like a little crisp texture from the crust, try baking one extra for a minute or two to test the oven, then proceed with the rest.

Directions

  1. Preheat oven to 375°F (190°C).
    • I like to warm the oven early so the crusts bake evenly. It takes the guesswork out of timing.
  2. In a large bowl, combine the shredded chicken, mixed vegetables, cream of chicken soup, garlic powder, onion powder, salt, and pepper.
    • Mix gently and taste. Adjust the seasonings with a small spoonful of extra soup or a pinch of salt if it feels dry.
  3. Roll out the pie crusts and cut them into small circles to fit into a mini muffin tin.
    • Use a small glass or cookie cutter for even rounds. Keep scraps for topping.
  4. Press the crusts into the muffin tin cups.
    • Press firmly at the base and up the sides to create a little pocket. A quick spray of nonstick oil helps release the pies later.
  5. Fill each crust with the chicken mixture.
    • Spoon so each cup is about three-quarters full. This keeps the top from overflowing and gives a perfect filling-to-crust ratio.
  6. Cut small circles from the remaining pie crust to top each pot pie.
    • A few shapes make them fun for kids. A small fork slice or vent hole helps steam escape.
  7. Brush the tops with the beaten egg.
    • This step gives a golden, glossy finish. If children are helping, let them brush gently.
  8. Bake for 25-30 minutes or until golden brown.
    • The smell of butter and baked crust will tell you they are nearly ready. Rotate the tin halfway through if your oven runs hot on one side.
  9. Allow to cool slightly before serving. Enjoy!
    • Let them rest 5 minutes so the filling sets. These are best warm and shared with family smiles.

If you need a quick protein swap, shredded rotisserie chicken is a smart shortcut and keeps the flavor bright and satisfying. For another crispy favorite that kids love, try my recipe for air-fryer chicken mozzarella wraps for a fun side or snack.

Serving

Mini Chicken Pot Pies

Serve these mini pot pies family-style on a big platter. Arrange them in neat rows so each person can take two or three. Offer small bowls of dipping sauces like a mild ranch or a simple gravy for dipping.

A green salad or steamed broccoli pairs well to balance the buttery crust. For a cozy touch, set out warm placemats, napkins, and a pitcher of water or iced tea. Plate in the kitchen and carry them out while they are still warm for the best family reactions.

If you want to turn them into a party appetizer, place toothpicks in each and serve on a tiered tray. They hold up well on a buffet table and are easy for little hands.

Storage

Refrigerator

  • Cool completely before covering. Store in an airtight container for up to 3 days.
  • To reheat, place on a baking sheet and warm at 350°F for 8-10 minutes, or until heated through.

Freezer

  • Flash-freeze on a baking sheet for 1 hour, then transfer to a freezer bag for up to 2 months.
  • Reheat frozen: bake at 375°F for 20-25 minutes, covered with foil for the first 15 minutes, then uncovered until golden.

Microwave

  • For a quick reheat, microwave on medium for 45-60 seconds. The crust will be softer than oven-reheated, but the filling heats fast.

Label containers with the date to keep track of freshness. If you prepare a double batch, freeze half for a nights when you need a warm, ready meal.

Kitchen Notes

  • Shortcut: Use shredded rotisserie chicken to skip roasting.
  • Shortcut: Frozen mixed vegetables save time. Thaw and drain to prevent soggy filling.
  • Shortcut: Use a standard muffin tin if you do not have a mini tin. Adjust baking time to 30-35 minutes.
  • Shortcut: Make filling a day ahead and assemble just before baking for fresher crust.
  • Shortcut: Double the recipe and freeze extras for effortless future dinners.

These small switches keep the recipe flexible for busy families while preserving the homemade feel.

Variations

  • For picky eaters: Leave out peas and substitute with extra corn or diced potatoes. Keep seasonings mild and serve with a favorite dip.
  • Vegetarian: Replace chicken with cubed tofu or a canned chickpea mash and use cream of mushroom or a thick vegetable béchamel.
  • Gluten-free: Use store-bought gluten-free pie crusts or make a simple biscuit topping with gluten-free flour.
  • Low-carb: Swap the crust for a mashed cauliflower topping and bake in small ramekins for a pot pie bowl.
  • Comfort upgrade: Stir a tablespoon of sour cream into the filling for creamier texture and tang.

Each variation keeps the same core process and family appeal while fitting different dietary needs.

FAQ

Q: Can I make these ahead and bake later?
A: Yes. Assemble into the muffin tin, cover tightly with plastic wrap, and refrigerate up to 24 hours. Add a couple of extra minutes to the baking time if chilled.

Q: Can I use fresh vegetables instead of frozen?
A: Absolutely. Cook them until just tender, then cool slightly before mixing to avoid adding too much moisture.

Q: How can I tell when the filling is hot enough?
A: The crust should be golden brown and the filling should bubble slightly through the vents. A quick thermometer check should read 165°F in the center.

Q: Can I freeze the unbaked pies?
A: Yes. Place the assembled pies on a baking sheet and freeze until solid, then transfer to a freezer-safe container. Bake from frozen, adding a few extra minutes to the time.

Q: What if I only have regular pie crusts, not mini?
A: Regular crusts work fine. Cut larger rounds and bake in a standard muffin tin or small ramekins. Expect a slightly longer bake time.

Conclusion

I hope these mini chicken pot pies bring a little extra warmth to your table. They are simple, reliable, and full of the cozy flavors that make family dinners memorable.

If you want another easy mini pot pie take on this classic, this Easy Mini Chicken Pot Pies Recipe – One Little Project has nice variations. For more comforting pot pie ideas and inspiration, this version from Mini Chicken Pot Pies – Hungry Enough To Eat Six is worth a look.

Thank you for cooking with me. Come back soon for more family-friendly recipes and tips.

Mini Chicken Pot Pies

Prep Time 15 minutes
Cook Time 30 minutes
Total Time 45 minutes
Servings 12 pieces
Calories 220
These mini chicken pot pies are a comforting, easy-to-make dish perfect for family meals, using leftover chicken and mixed vegetables for a quick assembly.

Ingredients

Filling

  • 1 cup cooked chicken, shredded (Use rotisserie chicken for fast prep and big flavor. Shred it finely.)
  • 1 cup mixed vegetables (peas, carrots, corn) (Frozen mixed vegetables work great. Thaw slightly and pat dry.)
  • 1/2 cup cream of chicken soup (Choose a lower-sodium option if you want better control of salt.)
  • 1 teaspoon garlic powder (Blends evenly and keeps a mild garlic flavor kids usually like.)
  • 1 teaspoon onion powder (Adds savory depth without the texture that picky eaters avoid.)
  • to taste salt and pepper (Start with a little and taste the filling.)

Crust

  • 1 package refrigerated pie crusts (Roll gently and keep them cool to avoid tearing.)
  • 1 egg beaten (for egg wash) (Brush lightly for a golden top; use milk for a softer top.)

Instructions 

Preparation

  • Preheat oven to 375°F (190°C).
  • In a large bowl, combine the shredded chicken, mixed vegetables, cream of chicken soup, garlic powder, onion powder, salt, and pepper.
  • Mix gently and taste. Adjust the seasonings if necessary.
  • Roll out the pie crusts and cut them into small circles to fit into a mini muffin tin.
  • Press the crusts into the muffin tin cups to create pockets.

Assembly

  • Fill each crust with the chicken mixture, about three-quarters full.
  • Cut small circles from the remaining pie crust to top each pot pie.
  • Brush the tops with the beaten egg.

Baking

  • Bake for 25-30 minutes or until golden brown.
  • Allow to cool slightly before serving.

Notes

Serve these mini pot pies with small bowls of dipping sauces like mild ranch or gravy. They store well in the refrigerator or freezer.
Calories: 220kcal
Course: Appetizer, Main Course
Cuisine: American
Keyword: Comfort Food, Easy Dinner, Family-Friendly Recipes, Mini Chicken Pot Pies

chicken and spinach recipes are the kind of lifesaver I reach for when it is 6 pm, I am hungry, and I do not want a sink full of dishes staring me down. You know that moment when you want something cozy and filling, but you also want it to feel a little fresh? That is exactly where chicken plus spinach comes in. It is hearty, it tastes like real dinner, and it still has a pop of green that makes you feel like you tried. Today I am sharing my go to creamy spinach chicken situation that my family requests on repeat.
Hearty and Flavorful Chicken and Spinach Recipes Everyone Will Love

30-minute one-pot recipe

This is my weeknight hero: creamy chicken with spinach, made in one pot, done in about 30 minutes if you are moving at a normal human pace. I am not talking about a fussy, restaurant style sauce either. It is simple, cozy, and forgiving. And yes, it fits right into the whole “hearty and flavorful chicken and spinach recipes everyone will love” vibe without making you do anything complicated.

What you will need

  • Chicken (about 1.5 pounds, see the next section for best cuts)
  • Fresh spinach (5 to 6 big handfuls) or frozen spinach (thawed and squeezed dry)
  • 1 small onion, chopped (or 1 teaspoon onion powder when you are in a hurry)
  • 3 cloves garlic, minced (or 1 to 2 teaspoons garlic powder)
  • 1 cup chicken broth
  • 3/4 cup cream (heavy cream is classic, but I give options below)
  • 1/3 cup grated parmesan (optional but really good)
  • 1 teaspoon salt, plus more to taste
  • 1/2 teaspoon black pepper
  • 1 teaspoon Italian seasoning (or a mix of oregano and basil)
  • 2 tablespoons olive oil or butter

How I make it

First, I heat olive oil in a large skillet or pot on medium high heat. I season the chicken with salt and pepper, then brown it for a few minutes on each side. You are not trying to fully cook it at this point, you just want that golden outside that makes everything taste better.

Next, I lower the heat a bit and toss in the onion. When the onion looks soft, I add garlic and stir for about 30 seconds. Then I pour in chicken broth and scrape the bottom a little so all the flavorful bits come up into the sauce.

Now the creamy part: I add the cream, seasoning, and parmesan if I am using it. Let it bubble gently for a few minutes so it thickens just a little. Then I add spinach and stir until it wilts down. The pot will look wildly full at first, then suddenly the spinach becomes basically nothing. That is normal and kind of funny every time.

Finally, I put the chicken back in (if you set it aside), cover for a few minutes, and cook until the chicken is done. If the sauce gets thicker than you like, add a splash of broth. If it is thinner than you want, let it simmer uncovered for a couple minutes.

This is one of those chicken and spinach recipes that makes you feel like you cooked a real meal, but you did not have to plan your entire day around it.
Hearty and Flavorful Chicken and Spinach Recipes Everyone Will Love

What kind of chicken to use?

I have made this with pretty much every type of chicken that shows up in my fridge, and it all works, but some options make life easier.

Chicken thighs are my personal favorite here. They stay juicy even if you get distracted and simmer a little too long. If you are cooking for picky eaters who prefer white meat, go with breasts, just keep an eye on the timing.

Here is my quick breakdown:

Boneless skinless chicken thighs: most forgiving, super flavorful, great for creamy sauces.

Boneless skinless chicken breasts: lean and mild, best if you slice them thinner so they cook evenly.

Chicken tenderloins: quickest option, good when you want dinner fast.

Rotisserie chicken: yes, you can cheat. Just make the sauce and stir in shredded chicken at the end to warm through.

One little tip from my own trial and error: if you use chicken breasts, pound them slightly or slice them in half horizontally. Not fancy, just practical. It helps them cook faster and keeps them from drying out, which is the number one complaint people have with chicken. And honestly, dry chicken can ruin even the best chicken and spinach recipes.

Substitutes for the cream

Not everyone wants heavy cream all the time, and I get it. Sometimes I am cooking for someone who wants lighter food, sometimes I just do not have cream in the fridge. The good news is you still have options that taste great.

My favorite swaps:

Half and half: still creamy, just a bit lighter. The sauce will be slightly thinner, so simmer a touch longer.

Evaporated milk: surprisingly good in creamy skillet dinners. It gives you that cozy texture without being super rich.

Greek yogurt: this one works, but you need to be gentle. Turn the heat low and stir it in at the end so it does not split. It adds a nice tang that goes well with garlic and spinach.

Cream cheese: if you have a block hanging out in the fridge, add 2 to 4 ounces and stir until smooth. It makes the sauce thick and dreamy.

Coconut milk: works if you are dairy free. Use the canned full fat kind for best results. The flavor is slightly different, but with garlic and parmesan omitted, it becomes its own delicious thing.

I will say this: if you are skipping dairy completely, go heavier on seasoning. A little extra garlic, black pepper, and herbs help keep the sauce tasting bold. It is still one of those hearty and flavorful chicken and spinach recipes everyone will love, just with a different kind of comfort.

“I made this after a long day and my kids actually asked for seconds. The sauce was so good I spooned it over rice, and there were no leftovers.”

Cooking tips

This is the section that saves you from the little annoyances, like bland sauce or watery spinach. I have made these chicken and spinach recipes enough times to learn what matters and what does not.

Tip 1: Season in layers. Salt the chicken before it hits the pan, then taste the sauce at the end. Creamy sauces need enough salt or they taste flat.

Tip 2: Do not crank the heat once the cream goes in. Gentle bubbling is your friend. High heat can make dairy sauces separate, especially if you used half and half or yogurt.

Tip 3: If using frozen spinach, squeeze it dry. I press it in a clean towel or paper towels. If you skip this, the sauce can get watery fast.

Tip 4: Brown the chicken. Even a quick sear adds so much flavor. It also makes the whole dish smell amazing, which is half the joy of cooking.

Tip 5: Use a big enough pan. Spinach takes up space before it wilts. A larger skillet keeps you from stirring spinach onto the stove, which I have done more than once.

Also, if you want a little kick, add a pinch of red pepper flakes. Not enough to burn your mouth off, just enough to make the creamy sauce feel lively.

What to serve with creamy spinach chicken

This is where you can make it feel like a full comfort meal or keep it lighter, depending on your mood. I love that flexibility. The sauce is the star, so you want something that can catch it.

Easy serving ideas

  • Rice, especially jasmine or basmati
  • Mashed potatoes for full cozy mode
  • Pasta, like penne or fettuccine
  • Cauliflower rice if you want low carb
  • Crusty bread to swipe through the sauce
  • Roasted broccoli or green beans on the side

If I am cooking for guests, I usually do pasta plus a simple salad with lemony dressing. If it is just a normal Tuesday, it is rice, and I call it a win. Either way, it is one of those hearty and flavorful chicken and spinach recipes everyone will love because it feels like comfort food without being heavy in a dull way.

Common Questions

Can I make this ahead of time?
Yes. It keeps well in the fridge for about 3 days. The sauce will thicken as it sits, so add a splash of broth when reheating.

Can I freeze creamy spinach chicken?
You can, but creamy sauces sometimes change texture after freezing. If you plan to freeze it, use evaporated milk or coconut milk instead of heavy cream for a more stable result.

How do I know the chicken is cooked?
The safest way is a thermometer, 165 F in the thickest part. If you do not have one, slice a piece and make sure it is no longer pink and the juices run clear.

What if my sauce is too thin?
Simmer it uncovered for a few minutes. Parmesan also helps thicken it a bit. If you are in a rush, mix 1 teaspoon cornstarch with 1 tablespoon water and stir it in, then simmer briefly.

Can I add extra veggies?
Absolutely. Mushrooms, sun dried tomatoes, and chopped bell peppers all work. Add mushrooms early with the onion, and add tomatoes closer to the end.

A cozy dinner you will actually want to make again

If you have been hunting for chicken and spinach recipes that feel comforting but still easy enough for a busy night, this one is a keeper. It is quick, it is one pot, and it gives you that creamy, garlicky sauce that makes people hover around the stove. Play with the cream substitutes if you need to, and pick the chicken cut that fits your life. Most importantly, taste as you go and do not stress it. Make it once, and I bet it slides into your regular rotation.
chicken and spinach recipes

Creamy Spinach Chicken

Prep Time 15 minutes
Cook Time 15 minutes
Total Time 30 minutes
Servings 4 servings
Calories 450
A cozy, easy, and delicious one-pot creamy spinach chicken recipe ready in 30 minutes, perfect for busy weeknights.

Ingredients

Main Ingredients

  • 1.5 pounds Chicken (about 1.5 pounds) (Boneless skinless chicken thighs or breasts recommended.)
  • 5-6 handsful Fresh spinach (Or use frozen spinach (thawed and squeezed dry).)
  • 1 small Onion, chopped (Alternatively, use 1 teaspoon onion powder.)
  • 3 cloves Garlic, minced (Or 1 to 2 teaspoons garlic powder.)
  • 1 cup Chicken broth
  • 3/4 cup Cream (Heavy cream recommended but can use half and half or alternatives.)
  • 1/3 cup Grated parmesan (Optional but enhances the flavor.)
  • 1 teaspoon Salt (Plus more to taste.)
  • 1/2 teaspoon Black pepper
  • 1 teaspoon Italian seasoning (Can substitute with a mix of oregano and basil.)
  • 2 tablespoons Olive oil or butter

Instructions 

Cooking

  • Heat olive oil in a large skillet or pot over medium-high heat. Season the chicken with salt and pepper, then brown it on each side for a few minutes.
  • Lower the heat and add the onion. Cook until the onion is soft, then add the garlic and stir for about 30 seconds.
  • Pour in the chicken broth and scrape the bottom of the pan to release any flavorful bits.
  • Add the cream, seasoning, and parmesan (if using). Let it bubble gently for a few minutes to thicken.
  • Stir in the spinach and cook until wilted. Add the chicken back into the pot, cover, and cook until the chicken is done.
  • Adjust the consistency of the sauce by adding broth if it's too thick or simmer uncovered if it's too thin.

Notes

Substitute cream with half and half, evaporated milk, Greek yogurt, cream cheese, or coconut milk if desired. Serve with rice, pasta, or crusty bread for a full meal.
Calories: 450kcal
Course: Dinner, Main Course
Cuisine: American, Comfort Food
Keyword: creamy chicken, easy weeknight dinner, one-pot recipe, quick chicken recipe, spinach chicken

Easy Street Corn Chicken Bowl

The smell of warm corn and cumin on a weeknight can make the whole kitchen feel like a hug. My kids always start setting the table the minute they catch that scent. The sound of a wooden spoon tapping a bowl, a small argument about who gets the lime wedge, and the little rush of everyone gathering makes this meal more than food. It is a simple routine that turns a busy night into a moment we share.

Why This Easy Street Corn Chicken Bowl Feels Like Home

This Easy Street Corn Chicken Bowl is the kind of meal that folds comfort and speed into one easy pan. It uses pantry staples and whatever cooked chicken you have on hand. That means dinner comes together fast without giving up flavor.

What helps it feel homey is the bright mix of corn, cumin, and fresh cilantro. The textures balance each other: tender chicken, sweet corn, crisp bell pepper, and the soft bed of rice. Meanwhile, the lime adds the small zing that wakes up the whole bowl.

This bowl also works for picky eaters and adventurous ones alike. The basics please children and the bright add-ons invite grown-ups to experiment. Often I set out toppings so everyone can build their bowl. It’s simple and special in the same sweep.

Easy Street Corn Chicken Bowl

The Simple Magic Behind Easy Street Corn Chicken Bowl

“This is where the magic happens, when the aroma fills the kitchen and my kids come running in, asking ‘Is it ready yet?’”

The heart of this recipe is the way flavors meet in one bowl. You start with cooked chicken and rice, then add corn, beans, bell pepper, and onion. Chili powder and cumin bring warmth, while cilantro and lime brighten the finish. Texture cues will tell you when it is right: soft shredded chicken coated in spices, corn plump and lightly sweet, and rice grains separated enough to soak up dressing without clumping.

Next up, think of this method as friendly and flexible. Use cooked chicken from the rotisserie, a pan of poached chicken, or last night’s leftovers. The seasoning is forgiving; taste and adjust as you go. From there, it becomes a bowl you can serve for a weeknight dinner or a casual weekend lunch.

Ingredients You’ll Need

2 cups cooked chicken, shredded
1 can (15 oz) corn, drained
1 cup cooked rice
1 bell pepper, diced
1/2 cup red onion, diced
1 cup black beans, rinsed and drained
1 teaspoon chili powder
1 teaspoon cumin
Salt and pepper to taste
Fresh cilantro, for garnish
Lime wedges, for serving

Don’t skip the fresh herbs. They are the soul of the dish and add that last bright layer. Use what’s in your fridge if you need to swap the bell pepper for a small zucchini or the red onion for green onion. This recipe welcomes creativity, not perfection.

Step-by-Step Directions

  1. In a large bowl, combine the shredded chicken, corn, cooked rice, bell pepper, red onion, and black beans.
    Sprinkle with chili powder, cumin, salt, and pepper, and stir until well combined.
    A quick toss helps the flavors start to mingle.

  2. Taste for seasoning and add more salt or a pinch more chili powder if you like extra warmth.
    If the mix seems dry, squeeze a little lime over it and stir again.
    Remember, bright citrus lifts the whole bowl.

  3. Divide the mixture into serving bowls or plate it family-style in a large bowl for everyone to share.
    Garnish with chopped cilantro and place lime wedges on the side.
    A sprinkle of extra cumin or a drizzle of olive oil can be a nice final touch.

  4. Serve with any optional toppings you love, such as avocado slices, a spoonful of sour cream, or salsa.
    Let everyone customize their bowl — kids love the small choices.
    This part makes dinner feel like a small celebration around the table.

  5. Enjoy your quick weeknight dinner!
    Clean up is easy because most of this comes together in one main bowl.
    Let the slow chatter at the table begin.

Quick tip: a little browning on the shredded chicken in a hot skillet before mixing builds deep flavor, just like my grandmother showed me. Let the kids stir this part if they want — it’s often the most fun for them.

Easy Street Corn Chicken Bowl

Serving Easy Street Corn Chicken Bowl with Love

I serve this bowl family-style in the middle of the table and let everyone help themselves. That simple act of sharing makes the meal feel warm and communal. I put out small bowls with toppings so each person can make their plate unique.

My kids usually go for extra cheese and avocado. My partner likes a splash of hot sauce and an extra lime wedge. I pop a big bowl of mixed greens on the side for anyone who wants to add freshness. For a heartier dinner, offer warm tortillas or chips so people can scoop and build.

If you are feeding guests, set up a small topping station: chopped cilantro, sliced avocado, shredded cheese, sour cream, and mild salsa. That way, the meal becomes a tiny interactive event and everyone can customize while chatting.

Easy Street Corn Chicken Bowl

Storage & Reheat Tips (Keeping the Goodness)

Store the bowls in an airtight container in the fridge for up to 3 days. Keep the cilantro and lime wedges separate until you serve. Fresh herbs lose their bright flavor after a day or two when mixed in, and limes dry out if left exposed.

For reheating, the microwave is fine for a quick lunch. Heat in 30 second bursts, stirring in between, so the rice warms evenly. If you want that “just-made” feel, reheat in a skillet over medium heat with a splash of water or chicken broth. That method brings back a little crunch to the bell pepper and freshens the whole dish.

If you plan to freeze, separate into single portions in freezer-safe containers. Freeze for up to 2 months. Thaw overnight in the fridge and warm gently on the stove to keep the texture pleasant.

If the bowl seems dry after refrigerating, add a squeeze of lime, a drizzle of olive oil, or a spoonful of warm broth when you reheat. Those simple additions revive flavor and make leftovers just as cozy as the first night.

My Kitchen Notes & Shortcuts

  • Use rotisserie chicken to cut prep time in half. It adds a smoky note and saves an evening.
  • Make a double batch of rice at the weekend and freeze single portions. It is a fast way to get dinner on the table.
  • If you prefer a smoky flavor, char the bell pepper under the broiler for a few minutes before dicing it.
  • Let the mixture sit for 15 to 30 minutes if you have time. The flavors settle and taste more connected.
  • Involve kids by letting them measure spices or squeeze lime wedges. Small tasks build confidence and make dinner a shared memory.

Family-Friendly Variations

Make it milder for little ones by reducing the chili powder and serving salsa on the side. For a low-carb option, serve over a bed of mixed greens or cauliflower rice. If you want a richer, creamier bowl, stir in a spoonful of Greek yogurt or a splash of crema.

For a vegetarian version, swap the chicken for extra beans, cubed tofu, or grilled halloumi. For more bite, add roasted sweet potato cubes or sautéed mushrooms. If you love heat, toss in sliced jalapeños or a drizzle of your favorite hot sauce at the end.

These shifts let you put your family’s stamp on the dish. The base is forgiving, and most changes keep the spirit of the bowl intact: simple, fast, and full of heart.

FAQs About Easy Street Corn Chicken Bowl

Can I make this ahead for a busy week?
Absolutely. In fact, letting it sit for an hour lets the flavors get to know each other, like a good family recipe. Store in the fridge for up to 3 days.

Is canned corn okay or should I use fresh?
Canned corn is fine and saves time. If you use fresh, it adds a bright snap. If you have fresh corn, a quick char in a hot pan deepens the flavor.

Can I substitute brown rice or quinoa?
Yes. Brown rice and quinoa work well and add more fiber. Just note that cooking times and texture will differ.

How do I keep the bell pepper crunchy after storing?
Store the bell pepper separately if you want it extra crisp. Add it to each bowl just before serving.

Will the black beans make the dish soggy?
Rinse and drain the beans well. That removes extra moisture and keeps textures pleasant.

One Final Thought from My Kitchen

Cooking small, steady rituals like this bowl has given me so many quiet, good moments. It is not only about feeding bodies, it is about the daily chance to slow and connect, even when time is tight. I hope this Easy Street Corn Chicken Bowl finds a place in your rotation and brings the same easy joy it brings ours.

Conclusion

If you want another version with a grilled corn twist and extra herbs, take a look at this take on Street Corn Chicken Rice Bowls from The Skinnyish Dish for ideas you can borrow. For a more step-by-step, family-friendly write up with bright salsa and topping options, try the recipe at Tastes Better From Scratch.

Easy Street Corn Chicken Bowl

Prep Time 10 minutes
Cook Time 10 minutes
Total Time 20 minutes
Servings 4 servings
Calories 450
A comforting and quick meal that combines cooked chicken, corn, rice, and vegetables, topped with fresh lime and herbs, perfect for family dinner.

Ingredients

Main Ingredients

  • 2 cups cooked chicken, shredded (Use rotisserie or leftover cooked chicken.)
  • 1 can corn (15 oz), drained (Canned corn is fine for quick preparation.)
  • 1 cup cooked rice (Brown rice or quinoa can be used as substitutes.)
  • 1 piece bell pepper, diced (Can be replaced with zucchini if desired.)
  • 1/2 cup red onion, diced (Green onion can be used as an alternative.)
  • 1 cup black beans, rinsed and drained (Rinse well to avoid sogginess.)

Spices and Garnish

  • 1 teaspoon chili powder (Adjust to taste for milder flavor.)
  • 1 teaspoon cumin (Additional cumin can be sprinkled on before serving.)
  • to taste salt and pepper
  • fresh herbs cilantro, for garnish (Important for adding brightness.)
  • 1 piece lime wedges, for serving (Adds a zing to the dish.)

Instructions 

Preparation

  • In a large bowl, combine the shredded chicken, corn, cooked rice, bell pepper, red onion, and black beans.
  • Sprinkle with chili powder, cumin, salt, and pepper, and stir until well combined.
  • Taste for seasoning and add more salt or a pinch of chili powder if you like extra warmth.
  • If the mix seems dry, squeeze a little lime over it and stir again.

Serving

  • Divide the mixture into serving bowls or plate it family-style in a large bowl.
  • Garnish with chopped cilantro and place lime wedges on the side.
  • Offer optional toppings such as avocado slices, sour cream, or salsa.

Notes

Store the bowls in an airtight container in the fridge for up to 3 days, and keep cilantro and lime wedges separate until serving. Reheat in the microwave or a skillet with water or broth for best results.
Calories: 450kcal
Course: Dinner, Family-Friendly, Main Course
Cuisine: American, Comfort Food
Keyword: Chicken Bowl, Comfort Food, Easy Street Corn Chicken Bowl, Family Meal, Quick Dinner