Tag

easy recipes

Browsing

chicken and dumplings is the kind of dinner I crave when the day has been long and I just want something warm that feels like a reset button. You know those nights when everyone is hungry, a little cranky, and you need a meal that actually makes the house feel calm again. This is my go to pot of comfort because it’s simple, filling, and it makes the kitchen smell like you really have your life together. I also love that it’s forgiving, so even if you’re not in the mood to measure perfectly, it still turns out cozy and good. If you’ve been searching for a homemade version that tastes like the real deal, you’re in the right place.
chicken and dumplings

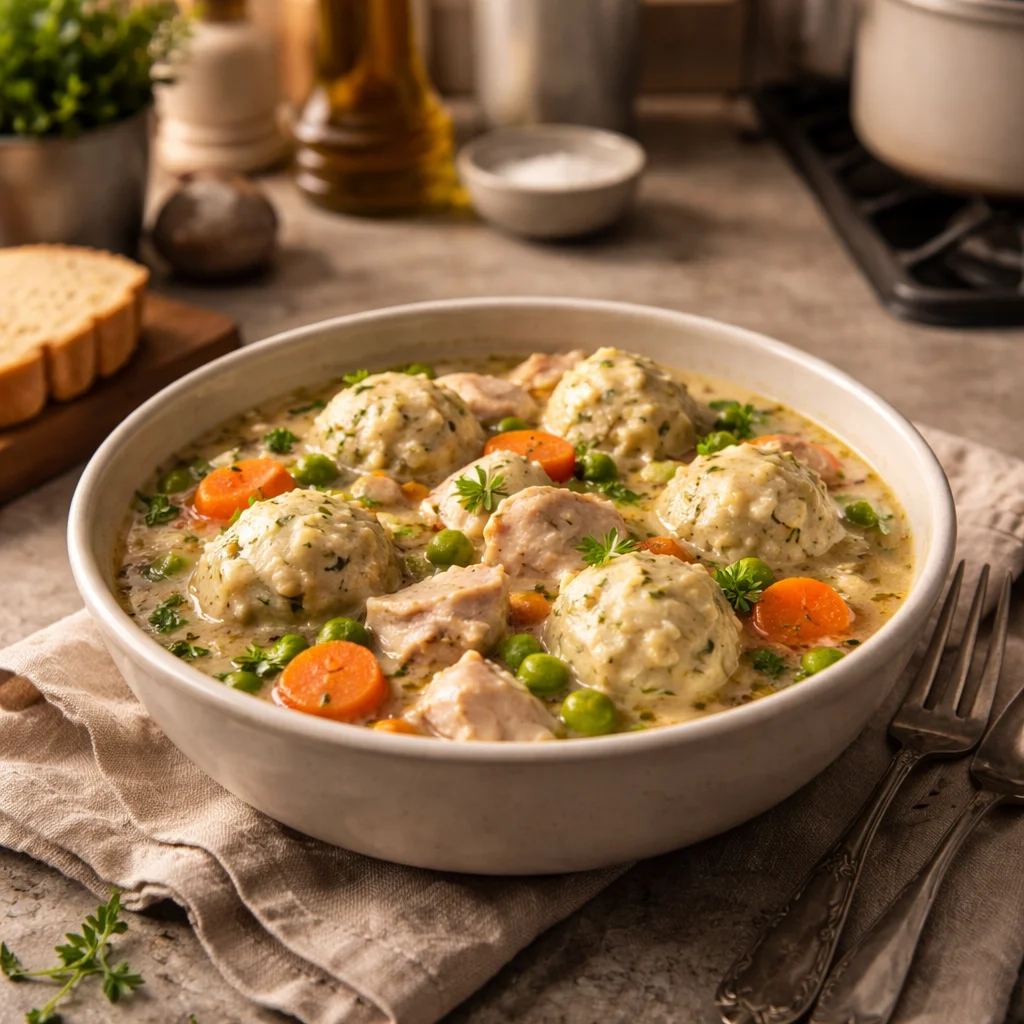
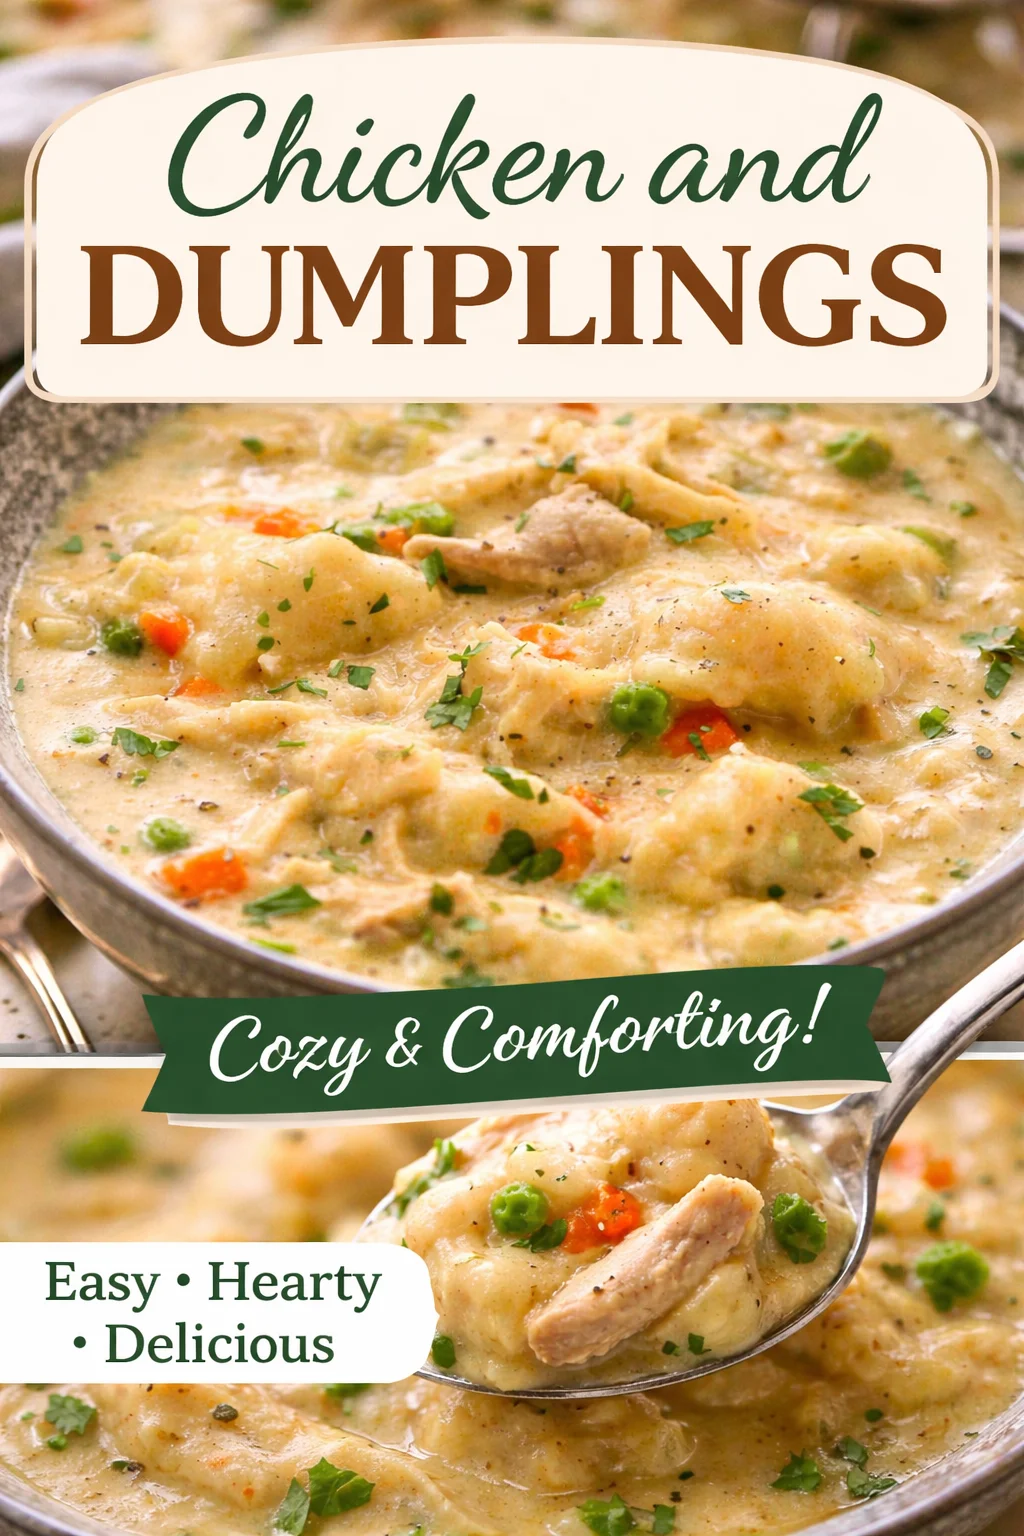
Chicken and Dumplings: A Beloved Comfort Food

I grew up thinking chicken and dumplings was only something you got at a diner or from someone’s grandma who had a secret recipe written on an index card. Then I started making it at home and realized it’s not fancy, it’s just honest food. It’s basically tender chicken in a creamy, peppery broth with soft dumplings that soak up all that flavor. It’s the kind of bowl you eat slower because it’s soothing.

For me, the magic is in the texture. You want the chicken to be pull apart tender, the broth to be thick enough to coat a spoon, and the dumplings to be fluffy but not raw in the middle. And yes, I’m going to say it out loud, leftover chicken and dumplings might be even better the next day because everything settles together.

Here’s the vibe of the dish in one sentence: simple ingredients, big comfort. Nothing showy. Just a meal that makes people ask for seconds.

“I made this on a rainy Sunday and my kids ate two bowls each. The dumplings were soft and perfect, and the broth tasted like it had simmered all day.”

chicken and dumplings

How to Make Chicken and Dumplings: A Step-by-Step Guide

This is my favorite way to make it because it uses basic grocery store ingredients and it doesn’t require any fancy tools. I usually make it in a big pot or Dutch oven. If you can stir and keep an eye on the heat, you can make this.

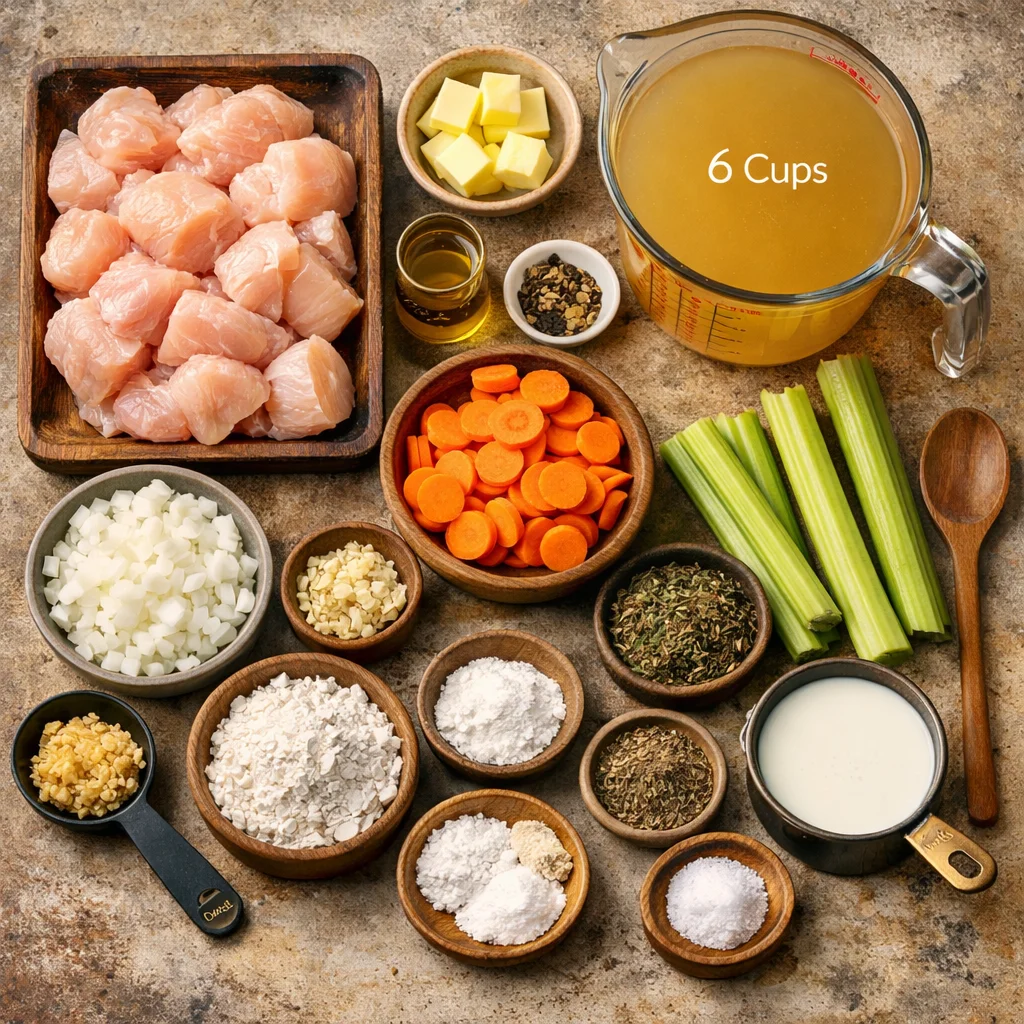
Ingredients you will need

  • Chicken: about 2 pounds boneless thighs (my favorite) or breasts
  • 6 cups chicken broth (low sodium helps you control salt)
  • 2 tablespoons butter
  • 1 tablespoon olive oil
  • 1 medium onion, diced
  • 2 carrots, sliced thin (optional but I like the sweetness)
  • 2 celery stalks, sliced (optional)
  • 3 cloves garlic, minced
  • 1 teaspoon salt, plus more to taste
  • 1 teaspoon black pepper, plus more to taste
  • 1 teaspoon dried thyme
  • 1 half teaspoon poultry seasoning (optional)
  • 1 third cup flour (for thickening)
  • 1 cup milk or half and half (for creaminess)
  • 2 cups frozen peas (optional, I toss them in at the end)

For the dumplings:

  • 2 cups all purpose flour
  • 1 tablespoon baking powder
  • 3 quarters teaspoon salt
  • 3 tablespoons melted butter
  • 3 quarters to 1 cup milk (add slowly)

Step by step directions

1) In a big pot, heat the butter and olive oil over medium heat. Add onion, carrot, and celery. Cook for about 5 to 7 minutes until the onion looks soft. Add garlic and cook for 30 seconds, just until it smells good.

2) Add the chicken, broth, salt, pepper, thyme, and poultry seasoning if using. Bring it to a gentle simmer. Turn the heat down and let it simmer until the chicken is cooked through and tender, about 18 to 22 minutes. If you use thighs, they stay juicy even if you go a little longer.

3) Pull the chicken out onto a plate and shred it with two forks. It doesn’t have to be perfect. Set it aside.

4) Now thicken the broth. Sprinkle in the flour while you whisk or stir constantly. This part feels a little chaotic, but keep stirring and it smooths out. Let it cook for 1 to 2 minutes so it doesn’t taste floury. Pour in the milk or half and half and stir. You’ll see it turn creamy.

5) Add the shredded chicken back into the pot. Taste the broth. This is where you adjust salt and pepper. Don’t be shy with pepper. That little bite is what makes homemade chicken and dumplings taste right.

6) Make the dumpling dough. In a bowl, mix flour, baking powder, and salt. Stir in melted butter, then add milk a bit at a time until it looks like a thick, sticky dough. If it seems dry, add a splash more milk. If it’s too runny, sprinkle in a spoon of flour.

7) Drop dumplings onto the simmering soup using a spoon. Keep them fairly small because they puff up. Once they’re all in, cover the pot and keep it at a gentle simmer for about 12 to 15 minutes. Try not to peek too much. The steam helps them cook.

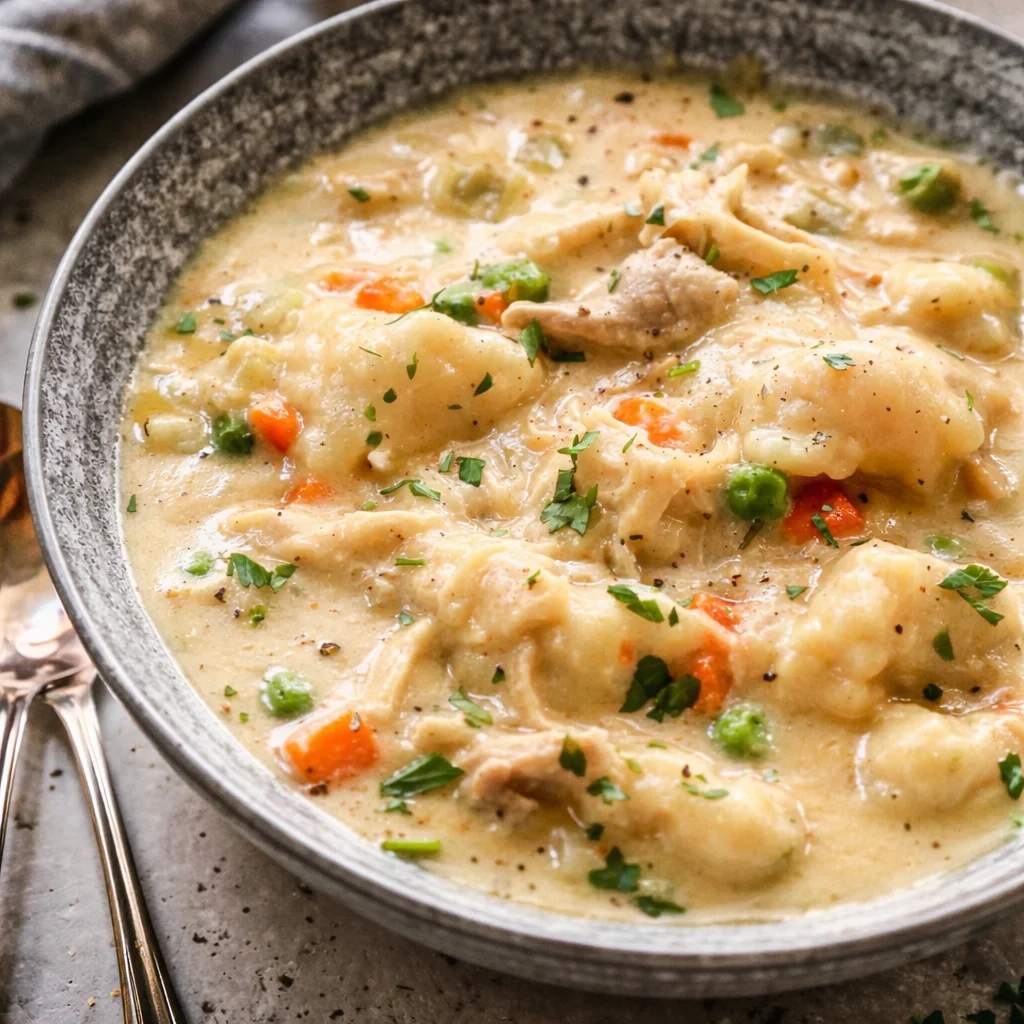
8) Uncover and gently stir. Add peas if you want and let them warm through for 2 minutes. The dumplings should look set and feel fluffy, not doughy in the middle.

When I serve chicken and dumplings, I like it in big bowls with extra black pepper on top. It’s one of those meals where silence at the table is a compliment.

Nutritional Information: What You Need to Know

Let’s keep this real: chicken and dumplings is comfort food first. But you can still understand what’s in it and make choices that work for you. The main sources of calories are the dumplings, the creamy broth, and any butter or half and half you use. The upside is you’re also getting solid protein from the chicken, and if you add veggies, you’re getting more fiber and vitamins too.

Here are a few practical nutrition notes that actually matter when you’re cooking at home:

Protein: Chicken gives this dish staying power, so it’s not the kind of dinner where you feel hungry again an hour later.

Sodium: Broth can be salty. Using low sodium broth and salting at the end helps a lot.

Fat: Half and half makes it richer. Milk works too if you want it lighter. You can also use less butter and it’ll still taste good.

Veggies: Carrots, celery, peas, even spinach can slide right in without changing the soul of the dish.

If you need a rough estimate, a typical bowl can range widely depending on dumpling size and how creamy you make the broth. The good news is you control it. And because it’s homemade, you actually know what went in the pot.

Variations and Tips for Perfecting Your Dish

I’ve made chicken and dumplings a bunch of different ways depending on what I have, how tired I am, and whether I remembered to thaw anything. Here are a few variations that still taste like the classic, just with your own spin.

Easy swaps and upgrades

Rotisserie chicken shortcut: If you want dinner fast, use shredded rotisserie chicken. Simmer the broth with the veggies and seasonings first, then add chicken and continue with dumplings. It saves time and still tastes homemade.

Add a little tang: A tiny splash of lemon juice at the end can brighten the whole pot. Not enough to taste like lemon, just enough to wake it up.

Herb boost: Fresh parsley on top makes it feel extra cozy and fresh. Dried thyme is great, but fresh herbs add that little something.

Cream level: If you like it extra creamy, use half and half. If you want lighter, use milk. If you want dairy free, unsweetened plain oat milk can work, but keep the heat gentle so it does not separate.

Spice option: A pinch of smoked paprika or a dash of hot sauce can be really good, especially if you like a little warmth.

One of my best tips is to keep the pot at a gentle simmer, not a rolling boil, especially once the dumplings are in. Boiling can break them apart and make the broth cloudy.

Common Mistakes to Avoid When Making Chicken and Dumplings

I’ve made every mistake on this list, so I’m saving you the trouble. Most problems come down to heat being too high or rushing the dumplings.

Mistake 1: Boiling the dumplings hard. Dumplings like a gentle simmer. Too much bubbling can make them fall apart or turn gummy.

Mistake 2: Making dumplings too big. Big dumplings can look done on the outside and still be raw inside. Keep them small and you’ll be happier.

Mistake 3: Overmixing the dumpling dough. Stir just until combined. If you beat it like pancake batter, the dumplings can get dense.

Mistake 4: Forgetting to taste the broth. The broth is the whole personality of the dish. Taste and adjust salt, pepper, and thyme before you drop dumplings in.

Mistake 5: Adding milk to a super hot pot too fast. Lower the heat a bit when you add milk or half and half, and stir as you pour. That helps keep it smooth.

If your broth ends up thicker than you like, just stir in a splash of broth or water. If it’s too thin, let it simmer uncovered for a few minutes. Homemade chicken and dumplings is flexible like that, which is why I keep coming back to it.

Delicious Homemade Chicken and Dumplings Everyone Will Love

Common Questions

Can I make this ahead of time?

Yes. The broth and chicken can be made a day ahead. I like to make fresh dumplings when reheating, but you can also store it fully made. Just know the dumplings will soak up broth as it sits.

How do I store and reheat leftovers?

Store in the fridge in a sealed container for up to 3 days. Reheat on the stove over low heat with a splash of broth or water, stirring gently so the dumplings do not break up too much.

Can I freeze chicken and dumplings?

You can freeze the soup base really well. Dumplings can get softer after freezing and thawing, so if you are picky about texture, freeze the base and make dumplings fresh later.

What if my dumplings turn out gummy?

Usually that’s from overmixing the dough or boiling too hard. Next time, stir the dough just until it comes together and keep the pot at a gentle simmer with the lid on.

Can I use biscuit dough instead?

You can. It’s a fun shortcut, and it tastes good. The texture is a bit different, more bready, but still very comforting.

A cozy bowl worth making again and again

If you’ve been craving a dinner that feels like a hug, this is it. With a simple pot, a few pantry basics, and a little patience while the dumplings steam, you can make something that tastes truly homemade. Remember to keep the simmer gentle, taste the broth, and don’t stress the small stuff. I hope you make this soon and let it become one of those recipes you keep in your back pocket for the days when you need comfort.

Chicken and Dumplings

Prep Time 20 minutes
Cook Time 35 minutes
Total Time 55 minutes
Servings 6 servings
Calories 450
A cozy and comforting dish featuring tender chicken in a creamy broth and fluffy dumplings that soak up all the flavor.

Ingredients

For the broth

  • 2 pounds boneless chicken thighs or breasts
  • 6 cups low sodium chicken broth (Using low sodium helps control salt.)
  • 2 tablespoons butter
  • 1 tablespoon olive oil
  • 1 medium onion, diced
  • 2 carrots sliced thin (Optional but adds sweetness.)
  • 2 stalks celery, sliced (Optional.)
  • 3 cloves garlic, minced
  • 1 teaspoon salt (Plus more to taste.)
  • 1 teaspoon black pepper (Plus more to taste.)
  • 1 teaspoon dried thyme
  • 1/2 teaspoon poultry seasoning (Optional.)
  • 1/3 cup flour (For thickening.)
  • 1 cup milk or half and half (For creaminess.)
  • 2 cups frozen peas (Optional, add at the end.)

For the dumplings

  • 2 cups all purpose flour
  • 1 tablespoon baking powder
  • 3/4 teaspoon salt
  • 3 tablespoons melted butter
  • 3/4 to 1 cup milk (Add slowly to achieve a thick, sticky dough.)

Instructions 

Preparation

  • In a big pot, heat the butter and olive oil over medium heat. Add onion, carrot, and celery. Cook for about 5 to 7 minutes until the onion looks soft. Add garlic and cook for 30 seconds, just until it smells good.
  • Add the chicken, broth, salt, pepper, thyme, and poultry seasoning if using. Bring it to a gentle simmer. Turn the heat down and let it simmer until the chicken is cooked through and tender, about 18 to 22 minutes.
  • Pull the chicken out onto a plate and shred it with two forks. Set it aside.
  • Sprinkle in the flour while you whisk or stir constantly to thicken the broth. Let it cook for 1 to 2 minutes. Pour in the milk or half and half and stir until creamy.
  • Add the shredded chicken back into the pot. Taste the broth and adjust salt and pepper as needed.

Dumpling Preparation

  • In a bowl, mix flour, baking powder, and salt. Stir in melted butter, then add milk a bit at a time until it looks like a thick, sticky dough.
  • Drop dumplings onto the simmering soup using a spoon. Cover the pot and keep at a gentle simmer for about 12 to 15 minutes.
  • Uncover and gently stir. Add peas if desired and let them warm through for 2 minutes. Dumplings should look set and feel fluffy.

Notes

For variations, try using rotisserie chicken for a quick dinner. A splash of lemon juice can brighten flavors, and adding fresh herbs or a bit of spice enhances the dish. Keep a gentle simmer to avoid overcooking dumplings.
Calories: 450kcal
Course: Comfort Food, Main Course
Cuisine: American
Keyword: Chicken and Dumplings, Comfort Food, Dinner, Homemade, Soup

Cheesy Garlic Chicken Wraps

I remember one evening when the rain tapped on the kitchen window and my kids were folding napkins at the table, humming to a silly song they learned at school. The smell of garlic and butter filled the room and something warm bubbled in the skillet. That small, cozy chaos is where these Cheesy Garlic Chicken Wraps were born, between laughter and a quick, satisfied sigh when everyone took the first bite.

Why This Cheesy Garlic Chicken Wraps Feels Like Home

There is something about garlic and melty cheese that instantly feels like comfort on a plate. These Cheesy Garlic Chicken Wraps taste like a warm hug after a long day. They combine tender chicken, creamy cheeses, and a touch of parsley to brighten things up.

This recipe is forgiving and flexible, which is why I reach for it on busy weeknights. It uses simple pantry items, cooks fast, and the assembly is almost meditative if you let it be. Meanwhile, the golden crust from a quick sear in the pan gives texture that kids and adults both adore.
Cheesy Garlic Chicken Wraps

I like to think of it as the bridge between a sandwich and a cozy casserole. It feeds the family without fuss and leaves time for homework help or a quick phone call to a friend. It is the sort of meal that keeps conversation flowing at the table.

How to Make Cheesy Garlic Chicken Wraps, The Heartwarming Way

“This is where the magic happens—when the aroma fills the kitchen and my kids come running in, asking ‘Is it ready yet?’”

The process is simple and comforting. You mix tender cooked chicken with cheeses and gentle seasonings until the filling is creamy and cohesive. Then you wrap, brush with garlic butter, and toast until the wrap is crisp and the cheese inside is luxuriously melted.

Watch for visual cues: the filling should be creamy and slightly glossy. When toasting, look for a warm golden brown on the tortilla and tiny spots where cheese bubbles through. The aroma of garlic and melted cheese is your best sign that dinner is moments away.

Step-by-Step Overview: Keeping It Simple

  1. In a mixing bowl, combine chicken, garlic powder, onion powder, salt, pepper, mozzarella, cheddar, cream cheese, mayonnaise, and parsley. Mix until creamy and cohesive.
    A little stirring helps the cream cheese warm and bind everything. This is where the flavors get friendly with each other.

  2. Place tortillas on a flat surface. Spoon 1/4 of the filling into the center of each. Add optional vegetables if desired. Fold sides inward and roll tightly from the bottom to form wraps.
    Keep the filling centered and compact so the wrap rolls neatly. It keeps the filling from escaping while toasting.

  3. In a small bowl, mix melted butter with minced garlic. Brush the outside of each wrap generously with the mixture.
    Don’t be shy with the garlic butter. It browns beautifully and adds a buttery, savory crunch.

  4. Heat a skillet over medium heat. Toast each wrap seam-side down for 2–3 minutes per side until golden and crisp, and the cheese is melted inside.
    A little browning builds flavor, just like my grandmother showed me. Watch the pan so they do not burn.

  5. Slice each wrap in half and serve warm with a dipping sauce of choice such as ranch or garlic aioli.
    Let them rest for a minute so the filling settles. Then slice and share. The kids love dipping; I love the smiles.

Cheesy Garlic Chicken Wraps

Ingredients You’ll Need

2 cups cooked shredded or chopped chicken
1 tablespoon olive oil
1 teaspoon garlic powder
1/2 teaspoon onion powder
Salt and black pepper, to taste
1 1/2 cups shredded mozzarella cheese
1/2 cup shredded cheddar cheese
1/4 cup softened cream cheese
2 tablespoons mayonnaise
2 tablespoons chopped fresh parsley or 1 teaspoon dried
4 large flour tortillas
2 tablespoons melted butter
1 teaspoon minced garlic
Optional: Baby spinach
Optional: Shredded lettuce
Optional: Sliced tomatoes

Don’t skip the fresh herbs when you can. They lift the whole dish. But if your fridge is missing parsley, dried will do. Use what’s in your fridge; this is about creativity, not perfection. If you are feeding little ones, take out the tomatoes or leave them on the table for individual choice.

Serving Cheesy Garlic Chicken Wraps with Love

We usually set the wraps in the middle of the table on a large platter. Everyone helps themselves and the first round never lasts long. I like to offer a small bowl of ranch, a jar of store-bought garlic aioli, and a simple salsa for those who want a tangy contrast.

Sides that make this shine: a crisp green salad, a tray of carrot sticks, or a warm bowl of roasted potatoes. For a lighter weeknight, pair the wraps with a lemony arugula salad; for busy nights, a bagged coleslaw makes a perfect companion. My husband always reaches for extra parsley and a little hot sauce. It’s beautiful watching each person make the wrap their own.

Before the kids were older, we would each add our own veggies and then fold. Now they crowd the table and argue playfully over the last half. It’s part of the ritual.
Cheesy Garlic Chicken Wraps

Storage & Reheat Tips (Keeping the Goodness)

Store leftover wraps in an airtight container in the refrigerator for up to 3 days. If you need to freeze them, wrap individually in foil and place in a freezer bag; they keep well for up to 2 months.

To reheat, the oven or toaster oven is best. Preheat to 350 F, unwrap any foil, and warm for 10 to 15 minutes until heated through and crisp on the outside. The oven brings back that just-made warmth and texture.

For a quicker option, the microwave works for a quick lunch. Heat on medium power for 45 to 60 seconds, then finish in a hot skillet for 1 minute per side to restore the crisp. Honest and practical advice: the microwave is fine for convenience, but the skillet or oven will give you the crunchy finish that makes my family cheer.

My Kitchen Notes & Shortcuts

  • Use rotisserie chicken to save time. It adds flavor and speeds up prep without sacrificing taste.
  • Mix the filling a little ahead and refrigerate for up to an hour to let flavors meld. It makes assembly faster and less frantic.
  • If you want a lighter version, swap mayo for plain Greek yogurt. The texture stays creamy and it adds a subtle tang.
  • Get the kids involved with folding or brushing the garlic butter. It is their favorite job and it makes dinner a shared moment.
  • For extra crunch, add thinly sliced bell peppers or cucumbers after toasting.

These small hacks keep the heart of the recipe while shaving off the extra minutes that busy nights demand.

Family-Friendly Variations

Make it your own with these small changes that each tell a different story at the table.

  • Lighter version: Use low-fat cheeses and Greek yogurt instead of mayonnaise. Add extra baby spinach for color.
  • Spicy twist: Stir in a tablespoon of chipotle in adobo or sprinkle crushed red pepper into the filling. Serve with lime wedges.
  • Kid-approved cheesy: Increase the mozzarella and leave out the parsley for picky eaters. Serve with their favorite dipping sauce.
  • Mediterranean spin: Add chopped sun-dried tomatoes and a sprinkle of oregano. Swap cheddar for feta and serve with tzatziki.
  • Veggie-forward: Replace half the chicken with sautéed mushrooms or roasted cauliflower for a more plant-forward meal.

Invite your family to pick a variation each week. It keeps dinner exciting and gives everyone a voice.

FAQs About Cheesy Garlic Chicken Wraps

Cheesy Garlic Chicken Wraps

Can I make this ahead for a busy week?
Absolutely. You can assemble the filling a day ahead and store it in the fridge. Fill and roll the wraps right before toasting for the best texture. Letting it sit for an hour lets the flavors get to know each other, just like an old family recipe.

What type of chicken is best?
Cooked, shredded rotisserie chicken is the easiest and tastiest shortcut. Leftover baked or grilled chicken also works well. Aim for tender, shredded pieces so the filling mixes evenly.

Can I freeze these?
Yes. Wrap each wrap tightly in foil and then put them into a freezer bag. They keep for up to two months. Reheat from frozen by baking at 350 F for about 20 to 25 minutes, or until heated through.

How do I keep the tortillas from getting soggy?
Brush the outside with garlic butter and toast them seam-side down first. That seals the seam and gives a protective, flavorful crust. Also, avoid watery fillings; drain any wet vegetables before adding.

Is there a low-carb version?
You can use low-carb tortillas or large collard leaves as a wrap. Toast gently in a skillet to warm and seal, though the texture will be slightly different from a flour tortilla.

One Final Thought from My Kitchen

I hope these Cheesy Garlic Chicken Wraps find their way into your weekly rotation. They are easy, forgiving, and full of the sort of flavors that invite conversation. Give the kids a job, set the timer, and let the aroma do the rest. It is easier than it looks, and the result is often better than you expect.

Conclusion

If you want a recipe to turn to when life is full and you still want dinner to feel special, try this Cheesy Garlic Chicken Wraps recipe and see how it fits in your family’s stories. For an extra reference and a slightly different take, I sometimes look at other versions like Cheesy Garlic Chicken Wraps – Cooked & Loved for inspiration, and I also enjoy comparing flavors and techniques in Cheesy Chicken Wraps | Spicedblog. Until next time, happy cooking and may your kitchen be full of warmth and laughter.

Cheesy Garlic Chicken Wraps

Prep Time 15 minutes
Cook Time 10 minutes
Total Time 25 minutes
Servings 4 servings
Calories 450
A comforting dish combining tender chicken, creamy cheeses, and fragrant garlic, perfect for family dinners.

Ingredients

Filling Ingredients

  • 2 cups cooked shredded or chopped chicken (Use rotisserie chicken to save time.)
  • 1 tablespoon olive oil
  • 1 teaspoon garlic powder
  • 1/2 teaspoon onion powder
  • 1 1/2 cups shredded mozzarella cheese (Increase for kid-approved version.)
  • 1/2 cup shredded cheddar cheese (Can be swapped for feta in a Mediterranean version.)
  • 1/4 cup softened cream cheese (For creaminess in filling.)
  • 2 tablespoons mayonnaise (Can substitute with Greek yogurt.)
  • 2 tablespoons chopped fresh parsley (Use dried if fresh is unavailable.)

Wrap Ingredients

  • 4 large flour tortillas
  • 2 tablespoons melted butter (Brush on wraps for toast.)
  • 1 teaspoon minced garlic (Mixed with melted butter.)
  • Optional baby spinach, shredded lettuce, sliced tomatoes (Add for veggie variety.)

Instructions 

Preparation

  • In a mixing bowl, combine chicken, garlic powder, onion powder, salt, pepper, mozzarella, cheddar, cream cheese, mayonnaise, and parsley. Mix until creamy and cohesive.
  • Place tortillas on a flat surface. Spoon 1/4 of the filling into the center of each. Add optional vegetables if desired. Fold sides inward and roll tightly from the bottom to form wraps.
  • In a small bowl, mix melted butter with minced garlic. Brush the outside of each wrap generously with the mixture.

Cooking

  • Heat a skillet over medium heat. Toast each wrap seam-side down for 2–3 minutes per side until golden and crisp, and the cheese is melted inside.
  • Slice each wrap in half and serve warm with a dipping sauce of choice such as ranch or garlic aioli.

Notes

Store leftover wraps in an airtight container in the refrigerator for up to 3 days. For freezing, wrap individually in foil and place in a freezer bag; they keep well for up to 2 months. Reheat in the oven for the best texture.
Calories: 450kcal
Course: Dinner, Main Course
Cuisine: American, Comfort Food
Keyword: Cheesy Garlic Chicken Wraps, Easy Dinner Recipe, Family Meal