Tag

easy dinner ideas

Browsing

Bang Bang Chicken

The first thing you notice is the sweet, tangy aroma of the sauce, bright with lime and a touch of chili. You hear the light sizzle of chicken as it hits the hot skillet. The kitchen feels alive and comforting. This Bang Bang Chicken comes together fast, and it fills the house with a scent that makes everyone wander toward the table.

If you love a quick family meal that tastes special, you will like this version. I often serve it over rice or tuck it into sliders for lunchboxes. For another fun way to build a meal, try my Bang Bang Chicken Bowl ultimate recipe for inspiration: Bang Bang Chicken Bowl ultimate recipe.

Why this works

Bang Bang Chicken

This recipe balances creaminess, sweetness, heat, and crunch in a way kids and adults both enjoy. The mayonnaise smooths the heat, while sweet chili sauce and sriracha add layers of flavor. Panko gives a satisfying crunch without heavy batter.

Beyond flavor, this dish saves time. It uses diced chicken for quick, even cooking. That makes it perfect for busy weeknights when you want something homemade that feels a little special. If you want a crunchy salad option with a similar vibe, check my Bang Bang Chicken Crispy Rice Salad for a related weeknight idea: Bang Bang Chicken Crispy Rice Salad.

Process Overview

“This is where the magic happens—when the aroma fills the kitchen.”

You will make a simple, creamy sauce, coat the diced chicken in panko, pan-cook until golden, and toss everything together. The steps are straightforward and forgiving. You can double the sauce easily, which I often do because it keeps well and many people reach for seconds.

Ingredients

  • 1 lb chicken breasts, diced
    Lily tip: Use evenly sized pieces so they cook at the same rate. If you buy thin cut breasts, slice them into uniform cubes.

  • 1/2 cup mayonnaise
    Lily tip: Full fat mayo gives the creamiest texture. If you prefer lighter, use light mayonnaise but expect a thinner sauce.

  • 1/4 cup sweet chili sauce
    Lily tip: This adds sweetness and a fruity chili flavor. Taste as you go because brands vary in heat and sweetness.

  • 2 tablespoons sriracha
    Lily tip: Adjust to your family’s heat tolerance. Start with 1 tablespoon for kids, then add more for adults.

  • 1 tablespoon soy sauce
    Lily tip: Use low sodium if you watch salt. It helps round out the sweet-sour profile.

  • 1 tablespoon lime juice
    Lily tip: Fresh lime brightens the sauce. If fresh is not available, bottled juice works in a pinch.

  • 1/2 cup panko breadcrumbs
    Lily tip: Panko gives the best crunch. For extra crisp, toast the panko briefly in the pan before coating.

  • Green onions, for garnish
    Lily tip: Slice thinly on the bias for a pretty finish and fresh bite.

  • Salt and pepper to taste
    Lily tip: Season the chicken lightly before breading. You can always finish with a pinch more after tossing in sauce.

For a playful twist, you can mix a little toasted sesame oil into the sauce for a nutty note. If you want to turn this into a sandwich, the Bang Bang Chicken Sliders recipe shows how sliders make the meal portable and kid-friendly: Bang Bang Chicken Sliders recipe.

Directions

  1. In a bowl, combine mayonnaise, sweet chili sauce, sriracha, soy sauce, and lime juice to create the sauce.
    Encouragement: Taste and tweak now. A splash more lime will brighten it, and a touch more sriracha will warm it up.

  2. Season the chicken with salt and pepper.
    Encouragement: Be gentle with salt. You can add a little more later after tasting the sauced chicken.

  3. Dredge the chicken pieces in panko breadcrumbs.
    Encouragement: Press the panko on so it sticks, and let any loose crumbs fall off. This helps get a golden crust.

  4. Heat oil in a skillet over medium heat, and cook the chicken until golden brown and fully cooked.
    Encouragement: Cook in a single layer without crowding. Flip once for a nice crust. Chicken is done at 165°F internal temperature.

  5. Toss the cooked chicken in the sauce until evenly coated.
    Encouragement: Do this off heat so the sauce stays creamy. If you like it saucier, add a little extra mayo and sweet chili sauce.

  6. Serve hot, garnished with chopped green onions.
    Encouragement: Serve immediately for the best crunch. If you need to hold it, keep chicken warm in a low oven and add sauce just before serving.

If you want to adapt for oven-baking instead of skillet cooking, my method for oven-baked boneless skinless chicken thighs shows timing and temperature ideas you can borrow: 30-min oven baked boneless skinless chicken thighs.

Serving

Bang Bang Chicken

Serve this Bang Bang Chicken family-style for a relaxed meal. Place a big bowl of steamed rice on the table, a platter of the sauced chicken, and small bowls of sliced cucumber and carrots for crunch. Let everyone build their own plates. It keeps dinner casual and fun.

You can also tuck the chicken into soft buns, spoon it over a bed of greens, or pile it on crispy rice for texture variation. A simple side of roasted broccoli or a quick cucumber salad balances the richness.

For a different bowl idea that pairs well with this saucy chicken, try my 30-minute teriyaki chicken bowl for inspiration on family-friendly bowls: 30-minute teriyaki chicken bowl.

Storage

Refrigerator: Store leftovers in an airtight container for up to 3 days. Keep sauce and chicken together if you plan to reheat gently. If you separate them, spoon sauce over after reheating.

Reheating: Reheat in a skillet over medium-low heat for best texture. Add a splash of water or a teaspoon of oil to loosen the sauce. You can also reheat in a 350°F oven for about 10 minutes. Microwaving works for speed, but the panko will soften.

Freezing: I do not recommend freezing sauced chicken. If you want to freeze, freeze the cooked chicken without sauce, then thaw and toss with fresh sauce after reheating.

Food safety: Always reheat to at least 165°F. Use a thermometer to check if you are unsure.

Kitchen Notes

  • Use a nonstick or well-seasoned skillet for easy flipping and cleanup.
  • Toast panko for extra crunch and a nutty flavor if you have a little extra time.
  • Double the sauce and keep extra in the fridge. It makes great dipping sauce for veggies.
  • For faster prep, buy pre-diced chicken or use a kitchen shears method to cut strips quickly.
  • Make the sauce ahead of time and store it in a jar. It will keep flavors melded for up to 3 days.

Variations

  • Picky eaters: Reduce the sriracha to 1 teaspoon or leave it off. Serve sauce on the side for dipping.
  • Gluten free: Use gluten-free panko or crushed gluten-free cornflakes as the coating and tamari instead of soy sauce.
  • Lower fat: Use light mayonnaise and bake the panko-coated chicken on a parchment-lined sheet at 425°F for 12 to 15 minutes.
  • Spicy fans: Add a teaspoon of chili garlic sauce or a pinch of cayenne to the sauce for extra kick.
  • Make it vegetarian: Swap in bite-sized cauliflower florets or tofu cubes, coat in panko, and cook until crisp before tossing in sauce.

FAQ

Q: Can I make the sauce ahead of time?

Yes. The sauce stores well in the refrigerator for up to 3 days in a sealed container. Taste before using and brighten with a little lime juice if needed.

Q: What is the best oil for frying the chicken?

Use a neutral oil with a high smoke point, such as canola, vegetable, or peanut oil. Olive oil works in a pinch but has a lower smoke point and a stronger flavor.

Q: How do I keep the panko crunchy after saucing?

The chicken will soften after tossing in sauce. To keep some crunch, reserve a small amount of toasted panko and sprinkle it on top just before serving.

Q: Can I make this in an air fryer?

Yes. Lightly spray the panko-coated pieces with oil and air fry at 400°F for about 8 to 10 minutes, shaking halfway through. Check for 165°F internal temperature.

Q: Is this safe for meal prep?

Absolutely. Store chicken and sauce together if you will reheat it in a skillet. If you prefer crunch, store them separately and mix when reheating or just before serving.

Conclusion

Thanks for cooking with me. I hope this Bang Bang Chicken becomes one of your go-to family meals. If you want another take on this dish from a home food stylist perspective, see the Bang Bang Chicken Recipe at Simple Home Edit for more ideas: Bang Bang Chicken Recipe at Simple Home Edit. For a tried and tested crispy version with different technique notes, I also recommend the Kitchn’s detailed Bang Bang Chicken Recipe: Bang Bang Chicken Recipe at The Kitchn.

Happy cooking, and remember to savor the moments around the table.

Bang Bang Chicken

Prep Time 15 minutes
Cook Time 15 minutes
Total Time 30 minutes
Servings 4 servings
Calories 450
This Bang Bang Chicken features a sweet and tangy sauce coating tender, crispy chicken, perfect for quick family meals.

Ingredients

For the Chicken

  • 1 lb chicken breasts, diced (Use evenly sized pieces for uniform cooking.)
  • 1/2 cup mayonnaise (Full fat mayo gives the creamiest texture.)
  • 1/4 cup sweet chili sauce (Taste as you go; brands vary in heat and sweetness.)
  • 2 tablespoons sriracha (Adjust based on family’s heat tolerance.)
  • 1 tablespoon soy sauce (Use low sodium if watching salt.)
  • 1 tablespoon lime juice (Fresh lime brightens the sauce.)
  • 1/2 cup panko breadcrumbs (Panko provides the best crunch.)
  • Green onions, for garnish (Slice thinly for garnish.)
  • Salt and pepper (To taste.)

Instructions 

Preparation

  • In a bowl, combine mayonnaise, sweet chili sauce, sriracha, soy sauce, and lime juice to create the sauce. Taste and adjust seasonings.
  • Season the diced chicken with salt and pepper.
  • Dredge the chicken pieces in panko breadcrumbs, pressing to adhere.

Cooking

  • Heat oil in a skillet over medium heat and cook the chicken until golden brown and fully cooked, about 5-7 minutes.
  • Toss the cooked chicken in the sauce off heat until evenly coated.

Serving

  • Serve hot, garnished with sliced green onions.

Notes

Serve over rice or in sliders. Store leftovers in an airtight container for up to 3 days. Reheat gently in a skillet for best texture.
Calories: 450kcal
Course: Dinner, Main Course
Cuisine: American, Asian
Keyword: Bang Bang Chicken, Chicken Recipe, Comfort Food, Family Meal, Quick Dinner

Delicious Chicken Enchiladas

There’s something magical about the sounds that fill a family kitchen during a cozy weeknight dinner. The clatter of dishes as my kids laugh and help set the table, the soft simmering of chicken enchiladas bubbling away in the oven, and the heavenly aroma that wafts through the air, instantly reminding me of those warm days spent at my grandmother’s house. As we gather together, ready to share a meal, it feels like comfort and connection all wrapped up in each delicious bite.

Why This Delicious Chicken Enchiladas Feels Like Home

When I first made chicken enchiladas, I was simply looking for an easy weeknight meal that wouldn’t require much fuss. But what I found was a dish that felt so welcoming, so full of love, that it quickly became a family favorite. The minute I pulled the cheesy, saucy enchiladas out of the oven, it was like a warm hug for the soul.

Many meals have come and gone from our dinner table, but these enchiladas carry a special memory. They come together quickly, require only one baking dish, and please even the pickiest of eaters in my household. It’s a joyful recipe that turns busy evenings into special moments, filled with laughter and togetherness.

Delicious Chicken Enchiladas

The Simple Magic Behind Delicious Chicken Enchiladas

The beauty of this dish lies not only in its flavor but also in its simplicity. You don’t need to be a gourmet chef or have an elaborate kitchen setup to make these enchiladas sing. With just a handful of ingredients, this recipe is like a backstage pass to home-cooked comfort.

Moreover, it’s versatile. Want to add beans? Do it. Prefer a spicy kick? Just adjust the seasoning. This meal comes together with little stress, transforming your kitchen into a haven of delicious aromas and familiar warmth. Each layer of flavor invites a connection between family members, bonding over a shared love for good food.

Why This Recipe Works for Our Busy, Joyful Nights

Many of us juggle busy schedules, and sometimes, a simple meal plan makes all the difference. When making chicken enchiladas, I can prep the filling in advance, letting the flavors mingle while I finish my workday. With just a few rolls and a sprinkle of cheese, dinner is ready in no time.

This is precisely why I love this recipe. It embodies the essence of comfortable food combined with convenience. As the kid’s help with the assembly, it becomes less of a chore and more of a cherished family activity. And when we finally sit down, the smiles and laughter around the table remind me why I love cooking for them.

How to Make Delicious Chicken Enchiladas, The Heartwarming Way

Cooking any dish should be an experience filled with joy. With chicken enchiladas, that sense of creativity flows freely as you mix, roll, and bake. Whether it’s a quick weeknight meal or a special gathering, this cooking process is satisfying.

“This is where the magic happens—when the aroma fills the kitchen and my kids come running in, asking ‘Is it ready yet?’”

Let’s take a closer look at the cooking process and enjoy every moment along the way.

Ingredients You’ll Need

Here’s what you need to create your own comforting batch of chicken enchiladas. Remember, don’t hesitate to play with the ingredients based on what you have at home. Cooking is about enjoying the process as much as the final dish.

  • 2 cups Cooked and shredded chicken (Use rotisserie chicken for convenience or cook your own.)
  • 1 can Red enchilada sauce (10 oz) (Adds a zesty kick; choose mild or spicy based on preference.)
  • 2 cups Shredded Monterey Jack cheese (Melts beautifully and adds creaminess.)
  • 8 pieces Flour tortillas (Soft and pliable for easy rolling.)
  • 1 tablespoon Vegetable oil (Used for sautéing onions and garlic.)
  • 1 small Onion, chopped (Adds sweetness and depth to the filling.)
  • 2 cloves Garlic, minced (Brings a wonderful aroma and flavor.)
  • 1 teaspoon Cumin (Adds warmth and earthiness.)
  • 1 teaspoon Chili powder (Gives a nice kick and enhances flavor.)
  • to taste Salt and pepper (Helps balance the flavors.)
  • for garnish Chopped cilantro (Adds a pop of color and freshness.)
  • for serving Sour cream (Adds creaminess and tang.)

Don’t skip the fresh herbs; they’re the soul of the dish. And remember, use what’s in your fridge. This is about creativity, not perfection.

Step-by-Step Directions

Creating these enchiladas is as easy as pie, and I promise you’ll be surprised at how effortlessly they come together. Let’s break it down into manageable steps:

  1. Prepare the chicken. Start by boiling or baking the chicken until fully cooked. Once it’s done, shred it using two forks or your hands.

  2. Sauté the aromatics. Heat a skillet over medium heat and add vegetable oil. Sauté the chopped onion and minced garlic until soft and fragrant, about 3-4 minutes.

  3. Combine the filling. Add the shredded chicken to the skillet with the sautéed onions and garlic. Season with cumin, chili powder, salt, and pepper. Stir and cook for another 3-5 minutes until everything is warmed through and mixed well.

  4. Prepare the baking dish. Pour a small amount of red enchilada sauce into the bottom of a baking dish. This prevents sticking and adds flavor.

  5. Stuff the tortillas. Take a flour tortilla and place a generous spoonful of the chicken mixture in the center. Sprinkle with shredded cheese and roll tightly. Place seam side down in the baking dish. Repeat this until all tortillas are filled.

  6. Add sauce and cheese. Pour the remaining enchilada sauce over the top of the rolled enchiladas, then sprinkle with the rest of the shredded cheese.

  7. Bake. Cover the dish with foil and bake in a preheated oven at 375°F (190°C) for 20-25 minutes. Remove the foil and bake for an additional 5-10 minutes until the cheese is bubbly and slightly golden.

  8. Rest and serve. Let the enchiladas rest for a few minutes before serving. Garnish with chopped cilantro and serve with sour cream for that perfect finishing touch.

Remember, a little browning here builds flavor, just like grandma showed me. Let the kids stir this part; it’s the fun bit!

Delicious Chicken Enchiladas

Serving Delicious Chicken Enchiladas with Love

In our home, the best way to enjoy chicken enchiladas is family-style. I love placing the baking dish on the table, letting everyone help themselves. It turns dinner into a casual feast, where everyone is involved and can customize their plates just the way they like.

Alongside these enchiladas, I’ll often whip up some classic sides like a refreshing green salad or Spanish rice. A dollop of sour cream and a sprinkle of cilantro brightens the flavor, turning our meal into a celebration. Sharing stories and laughter around the table makes the experience even more special.

Delicious Chicken Enchiladas

Storage & Reheat Tips

Now, let’s talk about what to do with any leftovers. Because, let’s be honest, enchiladas make fantastic leftovers.

If you have some enchiladas left, store them in an airtight container in your fridge. They should be good for about 3-4 days. When you want to reheat them, the oven is your best friend. Preheat it to 350°F (175°C) and warm the enchiladas for about 15-20 minutes. This will help revive that fresh-baked charm.

Of course, the microwave works for a quick lunch too; just know that you may lose some of that cheesy goodness.

My Kitchen Notes & Shortcuts

Here are some quick tips I’ve gathered from making these delicious enchiladas time and again:

  • Use rotisserie chicken. It saves time and effort, allowing you to focus on making the dish sing.
  • Add beans or veggies. Black beans or diced bell peppers can make for excellent add-ins.
  • Make a double batch. If you’re already in the kitchen, why not? Freeze some for those busy nights later on.
  • Let the kids assemble. It’s a great way to get them involved, turning dinner prep into family fun.
  • Get creative. Don’t be afraid to switch up the cheeses or the sauce; you might discover a new favorite twist.

Family-Friendly Variations

The best part about chicken enchiladas is how flexible they are. Here are some easy ways to make this dish your own:

  • For a lighter version, swap out the flour tortillas for corn tortillas, which can also add an extra flavor twist.
  • Try a vegetarian version by using black beans and additional veggies instead of chicken.
  • Switch up the sauce. Green enchilada sauce can give a completely different flavor profile, bringing freshness to the meal.
  • Add a crunch. Top your enchiladas with some crushed tortilla chips for an added texture contrast that kids love.

Cooking is about expression, and it’s wonderful to find ways to make the dish feel like your own family story.

FAQs About Delicious Chicken Enchiladas

Can I make this ahead for a busy week?

Absolutely! In fact, letting it sit for an hour lets the flavors get to know each other, just like an old family recipe. You can prepare the filling and roll your enchiladas, then cover them and refrigerate until you’re ready to bake.

Can I freeze chicken enchiladas?

Yes, chicken enchiladas freeze beautifully. Just assemble them but don’t add the sauce or cheese until you’re ready to bake. Wrap them tightly and store them in a freezer-safe container for up to three months.

What can I use instead of Monterey Jack cheese?

You can absolutely use your favorite cheese! Cheddar cheese works great, or you can even mix different cheeses for a flavor boost.

Are there any side dishes that go well with enchiladas?

Sure! Spanish rice, guacamole, or a simple corn salad are all excellent choices that pair well with enchiladas.

What if I don’t have enchilada sauce?

No problem! If you’re in a pinch, you can blend some diced tomatoes with spices like chili powder and cumin to create a quick alternative.

One Final Thought from My Kitchen

As we wrap up this delicious journey through chicken enchiladas, I hope you find comfort in this recipe. The joy of cooking flows through the simple and heartwarming moments it creates, reminding us to gather around the table, share stories, and make memories.

May this dish bring laughter and love into your home, just as it does in mine. Until next time, happy cooking!

Chicken Enchiladas

Prep Time 20 minutes
Cook Time 30 minutes
Total Time 50 minutes
Servings 8 pieces
Calories 350
Warm and comforting chicken enchiladas, perfect for busy weeknight dinners. This simple recipe brings family together with its delicious flavors and ease of preparation.

Ingredients

Main Ingredients

  • 2 cups Cooked and shredded chicken (Use rotisserie chicken for convenience or cook your own.)
  • 1 can Red enchilada sauce (10 oz) (Adds a zesty kick; choose mild or spicy based on preference.)
  • 2 cups Shredded Monterey Jack cheese (Melts beautifully and adds creaminess.)
  • 8 pieces Flour tortillas (Soft and pliable for easy rolling.)
  • 1 tablespoon Vegetable oil (Used for sautéing onions and garlic.)
  • 1 small Onion, chopped (Adds sweetness and depth to the filling.)
  • 2 cloves Garlic, minced (Brings a wonderful aroma and flavor.)
  • 1 teaspoon Cumin (Adds warmth and earthiness.)
  • 1 teaspoon Chili powder (Gives a nice kick and enhances flavor.)
  • to taste Salt and pepper (Helps balance the flavors.)

Garnish and Serving

  • to taste Chopped cilantro (Adds a pop of color and freshness.)
  • for serving Sour cream (Adds creaminess and tang.)

Instructions 

Preparation

  • Prepare the chicken: Start by boiling or baking the chicken until fully cooked. Once it’s done, shred it using two forks or your hands.
  • Sauté the aromatics: Heat a skillet over medium heat and add vegetable oil. Sauté the chopped onion and minced garlic until soft and fragrant, about 3-4 minutes.
  • Combine the filling: Add the shredded chicken to the skillet with the sautéed onions and garlic. Season with cumin, chili powder, salt, and pepper. Stir and cook for another 3-5 minutes until everything is warmed through and mixed well.

Assembly

  • Prepare the baking dish: Pour a small amount of red enchilada sauce into the bottom of a baking dish. This prevents sticking and adds flavor.
  • Stuff the tortillas: Take a flour tortilla and place a generous spoonful of the chicken mixture in the center. Sprinkle with shredded cheese and roll tightly. Place seam side down in the baking dish. Repeat until all tortillas are filled.
  • Add sauce and cheese: Pour the remaining enchilada sauce over the top of the rolled enchiladas, then sprinkle with the rest of the shredded cheese.

Cooking

  • Bake: Cover the dish with foil and bake in a preheated oven at 375°F (190°C) for 20-25 minutes. Remove the foil and bake for an additional 5-10 minutes until the cheese is bubbly and slightly golden.
  • Rest and serve: Let the enchiladas rest for a few minutes before serving. Garnish with chopped cilantro and serve with sour cream for that perfect finishing touch.

Notes

For variations, consider adding black beans or vegetables. Freezing instructions are also available for future convenience.
Calories: 350kcal
Course: Dinner, Main Course
Cuisine: Mexican
Keyword: Chicken Enchiladas, Comfort Food, Easy weeknight meal, Family Dinner, Simple Recipe

Queso Chicken Enchiladas for a Quick and Cheesy Dinner Delight

There’s something so special about the sound of laughter bubbling in the background while delicious aromas fill the air. I can almost hear my kids setting the table, each plate placed with care, their innocent banter creating a joyful symphony. In the midst of it all, there’s a comforting smell wafting from the oven—my Queso Chicken Enchiladas for a Quick and Cheesy Dinner Delight. This dish not only brings my family around the table but also weaves their memories into mine. It’s these simple moments that turn an ordinary meal into a cherished family gathering.

Why This Queso Chicken Enchiladas for a Quick and Cheesy Dinner Delight Feels Like Home

When I first began making Queso Chicken Enchiladas, I was drawn to their simplicity and the way they wrapped everyone in a warm embrace of flavor. There’s a real magic in seeing my family’s eyes light up at the sight of these cheesy beauties. It feels like home because each bite carries a comforting familiarity, reminiscent of special occasions and cozy nights together. The creamy queso and tender chicken invite everyone in, even the pickiest eaters, making it easy to share laughter and conversations around the table.

This recipe is perfect for busy weeknights when cooking can feel daunting. All the ingredients play together harmoniously, creating a delightful dish without spending hours in the kitchen. It’s genuinely an effortless yet special recipe that transforms a regular dinner into a warm gathering.

Queso Chicken Enchiladas for a Quick and Cheesy Dinner Delight

Why Queso Chicken Enchiladas for a Quick and Cheesy Dinner Delight is Our New Family Favorite

What sets Queso Chicken Enchiladas apart as our new family favorite is their adaptability. Each week brings different schedules and tastes, yet this dish molds to fit everyone’s needs. Plus, it brings everyone into the kitchen. The kids love to help mix the ingredients, making it a dynamic family affair. Watching them engage with food creates a culinary connection that’s just as important as eating together.

With flavors that excite yet comfort, these enchiladas strike the perfect balance. You can modify ingredients based on what you have on hand or your family’s preferences. It’s a dish that encourages creativity and spontaneity, reminding us that the best meals often emerge from improvisation in the kitchen.

The Simple Magic Behind Queso Chicken Enchiladas for a Quick and Cheesy Dinner Delight

The recipe embraces the concept of effortless cooking while delivering outstanding flavor. You start with some rotisserie chicken—how easy is that? No need to spend time cooking the chicken from scratch. Toss it in with some velvety queso, tender tortillas, and a handful of spices, and you’re well on your way to a delicious meal.

Each ingredient complements the others, creating a symphony of taste. The shredded chicken provides heartiness, melted queso gives richness, while the green chilies add a bit of zing. Together, they form the ultimate comfort food, reminding you that good meals don’t need to be complicated.

Why This Recipe Works for Our Busy, Joyful Nights

In my home, busy nights are the norm. Between school activities, work, and everything in between, I often found myself scrambling for dinner ideas. That’s where this Queso Chicken Enchiladas recipe shines.

It comes together in no time. You could say it’s a lifesaver on those chaotic evenings when everyone is hungry, and I can’t afford to spend hours prepping. Plus, it requires minimal cleanup. You don’t need multiple pots and pans that clutter the kitchen after a long day. Instead, it consolidates everything into a single dish that you can serve family-style, making everyone feel included.

“This is where the magic happens—when the aroma fills the kitchen, and my kids come running in, asking ‘Is it ready yet?’”

How to Make Queso Chicken Enchiladas for a Quick and Cheesy Dinner Delight, The Heartwarming Way

Creating these enchiladas is an engaging and joyful process. It starts with gathering a handful of ingredients that you may already have in your pantry, making it accessible for anyone. Here is a peek into what you will need.

Ingredients You’ll Need

  • 4 burrito-sized flour tortillas (Corn tortillas can also be used, just warm them first)
  • 2 cups shredded chicken (Rotisserie chicken works fabulously for faster prep!)
  • 1 packet taco seasoning (Feel free to use homemade or store-bought)
  • 1 cup sour cream (Greek yogurt is a healthier substitute if desired)
  • 1 cup shredded cheddar cheese (Mix in Monterey Jack for extra creaminess)
  • 1 can chopped green chilies (Adjust quantity based on heat preference)
  • 1 can diced tomatoes with green chilies (Undrained for moisture)
  • 16 oz Queso Blanco Velveeta (Melts beautifully to create a creamy sauce)

Remember, cooking is about flexibility. Use what’s in your fridge. This is about creativity, not perfection. And while fresh herbs add brilliance, you can skip them if you need to.

Step-by-Step Directions

Now for the fun part—making the enchiladas! Follow these steps for a delightful meal that even your kids will love to help with.

  1. Preheat your oven to 350°F (175°C). This will ensure that when your enchiladas are ready, the oven is warm and waiting.

  2. In a mixing bowl, combine shredded chicken, taco seasoning, sour cream, and half of the cheese. Mix until everything is beautifully coated. This step builds flavor just as I learned from grandma.

  3. Take a tortilla and place a generous amount of the chicken mixture in the middle. Roll it up tightly and place it seam-side down in a greased baking dish. This is where you get to let creativity shine; it’s even fun to let the kids practice their rolling skills!

  4. Repeat the process for the remaining tortillas until the baking dish is full. You may want to sneak in a taste—a little nibble never hurt anyone.

  5. In a separate bowl, mix the diced tomatoes with chilies and Velveeta. Stir until you have a creamy concoction. This savory sauce is the showstopper that brings everything together.

  6. Pour the queso sauce over the rolled enchiladas, ensuring every corner is covered. Don’t skimp on that lovely sauce.

  7. Sprinkle with the remaining cheese on top. It’s all about that cheesy goodness that everyone craves.

  8. Bake for 20-25 minutes, until the cheese is bubbly and golden brown. The aroma filling your kitchen will have everyone searching for the source.

  9. Once cooled for a few minutes, serve the enchiladas straight out of the oven. Enjoy every cheesy bite and the smiles around the table.

Queso Chicken Enchiladas for a Quick and Cheesy Dinner Delight

Serving Queso Chicken Enchiladas for a Quick and Cheesy Dinner Delight with Love

We serve Queso Chicken Enchiladas family-style right in the center of the table. It’s such a heartwarming experience to see everyone helping themselves. We often add toppings like diced avocado, fresh cilantro, or a squeeze of lime to brighten up each bite.

Sometimes we pair it with a simple salad or refried beans on the side to round out the meal. It’s always interesting to note how different family members have their favorite toppings. My husband swears by extra sour cream, while one of my kids prefers it spicy with jalapeños. Each plate becomes a personal story, a reminder of the beautiful variety that family brings to a meal.

Queso Chicken Enchiladas for a Quick and Cheesy Dinner Delight

Storage & Reheat Tips

If you happen to have leftovers—I know it’s hard to resist digging in right away—they store beautifully for another meal. Here are some practical tips for keeping that goodness intact.

  • Cool before storing: Let the enchiladas cool down to room temperature. This helps maintain their texture and flavor.

  • Store in an airtight container: Place leftovers in a sealed container and refrigerate them. They should last for up to three days.

  • Reheat in the oven for best results: While the microwave is a quick fix, heating them in the oven restores their melty cheese and soft tortillas. Just cover with foil to prevent over-browning.

  • Can be frozen too: Freeze the enchiladas, wrapped tightly, for up to two months. Thaw in the refrigerator overnight and bake until warm.

My Kitchen Notes & Shortcuts

Here are a few things I’ve learned along the way that might help make your cooking experience smoother and more enjoyable.

  • Use leftover chicken: This is a perfect way to utilize any leftover rotisserie chicken you might have. It drastically cuts down on prep time.

  • Taco seasoning substitutes: If you want to skip the package stuff, you can easily make your own with spices you likely already have. Think chili powder, cumin, garlic powder, and onion powder.

  • Engage the kids: Let the kids get involved! From mixing ingredients to rolling tortillas, it’s a perfect chance for family bonding and learning in the kitchen.

  • Prep ahead: You can assemble the enchiladas earlier in the day and pop them into the oven when you’re ready. Eating together is what counts, after all.

Family-Friendly Variations

Cooking with easy flexibility in mind encourages creativity, and these Queso Chicken Enchiladas can adapt to many tastes. Here are ways to personalize your dish:

  • Vegetarian option: Replace the chicken with black beans or sautéed veggies. It’s delicious and just as satisfying.

  • Cheesy variations: Layer in different cheeses or even mix in cream cheese for an ultra-creamy filling.

  • Add some crunch: Try adding some black olives or sliced bell peppers for extra texture before rolling the tortillas.

  • Spice it up: For a little kick, add diced jalapeños or use spicy queso.

FAQs About Queso Chicken Enchiladas for a Quick and Cheesy Dinner Delight

Can I make this ahead for a busy week?

Absolutely! In fact, letting it sit for an hour lets the flavors get to know each other, just like an old family recipe.

What if I can’t find Queso Blanco Velveeta?

You can use any melty cheese blend as a substitute. Look for Mexican blend cheese, which will work just as wonderfully.

How do I make these gluten-free?

Use corn tortillas instead, and double-check the taco seasoning and Velveeta for gluten-free options.

One Final Thought from My Kitchen

I hope this dish finds its way into your family’s laughter and stories. Cooking is about connection, joy, and sharing meals that become part of our fabric. If Queso Chicken Enchiladas for a Quick and Cheesy Dinner Delight does just that, my heart is full, and my grandmother’s kitchen is smiling. Until next time, happy cooking!

Queso Chicken Enchiladas

Prep Time 10 minutes
Cook Time 25 minutes
Total Time 35 minutes
Servings 4 servings
Calories 550
A comforting and cheesy dinner dish that brings the family together, featuring shredded chicken and melted queso in tortillas.

Ingredients

Main ingredients

  • 4 pieces burrito-sized flour tortillas (Corn tortillas can also be used, just warm them first.)
  • 2 cups shredded chicken (Rotisserie chicken works fabulously for faster prep!)
  • 1 packet taco seasoning (Feel free to use homemade or store-bought.)
  • 1 cup sour cream (Greek yogurt is a healthier substitute if desired.)
  • 1 cup shredded cheddar cheese (Mix in Monterey Jack for extra creaminess.)
  • 1 can chopped green chilies (Adjust quantity based on heat preference.)
  • 1 can diced tomatoes with green chilies (Undrained for moisture.)
  • 16 oz Queso Blanco Velveeta (Melts beautifully to create a creamy sauce.)

Instructions 

Preparation

  • Preheat your oven to 350°F (175°C).
  • In a mixing bowl, combine shredded chicken, taco seasoning, sour cream, and half of the cheese. Mix until everything is beautifully coated.
  • Take a tortilla and place a generous amount of the chicken mixture in the middle. Roll it up tightly and place it seam-side down in a greased baking dish.
  • Repeat the process for the remaining tortillas until the baking dish is full.
  • In a separate bowl, mix the diced tomatoes with chilies and Velveeta. Stir until you have a creamy concoction.
  • Pour the queso sauce over the rolled enchiladas, ensuring every corner is covered. Sprinkle with the remaining cheese on top.

Cooking

  • Bake for 20-25 minutes, until the cheese is bubbly and golden brown.
  • Once cooled for a few minutes, serve the enchiladas straight out of the oven.

Notes

Serve family-style with toppings like diced avocado, fresh cilantro, or a squeeze of lime. Can be stored in an airtight container for up to three days and reheated in the oven.
Calories: 550kcal
Course: Dinner, Main Course
Cuisine: Mexican
Keyword: cheesy enchiladas, Comfort Food, Easy Dinner, Family Recipe, Queso Chicken Enchiladas

Easy Thai Baked Chicken Meatballs

In a cozy kitchen, laughter bounces off the walls as the sound of my kids setting the table fills the air. The comforting aroma of something savory wafts through, calling everyone to gather. Tonight, that aroma comes from a batch of Easy Thai Baked Chicken Meatballs. It’s those simple moments that make cooking so special, especially when I can whip up a meal that feels like a warm hug but doesn’t leave me in a frenzy.

Why This Easy Thai Baked Chicken Meatballs Feels Like Home

Every family has their go-to meals that evoke feelings of comfort and joy. For us, Easy Thai Baked Chicken Meatballs is one of those dishes. It’s not just a meal; it’s a memory, a conversation starter, and a canvas for creativity.

The magic of this recipe lies in its simplicity. With just a handful of ingredients, it brings a burst of flavor to our dining table without consuming too much of our evening. This recipe feels good to prepare, and even better to share.

Easy Thai Baked Chicken Meatballs

Why Easy Thai Baked Chicken Meatballs is Our New Family Favorite

The charm of Easy Thai Baked Chicken Meatballs is hard to resist. It checks all the boxes for a busy family meal: quick to prepare, healthy, and bursting with flavors that everyone loves. Whether it’s a Monday night or a special occasion, these meatballs always steal the spotlight.

They remind me of family gatherings where laughter and shared meals were at the center of everything. I can already hear my kids asking if there are leftovers for lunch the next day. The appeal of this dish runs deep, proving it’s not only delicious but also a lovely way to connect over food.

The Simple Magic Behind Easy Thai Baked Chicken Meatballs

Why does this dish work so well, you might wonder? It’s all about balance. The ground chicken provides a light yet satisfying protein, while the red curry paste introduces a delightful kick. Fresh ginger adds warmth, and the breadcrumbs give the meatballs a lovely texture. Together, they create an experience that’s much more than the sum of its parts.

As someone who loves experimenting in the kitchen, I find this recipe sparks joy and creativity. You can serve it with a variety of dipping sauces, or pair it with jasmine rice and steamed vegetables. No matter how you dress it up, it always feels special.

Why This Recipe Works for Our Busy, Joyful Nights

On those busy weeknights, the last thing I want is to spend hours in the kitchen. Easy Thai Baked Chicken Meatballs is my secret weapon. They come together quickly and require minimal cleanup. This lets me spend quality time with my family, sharing stories about our day as we wait for dinner to be ready.

Cooking should be a shared joy, not a chore. With this recipe, I can involve my children in the prep. They love getting their hands a little messy by forming meatballs, and it turns into a fun bonding experience. This recipe isn’t just about food; it’s about making memories.

“This is where the magic happens—when the aroma fills the kitchen and my kids come running in, asking ‘Is it ready yet?’”

How to Make Easy Thai Baked Chicken Meatballs, The Heartwarming Way

When it comes to cooking, simplicity is key. With Easy Thai Baked Chicken Meatballs, you’ll see that the steps are straightforward and the process can be joyful. Let’s walk through the journey from mixing ingredients to enjoying the flavorful end result.

Step-by-Step Overview: Keeping It Simple

  1. Preheat your oven to 400°F (200°C) and line a baking sheet with parchment paper. This creates a non-stick surface for our meatballs.

  2. In a large bowl, combine ground chicken, red curry paste, grated ginger, breadcrumbs, green onions, egg, salt, and pepper. Mix until well combined. Don’t worry about being perfect here; just ensure everything is cohesive.

  3. Form the mixture into small meatballs and place them on the prepared baking sheet. Aim for uniform sizes so they cook evenly.

  4. Bake in the preheated oven for 20-25 minutes, or until the meatballs are cooked through and golden brown. You’ll know they are ready when the smell makes everyone’s stomach growl.

  5. Serve warm with peanut dipping sauce. This adds a creamy, nutty flavor that takes the dish over the top.

Each of these steps is designed to keep you engaged and relaxed. Mix, form, bake, and serve. That’s it!

Ingredients You’ll Need

Cooking is all about having the right ingredients on hand. For Easy Thai Baked Chicken Meatballs, you’ll need the following:

  • 1 pound ground chicken
  • 2 tablespoons red curry paste
  • 1 tablespoon fresh ginger, grated
  • 1/4 cup breadcrumbs
  • 1/4 cup green onions, chopped
  • 1 egg
  • Salt and pepper to taste
  • Peanut dipping sauce (for serving)

Don’t skip out on the fresh herbs; they are the soul of the dish! If you’re missing some ingredients, feel free to adjust. Cooking should be creative and stress-free.

Step-by-Step Directions

  1. Preheat your oven to 400°F (200°C) and line a baking sheet with parchment paper. This helps to prevent sticking.

  2. In a large bowl, combine ground chicken, red curry paste, grated ginger, breadcrumbs, green onions, egg, salt, and pepper. Mix until well combined. This is the point where the fun begins! Don’t worry if it feels a little sticky – that’s a good thing.

  3. Form the mixture into small meatballs and place them on the prepared baking sheet. I like making them about the size of a golf ball. This is a great time to let kids help; they love getting their hands in there.

  4. Bake in the preheated oven for 20-25 minutes, or until the meatballs are cooked through and golden brown. You’ll want to check them halfway through and rotate the pan for even cooking.

  5. Serve warm with peanut dipping sauce. This final touch is what elevates the dish. Let everyone dip their meatballs into the sauce for an exciting flavor explosion.

Serving Easy Thai Baked Chicken Meatballs with Love

Dinnertime in our household is all about sharing and enjoying. I love serving Easy Thai Baked Chicken Meatballs family-style in the middle of the table, where everyone can help themselves.

Pair it with some fragrant jasmine rice and steamed veggies, and you have a meal that’s colorful as well as nutritious. Some of my kids like to add a sprinkle of sesame seeds or crushed peanuts to give it that extra crunch. It really makes the dish shine, and it becomes a fun ritual for us.

Easy Thai Baked Chicken Meatballs

Another beautiful aspect of this recipe is that it’s versatile. You can switch the sides based on what you have and what you love. Whether you’re throwing together a quick weeknight meal or creating a feast for friends, Easy Thai Baked Chicken Meatballs fits in beautifully.

Storage & Reheat Tips (Keeping the Goodness)

If you happen to have leftovers—although they don’t last long in my house—here are some tips to store and reheat them.

Let the meatballs cool completely before placing them in an airtight container. They will stay fresh for about three days in the fridge. The microwave works for immediate lunches, but if you want to keep that just-baked warmth, the oven is the best option to reheat.

Simply pop them in at 350°F (175°C) for about 10 minutes, and they’ll taste fresh again.

My Kitchen Notes & Shortcuts

After making Easy Thai Baked Chicken Meatballs multiple times, I’ve picked up a few tips that make the process even smoother:

  • Use day-old bread for breadcrumbs. Just toss in a food processor—saves time and reduces waste.
  • Make a double batch and freeze half. You can enjoy these delicious meatballs for a quick meal later.
  • Get the kids involved in mixing and forming the meatballs. They love being part of the cooking process, and it always leads to fun memories.
  • Mix up the protein! Ground turkey or even plant-based alternatives work great.
  • Try adding finely chopped vegetables like bell peppers or carrots into the mixture for added nutrition.

These shortcuts help me save time and add a bit of creativity to our meals.

Family-Friendly Variations

Cooking is all about personal touch. While Easy Thai Baked Chicken Meatballs is a family favorite, here are some twists you might consider to make it your own:

  • Swap ground chicken for ground turkey or even lean beef if that’s what you have.
  • Add shredded carrots or zucchini for added nutrition and a pop of color in the meatballs.
  • Serve them with a yogurt dipping sauce for a refreshing change.
  • Experiment with different herbs like cilantro for a unique herby flavor.
  • If your family prefers less spice, use a milder curry paste or adjust the amount to suit your taste.

By playing with the ingredients, you can create a version of this dish that feels uniquely yours.

FAQs About Easy Thai Baked Chicken Meatballs

Can I make this ahead for a busy week?

Absolutely! In fact, letting it sit for an hour lets the flavors develop better, just like an old family recipe.

What can I serve with these meatballs?

They pair beautifully with rice, noodles, or even a fresh salad. Get creative and use what you have on hand!

Can I store uncooked meatballs in the freezer?

Yes! Just shape the meatballs and freeze them on a tray. Once frozen, you can transfer them to a freezer bag. Bake them straight from frozen, adding a few extra minutes to the cooking time.

What should I do if my meatballs are dry?

For the next batch, consider adding a little more egg or breadcrumbs. Both contribute moisture and help bind the ingredients together.

One Final Thought from My Kitchen

As I tuck my kids into bed after another joyful meal, I reflect on the delightful evening spent sharing Easy Thai Baked Chicken Meatballs. Cooking should be a joyful experience, and it’s my hope that this dish bridges the gaps in your family, sparking connection and warmth at the table.

I hope this recipe finds its way into your family’s laughter and stories. If it does, my grandmother’s kitchen is smiling. Until next time, happy cooking!

Easy Thai Baked Chicken Meatballs

Prep Time 15 minutes
Cook Time 25 minutes
Total Time 40 minutes
Servings 4 servings
Calories 300
These Easy Thai Baked Chicken Meatballs are a quick, flavorful family favorite that brings comfort to the dinner table.

Ingredients

Meatball Ingredients

  • 1 pound ground chicken (Use ground turkey or beef as alternatives.)
  • 2 tablespoons red curry paste (Adjust amount for less spice if desired.)
  • 1 tablespoon fresh ginger, grated
  • 1/4 cup breadcrumbs (Use day-old bread for best results.)
  • 1/4 cup green onions, chopped
  • 1 large egg
  • to taste salt
  • to taste pepper

For Serving

  • to taste peanut dipping sauce (Enhances flavor; serve warm.)

Instructions 

Preparation

  • Preheat your oven to 400°F (200°C) and line a baking sheet with parchment paper.
  • In a large bowl, combine ground chicken, red curry paste, grated ginger, breadcrumbs, green onions, egg, salt, and pepper. Mix until well combined.
  • Form the mixture into small meatballs and place them on the prepared baking sheet.

Cooking

  • Bake in the preheated oven for 20-25 minutes, or until the meatballs are cooked through and golden brown.
  • Serve warm with peanut dipping sauce.

Notes

Use cooking as a way to bond with family; involve kids in the formation of meatballs. Store leftovers in an airtight container, and reheat in the oven for best results.
Calories: 300kcal
Course: Dinner, Main Course
Cuisine: Asian, Thai
Keyword: Baked Chicken Meatballs, Comfort Food, Easy Recipe, Family Dinner, Thai Meatballs

Garlic Parmesan Chicken and Potatoes Skillet

The first time I made this Garlic Parmesan Chicken and Potatoes Skillet, I remember the small things: my son dragging the chair across the kitchen floor to peek into the pan, the soft hiss of butter meeting hot metal, and the smell of garlic and cheese wrapping the room like a familiar blanket. It felt like a recipe born for slow, easy evenings when we wanted comfort without fuss. I hope it greets your family the same way.

Why This Garlic Parmesan Chicken and Potatoes Skillet Feels Like Home

This recipe is simple and honest. It pairs golden, slightly crisp potatoes with juicy, seasoned chicken and a garlicky, cheesy finish that feels like a warm hug. The best part is how little it asks of you: a few pans, straightforward seasoning, and a short time to let the kitchen do the work.

I love how it brings everyone to the table. Kids love the crispy potatoes, adults love the garlic-parmesan punch, and everyone appreciates that it all comes together in one skillet. Meanwhile, the leftovers taste so good that my husband has been known to sneak a plate right out of the fridge.
Garlic Parmesan Chicken and Potatoes Skillet

If you enjoy creamy, garlicky chicken dishes, this one is a great weeknight alternative to my richer, oven-baked version of creamy garlic parmesan chicken breast. That recipe leans more indulgent, while this skillet keeps things breezy and bright.

The Simple Magic Behind Garlic Parmesan Chicken and Potatoes Skillet

There are two little cooking ideas that make this recipe shine. First, texture contrast: crisped potatoes against tender chicken keeps every bite interesting. Second, layered seasoning: simple spices on the potatoes and a slightly different blend on the chicken mean each piece tastes distinct while still belonging to the same dish.

This dish also scales well. Cook it one night for a small family, or double the potatoes if you have friends dropping by. It works with different tools too—an air fryer for potatoes and a skillet for the chicken make the timing forgiving. The simplicity is what makes it easy to fall in love with.

How to Make Garlic Parmesan Chicken and Potatoes Skillet, The Heartwarming Way

“This is where the magic happens—when the aroma fills the kitchen and my kids come running in, asking ‘Is it ready yet?’”

Step back and breathe. You will brown, you will toss, and you will finish with melted cheese. Look for golden-brown edges on the potatoes, a little sear on the chicken cubes, and a glossy sauce that clings to everything. These cues mean you are right on track.

Step-by-Step Overview: Keeping It Simple

1️⃣ Prepare the potatoes:
Wash and peel the potatoes, then cut them into small cubes.
Toss the cubed potatoes with olive oil, salt, pepper, garlic powder, and paprika until evenly coated.
A little crowd-pleasing trick: smaller cubes crisp faster, and tossing them well gives even browning.

2️⃣ Cook the potatoes:
Preheat the air fryer to 400°F and cook the potatoes for about 20 minutes, shaking the basket a couple of times to ensure even cooking.
The potatoes should be crispy on the outside and tender inside.
Tip: if your air fryer is small, cook in batches so nothing steams. Crispy is the goal.

3️⃣ Season the chicken:
While the potatoes are cooking, cut the chicken breasts into small cubes.
In a bowl, season the chicken with ½ teaspoon each of salt and pepper, and 1 teaspoon each of paprika, onion powder, and Italian seasoning.
Season generously but simply. The seasonings are small but build a lovely backbone for the garlic sauce.

4️⃣ Cook the chicken:
Heat 2 tablespoons of butter in a skillet over medium-high heat.
Add the seasoned chicken cubes and cook until they reach an internal temperature of 165°F and are fully cooked through.
A little browning builds flavor. Let the chicken sit for a moment in the hot pan before stirring to get those caramelized bits.

5️⃣ Add garlic and sauce:
Stir in the minced garlic and Buffalo Wild Wings Garlic Parmesan Sauce (use as much as desired) to the skillet.
Cook for an additional 1-2 minutes, stirring to coat the chicken evenly in the sauce.
Garlic cooks fast. Add it near the end so it stays bright and fragrant rather than bitter.

6️⃣ Combine potatoes and chicken:
Once the air-fried potatoes are done, add them to the skillet with the chicken.
Toss everything together so the potatoes are coated with the sauce.
Let the potatoes soak a minute so they pick up some of that saucy goodness. If you like a saucier result, add a splash of chicken broth.

7️⃣ Melt the cheese:
Sprinkle the shredded mozzarella cheese on top of the skillet.
Either cover the skillet with a lid until the cheese melts or transfer the skillet to the oven under the broiler for a few minutes until the cheese is bubbly and golden.
Careful with the broiler. Watch closely—cheese goes from golden to burnt in moments.

After you finish these steps, you will smell garlic, butter, and parmesan. The kitchen will feel like the kind of place people linger.
Garlic Parmesan Chicken and Potatoes Skillet

Ingredients You’ll Need

  • 2 chicken breasts, cubed
  • 4–5 small/medium-sized potatoes, cubed
  • Olive oil (for tossing the potatoes)
  • Salt
  • Pepper
  • Garlic powder
  • Paprika (for seasoning potatoes)
  • 2 tablespoons butter
  • ½ teaspoon each of salt and pepper (for seasoning chicken)
  • 1 teaspoon each of paprika, onion powder, and Italian seasoning
  • 2 tablespoons minced garlic
  • Buffalo Wild Wings Garlic Parmesan Sauce (as desired)
  • 1 cup shredded mozzarella cheese

Don’t skip small, fresh touches if you have them. A sprinkle of fresh parsley or grated Parmesan at the end lifts the dish. And remember, this is a friendly recipe: if you are out of mozzarella, try cheddar or a mix of cheeses. Use what’s in your fridge; creativity matters more than perfection.

If you enjoy one-pan chicken dinners, you might also like a quick, sheet-pan twist I sometimes make for busy nights: sheet-pan garlic butter chicken and veggies. It saves dishes and still feels special.

Serving Garlic Parmesan Chicken and Potatoes Skillet with Love

Serve this family-style in the middle of the table and let everyone dig in. We put the skillet down with a spoonful of extra sauce on the side for the sauciest eaters. My daughter loves a squeeze of lemon over her portion, which brightens the garlic and cheese.

Sides that pair well are simple green salads, steamed green beans, or a slice of crusty bread to mop up sauce. For a heartier meal, roasted vegetables or a small bowl of coleslaw work beautifully.

At our table, my husband goes for extra cheese and my kids always pick out their potatoes first. It is the kind of meal where everyone finds a favorite part, and that shared picking and passing is half the fun.
Garlic Parmesan Chicken and Potatoes Skillet

Storage & Reheat Tips (Keeping the Goodness)

Store leftovers in an airtight container in the fridge for up to 3 days.
Reheat gently: the oven at 350°F for 10-12 minutes brings back the best texture, while a quick microwave spin is fine for lunches.
If you reheat in a skillet, add a splash of water or chicken broth and cover briefly to steam the chicken and soften the potatoes without drying them out.
Once cooled, you can also freeze portions up to 2 months. Thaw overnight in the fridge and reheat in the oven for best results.
The microwave is okay for a quick fix, but the oven or a skillet will bring back the crispness and give you a meal that feels freshly made.

My Kitchen Notes & Shortcuts

  • Prep ahead: Cube the potatoes and chicken the night before and keep them in separate containers. It makes dinnertime almost effortless.
  • Swap the sauce: If you do not have Buffalo Wild Wings Garlic Parmesan Sauce, mix 2 tablespoons mayo, 1 tablespoon grated Parmesan, and 1 teaspoon garlic for a quick stand-in.
  • Air fryer tip: If your air fryer tends to crowd, cook the potatoes in two quick batches so they crisp properly.
  • Kid-friendly help: Let kids sprinkle the seasoning on the potatoes or grate the cheese. It feels like play and builds confidence.
  • Make it heartier: Stir in a cup of frozen peas or chopped spinach at the end for a veggie boost.
    If you like comfort with a twist, try pairing this with a creamy pasta side one night—our family sometimes pairs it with a fun, cheesy dish like BBQ chicken mac and cheese for extra smiles.

Family-Friendly Variations

Make it lighter:

  • Use low-fat cheese and reduce butter to 1 tablespoon. Swap air fryer for roasted sweet potatoes to add natural sweetness.

Make it bolder:

  • Stir in crushed red pepper flakes with the garlic or add a drizzle of hot honey on top for a sweet-and-spicy finish.

Make it slow-cooker style:

  • If you prefer hands-off cooking, try a slow-cooker version with bone-in thighs and a few extra tablespoons of sauce. For a similar slow-cook idea, I pull from a favorite: crockpot garlic parmesan chicken thighs.

Make it family-friendly:

  • Use mild buffalo or extra sauce on the side so picky eaters can customize. Serve with carrot sticks or apple slices for a kid-pleasing balance.

These small changes help you make the recipe your own, so it fits your weeknight rhythm and your family’s tastes.

FAQs About Garlic Parmesan Chicken and Potatoes Skillet

Garlic Parmesan Chicken and Potatoes Skillet

Can I make this ahead for a busy week?
Absolutely. Prep the potatoes and chicken the day before and assemble quickly when you get home. Letting it sit for an hour lets the flavors get to know each other, just like an old family recipe.

What if I do not have Buffalo Wild Wings Garlic Parmesan Sauce?
You can use any garlic-parmesan style sauce or whip a quick mix of mayonnaise, grated Parmesan, lemon, and garlic. It will be slightly different but still delicious.

How do I know the chicken is done?
Use a meat thermometer when you can. Chicken is safe at an internal temperature of 165°F. If you do not have a thermometer, cut a cube: it should be white through with no pink and the juices should run clear.

Can I use different potatoes?
Yes. Yukon golds or red potatoes hold their shape nicely. Russets crisp well but can fall apart if cut too small.

How long will leftovers last?
Stored in a sealed container, refrigerator life is about 3 days. Freeze for longer storage, up to 2 months.

One Final Thought from My Kitchen

This dish is a small, everyday celebration. It asks for a little time and gives back big flavors and cozy moments. The next time you smell garlic and melted cheese from the stove, pause and invite someone to share it with you. Food is how we fold more laughter into ordinary nights.

Conclusion

If you’d like another take on a garlic-parmesan chicken with potatoes, this version from a home cook’s blog inspired my first attempts and is full of friendly notes: Garlic Parm Chicken & Potatoes – Life With The Crust Cut Off. For a midwestern twist that focuses on comfort and family meals, check this helpful guide: Garlic Parmesan Chicken and Potatoes – Cooking in the Midwest.

Happy cooking. Give this Garlic Parmesan Chicken and Potatoes Skillet a try—you might surprise yourself with how quickly it becomes a favorite.

Garlic Parmesan Chicken and Potatoes Skillet

Prep Time 15 minutes
Cook Time 30 minutes
Total Time 45 minutes
Servings 4 servings
Calories 450
A delicious one-pan meal featuring golden, crispy potatoes and juicy, seasoned chicken finished with a garlicky, cheesy sauce, perfect for family dinners.

Ingredients

For the Potatoes

  • 4-5 medium small/medium-sized potatoes (Cubed)
  • 2 tablespoons olive oil (For tossing the potatoes)
  • 1 teaspoon salt (For seasoning)
  • 1 teaspoon pepper (For seasoning)
  • 1 teaspoon garlic powder
  • 1 teaspoon paprika (For seasoning potatoes)

For the Chicken

  • 2 breasts chicken (Cubed)
  • 2 tablespoons butter (For cooking)
  • ½ teaspoon salt (For seasoning)
  • ½ teaspoon pepper (For seasoning)
  • 1 teaspoon paprika (For seasoning)
  • 1 teaspoon onion powder
  • 1 teaspoon Italian seasoning

For the Garlic Sauce

  • 2 tablespoons minced garlic
  • as desired Buffalo Wild Wings Garlic Parmesan Sauce
  • 1 cup shredded mozzarella cheese

Instructions 

Preparation

  • Wash and peel the potatoes, then cut them into small cubes.
  • Toss the cubed potatoes with olive oil, salt, pepper, garlic powder, and paprika until evenly coated.

Cooking Potatoes

  • Preheat the air fryer to 400°F and cook the potatoes for about 20 minutes, shaking the basket a couple of times to ensure even cooking.
  • The potatoes should be crispy on the outside and tender inside.

Seasoning Chicken

  • While the potatoes are cooking, cut the chicken breasts into small cubes.
  • In a bowl, season the chicken with ½ teaspoon each of salt and pepper, and 1 teaspoon each of paprika, onion powder, and Italian seasoning.

Cooking Chicken

  • Heat 2 tablespoons of butter in a skillet over medium-high heat.
  • Add the seasoned chicken cubes and cook until they reach an internal temperature of 165°F and are fully cooked through.

Adding Garlic and Sauce

  • Stir in the minced garlic and Buffalo Wild Wings Garlic Parmesan Sauce to the skillet.
  • Cook for an additional 1-2 minutes, stirring to coat the chicken evenly in the sauce.

Combining Potatoes and Chicken

  • Once the air-fried potatoes are done, add them to the skillet with the chicken.
  • Toss everything together so the potatoes are coated with the sauce.

Melting the Cheese

  • Sprinkle the shredded mozzarella cheese on top of the skillet.
  • Cover the skillet with a lid until the cheese melts or transfer to the oven under the broiler until bubbly and golden.

Notes

Don't skip small, fresh touches if available. A sprinkle of fresh parsley or grated Parmesan at the end elevates the dish. Leftovers can be stored in an airtight container for up to 3 days.
Calories: 450kcal
Course: Dinner, Main Course
Cuisine: American, Comfort Food
Keyword: Comfort Food, Garlic Chicken, One Pan Dinner, Parmesan Chicken, skillet meal

If you’re anything like me, you’re always on the lookout for delicious and nutritious meal ideas that the whole family will love. I’ve gathered my absolute favorite chicken and sweet potato recipes that not only taste incredible but also pack a healthy punch. From the sweet and spicy honey pepper chicken paired with creamy macaroni and cheese to comforting BBQ chicken sweet potato bowls, this collection has something for everyone. Get ready to discover mouthwatering recipes that will streamline your weeknight dinners and impress your taste buds, all while being easy to prepare. Let’s dive in and transform your dinner routine!

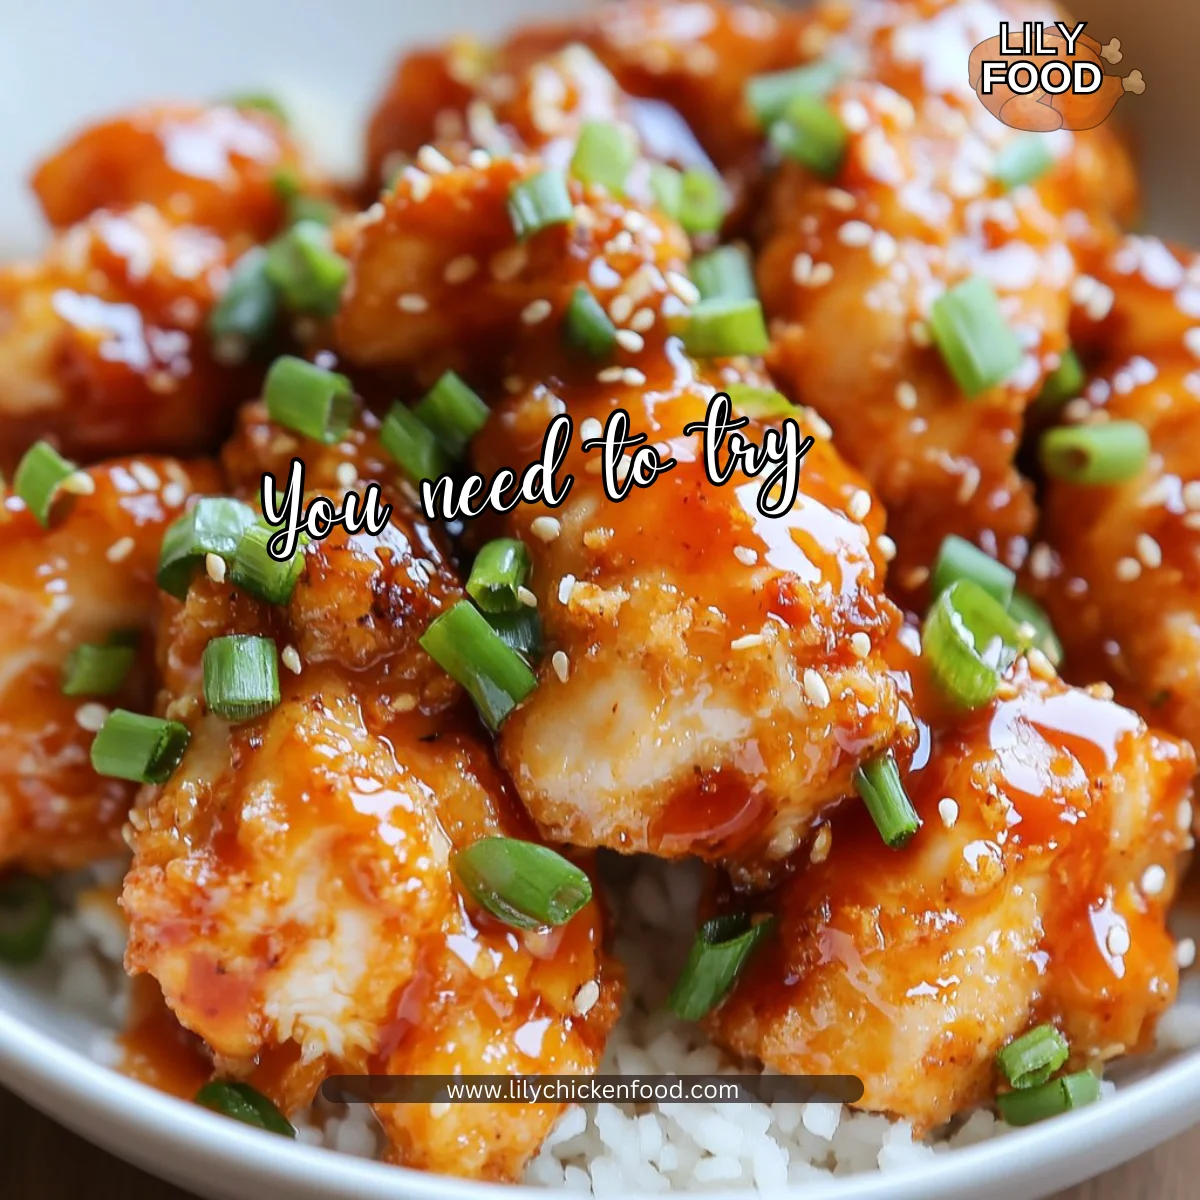
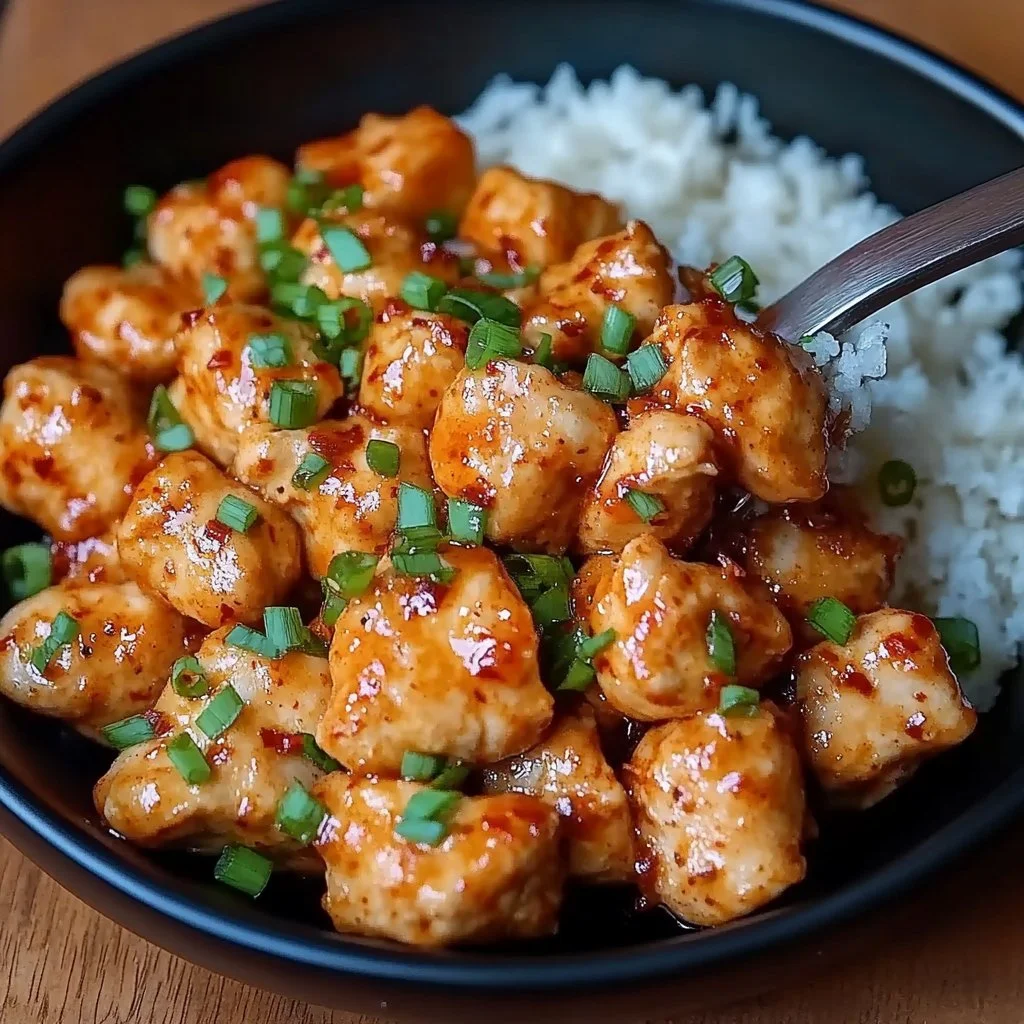
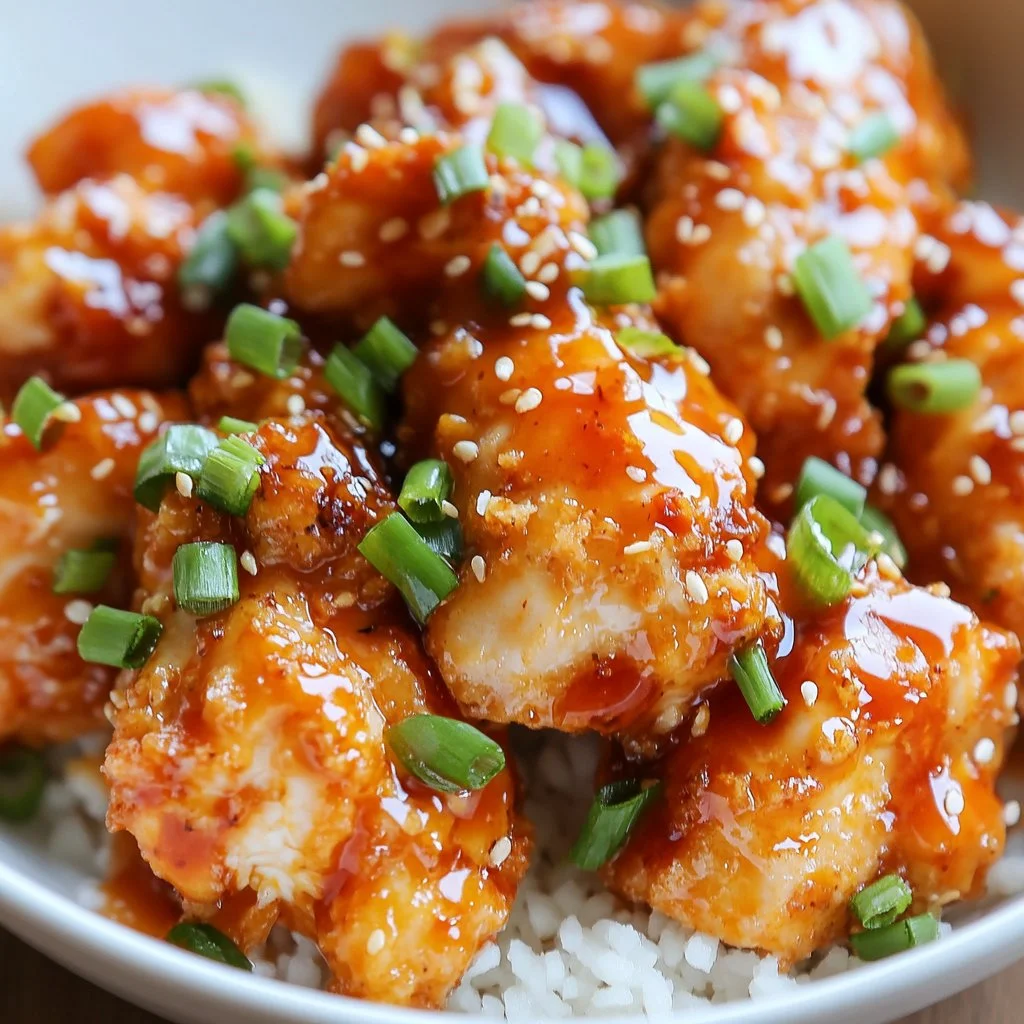
1. Sweet and Spicy Honey Pepper Chicken with Macaroni and Cheese

Sweet and Spicy Honey Pepper Chicken with Macaroni and Cheese

Sweet and Spicy Honey Pepper Chicken with Macaroni and Cheese

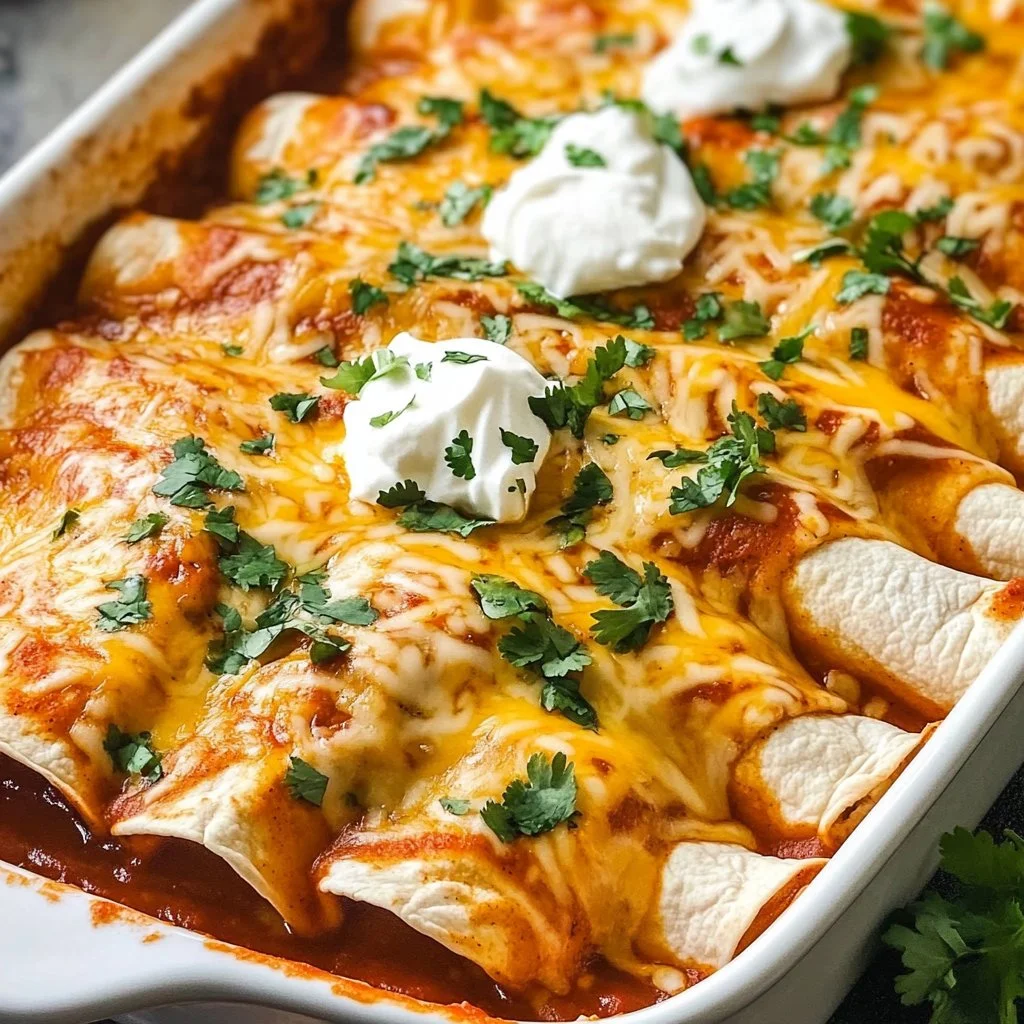
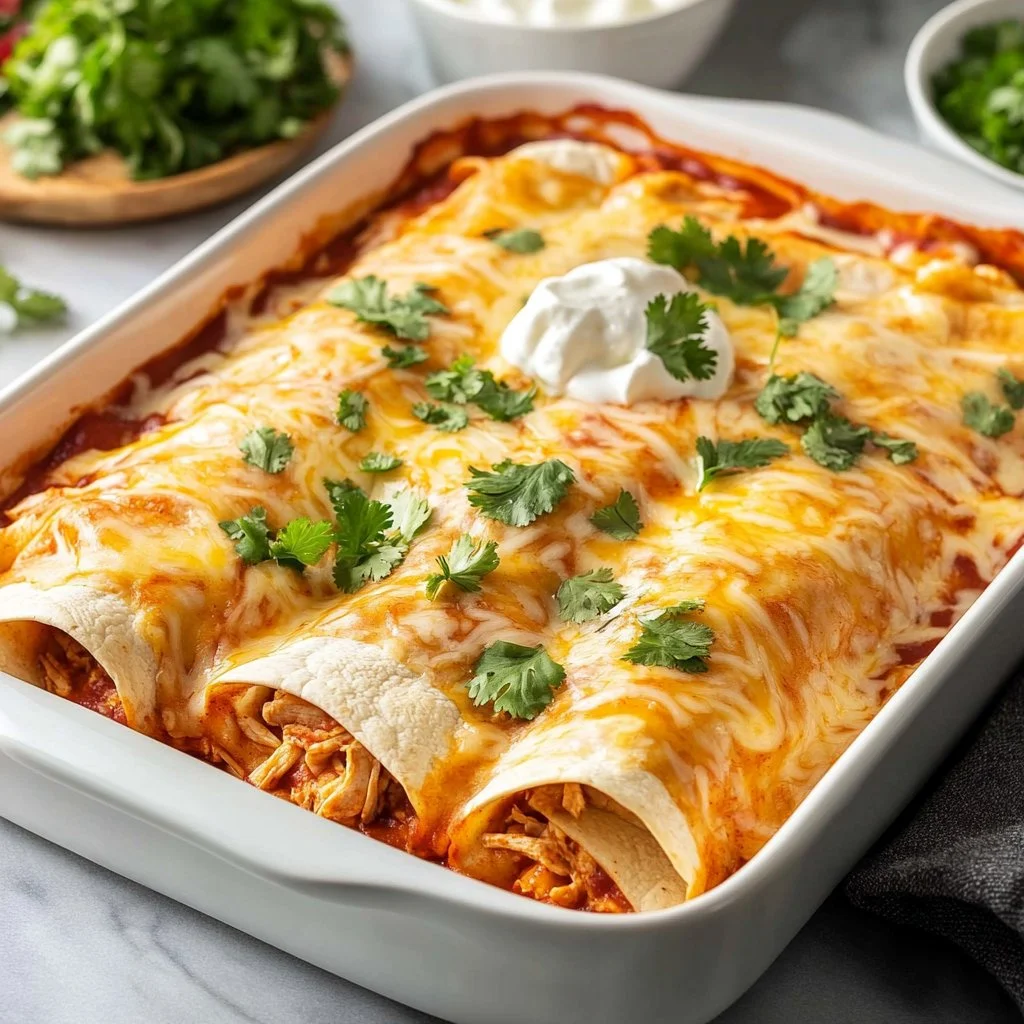
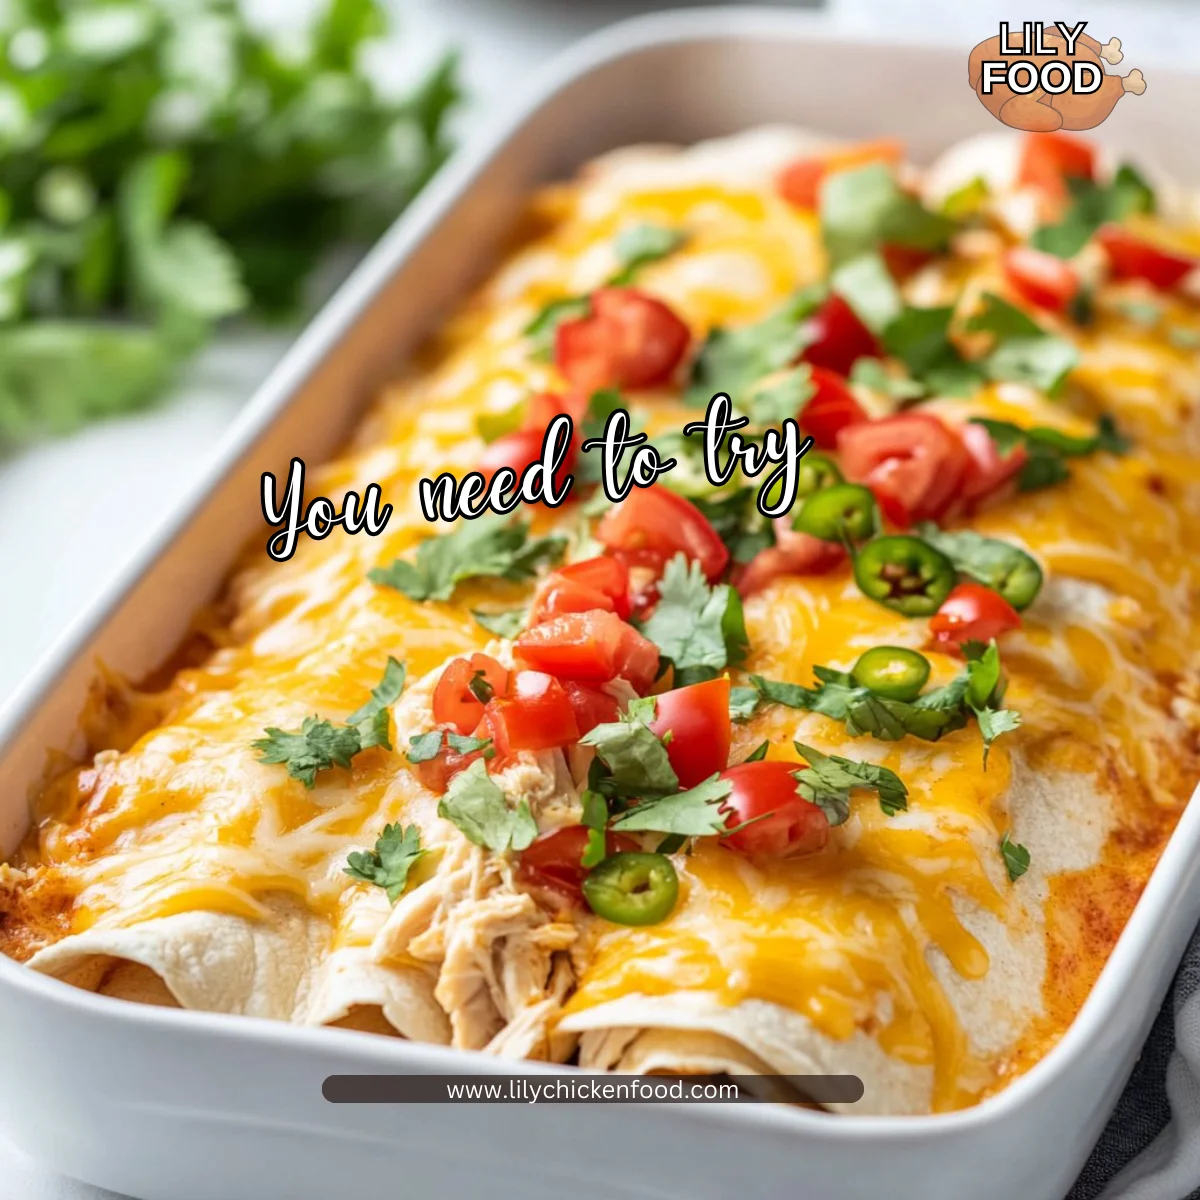
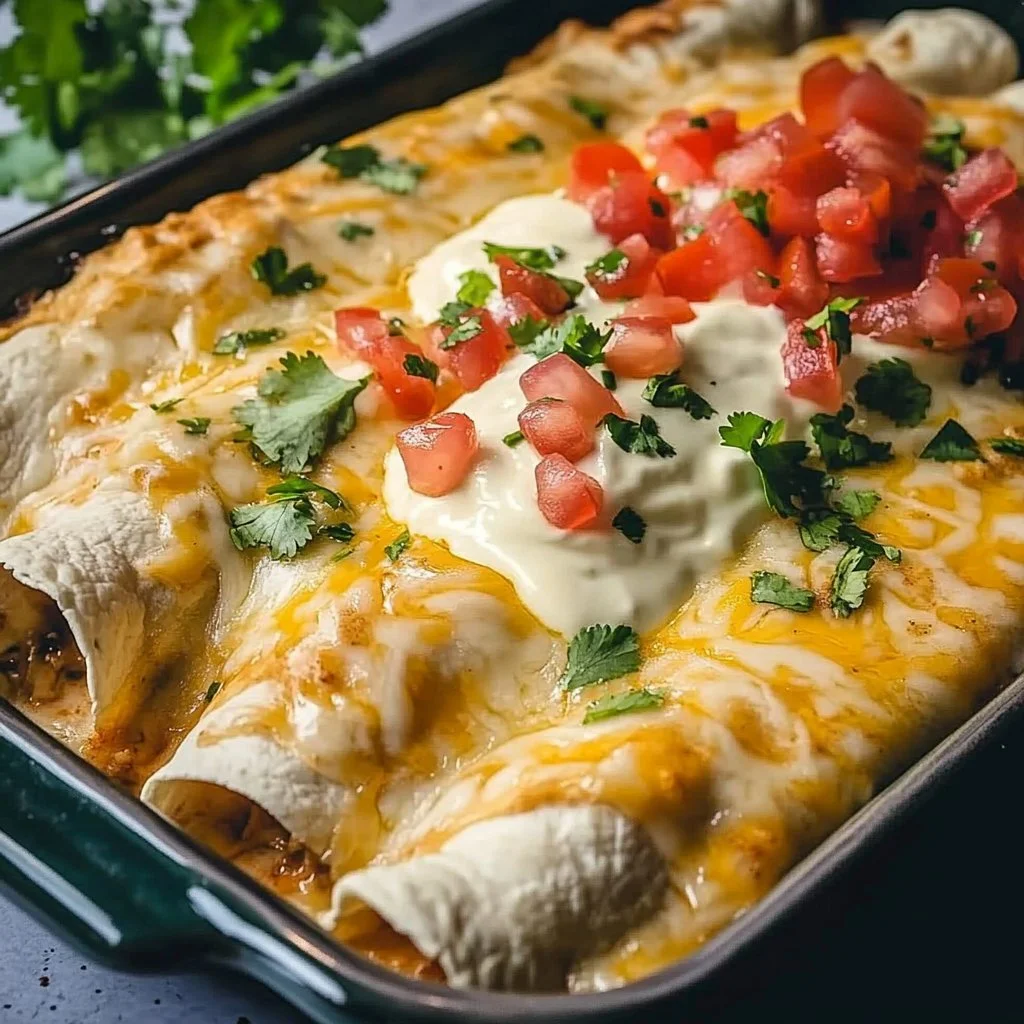
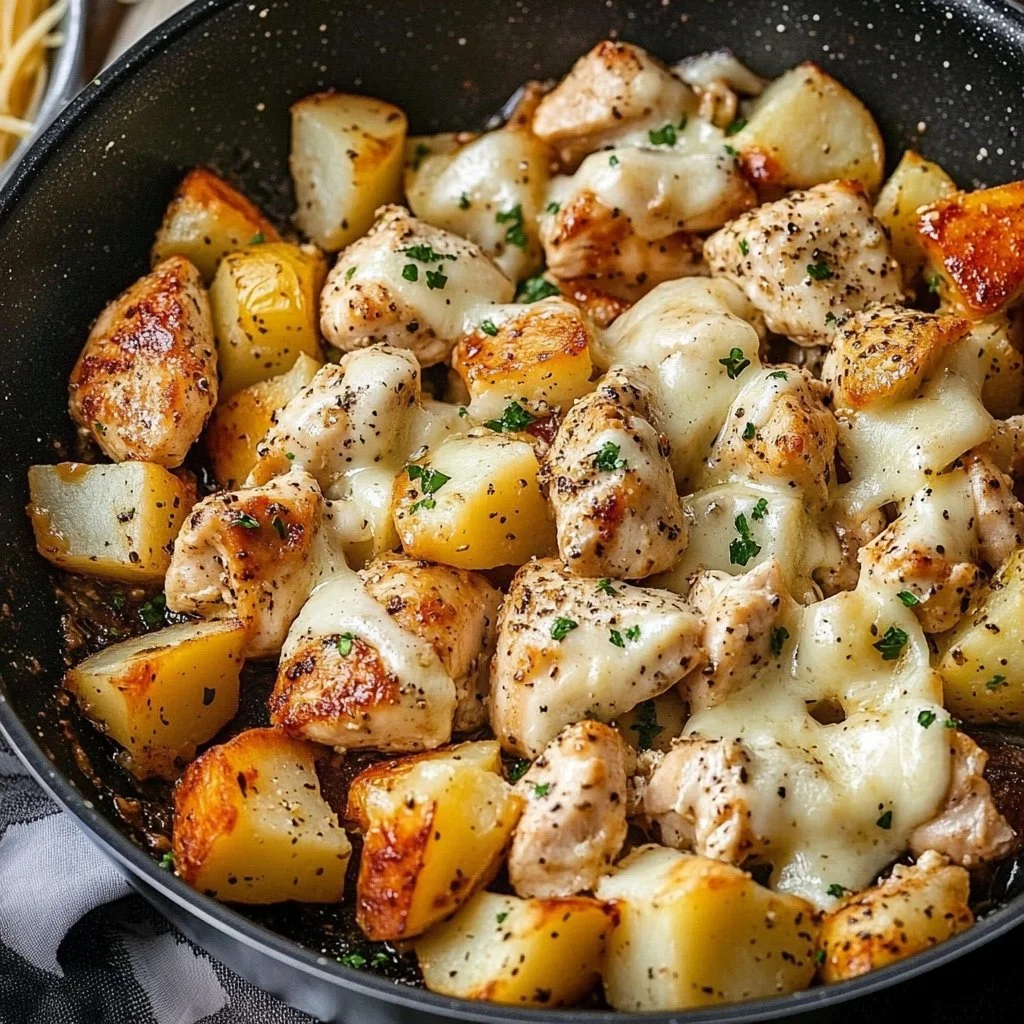
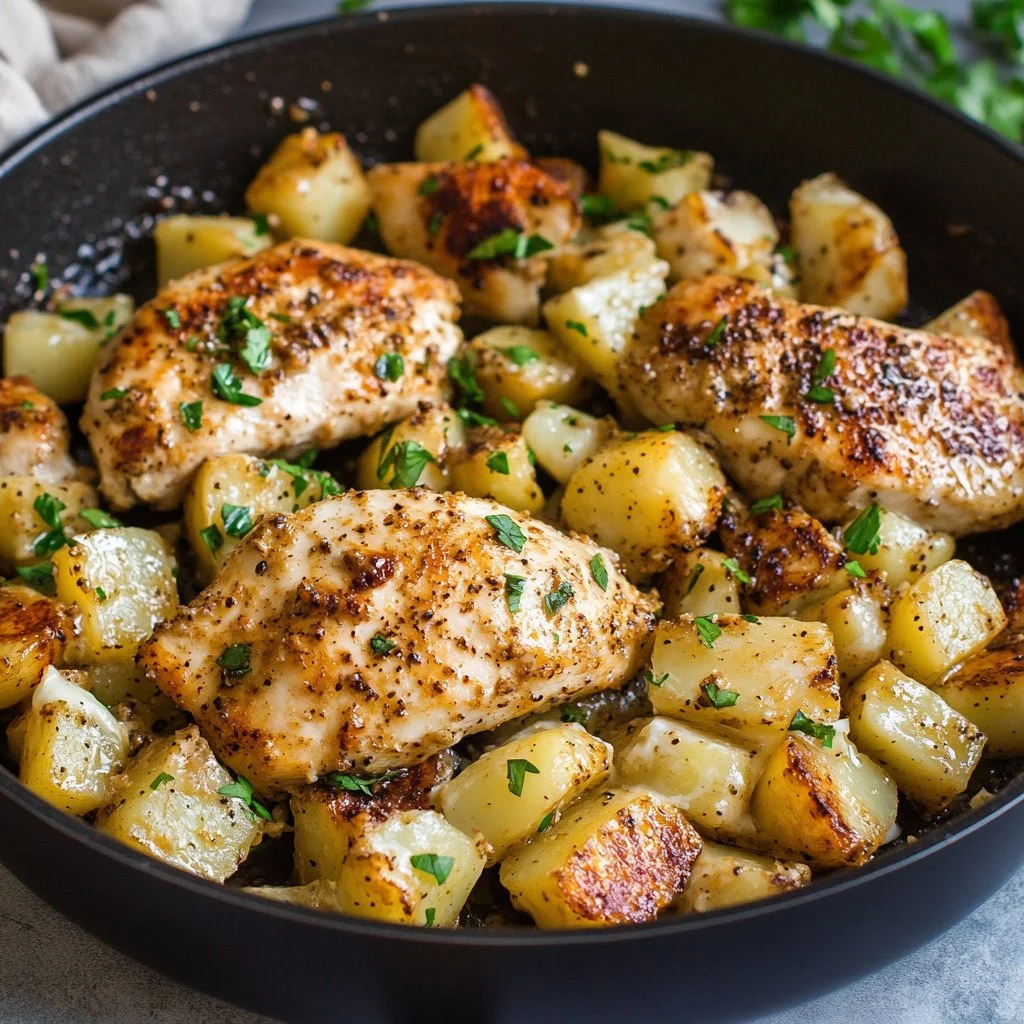
The kitchen is a warm haven when you cook Sweet and Spicy Honey Pepper Chicken with creamy macaroni and cheese. As the chicken sizzles and caramelizes in the oven, your home fills with inviting scents. You can hear the gentle bubbling of the cheese sauce, waiting to embrace the tender macaroni. It’s a symphony of flavors that delights the senses, beckoning your family to gather around the table.

Why This Works

Sweet and Spicy Honey Pepper Chicken with Macaroni and Cheese

This recipe is a family favorite for many reasons. It combines the sweetness of honey with a kick of spice, creating a dish that pleases both kids and adults. The honey pepper chicken is vibrant and flavorful, making it irresistible. On top of that, it’s an easy one-dish meal that saves you time in the kitchen.

With simple steps and ingredients, this recipe allows you to spend less time cooking and more time enjoying juicy conversations with loved ones. Whip up this delightful dish, and I guarantee your family will feel the love in every bite.

Process Overview

“This is where the magic happens—when the aroma fills the kitchen.”

Creating Sweet and Spicy Honey Pepper Chicken with Macaroni and Cheese doesn’t take a culinary degree. It’s about combining the right ingredients and letting them shine. From marinating your chicken to melting cheese over pasta, each step leads you closer to a meal that your family will crave again and again.

Ingredients

  • 4 chicken thighs
  • Tip: Look for skin-on and bone-in thighs for more flavor and tenderness.
  • 1/4 cup honey
  • Tip: Use fresh, local honey if possible to enhance the taste and support local beekeepers.
  • 2 tablespoons soy sauce
  • Tip: Low-sodium soy sauce works well for controlling salt levels.
  • 1 tablespoon olive oil
  • Tip: Choose extra virgin olive oil for added richness in flavor.
  • 1 teaspoon black pepper
  • Tip: Freshly ground black pepper brings an extra level of spiciness.
  • 1 teaspoon red pepper flakes (optional)
  • Tip: Adjust the amount based on your family’s heat preference.
  • Salt to taste
  • 1 cup macaroni
  • Tip: Any small pasta shape works great, but elbow macaroni holds the cheese nicely.
  • 1 1/2 cups shredded cheddar cheese
  • Tip: Use a mix of sharp and mild cheddar for depth of flavor.
  • 1/2 cup milk
  • Tip: Whole milk creates a creamier texture, but you can use low-fat if you prefer.
  • 2 tablespoons butter
  • Tip: Use unsalted butter to better control the overall saltiness of the dish.
  • 1/4 teaspoon garlic powder
  • Tip: Fresh garlic can be used for an even bolder flavor.
  • Salt and pepper to taste

Directions

  1. In a bowl, mix honey, soy sauce, olive oil, black pepper, red pepper flakes, and salt to create a marinade.
  2. Encouragement: Family cooking is all about ease. Take a moment to fully appreciate each ingredient as you pour it in the bowl.
  3. Marinate the chicken thighs for at least 30 minutes.
  4. Encouragement: You can do this in the morning and let it marinate all day for maximum flavor. Just let that chicken soak up all those delicious flavors!
  5. Preheat the oven to 375°F (190°C) and place the chicken in a baking dish.
  6. Encouragement: The sound of the oven door opening is like a gentle invitation to deliciousness.
  7. Bake chicken for about 25-30 minutes or until fully cooked.
  8. Encouragement: You’ll know it’s done when the juices run clear. You got this!
  9. Meanwhile, cook macaroni according to package instructions. Drain and set aside.
  10. Encouragement: Feel free to taste a few pieces of macaroni. Quality control is important!
  11. In a saucepan, melt butter, then add milk and bring to a simmer.
  12. Encouragement: Listen for the gentle bubbling. That means you’re on the right track!
  13. Stir in cheese until melted, then add cooked macaroni, garlic powder, salt, and pepper. Mix well.
  14. Encouragement: Take a moment to really enjoy the creamy texture as you stir it all together.
  15. Serve the baked chicken alongside the creamy macaroni and cheese.
  16. Encouragement: The satisfaction of plating your dish makes all the cooking worth it!

Serving

Sweet and Spicy Honey Pepper Chicken with Macaroni and Cheese

To serve this mouthwatering dish family-style, place the chicken on a large platter and showcase the macaroni in a beautiful bowl. You can garnish with fresh parsley or sliced green onions for a pop of color. Encourage everyone to help themselves. Nothing brings a family together like gathering around a delicious home-cooked meal.

Storage

If you have leftovers, store them in an airtight container in the refrigerator for up to three days. When you’re ready to enjoy them again, simply reheat in the oven to maintain that delightful crispiness of the chicken. You can also microwave the macaroni for a quick meal. Adding a splash of milk when reheating will help keep the macaroni cheesy and creamy.

Kitchen Notes

  • Use a slow cooker: Marinate the chicken in the morning and let it cook low and slow for maximum flavor.
  • Prep the macaroni ahead: Cook macaroni earlier in the week to save time during busy nights.
  • Cheese alternatives: Swap cheddar for mozzarella or pepper jack if you’re in the mood for something different.
  • Garnishes: Consider topping your dishes with breadcrumbs or crispy onions for a delightful crunch.
  • Pair with veggies: Add a side of steamed broccoli or a simple salad for a balanced meal.

Variations

Not every family member has the same taste, so here are some tweaks you can make. For picky eaters, try using boneless chicken breasts, which will cook quickly and soak up the marinade nicely. For a lighter version, use whole wheat macaroni and low-fat cheese. If you or someone in your family follows a gluten-free diet, substitute the macaroni with gluten-free pasta. Experiment with different spices such as smoked paprika or garlic for an added flavor twist.

FAQ

1. Can I use chicken breasts instead of thighs?

Yes, chicken breasts work well, but they may require less baking time. Keep an eye on them.

2. How do I know the chicken is fully cooked?

Chicken should reach an internal temperature of 165°F (74°C) when done.

3. Can I make the macaroni and cheese with different cheeses?

Absolutely! Feel free to mix in your favorite cheeses, like Monterey Jack or Gouda.

4. Can this recipe be doubled?

Yes, you can easily double the recipe to serve more people.

5. What if I don’t have honey?

You can substitute with maple syrup or agave nectar for sweetness.

As you sit down to enjoy this Sweet and Spicy Honey Pepper Chicken with Macaroni and Cheese, take a moment to be thankful for the time spent in the kitchen. Each bite brings back memories of laughter and love shared at the table. This recipe is more than a meal; it’s a way to connect with your family and show them how much you care. Happy cooking, and enjoy this delicious journey together!

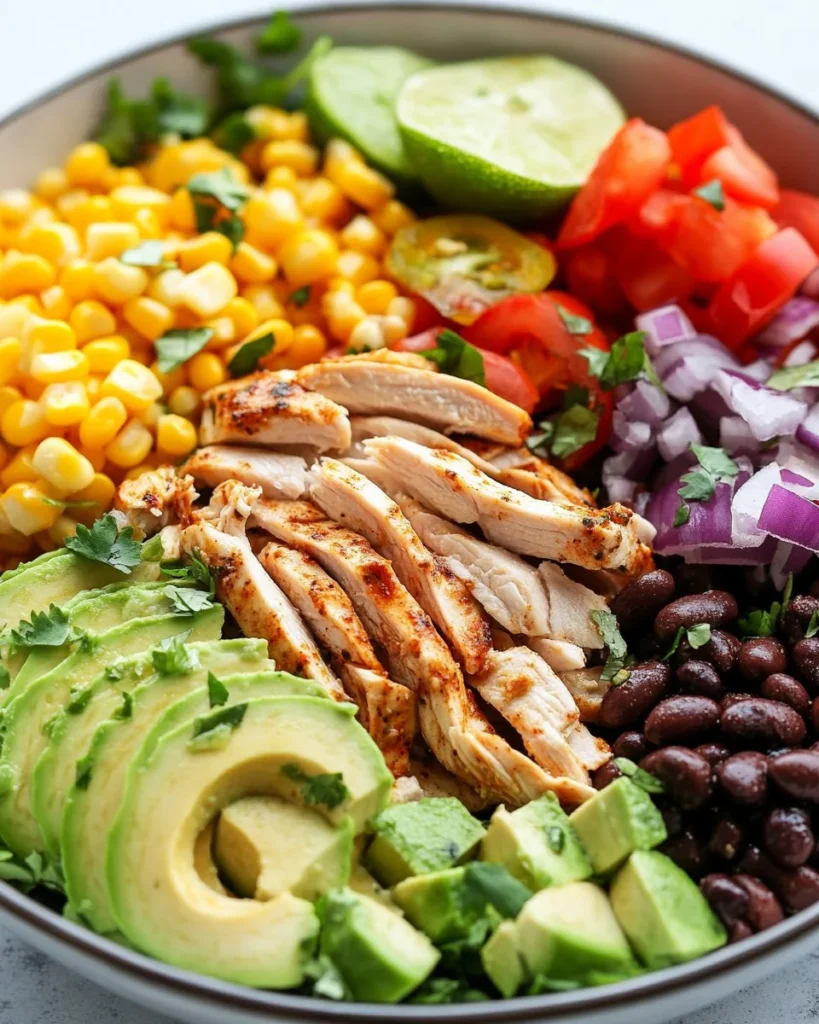
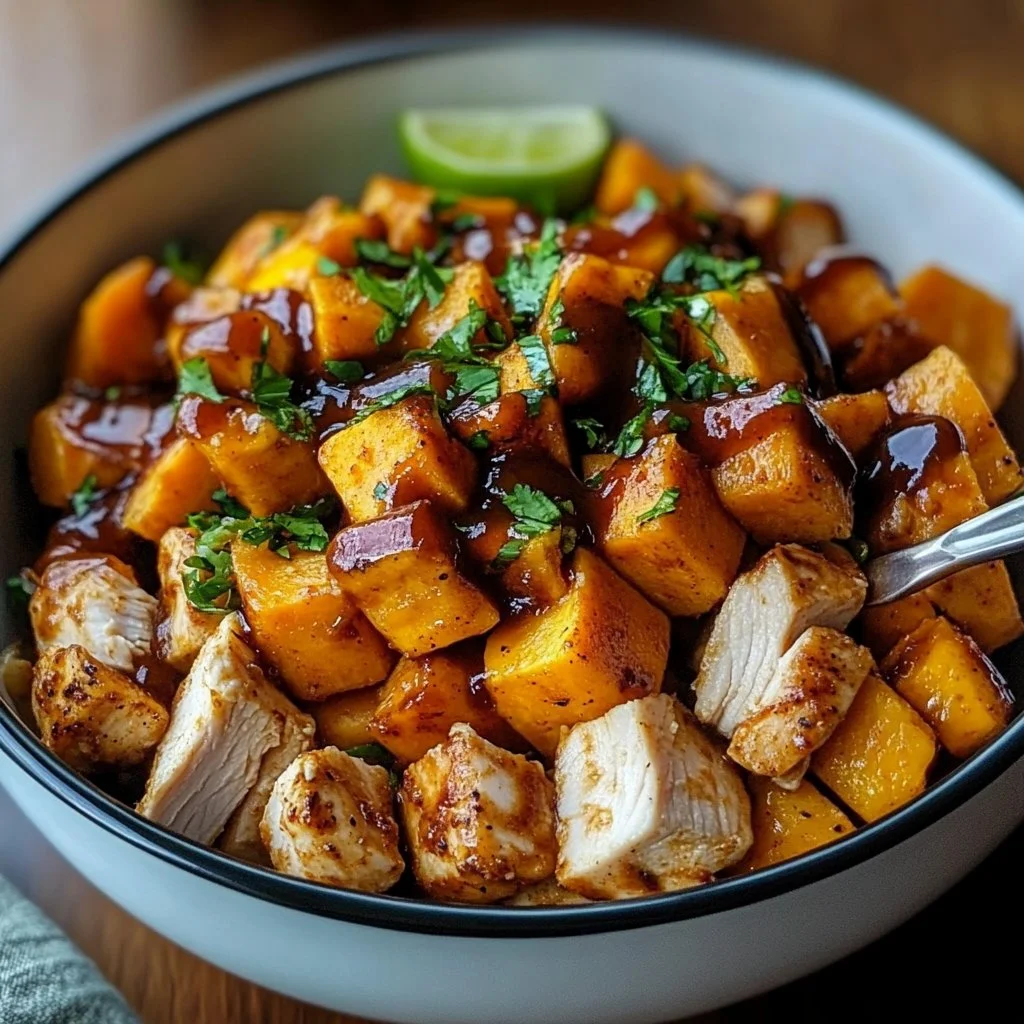
2. BBQ Chicken Sweet Potato Bowl

BBQ Chicken Sweet Potato Bowl

BBQ Chicken Sweet Potato Bowl

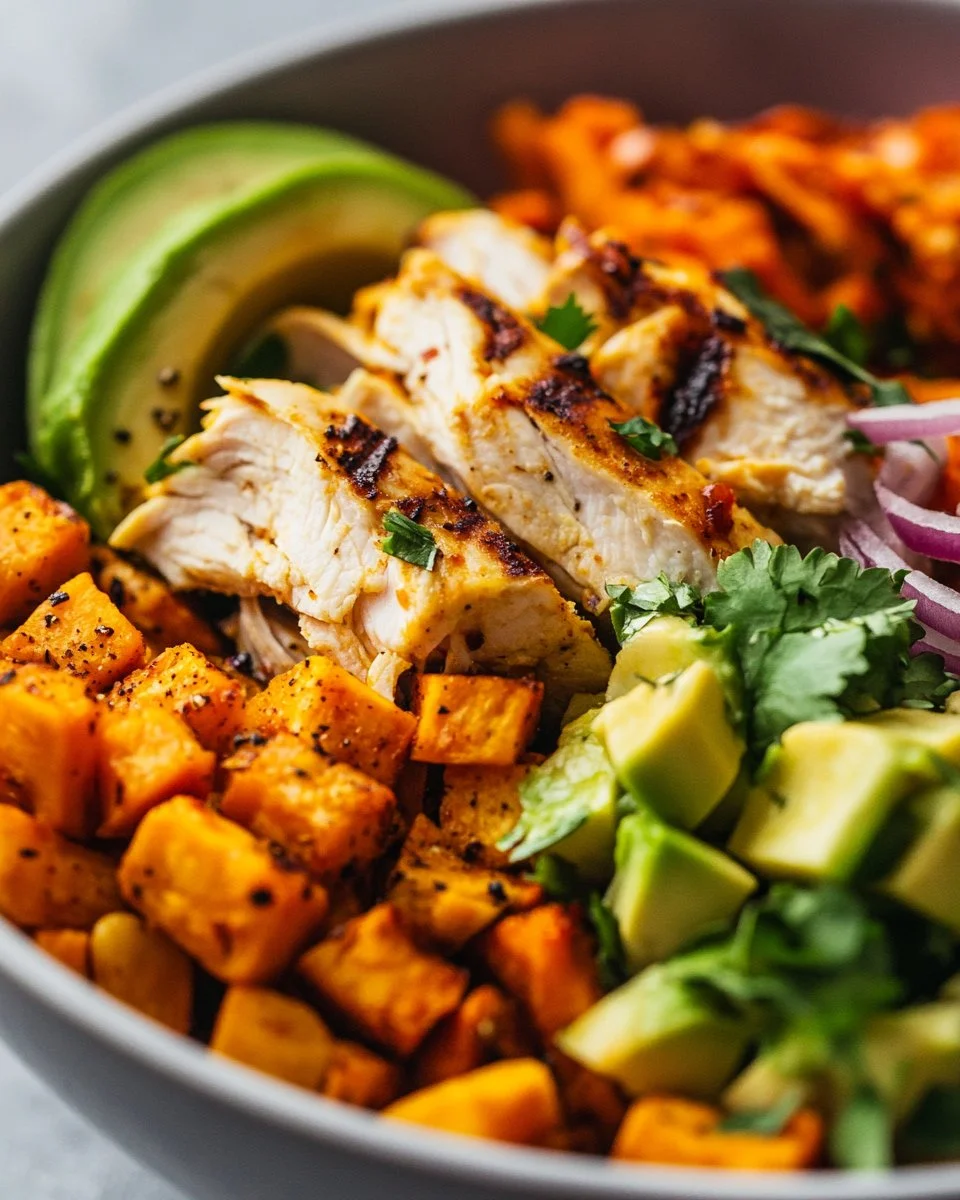
There’s something truly comforting about stepping into the kitchen as the sun is setting. The rich smell of sweet potatoes roasting in the oven mingles with the sound of sizzling chicken on the stove. It’s a symphony of scents and sounds, hinting at the delicious meal you’re about to create. Today, we are diving into a delightful and hearty recipe: the BBQ Chicken Sweet Potato Bowl. It’s a dish that brings warmth to your family as you gather around the table. Let’s get started!

Why This Works

BBQ Chicken Sweet Potato Bowl

This BBQ Chicken Sweet Potato Bowl is the perfect weeknight dinner solution. It’s not only flavorful but also incredibly satisfying. Sweet potatoes are a wonderful source of fiber and nutrients, and paired with protein-rich chicken, they create a well-rounded meal.

Making this dish is a great way to bring the family together. Everyone can customize their bowl with their favorite toppings. Plus, it saves you time. The sweet potatoes roast in the oven while you heat up the chicken, creating a delicious and filling dinner in under an hour.

Process Overview

“This is where the magic happens—when the aroma fills the kitchen.”

As the sweet potatoes roast and the chicken simmers, your kitchen will be filled with mouthwatering scents. This dish comes together seamlessly, allowing you to spend less time cooking and more time enjoying a meal with your loved ones.

Ingredients

Here’s what you’ll need to make these delightful bowls:

  • 2 chicken breasts, cooked and shredded
  • Tip: Use leftover rotisserie chicken for quicker prep.
  • 2 medium sweet potatoes, cubed
  • Tip: Look for firm sweet potatoes free from blemishes.
  • 1 cup corn, fresh or frozen
  • Tip: Frozen corn is a great time-saver.
  • 1 avocado, diced
  • Tip: Choose a ripe avocado for the creamiest texture.
  • 1/2 cup barbecue sauce
  • Tip: Use your favorite store-bought or homemade sauce.
  • 1 tablespoon olive oil
  • Tip: Extra virgin olive oil adds great flavor.
  • Salt and pepper to taste
  • Tip: Adjust to your preference for seasoning.
  • Optional: diced red onion, cilantro, lime for serving
  • Tip: Fresh herbs elevate the flavor and add brightness.

Directions

  1. Preheat the oven to 400°F (200°C).
  2. This step gets the kitchen ready for a delicious dish. The heat will bring out the best in the sweet potatoes!
  3. Toss the cubed sweet potatoes with olive oil, salt, and pepper. Spread out on a baking sheet and roast for 25-30 minutes until tender.
  4. Keep an eye on them and give them a gentle shake halfway through for even roasting.
  5. In a skillet, heat the shredded chicken and barbecue sauce until warmed through.
  6. This will take only a few minutes, and the smell will be simply irresistible.
  7. To assemble the bowls, place roasted sweet potatoes at the bottom, top with barbecue chicken, corn, and diced avocado.
  8. Layering creates a beautiful presentation; feel free to make it colorful and fun!
  9. Add any additional toppings such as red onion, cilantro, or a squeeze of lime. Serve warm.
  10. Encourage everyone to make their bowl unique—it’s all about enjoying what you love!

Serving

BBQ Chicken Sweet Potato Bowl

Serving this BBQ Chicken Sweet Potato Bowl family-style can be a wonderful experience. Place all the components in the center of the table and let everyone build their bowl. This approach brings a sense of togetherness as everyone selects their favorite ingredients. You can share stories about your day while enjoying a hearty meal.

Storage

Storing leftovers is easy! You can keep any extra BBQ Chicken Sweet Potato Bowls in airtight containers in the refrigerator for up to three days. When you’re ready to eat, reheat them in the microwave or on the stove until warmed through. Just be careful not to overheat the sweet potatoes, as they can become mushy.

Kitchen Notes

  • Prep Ahead: Wash and cut the sweet potatoes a day in advance for time-saving.
  • Shredding Chicken: Use a hand mixer to shred cooked chicken quickly.
  • Batch Cooking: Make extra sweet potatoes and chicken for quick lunches or dinners later on.
  • Frozen Corn: No need to thaw if using frozen corn; just toss it in when assembling the bowls.
  • Use One Pan: Roast the sweet potatoes and warm the chicken in one skillet to save on dishes!

Variations

This recipe can easily adapt to suit different tastes or dietary restrictions:

  • For Veggie Eaters: Substitute the chicken with black beans for a delicious plant-based option.
  • For Keto Dieters: Skip the corn and avocado for a lower-carb option.
  • Picky Eaters: Serve ingredients separately and let them choose what they want.
  • Wealth of Toppings: Consider adding cheese, salsa, or Greek yogurt for extra flavor.
  • Spicy Kick: Add jalapeños or a spicy barbecue sauce for those who like a little heat.

FAQ

1. Can I use other proteins instead of chicken?

Yes, you can use beef, turkey, or even tofu if you prefer a vegetarian option.

2. How can I make this dish healthier?

You can reduce the use of barbecue sauce or opt for a low-sugar version.

3. Can I prepare this dish in advance?

Yes, you can pre-cook the sweet potatoes and chicken, then assemble the bowls just before serving.

4. Is this recipe gluten-free?

Yes, all ingredients are gluten-free unless you use a barbecue sauce with gluten.

5. How do I know when the sweet potatoes are done?

They should be fork-tender and lightly browned on the edges.

Conclusion

As the meal comes together, the kitchen fills with warmth and delight. This BBQ Chicken Sweet Potato Bowl is not just food; it’s a way to connect with your loved ones, nourishing both body and soul. Remember, the best meals are those shared with family and friends, so gather around the table and enjoy every bite together. Happy cooking!

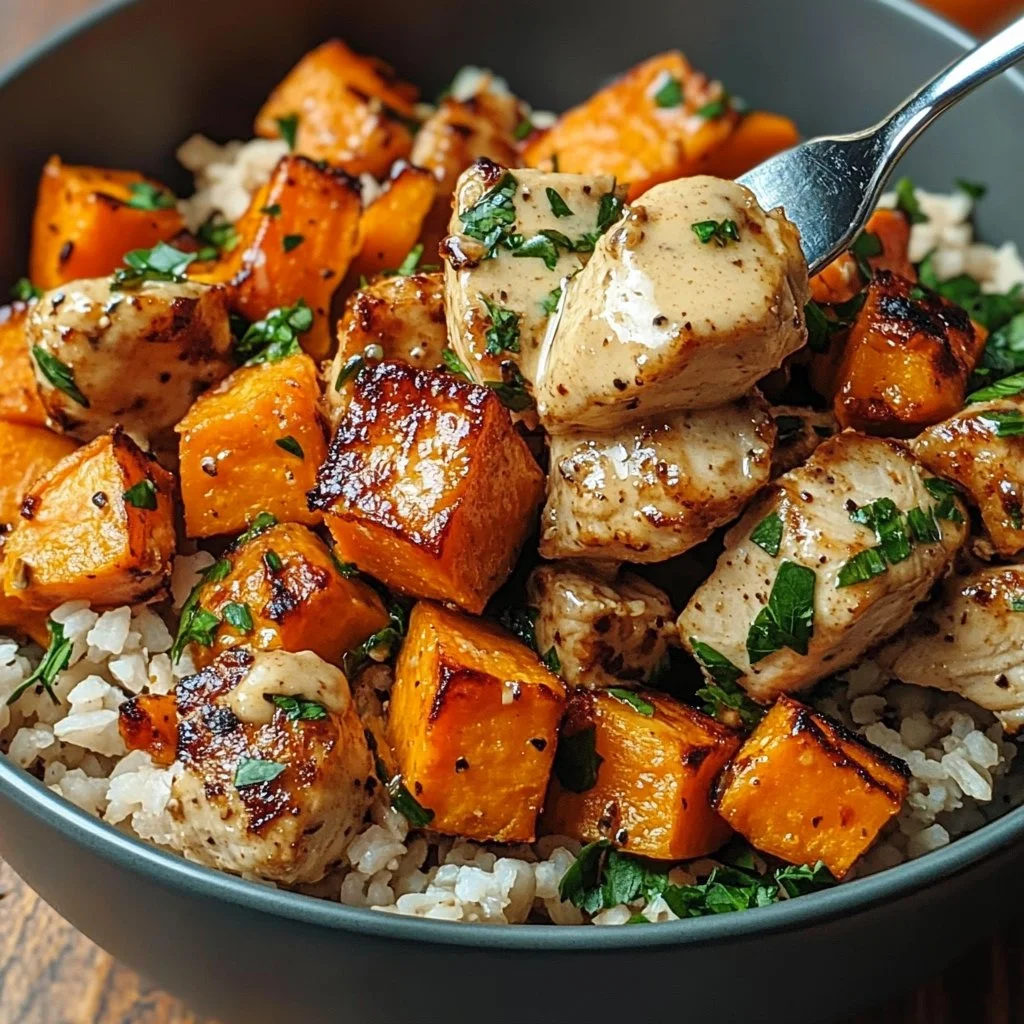
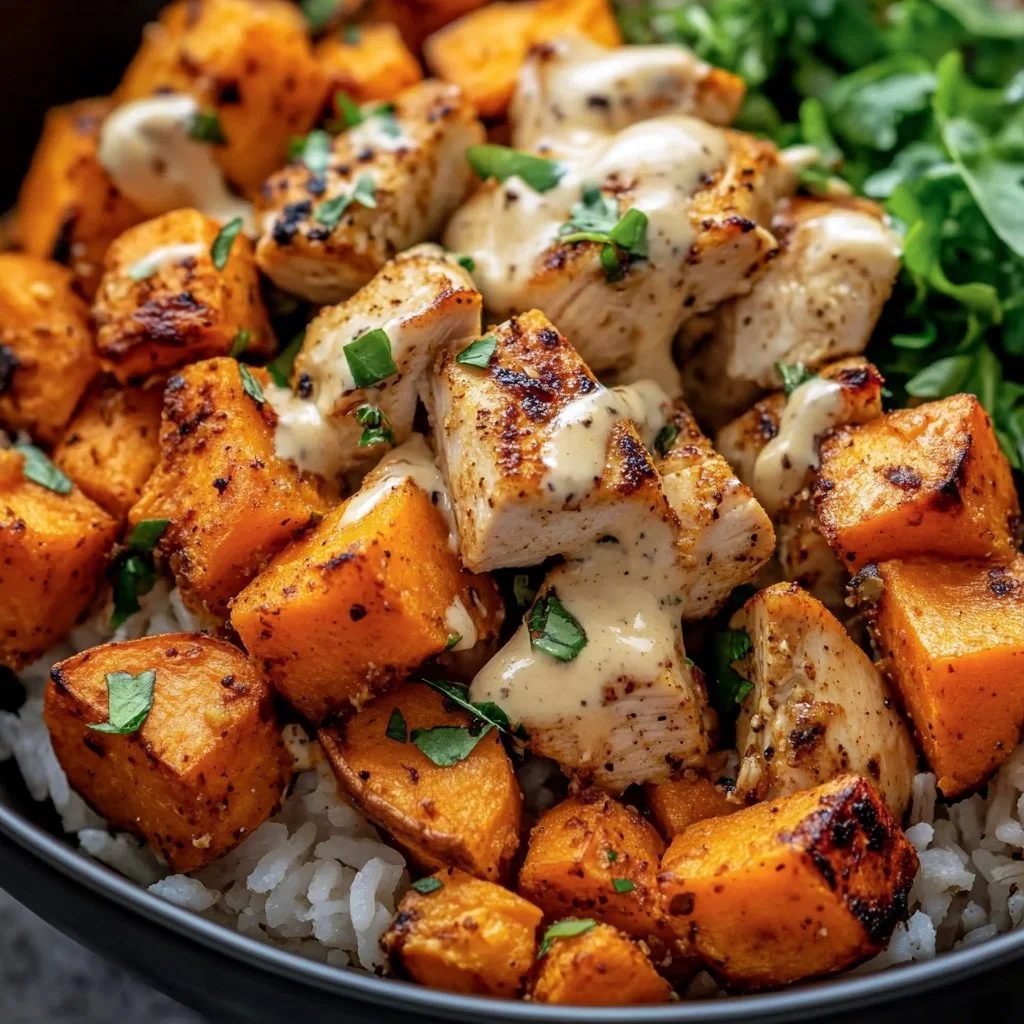
3. Chicken & Sweet Potato Rice Bowl

Chicken & Sweet Potato Rice Bowl

Chicken & Sweet Potato Rice Bowl

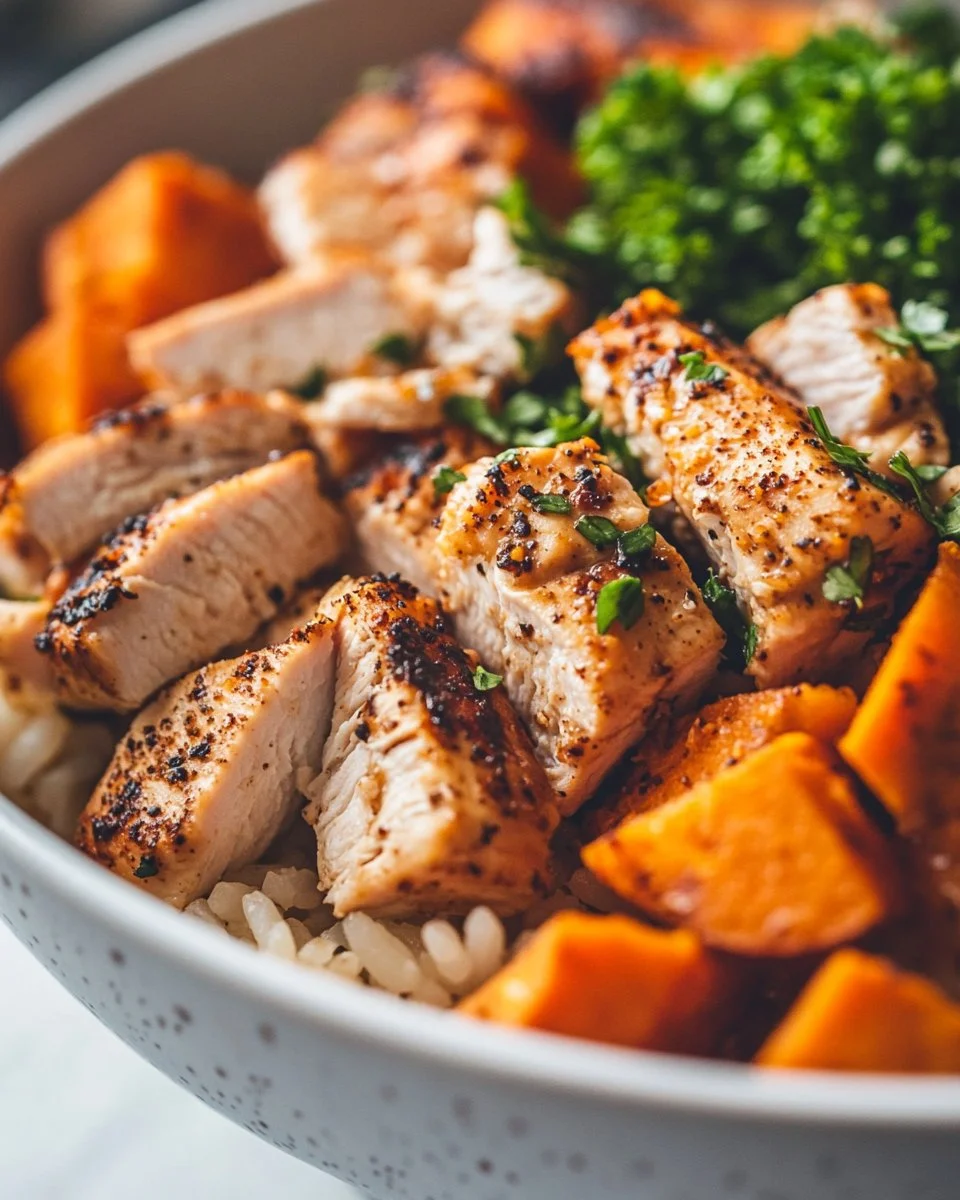
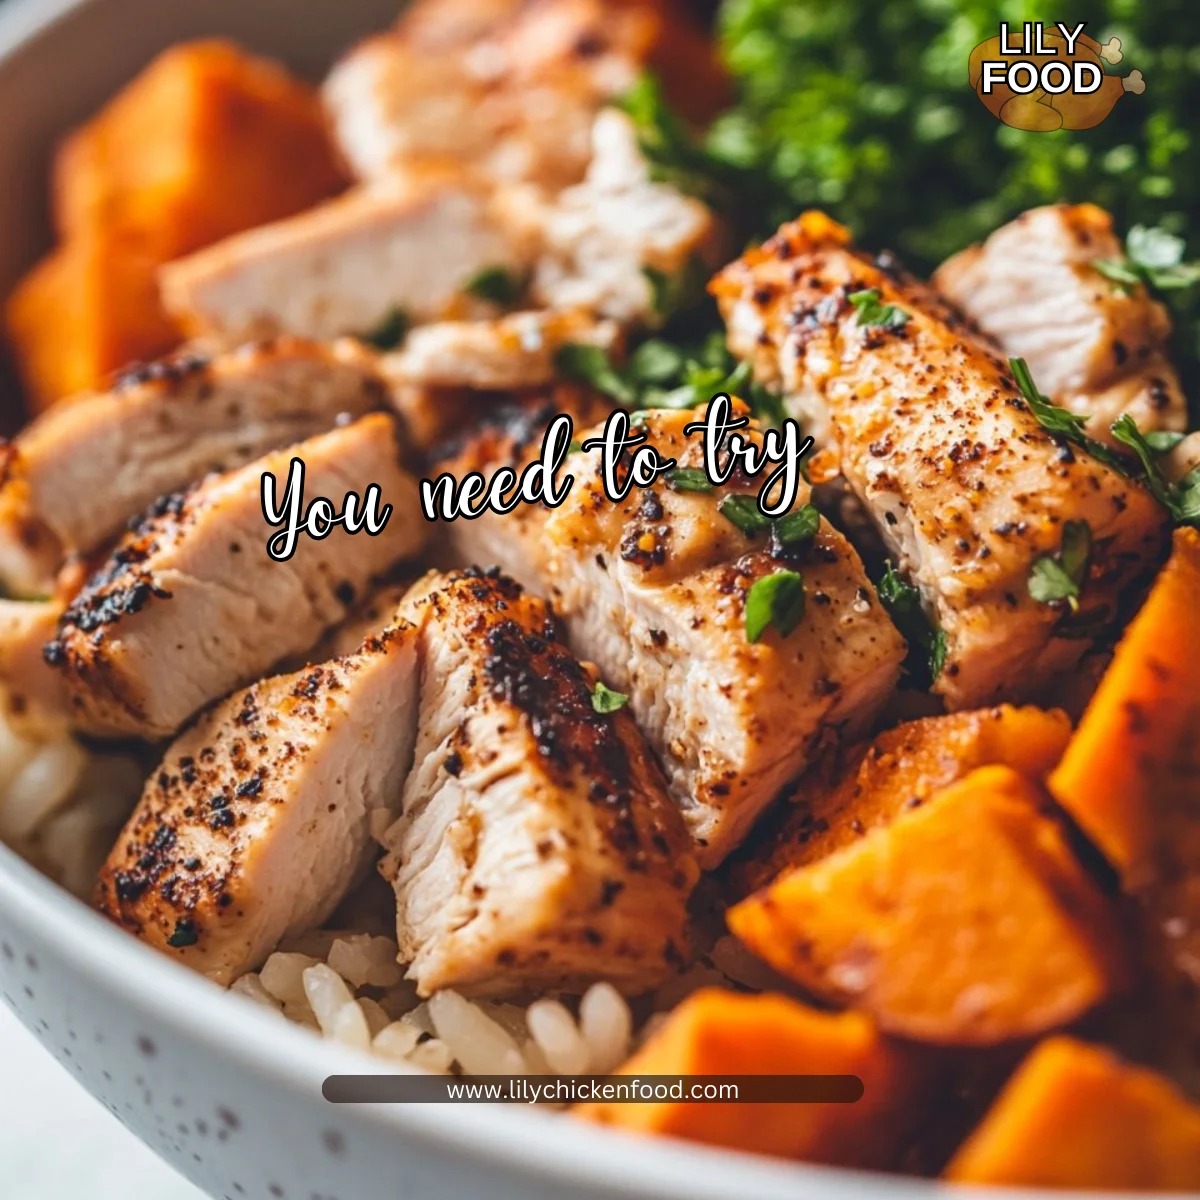
There’s something comforting about the sounds and smells that fill the kitchen while cooking a delicious meal. Imagine the soft sizzle of chicken in a skillet, mingling with the sweet aroma of roasting sweet potatoes. The harmony of these ingredients transforms your home into a warm gathering place. A Chicken & Sweet Potato Rice Bowl is exactly what you need. It’s comforting, nutritious, and perfect for busy families looking for a wholesome meal without spending all day in the kitchen.

Why This Works

Chicken & Sweet Potato Rice Bowl

This recipe is a favorite in our household. It’s quick to prepare, so you can focus on what really matters—your family. Using simple ingredients, you create a dish bursting with flavor. The combination of tender chicken, sweet potatoes, and hearty brown rice makes for a filling meal. Plus, it’s easy to customize for different tastes.

After a long day, I appreciate recipes that are not only straightforward but also healthy. The sweet potatoes provide vitamins, and the chicken offers lean protein. When you toss this bowl together, it feels like more than just a meal; it’s an experience that brings everyone to the table.

Process Overview

“This is where the magic happens—when the aroma fills the kitchen.”

This Chicken & Sweet Potato Rice Bowl is simple yet satisfying. The recipe comes together in about 40 minutes, making it ideal for a weeknight dinner. You’ll roast the sweet potatoes while cooking the chicken. Then, it all comes together in a delicious bowl you can share with your loved ones.

Ingredients

  • 1 lb chicken breast, diced and seasoned with salt and pepper
  • 2 cups sweet potatoes, diced
  • 2 cups cooked brown rice
  • 1 tbsp olive oil
  • 1 tsp paprika
  • Salt and pepper, to taste
  • 2 tbsp tahini
  • 1 tbsp lemon juice
  • 1 tbsp water

Lily’s Tips:

  • For even cooking, make sure the sweet potato cubes are uniform in size.
  • Use a meat thermometer to ensure the chicken reaches an internal temperature of 165°F.
  • Cook extra rice for quick meals throughout the week or to use in salads.
  • If you prefer a little spice, add chili powder or red pepper flakes to the chicken.
  • Opt for a whole rotisserie chicken if you’re short on time—this can cut down prep significantly.

Directions

  1. Preheat your oven to 400°F (200°C). This temperature helps caramelize the sweet potatoes while keeping them tender.
  2. In a bowl, toss the diced sweet potatoes with olive oil, paprika, salt, and pepper. Spread them out on a baking sheet. Note: The key is to keep them in a single layer for the best roasting.
  3. Roast the sweet potatoes for 20 minutes, flipping halfway through. The sweet smell will start to fill your kitchen.
  4. While the sweet potatoes roast, heat a skillet over medium-high heat. Add the seasoned chicken and cook until browned and no longer pink in the center. Encouragement: Stir occasionally and keep an eye on it. It will only take about 8-10 minutes.
  5. In a small bowl, whisk together tahini, lemon juice, and water until smooth. Adjust the consistency with water as needed. This drizzle adds a lovely creaminess to the dish.
  6. Now, let’s assemble! In bowls, layer the cooked brown rice, chicken, and roasted sweet potatoes. Tip for a beautiful bowl: Take your time with the layers—it makes the meal feel special.
  7. Drizzle your tahini sauce on top just before serving. This final touch not only looks great but adds a burst of flavor.

Serving

Chicken & Sweet Potato Rice Bowl

Serving this dish family-style makes it even more inviting. Place all components in the center of the table and let everyone build their own bowl. This not only allows for customization but also encourages conversation and sharing. You can put out some extra toppings like fresh herbs, nuts, or even avocado slices.

This is more than a meal; it’s a wonderful way to connect over food. Trust me; everyone will love choosing their favorite flavors.

Storage

Leftovers can be stored in an airtight container in the fridge for up to four days. To reheat, simply place in the microwave for 1-2 minutes, or until heated through. The sweet potatoes may lose some texture, so if you like them crispy, consider reheating them in an oven or skillet for a few minutes.

Kitchen Notes

  • Prep Ahead: Dice sweet potatoes and chicken the night before to save time.
  • Cook Extra: Make double the amount of chicken to have for lunch or add to salads.
  • One-Pan Wonder: Roast the chicken with the sweet potatoes if you use oven-safe cookware.
  • Freeze Portions: Consider freezing individual servings for easy meals later on.
  • Use Leftover Rice: If you have leftover rice, this is a perfect dish to use it up and reduce waste.

Variations

Not everyone in your family may be a fan of sweet potatoes, and that’s okay! Here are a few adjustments:

  • For Picky Eaters: Substitute sweet potatoes with regular potatoes or carrots for a more familiar taste.
  • For Vegans: Replace chicken with chickpeas or tofu and omit the tahini sauce for a different drizzle, like a balsamic reduction.
  • Low-Carb Option: Skip the rice and serve the chicken and sweet potatoes over a bed of leafy greens.
  • Spice it Up: Use garlic powder or hot sauce for extra flavor in the chicken.
  • Herbs and Greens: Incorporate fresh herbs like parsley or spinach for an extra boost of nutrition.

FAQ

1. Can I use different grains?

Absolutely! Quinoa or couscous would work well in place of brown rice.

2. How do I know when the chicken is done?

Check the internal temperature with a meat thermometer. It should read 165°F.

3. Is this recipe suitable for meal prep?

Yes! These bowls store well and are perfect for making ahead of time.

4. Can I add more veggies?

Yes, feel free to add veggies like bell peppers or broccoli to the mix.

5. What’s tahini, and what can I use instead?

Tahini is a sesame seed paste that adds creaminess. If you don’t have it, you can use yogurt or a creamy dressing.

At the heart of cooking is the desire to nourish our loved ones. This Chicken & Sweet Potato Rice Bowl embodies warmth, flavor, and the joy of family. Whip it up for your next dinner, and enjoy the wonderful aroma and flavors that come together in this simple yet satisfying dish. Happy cooking!

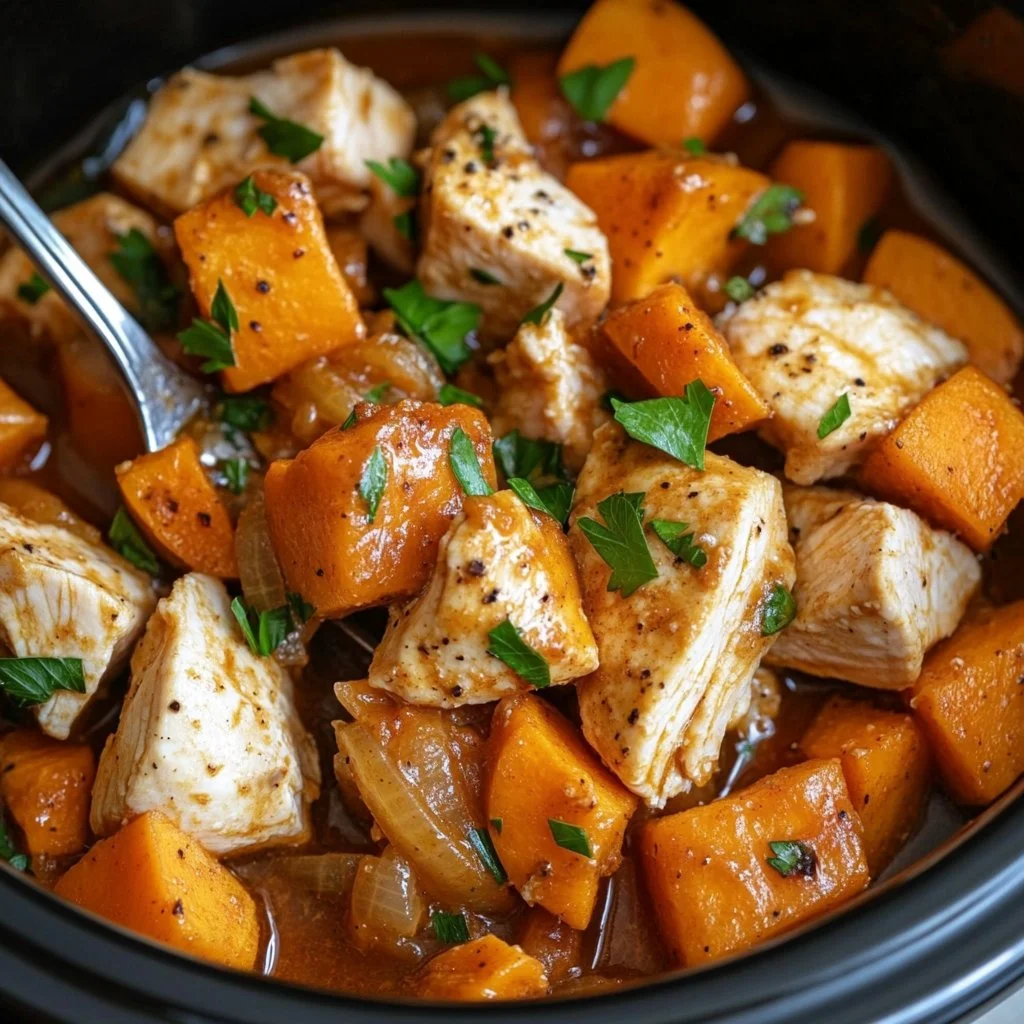
4. Crockpot Chicken and Sweet Potatoes

Crockpot Chicken and Sweet Potatoes

Crockpot Chicken and Sweet Potatoes

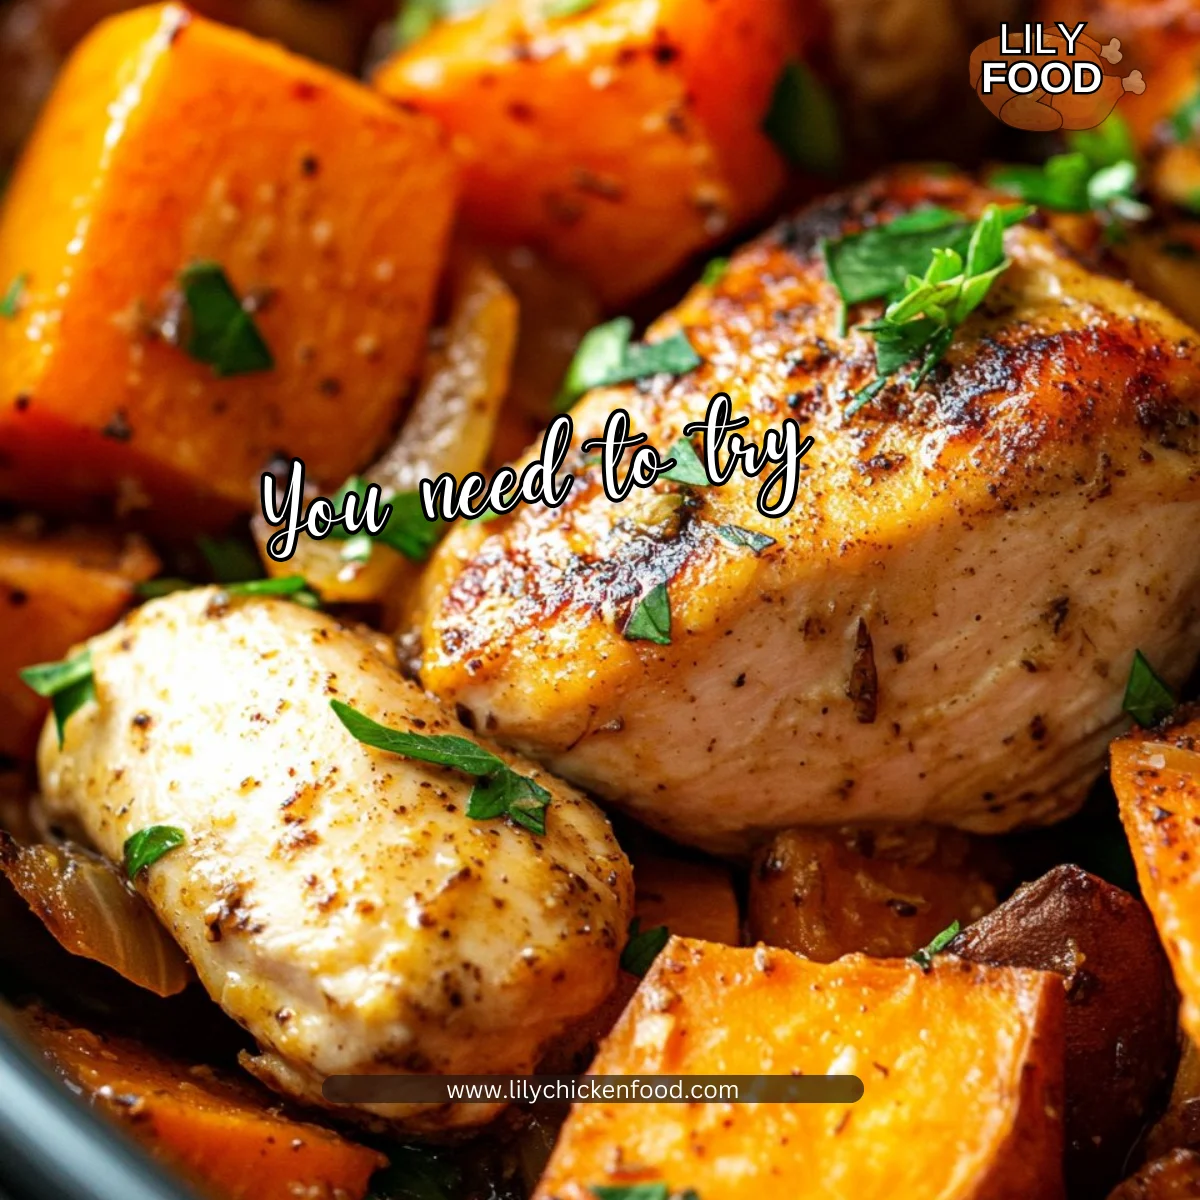
As you step into the kitchen, the sound of the crockpot gently bubbling is music to your ears. The sweet aroma of chicken and sweet potatoes fills the air, warming your heart and inviting your loved ones to gather around the table. You know that in just a few hours, you’ll have a comforting meal ready to serve, one that brings a smile to everyone’s face.

Why This Works

Crockpot Chicken and Sweet Potatoes

This crockpot chicken and sweet potatoes recipe is a family favorite. It’s simple, delicious, and perfect for busy weeknights. The beauty of this dish lies in its ability to blend flavors seamlessly over hours of cooking.

Using the crockpot saves you time without sacrificing quality. As the chicken cooks, it becomes tender and juicy, while the sweet potatoes absorb all the flavors. Your family will appreciate a hearty meal that warms not just their stomachs, but their hearts.

Process Overview

“This is where the magic happens—when the aroma fills the kitchen.”

Cooking in a crockpot is both convenient and rewarding. The first step is a quick prep, then you can walk away and let the slow cooker do its job. As the hours go by, you’ll be rewarded with an enticing smell that makes everyone excited for dinner.

Ingredients

To make this dish, here’s what you’ll need:

  • 4 boneless, skinless chicken breasts
  • Tip: Look for chicken that feels moist and smells fresh. This will ensure the best flavor and texture.
  • 2 large sweet potatoes, peeled and cubed
  • Tip: Sweet potatoes should be firm with smooth skin. A little sweetness makes everything better!
  • 1 onion, chopped
  • Tip: Any type of onion will work, but yellow onions tend to be sweeter.
  • 2 cloves garlic, minced
  • Tip: Fresh garlic always adds a richer flavor than powdered.
  • 1 teaspoon paprika
  • Tip: Smoked paprika gives a wonderful depth of flavor, if you have it on hand.
  • Salt and pepper to taste
  • Tip: Seasoning ensures that all the flavors pop; don’t be shy!
  • 1 cup chicken broth
  • Tip: Homemade broth is great if you have some, but store-bought works too!
  • Fresh parsley for garnish (optional)
  • Tip: A sprinkle of parsley adds a fresh touch to the dish and enhances the visual appeal.

Directions

  1. Place the cubed sweet potatoes and chopped onion in the bottom of the crockpot.
  2. Start with a solid base. The sweet potatoes will soak up that delicious chicken flavor.
  3. Lay the chicken breasts on top of the veggies.
  4. This way, the chicken juices will drip down, making everything even more flavorful.
  5. Sprinkle with minced garlic, paprika, salt, and pepper.
  6. These seasonings create a beautiful aroma that will make your kitchen come alive.
  7. Pour the chicken broth over the top.
  8. This adds moisture to keep everything nice and tender as it cooks.
  9. Cover and cook on low for 6-7 hours or on high for 4-5 hours, until the chicken is cooked through and tender.
  10. Trust the process; the low slow method yields the best results.
  11. Shred the chicken with two forks and mix it with the vegetables before serving.
  12. Shredding the chicken allows it to blend beautifully with the sweet potatoes and onions.
  13. Garnish with fresh parsley if desired.
  14. This final touch completes your dish, adding color and freshness.

Serving

Crockpot Chicken and Sweet Potatoes

Serving this meal family-style is the way to go. Place the entire crockpot in the center of the table and let everyone help themselves. Consider offering a side of crusty bread to scoop up the delicious sauce and veggies. This creates a shared experience, encouraging laughter and connection around the table.

Storage

This crockpot chicken and sweet potatoes dish stores well. Leftovers can be kept in an airtight container in the fridge for up to 3 days. When reheating, add a splash of chicken broth to keep everything moist and flavorful. You can also freeze individual portions for up to 3 months. Just make sure to use freezer-safe containers.

Kitchen Notes

  • Prep Ahead: Chop the vegetables the night before to save time.
  • Use Leftovers: Shred any leftover chicken for sandwiches or salads.
  • Make it Spicy: Add red pepper flakes for some heat.
  • Switch Up the Veggies: You can add carrots or bell peppers for added flavor.
  • Quick Clean-Up: Lining your crockpot with a special liner will help with easy clean-up.

Variations

If you have picky eaters, consider these tweaks:

  • Swap the Chicken: Use turkey cutlets or even tofu for a plant-based option.
  • Different Seasoning: Experiment with Italian seasoning for a different flavor profile.
  • Change the Veggies: Use regular potatoes or even carrots if sweet potatoes aren’t popular.
  • Dairy-Free: Substitute chicken broth with vegetable broth to cater to different diets.

FAQ

  1. Can I use frozen chicken?
  2. Yes, but you need to increase the cooking time by about an hour.
  3. What can I serve with this dish?
  4. A simple salad or some steamed broccoli would be great compliments.
  5. Is there an alternative to paprika?
  6. Yes, you can use cayenne for heat or skip it entirely for a neutral flavor.
  7. Can I cook this on the stove instead?
  8. Absolutely! Just simmer on low heat in a pot for about 1-2 hours, stirring occasionally.
  9. How do I know when the chicken is done?
  10. The internal temperature should reach 165°F, and it should shred easily.

Conclusion

As the day winds down, gather your loved ones around the table. Share stories, laughter, and this delicious crockpot chicken and sweet potatoes meal. It’s a dish that nourishes both body and soul, bringing everyone closer together. Remember, the best meals are those made with love. Enjoy!

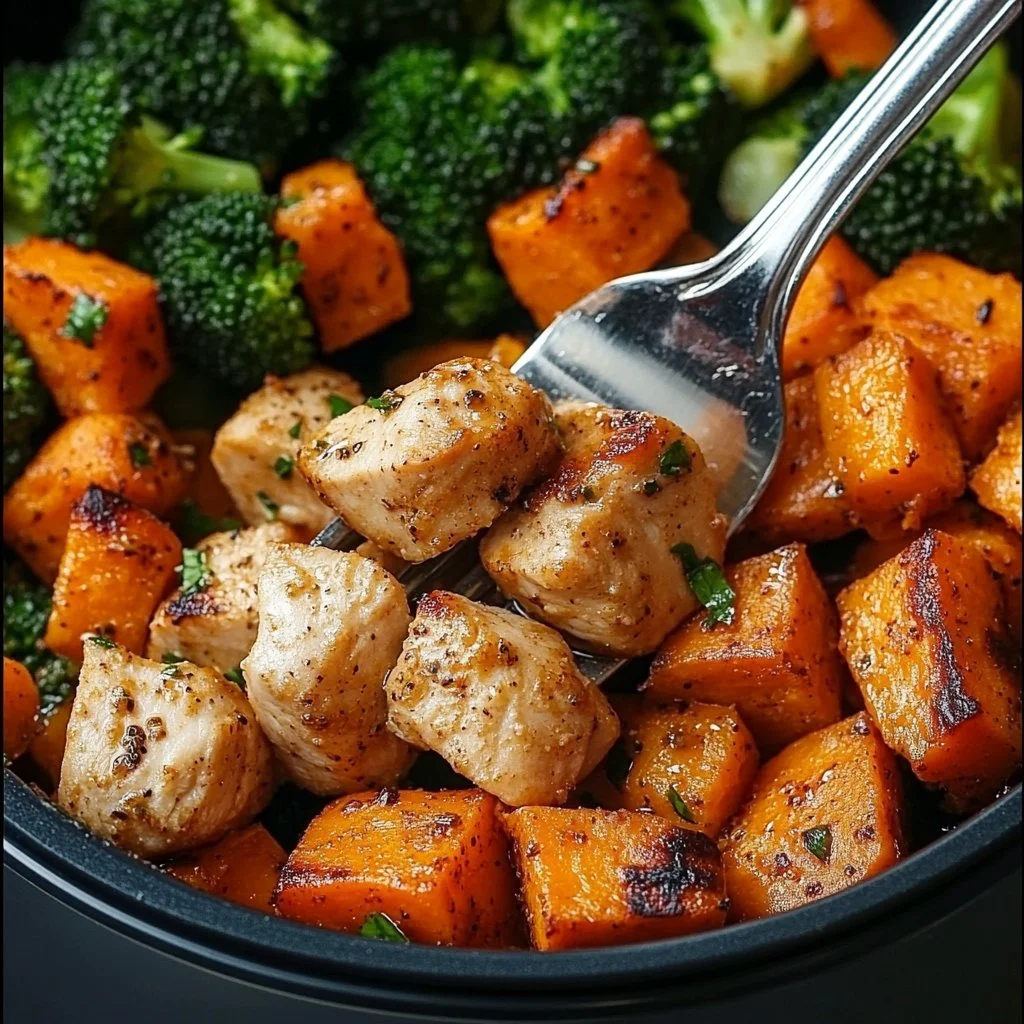
5. Chicken and Sweet Potato Meal Prep

Chicken and Sweet Potato Meal Prep

Chicken and Sweet Potato Meal Prep

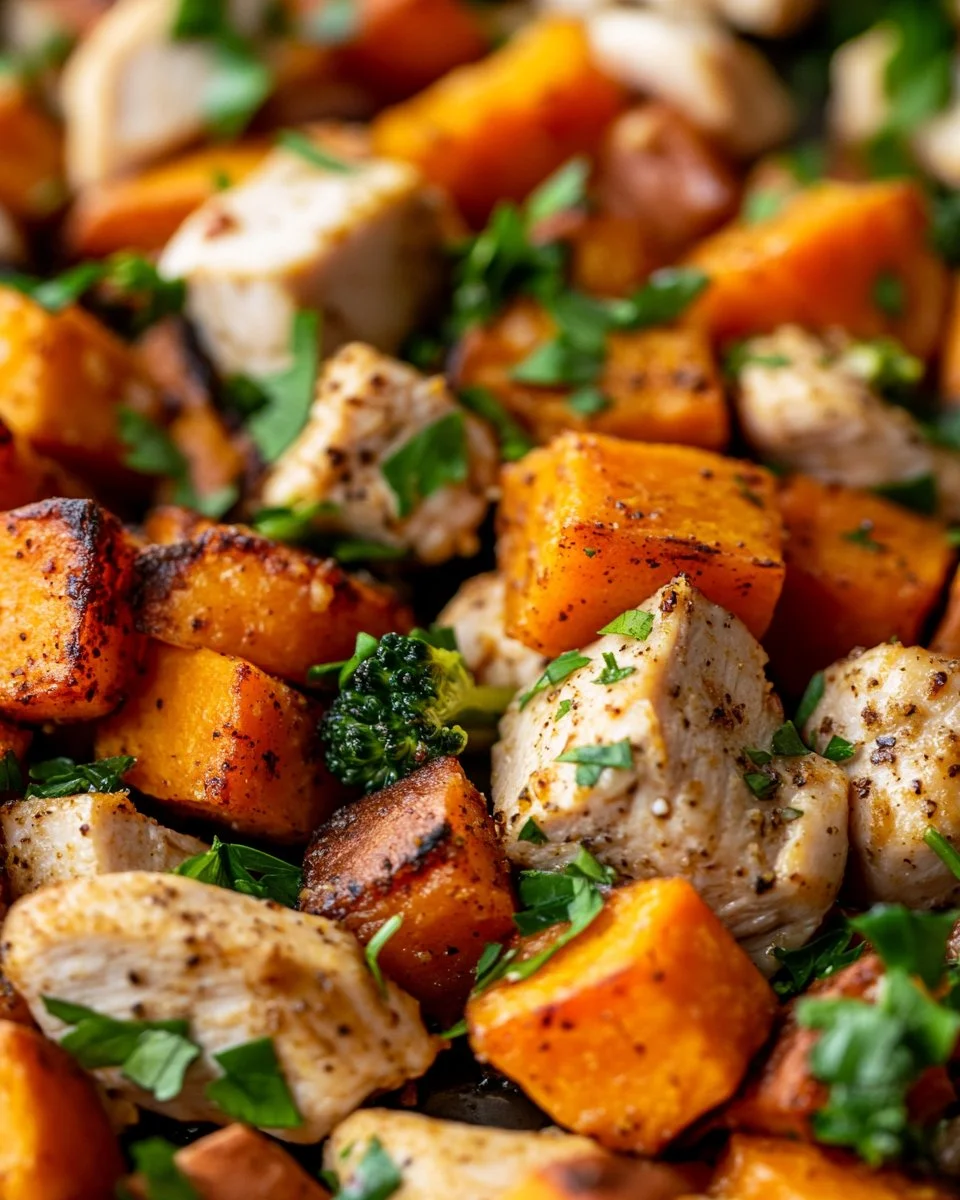
The smell of roasted sweet potatoes and seasoned chicken fills the air. You can hear the sizzling of the chicken as it cooks in the oven, bringing a sense of comfort and warmth. This is not just a meal; it’s a family gathering around the dinner table. Today, I’m excited to share a Chicken and Sweet Potato Meal Prep that is perfect for busy weeks. Not only is this dish delicious, but it’s also packed with nutrients, making it a family favorite that you’ll want to make again and again.

Why This Works

Chicken and Sweet Potato Meal Prep

This Chicken and Sweet Potato Meal Prep recipe is a lifesaver. Between busy schedules, after-school activities, and the rush of daily life, who has time to cook every single night? This recipe allows you to cook once and enjoy delicious meals throughout the week.

The combination of chicken and sweet potatoes is not only satisfying but also nutritious. Sweet potatoes are rich in vitamins and minerals, while chicken is a great source of protein. This meal prep is perfect for families who want to eat healthy without sacrificing flavor or time. You can store your meals in individual containers, making it easy to grab and go when you need to.

Process Overview

“This is where the magic happens—when the aroma fills the kitchen.”

Meal prep is all about making life simpler in the kitchen. You can take an hour or so to prepare this dish, and the rewards will last you all week. Roasting the chicken and sweet potatoes together promotes flavor melding, and the broccoli adds a pop of green to your meals.

Your kitchen will transform into a haven of scents that will get the whole family excited about eating healthy.

Ingredients

Gather these simple ingredients for a hassle-free cooking experience:

  • 2 pounds chicken breast, diced
  • Tip: Choose fresh chicken for the best flavor. If using frozen, be sure to thaw thoroughly before cooking.
  • 4 medium sweet potatoes, cubed
  • Tip: Be sure to peel them for a smoother texture, or leave the skin on for additional nutrients.
  • 1 tablespoon olive oil
  • Tip: A good quality olive oil enhances the flavor of the chicken and sweet potatoes.
  • 1 teaspoon garlic powder
  • Tip: Garlic powder is a quick way to add flavor. If you have fresh garlic, use that for an even stronger taste.
  • 1 teaspoon paprika
  • Tip: Smoked paprika can add a nice smoky flavor, which pairs beautifully with sweet potatoes.
  • 1 teaspoon salt
  • Tip: Adjust the salt based on your family’s taste preferences; you can always add more later.
  • 1/2 teaspoon black pepper
  • Tip: Freshly ground black pepper is more flavorful than pre-ground.
  • 2 cups broccoli florets
  • Tip: Fresh or frozen broccoli works; just adjust the cooking time slightly if using frozen.
  • 1/4 cup fresh parsley, chopped
  • Tip: Fresh herbs brighten up any dish. You can substitute with cilantro or thyme if you prefer.

Directions

  1. Preheat your oven to 400°F (200°C).
  2. This is the first step to ensuring your meal cooks evenly.
  3. In a large bowl, combine the diced chicken, cubed sweet potatoes, olive oil, garlic powder, paprika, salt, and black pepper. Mix well.
  4. Get your hands in there! This is part of the fun.
  5. Spread the mixture onto a baking sheet in a single layer.
  6. A single layer ensures even cooking and browning.
  7. Bake for 25-30 minutes or until the chicken is cooked through and sweet potatoes are tender.
  8. You want to see that lovely golden brown color on the edges.
  9. In the last 10 minutes of baking, add the broccoli florets to the baking sheet.
  10. This way, the broccoli stays bright and crisp, which adds color to your meal.
  11. Remove from the oven, garnish with chopped parsley, and let cool before portioning.
  12. Letting it cool makes it easier to pack away into containers.

Serving

Chicken and Sweet Potato Meal Prep

To serve this meal, I recommend family-style plating. You can set everything out on the table, letting everyone fill their plates. This fosters a sense of togetherness and allows your family members to choose their portions.

Pair this meal with a light salad or some whole-grain bread if you like. It’s all about making it a complete and satisfying dinner for everyone to enjoy.

Storage

For proper storage, let the meal cool completely before transferring it to airtight containers. You can keep these meals in the fridge for up to five days. When reheating, simply microwave them for about 2-3 minutes until they are warmed through.

If you want to freeze some portions, it’s best to do so before adding the broccoli. Freeze in single-serve containers, and they’ll last for about 3 months. To reheat, defrost in the fridge overnight and then microwave.

Kitchen Notes

  • Pre-chop the sweet potatoes and chicken the night before to save time on cooking day.
  • Use parchment paper on your baking sheet for easy cleanup.
  • Experiment with spices according to your family’s preferences.
  • Swap out the veggies based on what’s in season or on sale.
  • Invest in good-quality meal prep containers for better storage.

Variations

Are there picky eaters in your family? No problem! Here are some tweaks to make this dish more appealing:

  • Substitute chicken with turkey or even firm tofu for a vegetarian option.
  • Try different protein options like shrimp or sausage.
  • For the sweet potatoes, use butternut squash or pumpkin for a different flavor.
  • If broccoli isn’t a hit, add green beans or snap peas instead.
  • For a spicier kick, add chili powder or red pepper flakes in the mix.

FAQ

1. Can I use other vegetables?

Absolutely! Feel free to mix in your family’s favorite veggies. Carrots and bell peppers work great, too.

2. How can I make this gluten-free?

This recipe is naturally gluten-free, just ensure any spices used are gluten-free as well.

3. Can I prep this dish in advance?

Yes, it’s perfect for meal prep! Just prepare ahead of time and store in the fridge.

4. Can I use frozen chicken?

You can, but make sure it’s thawed completely for even cooking.

5. How do I know when the chicken is fully cooked?

The internal temperature should reach 165°F. Use a meat thermometer for accuracy.

Conclusion

Cooking doesn’t have to be a chore. With this Chicken and Sweet Potato Meal Prep, you’re not just making a meal; you’re creating a wonderful family experience. Your kitchen will fill with delightful aromas, and your family will gather around the table, enjoying nourishing food together. So, roll up your sleeves and enjoy the process. Happy cooking!

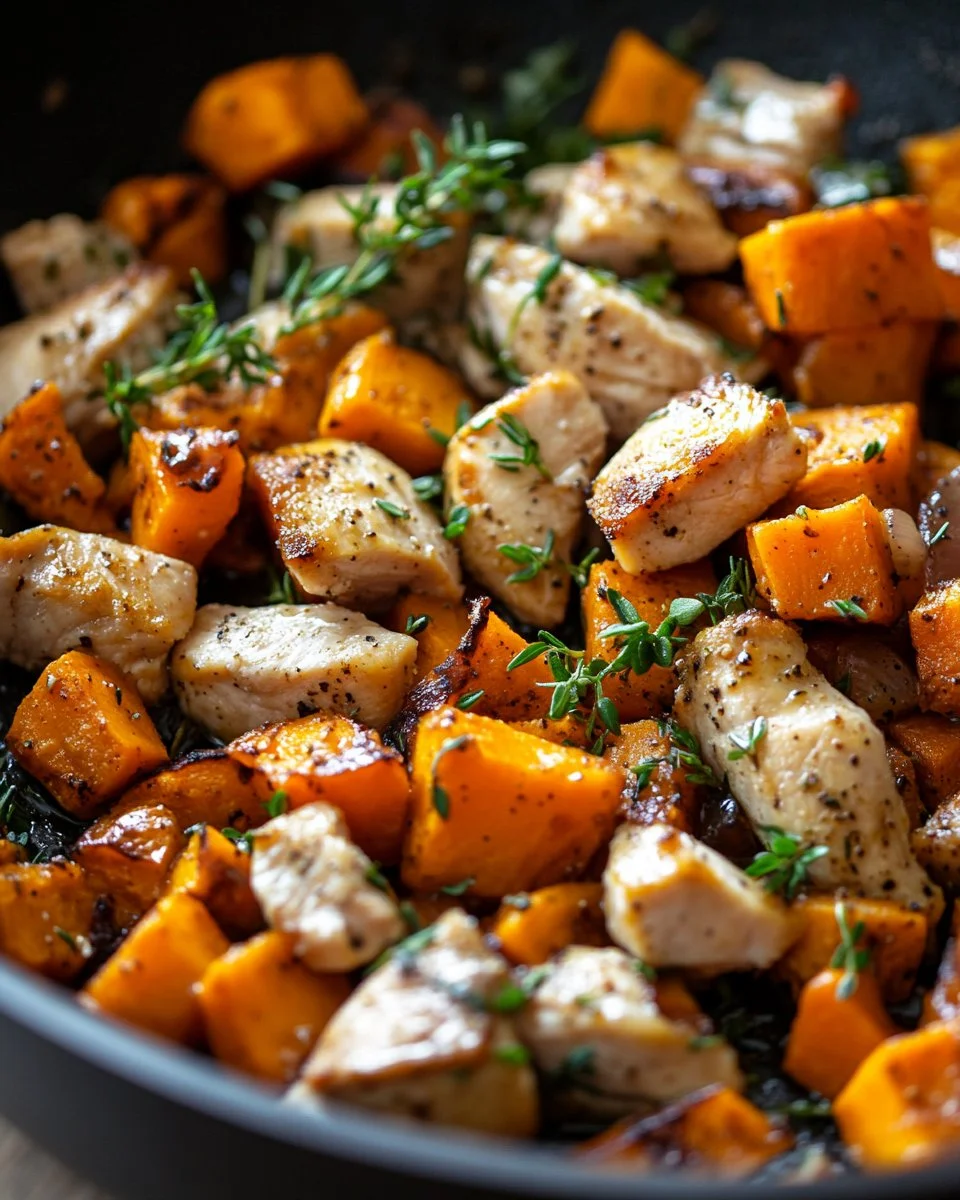
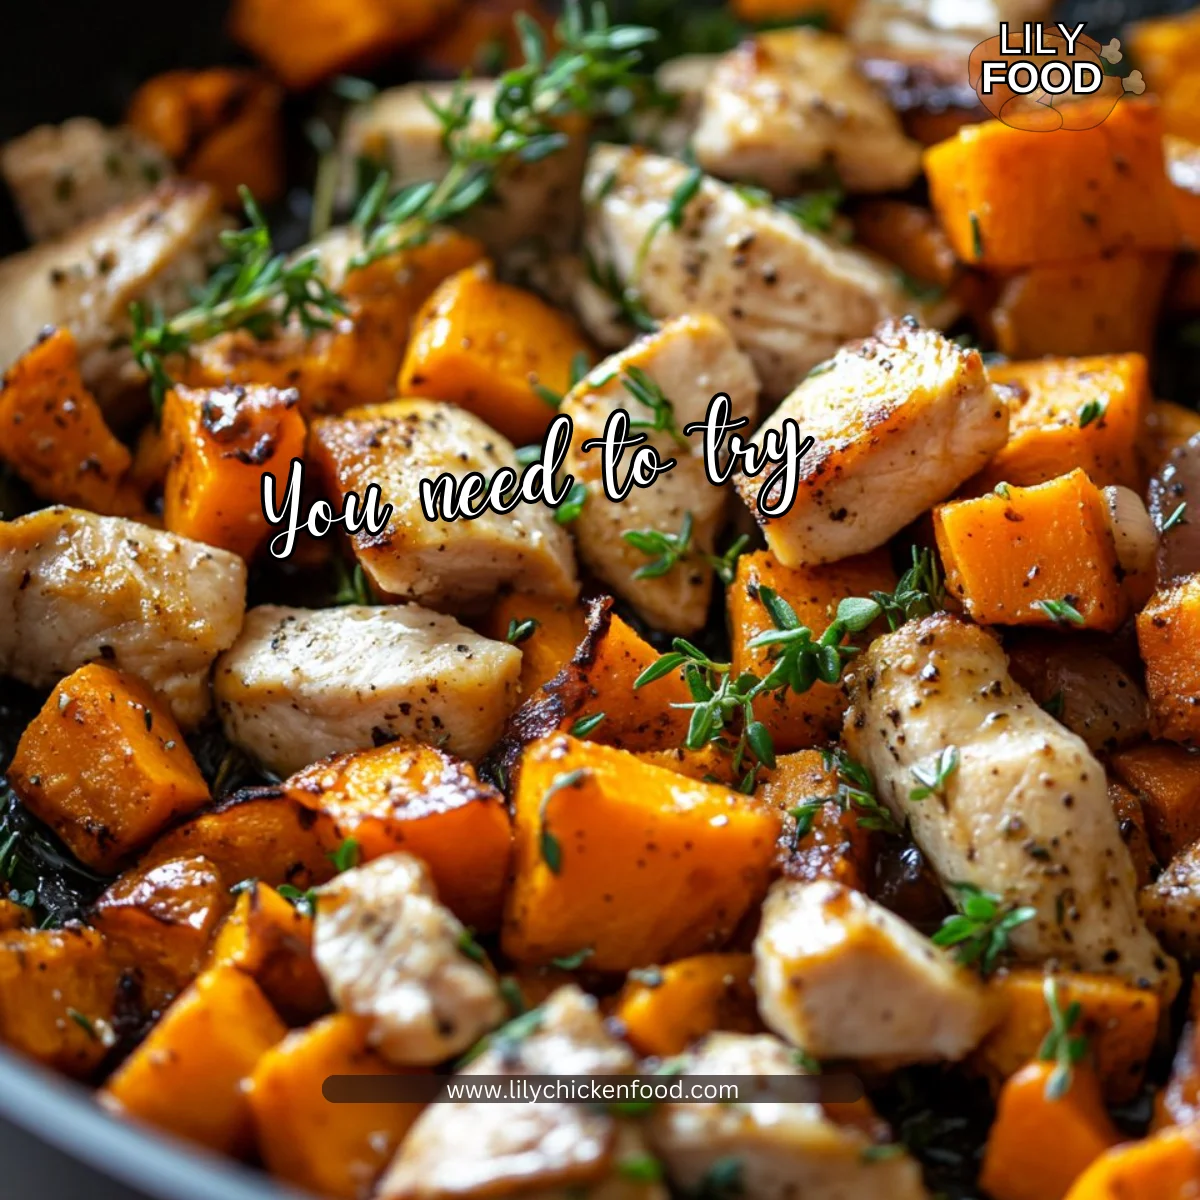
6. Cajun Chicken & Sweet Potato Bowls: An Amazing Ultimate Recipe

Cajun Chicken & Sweet Potato Bowls: An Amazing Ultimate Recipe

Cajun Chicken & Sweet Potato Bowls: An Amazing Ultimate Recipe

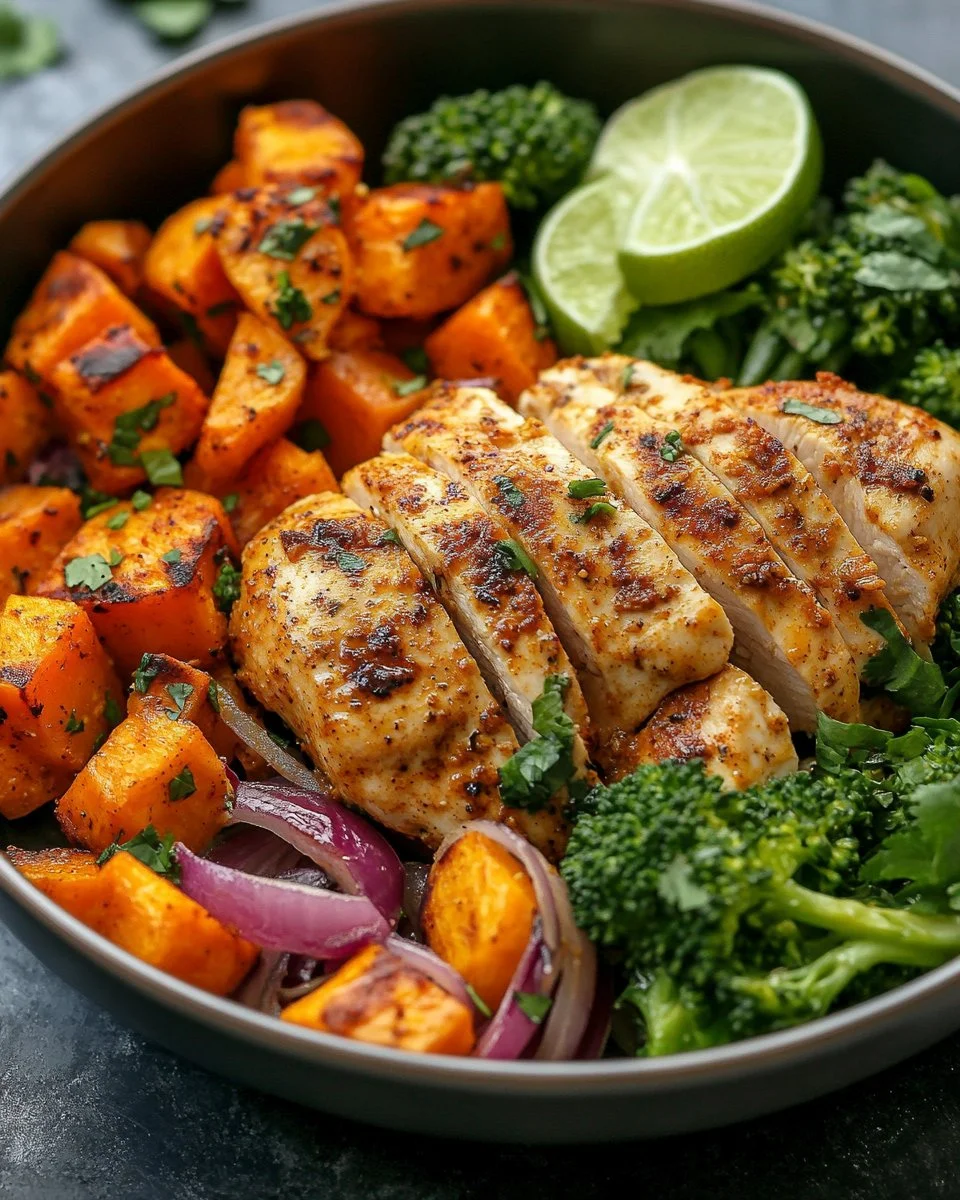
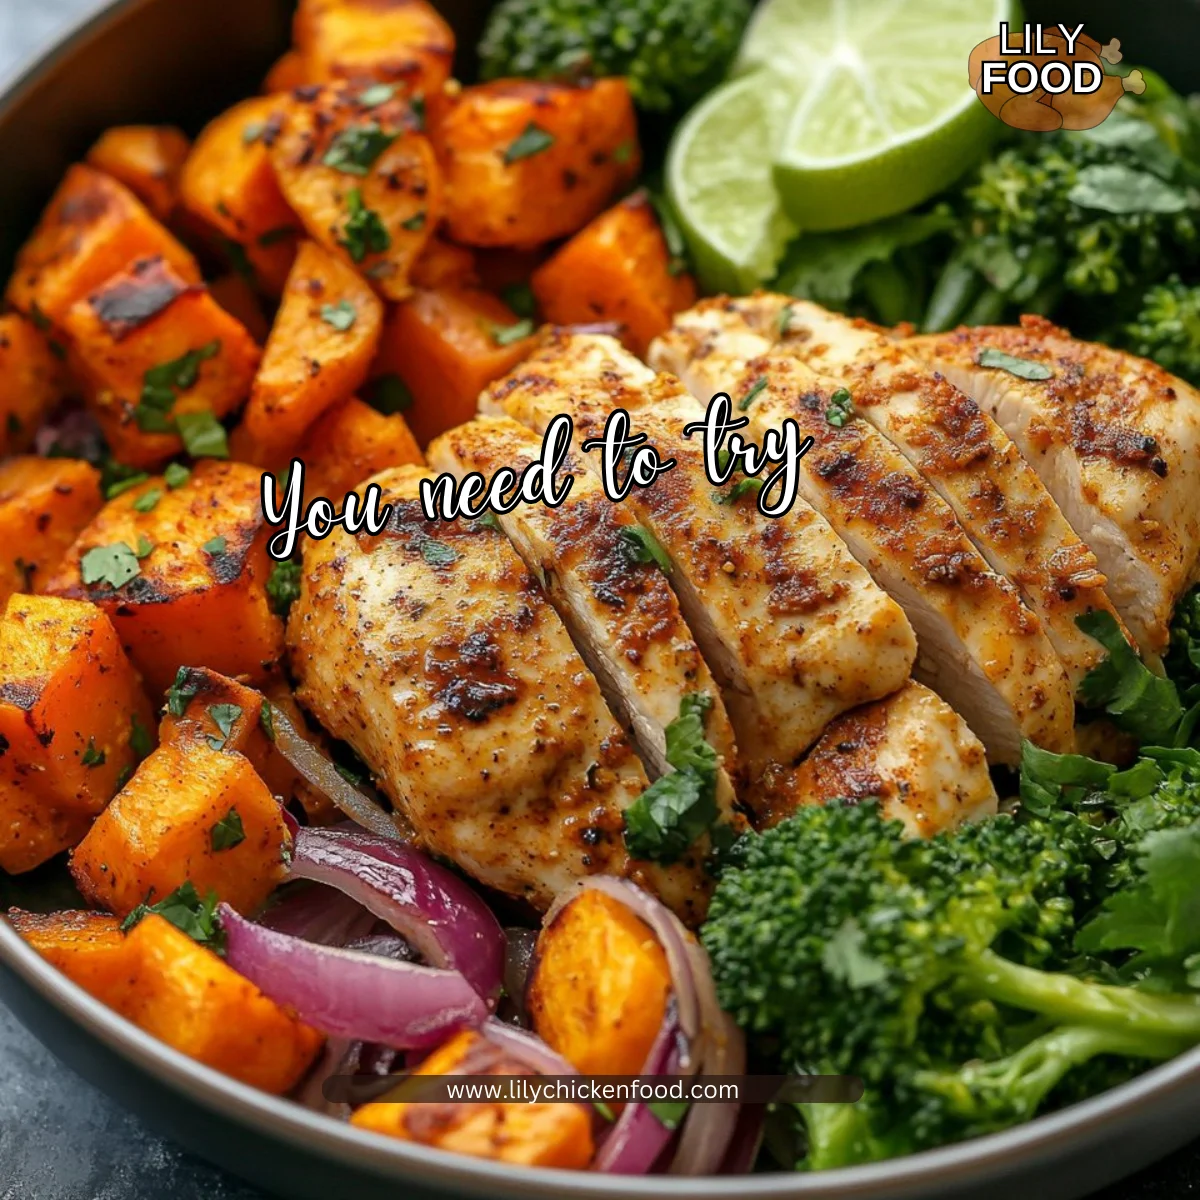
The kitchen is the heart of every home, a place where aromas dance and flavors blend. As you step in, the sounds of sizzling and gentle stirring beckon you to create something magical. Today, we’re diving into the savory world of Cajun Chicken & Sweet Potato Bowls. The blend of spices and fresh ingredients will fill your home with warmth, making it a perfect dish for family gatherings or a cozy weeknight dinner.

Why This Works

Cajun Chicken & Sweet Potato Bowls: An Amazing Ultimate Recipe

Cajun Chicken & Sweet Potato Bowls are a fantastic choice for families. They are not only nutritious but also incredibly flavorful. The sweet potatoes bring a touch of natural sweetness, while the Cajun seasoning on the chicken adds a warm heat that everyone will love.

Additionally, this recipe is a time-saver. With a handful of simple steps, you can whip up a delicious dinner that doesn’t consume your entire evening. This meal not only satisfies the taste buds but also brings loved ones together at the table. There’s something about sharing a hearty bowl that feels like a warm hug after a long day.

Process Overview

“This is where the magic happens—when the aroma fills the kitchen.”

Making Cajun Chicken & Sweet Potato Bowls is a delightful process. Each step is straightforward, ensuring you spend more time enjoying the meal and less time scrambling around. The combination of roasting sweet potatoes while sautéing the chicken and veggies creates a symphony of flavors.

Let’s gather our ingredients and prepare to create a masterpiece that will leave everyone at the table smiling.

Ingredients

  • 2 large chicken breasts
  • 2 tablespoons Cajun seasoning
  • 2 medium sweet potatoes, peeled and diced
  • 2 tablespoons olive oil
  • 1 bell pepper, diced
  • 1 red onion, diced
  • 1 cup broccoli florets
  • Salt and pepper to taste
  • Fresh cilantro (for garnish)
  • Lime wedges (for serving)

Lily’s Tips:

  • Chicken Breasts: Choose chicken breasts that are similar in size for even cooking.
  • Cajun Seasoning: For a homemade blend, mix paprika, garlic powder, onion powder, and cayenne.
  • Sweet Potatoes: Look for vibrantly colored sweet potatoes; they’re usually sweeter.
  • Veggies: Feel free to swap the broccoli with seasonal vegetables you enjoy.
  • Lime: Fresh limes add a zesty kick that brightens the dish.

Directions

  1. Preheat Oven: Start by preheating your oven to 425°F (220°C). This high temperature will caramelize your sweet potatoes beautifully.
  2. Prepare Sweet Potatoes: In a large bowl, toss the diced sweet potatoes with 1 tablespoon of olive oil, salt, and pepper. Spread them out on a baking sheet in a single layer. This helps them cook evenly.
  3. Bake Sweet Potatoes: Place the baking sheet in the oven and roast the sweet potatoes for about 20-25 minutes or until tender and slightly caramelized. The sweetness will intensify as they bake.
  4. Season Chicken: While the sweet potatoes are roasting, rub the chicken breasts with 1 tablespoon of olive oil and then coat evenly with Cajun seasoning. Don’t be shy – make sure the seasoning covers every inch of the chicken for an amazing flavor.
  5. Cook Chicken: Heat a skillet over medium-high heat and add the seasoned chicken. Cook for about 6-7 minutes on each side, or until the internal temperature reaches 165°F (75°C). Removing the chicken from the skillet is key to allowing the juices to redistribute.
  6. Sauté Veggies: In the same skillet, add the diced onion, bell pepper, and broccoli. Sauté for about 5-7 minutes until the vegetables are tender yet still crisp. This adds both color and nutrition to your bowls.
  7. Slice Chicken: Once rested, slice the chicken into strips. This makes it easy to layer and enjoy in your bowls.
  8. Assemble Bowls: In individual bowls, layer roasted sweet potatoes, sautéed veggies, and sliced chicken. The vibrant colors make the dish as appealing to the eye as it is to the palate.
  9. Garnish and Serve: Top each bowl with fresh cilantro and serve with lime wedges for an extra burst of flavor. The lime will brighten each bite.

These steps are simple and straightforward, ensuring a delicious and satisfying meal that whisks you away to Cajun shores with every bite.

Serving

Cajun Chicken & Sweet Potato Bowls: An Amazing Ultimate Recipe

These bowls are not only perfect for individual servings but also for family-style gatherings. Present the entire tray of sweet potatoes, veggies, and sliced chicken at the center of the table. Let everyone build their own bowl, creating a sense of togetherness and fun.

Consider serving with a simple green salad or some cornbread on the side to round out the meal. Don’t shy away from adding your family’s favorite hot sauce for those looking for a bit more kick.

Storage

Leftovers? No problem! Store any extra Cajun Chicken & Sweet Potato Bowls in airtight containers in the refrigerator for up to three days.

When you’re ready to enjoy them again, simply reheat in the microwave for 1-2 minutes until warmed through. If you prefer, you can also reheat them in a skillet over medium heat. This helps maintain the texture of the veggies.

Kitchen Notes

  • Prep Ahead: You can dice sweet potatoes and veggies ahead of time to make meal prep a breeze.
  • Batch Cooking: Double the recipe and freeze half for an easy meal later.
  • Rotisserie Chicken: Use rotisserie chicken to save time on the protein.
  • Sheet Pan Cooking: Feel free to roast the chicken alongside the sweet potatoes if you have a large enough baking sheet.
  • Non-Stick Skillet: Using a non-stick skillet can help reduce the amount of oil needed for cooking.

Variations

For a twist on this recipe, consider these variations:

  • For Picky Eaters: Substitute sweet potatoes for regular potatoes and change the veggies to those your family prefers.
  • Vegetarian Version: Replace chicken with black beans or chickpeas for a protein-packed vegetarian meal.
  • Low-Carb Option: Use cauliflower rice instead of sweet potatoes for a low-carb alternative.
  • Spicy Kick: Add diced jalapeños or a sprinkle of cayenne pepper to the sautéed veggies for more heat.
  • Different Proteins: Try shrimp or tofu with the same seasoning for a delicious alternative.

FAQ

  1. Can I make this dish ahead of time? Yes, you can prep the ingredients a day before and cook them just before serving.
  2. What if I don’t have Cajun seasoning? You can use a blend of paprika, garlic powder, and pepper as a substitute.
  3. Can I bake everything at once? Yes, if you have enough space on your baking sheet, you can roast the chicken and sweet potatoes together.
  4. Is this dish freezer-friendly? Yes, you can freeze the components separately and assemble them when ready to eat.
  5. How can I make this spicier? Add extra Cajun seasoning or your favorite hot sauce during cooking for increased heat.

Conclusion

Cooking brings joy not only to the cook but also to those who gather around the table. Cajun Chicken & Sweet Potato Bowls are more than just a meal; they represent a shared moment, filled with laughter and connection.

I hope you enjoy making and sharing this dish with your loved ones. The warmth and flavor will keep you coming back for more. Happy cooking!

7. Healthy Chicken & Sweet Potato Rice Bowl

Healthy Chicken & Sweet Potato Rice Bowl

Healthy Chicken & Sweet Potato Rice Bowl

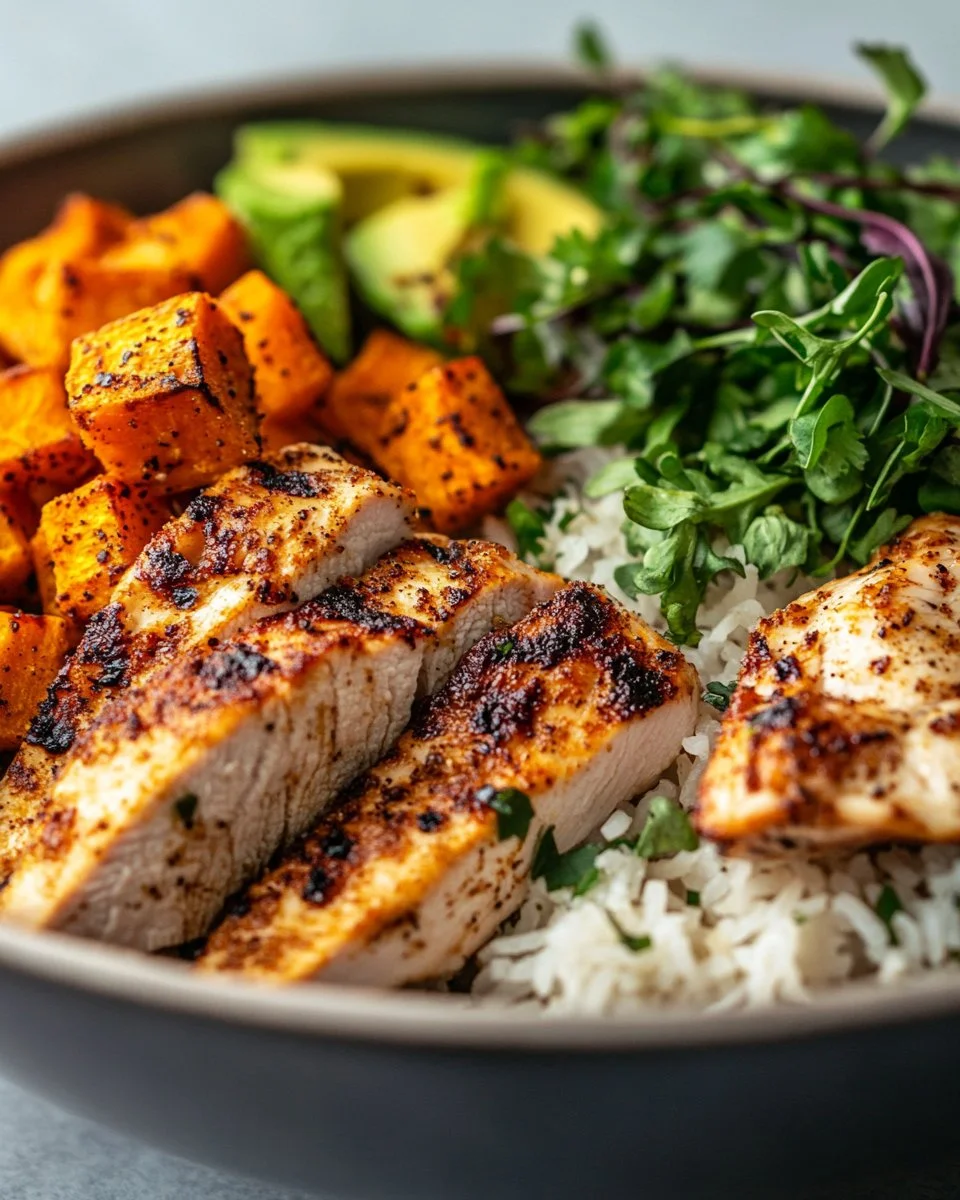
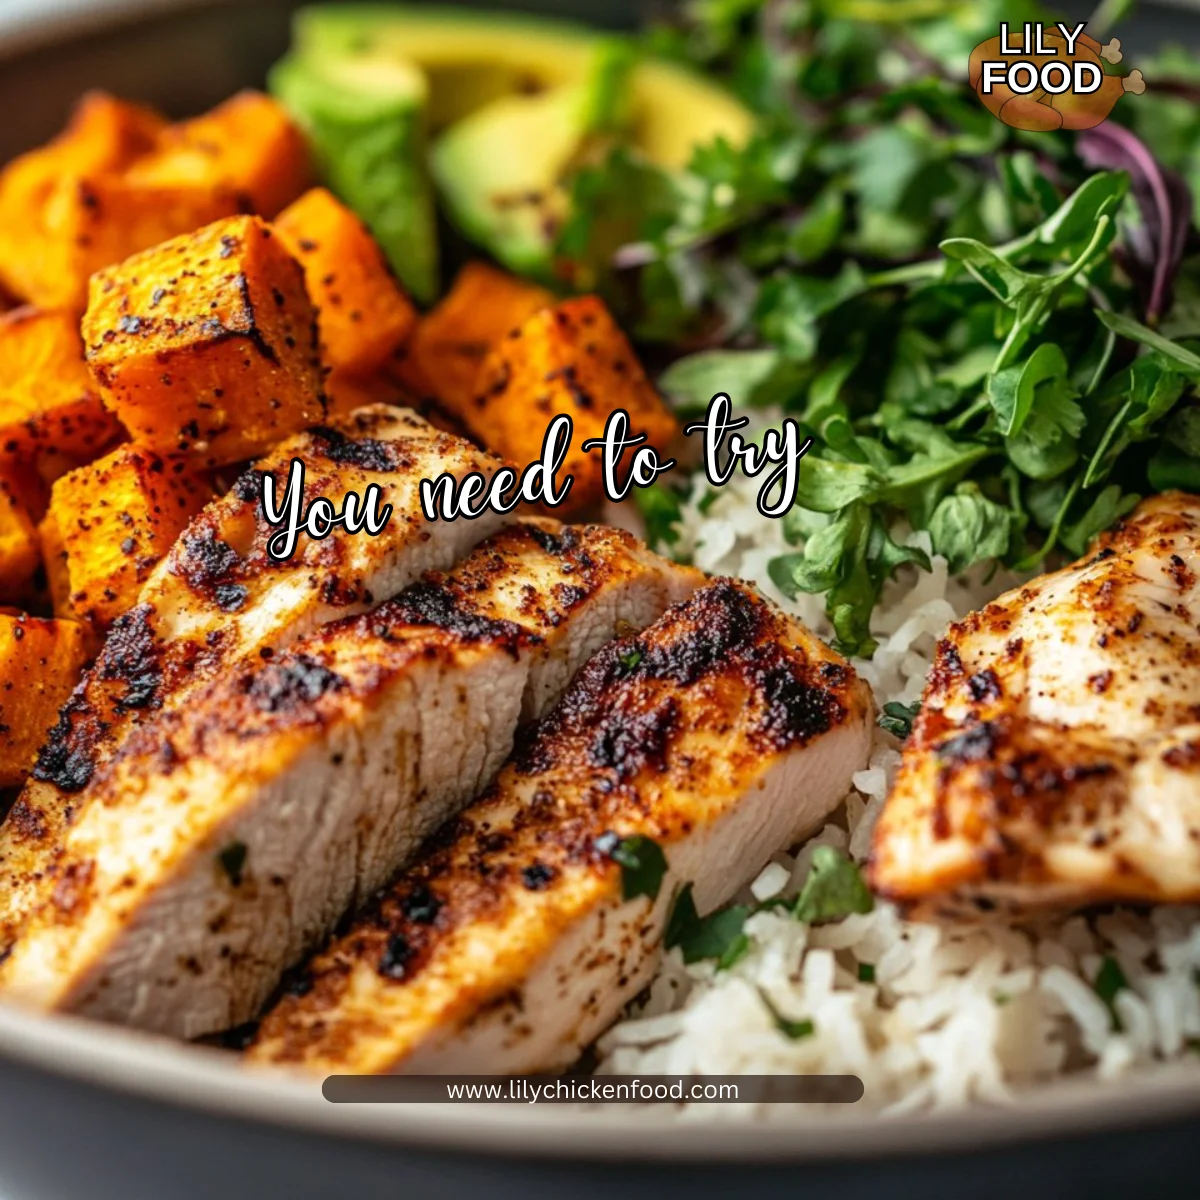
The smell of sweet potatoes roasting in the oven fills the kitchen, blending with the enticing aroma of seasoned chicken sizzling in a pan. The sound of chopping and stirring creates a cozy rhythm that reminds me of family dinners gathered around the table. Each element in the air invites everyone in the house to come together and enjoy a wholesome meal. Today, we’re making a Healthy Chicken & Sweet Potato Rice Bowl that is not only delicious but also simple enough for any weeknight dinner.

Why This Works

Healthy Chicken & Sweet Potato Rice Bowl

This Healthy Chicken & Sweet Potato Rice Bowl is perfect for busy families. With prep and cooking time combined, you can have a healthy and tasty dinner ready in about 45 minutes. Roasting sweet potatoes brings out their natural sweetness while keeping the chicken juicy and flavorful. Plus, this dish is always a hit, meaning your family and friends will ask for seconds. It’s a win-win in the kitchen!

Process Overview

“This is where the magic happens—when the aroma fills the kitchen.”

By focusing on fresh, wholesome ingredients, we can create a meal that nourishes our bodies and warms our hearts. The process is straightforward, meaning more time to spend with loved ones and less time stressing over dinner.

Ingredients

Here’s what you will need for our Healthy Chicken & Sweet Potato Rice Bowl:

  • Chicken breast: About 1 pound. I recommend using boneless and skinless for easier cooking and slicing.
  • Sweet potatoes: 2 medium-sized. Choose firm sweet potatoes without blemishes. They are the star of the dish!
  • Rice: 1 cup, white or brown. Brown rice is great for added fiber, but use whatever you prefer.
  • Olive oil: 2 tablespoons. A pantry staple that adds flavor and helps to roast the veggies perfectly.
  • Salt: To taste. A little sprinkle can elevate the flavors.
  • Pepper: To taste. Freshly cracked black pepper enhances the dish beautifully.
  • Garlic powder: 1 teaspoon. Adds a wonderful depth of flavor with ease.
  • Paprika: 1 teaspoon. Not only for flavor but also for a lovely color.
  • Optional toppings: Feel free to add greens, avocado, or nuts. These toppings not only bring added nutrition but also beautiful color and flavors. For example, a handful of spinach or sliced almonds can give it a nice crunch.

Directions

  1. Preheat the oven to 400°F (200°C). This is an important first step. A hot oven ensures that your sweet potatoes will roast to perfection.
  2. Cut the sweet potatoes into cubes and toss them with olive oil, salt, pepper, garlic powder, and paprika. Spread them out on a baking sheet and roast for 25-30 minutes until tender. Keep an eye on them; flipping halfway will help them brown evenly.
  3. While the sweet potatoes are roasting, cook the rice according to package instructions. You can use a rice cooker or stovetop, depending on what you have on hand. This is a great time to let the kids help rinse the rice.
  4. Season the chicken with salt, pepper, and any desired spices. Grill or sauté the chicken in a pan until cooked through, about 6-8 minutes on each side. Use medium-high heat for that lovely sear!
  5. In a bowl, layer cooked rice, roasted sweet potatoes, and sliced chicken. Encourage the kids to help build their own bowl. It makes dinner interactive and fun.
  6. Add any optional toppings and serve. A sprinkle of greens or a couple slices of avocado can take your bowl to the next level.

Serving

Healthy Chicken & Sweet Potato Rice Bowl

When serving, consider creating a family-style setup. Place large bowls of the rice, sweet potatoes, and sliced chicken in the center of the table and let everyone build their own bowl. This not only encourages creativity but also brings everyone together, fostering conversation and connection over a shared meal.

Storage

Leftovers can be stored in an airtight container in the fridge for up to three days. To reheat, simply pop it in the microwave for about 1-2 minutes. If you like, you can add a splash of water to keep it moist while reheating. Alternatively, you can heat it on the stove in a little olive oil, which also adds more flavor.

Kitchen Notes

  • Use pre-cooked rotisserie chicken to save time on busy nights.
  • Cut sweet potatoes into smaller cubes for quicker cooking.
  • Cook rice in advance during meal prep for easy dinners later in the week.
  • Feeling creative? Try adding beans or lentils for extra protein.
  • Use frozen veggies if you’re short on time; they are just as nutritious.

Variations

If you have picky eaters or specific dietary requirements, this recipe can easily be tweaked.

  • Substituting quinoa for rice adds a nutty flavor and is gluten-free.
  • Swap chicken for chickpeas or tofu for a vegetarian or vegan option.
  • If your family prefers milder flavors, reduce spices and stick with just olive oil, salt, and pepper.

FAQ

  1. Can I make this meal ahead of time? Yes, you can roast the sweet potatoes and cook the chicken in advance. Just reheat when ready to serve.
  2. Can I use other vegetables in this bowl? Absolutely. Broccoli, bell peppers, or kale would work wonderfully.
  3. What can I substitute for rice? Quinoa, cauliflower rice, or even farro can be delicious alternatives.
  4. Is this dish freezer-friendly? Yes, you can freeze the components separately. Just ensure everything is cool before sealing.
  5. Can I adjust the spice levels? Definitely! Feel free to play around with the spices and make it as mild or spicy as your family likes.

Conclusion

Crafting a healthy meal for the family doesn’t have to be complicated. This Chicken & Sweet Potato Rice Bowl is not only easy to make but also packed with nutrients that everyone will love. I hope this dish fills your kitchen with warmth and brings your family to the table for memorable meals together. Enjoy the laughter, the love, and, most importantly, the delicious food!

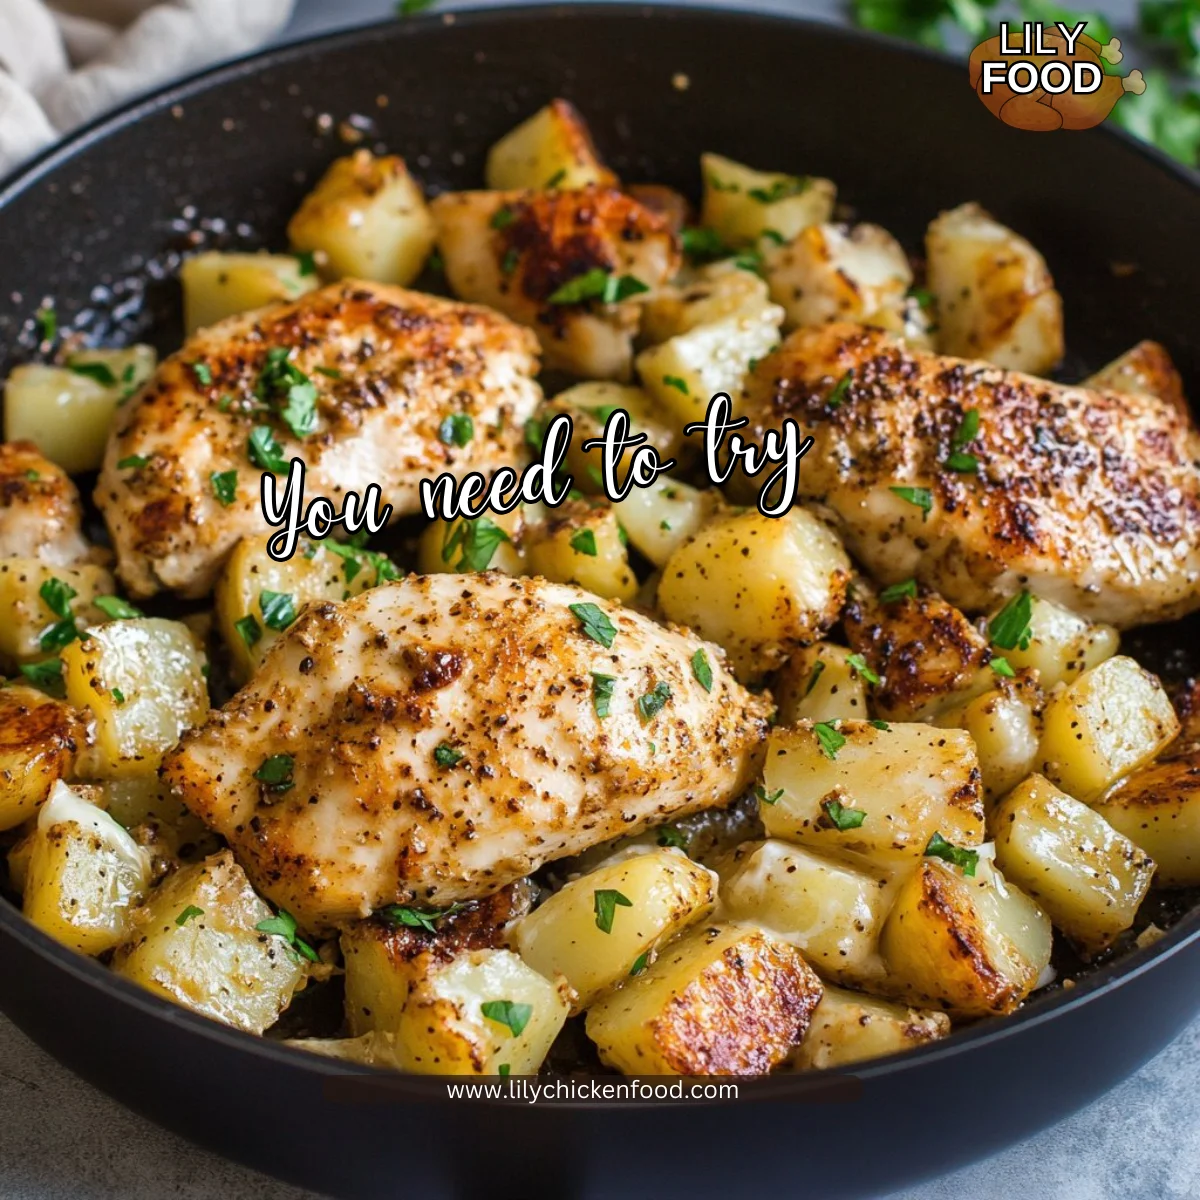
8. Chicken and Sweet Potato Skillet

Chicken and Sweet Potato Skillet

Chicken and Sweet Potato Skillet

There’s something undeniably comforting about the smell of dinner cooking in the kitchen. As you chop vegetables, the gentle sizzle of the skillet starts to fill the air. The inviting aroma of seasoned chicken and sweet potatoes brings everyone together, creating a warmth that wraps around you like a cozy blanket. It’s the kind of meal that not only nourishes the body but also feeds the soul.

Why This Works

Chicken and Sweet Potato Skillet

This Chicken and Sweet Potato Skillet is a perfect weeknight dinner that checks all the boxes. It’s quick, simple, and made with wholesome ingredients. This dish is great for busy families or anyone who wants to spend less time in the kitchen without sacrificing flavor or nutrition.

The best part is how easily everything comes together in one skillet. This minimizes the mess and clean-up. You can savor your time with family while this delightful meal cooks. Just think of it as a time-saver that lets you enjoy the hustle of life while still serving a dish everyone will love.

Process Overview

“This is where the magic happens—when the aroma fills the kitchen.”

When you cook this meal, you won’t just be following a recipe; you’ll be creating an experience. The combination of sweet and savory flavors brings comfort to the dinner table. Plus, it’s a great opportunity to introduce kids to cooking. They can help when it comes to stirring, washing vegetables, or even garnishing.

You’ll find that this chicken and sweet potato skillet recipe is straightforward, allowing you to focus on what matters: quality time with your loved ones while sharing delicious food.

Ingredients

To make this comforting dish, you’ll need the following ingredients:

  • 1 lb chicken breast, diced: Opt for organic or free-range, if available. This adds extra flavor to your meal.
  • 2 medium sweet potatoes, peeled and cubed: Select firm sweet potatoes without blemishes for the best texture.
  • 1 onion, diced: A yellow onion works best, adding a slightly sweet flavor when cooked.
  • 2 cloves garlic, minced: Fresh garlic elevates the taste; avoid pre-minced for the best flavor.
  • 1 teaspoon paprika: This spice gives a warm color and a hint of smoky flavor.
  • 1 teaspoon dried thyme: Fresh thyme can be used; it offers an aromatic touch.
  • Salt and pepper to taste: Remember, seasoning is key; always start sparingly and adjust to your preference.
  • 2 tablespoons olive oil: Extra virgin olive oil is a healthy fat that enhances the dish.
  • Fresh herbs for garnish (optional): Fresh parsley or cilantro add color and freshness.

Directions

  1. Heat olive oil in a large skillet over medium heat.
  2. Start by warming the oil; you’ll hear it gently sizzling. This is the sound of flavor building.
  3. Add onions and garlic; sauté until softened.
  4. The onions should become translucent and aromatic. Enjoy that enticing smell.
  5. Add the diced chicken and cook until browned.
  6. Cook the chicken for about 5-7 minutes. You’re looking for a beautiful golden color, which means it’s full of flavor.
  7. Stir in the sweet potatoes, paprika, thyme, salt, and pepper.
  8. Mix everything well, allowing the sweet potatoes to soak up all the spices. This step is key for a taste explosion!
  9. Cover and cook for about 20 minutes, stirring occasionally, until the sweet potatoes are tender, and the chicken is cooked through.
  10. While it simmers, use this time to set the table or serve a light salad. Delegating is part of the fun.
  11. Garnish with fresh herbs if desired and serve hot.
  12. Serving it hot showcases all the beautiful colors. A final sprinkle of fresh herbs adds a pop of freshness.

Serving

Chicken and Sweet Potato Skillet

When it comes to serving this chicken and sweet potato skillet, I recommend presenting it family-style. Serve directly from the skillet for a warm, inviting display. Place some simple plates and utensils nearby, and watch your family gather around the table.

Feel free to accompany this dish with a fresh green salad or some crusty bread for a complete meal. It’s all about sharing and making memories. Everyone can help themselves while discussing their day, creating a lovely atmosphere.

Storage

Got leftovers? No problem! Store any leftovers in an airtight container in the fridge for up to three days. To reheat, simply place it in a skillet over low heat, stirring occasionally until warmed through. You can also pop it in the microwave for about 1-2 minutes.

Make sure it’s piping hot before serving again. If you think you’ll have leftovers, try to undercook the sweet potatoes slightly when you first serve it. This will help them hold their texture when reheating.

Kitchen Notes

  • Pre-cooked chicken: If you’re short on time, use rotisserie chicken to speed up preparation.
  • Frozen sweet potatoes: You can use pre-cubed sweet potatoes; just adjust cooking time.
  • Batch cooking: Double the recipe and enjoy the leftovers for lunch or dinner later in the week.
  • Prep ahead: Chop your veggies in advance and store them in the fridge for a quick weeknight meal.
  • Turn up the heat: For a little kick, add some cayenne pepper or crushed red pepper flakes to the chicken mixture.

Variations

This recipe is quite flexible and can accommodate various tastes and dietary needs. Here are a few ideas:

  • For picky eaters, swap the sweet potatoes with regular potatoes or add some frozen peas at the end for greenery.
  • If you’re looking for a vegetarian option, replace the chicken with chickpeas or lentils. Sauté them directly with the spices.
  • For those on a paleo or Whole30 diet, omit the sweet potatoes, and add more vegetables like bell peppers and zucchini.
  • If you prefer a little creaminess, stir in a splash of coconut milk at the end, which pairs very well with the spices.

FAQ

Q: Can I use chicken thighs instead of chicken breasts?

A: Absolutely! Chicken thighs will give you a juicier result and can be more flavorful. Just ensure they are cooked thoroughly.

Q: How can I make this dish spicier?

A: Add some diced jalapeños or sprinkle red pepper flakes during cooking to give it some heat.

Q: Is it necessary to peel the sweet potatoes?

A: No, it’s not necessary. The skin contains nutrients, but make sure to scrub them well if you decide to leave the skin on.

Q: Can I prepare this ahead of time?

A: Yes, you can prep the chicken and sweet potatoes and store them in the fridge until you’re ready to cook.

Q: Can I freeze this dish?

A: Yes, it freezes well. Store in an airtight container, and it should be good for about 3 months.

In conclusion, this Chicken and Sweet Potato Skillet is more than just a meal; it’s a way to bring the family together. Sharing simple yet delicious food can create lasting memories. Encourage everyone to gather around the table, share stories, and enjoy this comforting dish together. Happy cooking!

Chipotle Lime Chicken Salad

The kitchen buzzes with activity. You hear the sizzle of chicken in the pan, and the scent of lime and spices dances in the air. It’s the sound of a family meal being prepared with love. This Chipotle Lime Chicken Salad is more than just a dish; it’s a joyful experience that brings everyone together at the table. With vibrant colors and a spicy kick, it connects flavors and family in a simple, wholesome way.

Why This Works

Chipotle Lime Chicken Salad

This Chipotle Lime Chicken Salad is a winner for many reasons. First, it’s quick to prepare, making it perfect for busy family nights. You can whip up this salad in under 30 minutes, giving you more time to enjoy dinner with loved ones.

The combination of shredded chicken, black beans, and fresh veggies means you’re packing all the nutrients into one dish. It’s deliciously filling while also being light and refreshing. Plus, feel free to get the kids involved! It’s a great way to introduce them to cooking and have fun in the kitchen.

Process Overview

“This is where the magic happens—when the aroma fills the kitchen.”

As you gather the ingredients and start mixing, you’ll find that this salad is not only simple but also satisfying. Let’s break it down into easy steps to make the process even smoother.

Ingredients

Here’s what you will need for this amazing salad:

  • 2 cups cooked chicken, shredded: Use rotisserie chicken for a time saver. It adds a flavorful touch.
  • 1 can black beans, drained and rinsed: A great source of protein and fiber. Rinse well to reduce sodium.
  • 1 cup corn, cooked: Frozen corn works just fine. Just cook it until warm.
  • 1 red bell pepper, diced: Adds color and a crunchy texture. Don’t skip this; it brightens up the dish.
  • 1/2 cup red onion, diced: A mild onion adds depth. You can soak diced onion in cold water for a milder flavor.
  • 1 avocado, diced: For creaminess. Choose a ripe avocado for the best texture and flavor.
  • 1/4 cup fresh cilantro, chopped: Adds freshness. If cilantro is not your thing, try parsley instead.
  • Juice of 2 limes: This gives it that zesty kick. Freshly squeezed is best for flavor.
  • 2 tablespoons chipotle sauce: Adds a smoky heat. Adjust to your spice preference.
  • Salt and pepper to taste: Essential seasonings. Always taste as you go.

Directions

  1. In a large mixing bowl, combine the shredded chicken, black beans, corn, red bell pepper, red onion, and avocado. This colorful mix is sure to delight everyone.

  2. In a small bowl, whisk together the lime juice, chipotle sauce, salt, and pepper. Feel free to adjust the chipotle sauce based on your spice tolerance.

  3. Pour the dressing over the salad and gently toss to combine. Be gentle with the avocado to keep it intact.

  4. Stir in the chopped cilantro. This is where the salad starts to really come alive with flavor.

  5. Serve immediately or refrigerate for later. It tastes fresh but can also be enjoyed the next day!

Serving

Chipotle Lime Chicken Salad

Serving this salad family-style is a great way to create a warm atmosphere around the table. Use a big beautiful bowl to showcase the vibrant colors. You can even offer additional lime wedges on the side for those who love an extra zing. Consider pairing it with some warm tortillas or corn chips for a delightful crunch.

Storage

To keep the salad fresh, store it in an airtight container in the refrigerator. It will be good for about 2-3 days. Keep in mind that avocado tends to brown, so if you plan to store leftovers, consider adding the avocado just before serving. For reheating, if you want to warm the chicken salad, do it gently in the microwave or enjoy it cold.

Kitchen Notes

  • Use leftover grilled chicken for added depth of flavor.
  • For quicker prep, use pre-cooked frozen corn.
  • Substitute lime juice with lemon juice if needed.
  • Dice veggies ahead of time for a quicker assembly.
  • Blend the dressing in advance and store it in the fridge.

Variations

Not everyone has the same taste preferences. Here are some variations that can tailor the salad to everyone’s liking:

  • For Picky Eaters: Leave out the onions or cilantro. You can also add some shredded cheese for extra flavor.
  • For Vegans: Swap chicken with chickpeas or tempeh for a plant-based protein.
  • For Gluten-Free: This salad is naturally gluten-free. Just double-check that your chipotle sauce is gluten-free.
  • For Extra Crunch: Add some nuts or seeds like sunflower seeds or sliced almonds.

FAQ

1. Can I use raw chicken?
Yes, you can grill or sauté raw chicken. Just ensure it reaches an internal temperature of 165°F.

2. How long will the salad stay fresh?
It is best enjoyed within 2-3 days if stored properly in the fridge.

3. Can I make this salad ahead of time?
Yes, just wait to add avocado until you are ready to serve to prevent browning.

4. What can I serve with this salad?
Tortilla chips, warm tortillas, or a side of rice complement the salad well.

5. How can I make it spicier?
Add more chipotle sauce or diced jalapeños for an extra kick.

In conclusion, the Chipotle Lime Chicken Salad is not just a meal; it’s a celebration of flavors and family time in the kitchen. It’s easy to make, tastes fantastic, and invites everyone to gather around the table. So, grab those ingredients, get cooking, and enjoy this delicious salad with your loved ones. Whether you whip it up on a busy weeknight or serve it at a gathering, it’s sure to be a hit. Happy cooking!

Chipotle Lime Chicken Salad

Prep Time 15 minutes
Cook Time 15 minutes
Total Time 30 minutes
Servings 4 servings
Calories 400
A vibrant and refreshing salad featuring shredded chicken, black beans, fresh veggies, and a zesty chipotle-lime dressing, perfect for family dinners.

Ingredients

Main Ingredients

  • 2 cups cooked chicken, shredded (Use rotisserie chicken for a time saver.)
  • 1 can black beans, drained and rinsed (A great source of protein and fiber.)
  • 1 cup corn, cooked (Frozen corn works just fine.)
  • 1 piece red bell pepper, diced (Adds color and a crunchy texture.)
  • 1/2 cup red onion, diced (Soak in cold water for a milder flavor.)
  • 1 piece avocado, diced (Choose a ripe avocado for the best texture.)
  • 1/4 cup fresh cilantro, chopped (If cilantro is not preferred, try parsley.)
  • 2 tablespoons chipotle sauce (Adjust based on your spice preference.)
  • 2 pieces limes, juiced (Freshly squeezed is best for flavor.)
  • to taste salt and pepper (Essential seasonings.)

Instructions 

Preparation

  • In a large mixing bowl, combine the shredded chicken, black beans, corn, red bell pepper, red onion, and avocado.
  • In a small bowl, whisk together the lime juice, chipotle sauce, salt, and pepper.
  • Pour the dressing over the salad and gently toss to combine, being careful with the avocado.
  • Stir in the chopped cilantro.
  • Serve immediately or refrigerate for later.

Notes

To keep the salad fresh, store it in an airtight container for up to 2-3 days. Add avocado just before serving to prevent browning.
Calories: 400kcal
Course: Main Course, Salad
Cuisine: American, Mexican
Keyword: Chicken Salad, Chipotle, Healthy Recipe, Lime, Quick Meal

Crockpot White Chicken Chili with Cream Cheese

The kitchen smells like garlic and warm spices. The slow hum of the crockpot is a gentle promise of dinner. Little feet patter in the hallway and someone laughs at a small kitchen mishap.

I love the way a simple recipe turns a busy day into something cozy. If you enjoy easy weeknight dinners, you might also like my easy crockpot chicken thighs with creamy gravy, which is another family favorite.

Why this works

Crockpot White Chicken Chili with Cream Cheese

This recipe saves time and creates big, comforting flavors with almost no fuss. The crockpot does the heavy lifting, so you can work, play with the kids, or relax while dinner cooks slowly all afternoon.

I have been cooking and testing crockpot recipes for more than a decade. I share this one because it consistently wins over picky eaters and busy parents alike. The cream cheese makes the chili rich and smooth, while the ranch packet adds a familiar, savory note that kids love.

For a different spice profile when you want something brighter, try my chicken shawarma with garlic sauce. It is a great contrast and shows how versatile simple chicken recipes can be.

Process Overview

“This is where the magic happens—when the aroma fills the kitchen.”

The process is wonderfully simple. You combine ingredients in the crockpot, let them mingle for hours, then finish with cream cheese for a silky texture. The long, slow simmer lets flavors develop without much attention.

You can set it in the morning and come home to a warm, hearty meal. This is the kind of dinner that brings everyone to the table.

Ingredients

  • 1 lb shredded boneless skinless chicken breasts
    Tip: Use cooked rotisserie chicken for a faster start, or poach breasts in salted water and shred with two forks.

  • 1 can corn (drained)
    Tip: Frozen corn works well too. Thaw and drain before adding for the same texture.

  • 1 can black beans (drained and rinsed)
    Tip: Rinse to reduce sodium and any canning liquid flavor. If your family dislikes beans, reduce to half a can.

  • 1 can diced tomatoes with green chilies
    Tip: Use mild if kids are sensitive to heat, or fire-roasted for a deeper smoky taste.

  • 8 oz cream cheese
    Tip: Soften at room temperature for easy melting. Low-fat cream cheese thins differently, so expect a slightly lighter texture.

  • 1 cup chicken broth
    Tip: Use low-sodium broth so you can control the salt at the end.

  • 1 packet ranch seasoning
    Tip: If you prefer a cleaner ingredient list, use a homemade ranch blend of dried parsley, dill, garlic powder, onion powder, and salt.

  • 1 tsp chili powder
    Tip: Adjust to taste. For a smokier flavor, try smoked paprika in addition to the chili powder.

  • Salt and pepper to taste
    Tip: Start with a small pinch and adjust after the cream cheese melts. Cream cheese can mute saltiness.

My goal with these tips is to help you adapt the recipe to your pantry and your family. If you want a heartier, pasta-based dinner, consider the flavors in my cowboy butter lemon bowtie chicken with broccoli for inspiration.

Directions

  1. In a crockpot, combine the shredded chicken, corn, black beans, diced tomatoes, ranch seasoning, chili powder, salt, and pepper.
    Encouraging note: Mix gently but thoroughly. This is the moment to smell the spices and smile. If you used rotisserie chicken, this step is even faster.

  2. Pour in the chicken broth and stir until well combined.
    Encouraging note: The broth helps everything cook evenly. If your crockpot seems crowded, reduce broth slightly; you can always thin it later with more broth.

  3. Cook on low for 6-8 hours or on high for 3-4 hours.
    Encouraging note: Low and slow gives deeper flavor, but high works when time is short. The house will start to smell amazing, and family members will begin to drift toward the kitchen.

  4. About 30 minutes before serving, add the cream cheese to the crockpot and stir until melted and well blended.
    Encouraging note: Cut the cream cheese into cubes before adding to help it melt faster. If you want a chunkier texture for picky kids, fold some cream cheese in at the table.

  5. Serve warm and enjoy!
    Encouraging note: Top with your favorite garnishes like shredded cheese, cilantro, a squeeze of lime, or tortilla chips. This is the best part—watching everyone dig in.

If you like adding mushrooms for an earthier flavor, you can borrow techniques from my creamy garlic mushroom chicken thighs to sauté mushrooms separately and stir them in at the end.

Serving

Crockpot White Chicken Chili with Cream Cheese

Serve this chili family-style in a large bowl and let everyone help themselves. Place bowls of shredded cheese, chopped cilantro, lime wedges, and tortilla chips on the table.

This dish pairs well with warm cornbread or a simple green salad for freshness. Set out spoons and napkins, and let the family customize their bowls.

For younger children, keep a small bowl of plain shredded chicken and some mild toppings available. That way, everyone eats happily without extra stress.

Storage

Cool leftovers quickly by letting them come to room temperature for no more than two hours. Transfer to an airtight container and refrigerate.

Refrigerator: Keep for 3 to 4 days. Reheat individual portions in the microwave on medium power, stirring halfway through.

Freezer: This chili freezes well. Portion into freezer-safe containers, leaving headspace for expansion. Freeze for up to 3 months. Thaw overnight in the refrigerator before reheating.

Reheating tip: If the chili thickens after refrigeration, stir in a splash of chicken broth while reheating to restore the creamy texture.

Kitchen Notes

  • Shortcut: Use pre-shredded rotisserie chicken right from the store to save an hour.
  • Time saver: Add the cream cheese at the last 30 minutes so it melts smooth without overcooking.
  • Kid friendly: Serve with tortilla chips or rice so picky eaters can hide extra veggies.
  • Flavor booster: A squeeze of fresh lime before serving brightens the entire dish.
  • Make it dairy-free: Replace cream cheese with a dairy-free cream alternative and add a tablespoon of cornstarch mixed with water to thicken.

For another quick dinner idea that uses simple pantry ingredients, try my creamy garlic parmesan chicken breast as a weeknight alternative.

Variations

  • Lower carb: Skip the corn and serve the chili over cauliflower rice or spoon it into halved roasted peppers.
  • Vegetarian swap: Use a firm plant-based chicken substitute or extra white beans and vegetable broth instead of chicken. Add extra spices for depth.
  • Spicier version: Add a diced jalapeño with the other ingredients or a pinch of cayenne. Taste as you go.
  • Lighter option: Use reduced-fat cream cheese and lower-sodium broth. The texture will be slightly lighter but still satisfying.
  • Slow cooker to stove: Make this on the stove by simmering the ingredients for 20 to 30 minutes until flavors meld, then stir in cream cheese off the heat.

These tweaks make it easy to feed everyone at the table, even with different tastes and dietary needs.

FAQ

Q: Can I use chicken thighs instead of breasts?
A: Yes, shredded boneless skinless chicken thighs work great. They are more forgiving and stay moist. Adjust cooking time slightly if you start with raw thighs.

Q: Is it safe to leave the crockpot on while I am at work?
A: Yes, for the typical 6 to 8 hour low setting this recipe is safe. Make sure your crockpot is in good condition and placed on a heat-safe surface away from edges.

Q: Can I make this in an Instant Pot?
A: You can. Use the poultry setting or manual high pressure for about 10 minutes, then quick-release, shred the chicken, stir in cream cheese, and use the sauté setting to finish.

Q: How do I thicken the chili if it seems thin?
A: Simmer uncovered for 10 to 15 minutes to reduce liquid. Or mix 1 tablespoon cornstarch with 2 tablespoons cold water and stir in, cooking until thickened.

Q: Can I prepare this the night before?
A: Yes, assemble everything in the crockpot insert, cover, and refrigerate overnight. In the morning, place the insert in the crockpot and cook as directed. Add cream cheese in the last 30 minutes.

Conclusion

I hope this crockpot white chicken chili with cream cheese becomes one of your go-to family meals. It is simple, comforting, and forgiving, perfect for busy nights and hungry kids.

For a slightly different creamy white chili inspiration, see this Crockpot White Chicken Chili (Contest Winning!) – The Chunky Chef which influenced some ideas for texture and timing.
If you want another make-ahead cream cheese crockpot option, this Crockpot Cream Cheese Chicken Chili – Family Review Guide offers useful tips for freezing and serving.

Thanks for cooking with me. Invite your family, share a bowl, and enjoy the warm sounds and smells of home.

Crockpot White Chicken Chili

Prep Time 15 minutes
Cook Time 8 hours
Total Time 8 hours 15 minutes
Servings 6 servings
Calories 320
This easy crockpot white chicken chili is a comforting meal that combines shredded chicken, beans, corn, and cream cheese for a rich, flavorful dish that cooks itself.

Ingredients

Chicken and Base Ingredients

  • 1 lb shredded boneless skinless chicken breasts (Use cooked rotisserie chicken for a faster start.)
  • 1 can corn (Frozen corn works well too.)
  • 1 can black beans (Rinse to reduce sodium.)
  • 1 can diced tomatoes with green chilies (Use mild if kids are sensitive to heat.)
  • 1 cup chicken broth (Use low-sodium broth.)
  • 1 packet ranch seasoning (Use a homemade ranch blend for cleaner ingredients.)
  • 1 tsp chili powder (Adjust to taste.)
  • Salt to taste Salt and pepper (Start with a small pinch.)

Creamy Finish

  • 8 oz cream cheese (Soften at room temperature for easy melting.)

Instructions 

Preparation

  • In a crockpot, combine the shredded chicken, corn, black beans, diced tomatoes, ranch seasoning, chili powder, salt, and pepper.
  • Pour in the chicken broth and stir until well combined.

Cooking

  • Cook on low for 6-8 hours or on high for 3-4 hours.
  • About 30 minutes before serving, add the cream cheese to the crockpot and stir until melted and well blended.

Serving

  • Serve warm and enjoy, topping with shredded cheese, cilantro, lime, or tortilla chips.

Notes

Cool leftovers quickly, refrigerate, and consume within 3-4 days. This chili freezes well. Consider using different toppings for personalization.
Calories: 320kcal
Course: Dinner, Main Course
Cuisine: American, Comfort Food
Keyword: Comfort Food, Crockpot Chili, Easy Dinner, Slow Cooker Recipe, White Chicken Chili

{image_template}

I can still smell it now. The warm scent of roasted potatoes mixes with toasted spices and sizzling meat. The kitchen hums with the oven fan and the soft clatter of a skillet. That is the kind of dinner that makes the whole house gather.

This Loaded Potato Taco Bowl is a simple weeknight winner. It fills the house with comforting smells, feeds a crowd, and comes together with minimal fuss. If you loved my bang bang chicken bowl, you will find the same cozy vibe here. It is hearty, customizable, and kid friendly.

Why this works

Loaded Potato Taco Bowl

This recipe combines two family favorites in one bowl: the crispy potato and the classic taco flavor profile. The contrast of textures keeps kids and adults interested. The roasted potatoes give you a satisfying crisp outside and a fluffy inside. The seasoned meat and beans add protein and warmth.

It saves time because everything cooks at once. You roast the potatoes while you brown the meat. Beans and corn come from the pantry or freezer. This makes it perfect for evenings when you want something homey without a long cooking marathon.

I often turn this into a build-your-own station for dinner guests. Let everyone assemble their bowl. It reduces last minute plate juggling and keeps the kitchen calm. If you like a similar layered, family style meal, try my street corn chicken bowl for another kid friendly twist.

Process Overview

“This is where the magic happens—when the aroma fills the kitchen.”

The process is straightforward. Roasted potatoes become the base. While they crisp, you brown the meat and season it. Then you layer beans, corn, tomatoes, and avocado. Finish with cheese and cilantro.

Think of it as simple mise en place. Chop the potatoes and tomatoes early. Drain and rinse the beans. Set out bowls for toppings so assembly moves fast. The goal is warm, comforting bowls with bright fresh touches.

Ingredients
H3 Lily’s personal tips for each

  • 2 large potatoes, diced
    Tip: Use russet for a fluffy interior and crisp exterior. Dice them evenly so they roast at the same rate.

  • 1 lb ground meat, beef, turkey, or chicken
    Tip: I like ground turkey for a lighter bowl. If using beef, drain excess fat for a cleaner flavor.

  • 1 cup black beans, drained and rinsed
    Tip: Rinsing removes extra sodium and the canned bean liquid. Warm them briefly before serving.

  • 1 cup corn
    Tip: Frozen corn works great. Thaw and pat dry so it does not water down the bowl.

  • 1 cup diced tomatoes
    Tip: Use Roma tomatoes for less liquid, or do halved cherry tomatoes for sweetness.

  • 1 avocado, diced
    Tip: Pick a slightly firm avocado and ripen on the counter a day before. Add lime if you want to prevent browning.

  • 1 cup shredded cheese
    Tip: Cheddar melts well. A mix of Monterey Jack and cheddar offers great melt and mild flavor.

  • 1 teaspoon chili powder
    Tip: Adjust to taste. For kids, reduce this by half and add more for adults.

  • 1 teaspoon cumin
    Tip: Toast the cumin briefly in a dry pan for a deeper aroma if you have a moment.

  • Salt and pepper to taste
    Tip: Season in layers. Lightly salt the potatoes and add a little to the meat so everything tastes balanced.

  • Olive oil
    Tip: Use a high quality extra virgin for flavor at the end or a neutral oil for roasting.

  • Fresh cilantro for garnish
    Tip: Chop cilantro last and sprinkle on right before serving for the freshest taste.

Directions

  1. Preheat the oven to 425°F (220°C).
    Encouraging note: Preheating gives you an immediate rush of aroma when the potatoes hit the hot oven. It sets the foundation for crispiness.

  2. Toss diced potatoes in a bowl with olive oil, salt, pepper, and half of the chili powder and cumin.
    Encouraging note: Be generous with the oil so the potatoes get golden. Seasoning early builds flavor deep into each bite.

  3. Spread the seasoned potatoes on a baking sheet and roast for 25-30 minutes or until crispy.
    Encouraging note: Flip them once halfway through for even browning. The kids will love the crunch and you will love how little attention they need.

  4. While the potatoes are baking, heat a skillet over medium heat and brown the ground meat.
    Encouraging note: Break the meat into small pieces as it cooks so it warms evenly and mixes nicely with the spices.

  5. Add the remaining chili powder, cumin, salt, and pepper to the meat, stirring to combine.
    Encouraging note: Taste and adjust seasonings. This is your chance to make the bowl mild or bold based on family preferences.

  6. Once the potatoes are done, assemble the taco bowl by layering roasted potatoes, black beans, corn, seasoned meat, diced tomatoes, and avocado.
    Encouraging note: Layering keeps hot and cold components distinct. Let each family member choose their own order for fun.

  7. Top with shredded cheese and fresh cilantro.
    Encouraging note: The cheese will melt on the warm meat and potatoes. Cilantro adds a bright finish that lifts the whole bowl.

  8. Serve and enjoy!
    Encouraging note: Sit down together and let everyone dig in. Family meals are about connection as much as flavor.

Serving

Loaded Potato Taco Bowl

H3 Family-style tips

Serve this bowl family-style on the table. Put roasted potatoes on one platter, meat in a skillet, and bowls of beans, corn, tomatoes, avocado, and cheese in the center. Let each person build their bowl.

For younger kids, make a small stack plate with potatoes, some meat, and a little cheese. Present the toppings on the side so picky eaters can choose. This keeps dinner relaxed and reduces waste.

If you have guests, offer tortilla chips on the side. They make a great scoop and add extra crunch. A squeeze of lime over each bowl brightens every bite.

Storage

Refrigerator tips
Store leftovers in an airtight container up to 3 days. Keep the avocado separate if possible. If not, add it fresh the next day and expect a little browning.

Freezing tips
You can freeze the cooked meat and roasted potatoes separately up to 2 months. Thaw overnight in the refrigerator before reheating.

Reheat with care
Reheat potatoes in a 400°F oven for 8 to 10 minutes to bring back crispiness. Heat meat in a skillet over medium heat until warmed through. Combine and top with fresh avocado and cilantro before serving.

Kitchen Notes

  • Shortcut 1: Use pre-diced frozen potatoes for a big time saver on busy nights.
  • Shortcut 2: Swap canned seasoned chilies for extra flavor with less work.
  • Shortcut 3: Brown the meat in advance and freeze in portions for quick assembly later.
  • Shortcut 4: Use a sheet pan for the meat and potatoes if you prefer to roast everything together. Adjust seasoning and watch for juices.
  • Shortcut 5: Keep bowls of toppings chilled on ice if you serve this at a party.

Variations
H3 For picky eaters and different diets

  • Vegetarian: Omit the meat and add extra black beans, roasted sweet potatoes, or crumbled tofu for protein.
  • Gluten-free: This recipe is naturally gluten-free. Watch labels on spice blends to be safe.
  • Low carb: Replace potatoes with roasted cauliflower florets for a lower carb bowl.
  • Kid friendly: Reduce chili powder and cumin, and offer cheese and avocado as optional add-ons.
  • Spicy adult version: Add a diced jalapeño to the meat or top with a hot sauce when serving.

FAQ
H3 Common questions answered

Q1: Can I make this ahead of time?
A1: Yes. Roast the potatoes and cook the meat a day ahead. Store separately and warm before serving. Add avocado fresh.

Q2: Which potato is best for roasting?
A2: Russet potatoes roast up crispy and fluffy. Yukon Gold will be creamier and still tasty. Cut them evenly for consistent cooking.

Q3: How can I make this dairy free?
A3: Omit the shredded cheese or use a dairy free alternative. Add a dollop of dairy free yogurt or a squeeze of lime to maintain creaminess.

Q4: Is this meal kid friendly?
A4: Absolutely. Keep the spices light and offer toppings on the side. Many kids enjoy building their own bowls.

Q5: Can I use ground turkey instead of beef?
A5: Yes. Ground turkey makes a lighter version and works beautifully with the spices. Brown it the same way as beef.

Conclusion

Thank you for letting me share this cozy, weeknight favorite. I love how simple ingredients come together to make something special for the whole family. If you want a version with a different texture and presentation, I often look to the Loaded Potato Taco Bowl Recipe at Simple Home Edit for inspiration. For a crispier take on potato taco bowls, the tips and photos at Crispy Potato Taco Bowls from How Sweet Eats are also lovely.

If you make this, come back and tell me how your family liked it. I love hearing your twists and seeing your photos. Happy cooking, from my kitchen to yours.

Loaded Potato Taco Bowl

Prep Time 15 minutes
Cook Time 30 minutes
Total Time 45 minutes
Servings 6 servings
Calories 550
A cozy and comforting dinner recipe that combines crispy roasted potatoes with seasoned meat, beans, corn, and fresh toppings, perfect for a filling family meal.

Ingredients

Main Ingredients

  • 2 large potatoes, diced (Use russet for a fluffy interior and crisp exterior. Dice them evenly so they roast at the same rate.)
  • 1 lb ground meat (beef, turkey, or chicken) (I like ground turkey for a lighter bowl. If using beef, drain excess fat for a cleaner flavor.)
  • 1 cup black beans, drained and rinsed (Rinsing removes extra sodium and the canned bean liquid. Warm them briefly before serving.)
  • 1 cup corn (Frozen corn works great. Thaw and pat dry so it does not water down the bowl.)
  • 1 cup diced tomatoes (Use Roma tomatoes for less liquid, or do halved cherry tomatoes for sweetness.)
  • 1 each avocado, diced (Pick a slightly firm avocado and ripen on the counter a day before. Add lime if you want to prevent browning.)
  • 1 cup shredded cheese (Cheddar melts well. A mix of Monterey Jack and cheddar offers great melt and mild flavor.)
  • 1 teaspoon chili powder (Adjust to taste. For kids, reduce this by half and add more for adults.)
  • 1 teaspoon cumin (Toast the cumin briefly in a dry pan for a deeper aroma if you have a moment.)
  • to taste salt and pepper (Season in layers. Lightly salt the potatoes and add a little to the meat so everything tastes balanced.)
  • to taste olive oil (Use a high quality extra virgin for flavor at the end or a neutral oil for roasting.)
  • to taste fresh cilantro for garnish (Chop cilantro last and sprinkle on right before serving for the freshest taste.)

Instructions 

Preparation

  • Preheat the oven to 425°F (220°C).
  • Toss diced potatoes in a bowl with olive oil, salt, pepper, and half of the chili powder and cumin.
  • Spread the seasoned potatoes on a baking sheet and roast for 25-30 minutes or until crispy.
  • While the potatoes are baking, heat a skillet over medium heat and brown the ground meat.
  • Add the remaining chili powder, cumin, salt, and pepper to the meat, stirring to combine.

Assembly

  • Once the potatoes are done, assemble the taco bowl by layering roasted potatoes, black beans, corn, seasoned meat, diced tomatoes, and avocado.
  • Top with shredded cheese and fresh cilantro.

Serving

  • Serve and enjoy! Sit down together and let everyone dig in.

Notes

Serve this bowl family-style. Offer toppings on the side to accommodate picky eaters and guests. Add tortilla chips for extra crunch.
Calories: 550kcal
Course: Dinner, Main Course
Cuisine: Mexican, Tex-Mex
Keyword: Comfort Food, easy recipes, Family Meal, Loaded Potato Taco Bowl, Weeknight Dinner

{image_template}

I can still smell it now. The warm, garlicky aroma that fills the kitchen as butter melts and garlic sizzles. You hear the gentle pop of searing beef and the quiet hum of the slow cooker doing its steady work. That comfort smell tells me dinner will be ready and everyone will gather around the table.

I’ve been cooking for my family for over a decade and I test recipes until they hold up on busy weeknights. If you love simple, flavor-forward meals, you might also enjoy my take on chicken shawarma with garlic sauce which shares that same garlicky warmth your family will love.

Why this works

Garlic Butter Beef Bites with Potatoes

This garlic butter beef bites with potatoes recipe is all about flavor, ease, and family time. Searing the beef locks in juices and creates a tasty crust, while the slow cooker finishes the meat until it is fall-apart tender. The halved baby potatoes soak up the garlic butter and beef broth for comfort in every bite.

Because most of the active work is searing and mixing a simple sauce, you spend less time over the stove and more time with your family. It’s a great weeknight meal when you want something homemade without a lot of fuss, and it doubles well for leftovers the next day. If you love one-pan comfort dinners, check out my recipe for cowboy butter lemon bowtie chicken with broccoli for another family favorite.

Process Overview

“This is where the magic happens—when the aroma fills the kitchen.”

Here’s the simple process in three parts. Sear the beef quickly to develop color and flavor. Combine a garlic butter sauce so every bite gets that rich, savory coating. Let the slow cooker do the rest, turning those seared bites and halved potatoes into a tender, cozy meal.

If you prefer a tighter timeline, you can use the oven or a pressure cooker for a faster finish. For more one-pan, hands-off meals that bring big flavor, have a look at my sheet-pan garlic butter chicken and veggies recipe.

Ingredients

  1. 1.5 pounds Beef stew meat (Cut into bite-sized pieces.)

    • Lily’s tip: Choose chuck or blade steak for connective tissue that turns silky when slow cooked. Trim large pieces into even bites so they cook uniformly.
  2. 1 pound Baby potatoes (Halved for even cooking.)

    • Lily’s tip: Use waxy baby potatoes so they hold their shape. Halving them gives a nice surface for the garlic butter to cling to.
  3. 4 tablespoons Unsalted butter (Melted for the garlic butter sauce.)

    • Lily’s tip: Unsalted lets you control salt level. If you want a deeper flavor, brown the butter lightly before adding garlic.
  4. 3 cloves Garlic (Minced for flavor.)

    • Lily’s tip: Fresh garlic beats jarred every time. Mince fine so it marries into the butter and doesn’t leave big raw pieces.
  5. 1 teaspoon Onion powder (Adds depth to the flavor.)

    • Lily’s tip: Onion powder gives a baked-on savory note without extra chopping. Toast it slightly in the butter for more complexity.
  6. 1 teaspoon Smoked paprika (For a smoky flavor.)

    • Lily’s tip: Smoked paprika adds a mild, smoky warmth. Use sweet paprika if you prefer less smoke.
  7. 0.5 teaspoon Dried thyme (Enhances the aroma.)

    • Lily’s tip: Crumble dried thyme between your fingers before adding to release oils and aroma.
  8. 0.5 teaspoon Dried rosemary (Adds a fragrant touch.)

    • Lily’s tip: Rub the rosemary in your palms to break it up; it can be woody, so smaller pieces distribute better.
  9. 0.5 teaspoon Salt (Or to taste.)

    • Lily’s tip: Start with half the salt if using salted beef or broth. You can always add a pinch before serving.
  10. 0.25 teaspoon Black pepper (For seasoning.)

  • Lily’s tip: Freshly ground black pepper tastes brighter. Adjust to your family’s preference.
  1. 0.25 cup Beef broth (To keep the dish moist.)
  • Lily’s tip: Use low-sodium broth to control salt. If you have homemade broth, even better.
  1. 1 tablespoon Olive oil (For searing the beef.)
  • Lily’s tip: Use a high-heat oil like a light olive oil or grapeseed to get a quick, even sear without smoking.

If you enjoy recipes that center garlic flavor, my roundup of best garlic chicken recipes has more ideas for weeknight dinners and crowd-pleasing meals.

Directions

  1. Gather all ingredients and cut the beef into bite-sized pieces and halve the baby potatoes.

    • Encouraging note: Take a deep breath and line everything up; mise en place makes the cooking calm and efficient.
  2. Optional: Parboil the baby potatoes for a few minutes to soften them slightly.

    • Encouraging note: This step helps the potatoes cook evenly and shortens slow cooker time. You can skip it if you are short on time.
  3. Heat olive oil in a skillet over medium-high heat and sear the beef bites until browned on all sides.

    • Encouraging note: Browning builds flavor. Work in batches so the meat gets a good sear instead of steaming.
  4. In a small bowl, combine melted butter, minced garlic, onion powder, smoked paprika, thyme, rosemary, salt, and black pepper to create the garlic butter sauce.

    • Encouraging note: Taste as you go. If your family loves garlic, add another half clove. The sauce is the heart of the dish.
  5. In the slow cooker, place the halved baby potatoes and seared beef. Pour the garlic butter sauce over the top and add beef broth.

    • Encouraging note: Nestle everything in gently so flavors mingle. Pour the butter across the beef and potatoes to evenly coat.
  6. Cover the slow cooker and cook on low for 6-8 hours or on high for 3-4 hours until the beef is fork-tender.

    • Encouraging note: Low and slow gives tenderness and depth. If you’re short on time, try high; just check tenderness a little early.
  7. Let the dish rest for about 10 minutes before serving.

    • Encouraging note: Resting lets juices redistribute and flavors settle. Use this time to set the table or slice a simple green salad.

If you want a handheld twist later, my cheesy garlic chicken wraps are a fun way to repurpose leftovers and make a quick lunch for the kids. Try them when you have extra beef bites at cheesy garlic chicken wraps.

Serving

Garlic Butter Beef Bites with Potatoes

Serve family-style in a large shallow bowl or on a platter so everyone can dig in. Spoon extra garlic butter from the slow cooker over the top and garnish with chopped parsley for color. This meal pairs nicely with a simple green salad, steamed green beans, or crusty bread to sop up the sauce.

If you are feeding little ones, set out a small dish of plain potatoes first. Let them choose their favorite bites and show them how the potatoes soak up all that buttery garlic. Keep extra salt and pepper on the side so adults can adjust seasoning to taste.

Storage

Refrigerator: Cool leftovers within two hours and store in an airtight container for up to 3 days. The potatoes will soak up more sauce, which keeps them moist but changes texture slightly.

Freezer: For longer storage, freeze in a freezer-safe container for up to 3 months. Thaw overnight in the refrigerator before reheating.

Reheating: Reheat gently on the stove over low heat with a splash of beef broth to loosen the sauce. In the microwave, cover loosely and heat in 1-minute intervals, stirring in between, until warmed through. The gentle heat keeps the beef tender and prevents the butter from separating.

Tip: If the sauce separates after freezing, whisk in a tablespoon of warm water or broth while reheating to bring it back together.

Kitchen Notes

  • Use a heavy skillet for searing so the pan holds heat and creates a better crust.
  • Parboil potatoes for 5 minutes if you prefer very tender potatoes in less time.
  • Brown the butter for a nutty flavor but watch carefully so it does not burn.
  • If your slow cooker runs hot, check for doneness an hour earlier on high.
  • Double the recipe for company; this dish scales well and leftovers keep nicely.

Variations

  • Kid-friendly: Omit smoked paprika and reduce black pepper. Serve with a mild ketchup or yogurt dip for picky eaters.
  • Low-carb: Swap potatoes for cauliflower florets; add them during the last 1.5 to 2 hours to avoid overcooking.
  • Gluten-free: This recipe is naturally gluten-free as written. Just confirm your beef broth is labeled gluten-free.
  • Instant Pot option: After searing in the Instant Pot on sauté, add sauce and broth, seal, and cook on high pressure for 25 minutes with a natural release for 10 minutes.
  • Herb-forward: Finish with fresh chopped rosemary and thyme for a brighter, fresher finish.

FAQ

Q: Can I use other cuts of beef?
A: Yes. Chuck or blade roast cut into bite-sized pieces works best. Steaks like sirloin will work but may not get as tender in the slow cooker.

Q: Do I have to sear the beef first?
A: Searing adds depth and color. If you are short on time, you can skip it, but the flavor will be less developed. I encourage a quick sear for the best result.

Q: Can I make this on the stovetop only?
A: You can. After searing, simmer covered over low heat for 1.5 to 2 hours, adding broth as needed until the beef is tender. Stir occasionally to prevent sticking.

Q: How can I thicken the sauce?
A: Remove the lid and simmer on high in the slow cooker for 20 to 30 minutes to reduce. Alternatively, whisk 1 teaspoon cornstarch with 1 tablespoon cold water and stir into hot sauce to thicken.

Q: Will this work with frozen beef?
A: For safety and even cooking, thaw the beef first. Searing frozen meat will steam and prevent proper browning.

Conclusion

Thank you for letting me share this cozy, family-friendly recipe. I hope it becomes one of those go-to dinners you turn to on busy nights when you want something warm and comforting. For a version with a similar heartwarming garlic butter approach, I like the take on Garlic Butter Steak Bites and Potatoes from The Country Cook and a slightly different method is offered at Coconuts & Kettlebells’ Garlic Butter Steak Bites and Potatoes. Happy cooking from my kitchen to yours.

Garlic Butter Beef Bites with Potatoes

Prep Time 15 minutes
Cook Time 8 hours
Total Time 8 hours 15 minutes
Servings 6 servings
Calories 400
A comforting weeknight meal featuring tender beef bites and halved baby potatoes, coated in a rich garlic butter sauce.

Ingredients

Main Ingredients

  • 1.5 pounds Beef stew meat, cut into bite-sized pieces (Choose chuck or blade steak for connective tissue that turns silky when slow cooked.)
  • 1 pound Baby potatoes, halved (Use waxy baby potatoes so they hold their shape.)
  • 4 tablespoons Unsalted butter, melted (Unsalted lets you control salt level; consider browning for deeper flavor.)
  • 3 cloves Garlic, minced (Fresh garlic beats jarred every time.)
  • 1 teaspoon Onion powder (Gives a baked-on savory note without extra chopping.)
  • 1 teaspoon Smoked paprika (Adds a mild, smoky warmth.)
  • 0.5 teaspoon Dried thyme (Enhances the aroma; crumble before adding.)
  • 0.5 teaspoon Dried rosemary (Rub in palms to break it up for better distribution.)
  • 0.5 teaspoon Salt (Start with half if using salted beef or broth.)
  • 0.25 teaspoon Black pepper (Freshly ground tastes brighter.)
  • 0.25 cup Beef broth (Use low-sodium broth to control salt.)
  • 1 tablespoon Olive oil (Use a high-heat oil for searing.)

Instructions 

Preparation

  • Gather all ingredients and cut the beef into bite-sized pieces and halve the baby potatoes.
  • Optional: Parboil the baby potatoes for a few minutes to soften them slightly.
  • Heat olive oil in a skillet over medium-high heat and sear the beef bites until browned on all sides.

Cooking

  • In a small bowl, combine melted butter, minced garlic, onion powder, smoked paprika, thyme, rosemary, salt, and black pepper.
  • In the slow cooker, place the halved baby potatoes and seared beef. Pour the garlic butter sauce over the top and add beef broth.
  • Cover the slow cooker and cook on low for 6-8 hours or on high for 3-4 hours until the beef is fork-tender.

Serving

  • Let the dish rest for about 10 minutes before serving.
  • Serve family-style in a large shallow bowl or on a platter, garnished with chopped parsley.

Notes

Refrigerate leftovers for up to 3 days. For longer storage, freeze for up to 3 months. Reheat gently to maintain tenderness.
Calories: 400kcal
Course: Dinner, Main Course
Cuisine: American, Comfort Food
Keyword: Easy Beef Recipe, Family Meal, Garlic Butter Beef Bites, Slow Cooker Dinner, Weeknight Dinner