Tag

classic recipes

Browsing

Classic Chicken Parmesan

There is something magical about the sound of silverware clinking and the laughter of children as they gather around the table. When the aroma of something delicious fills the kitchen, it becomes a warm invitation for everyone. That’s the kind of scene I recall from my childhood. It reminds me of family dinners where my grandmother’s classic chicken Parmesan would often steal the spotlight. The tender chicken, crispy coating, and rich marinara sauce always had everyone coming back for seconds. It is moments like these that reinforce the love and togetherness that come from sharing a heartfelt meal.

Why This Classic Chicken Parmesan Feels Like Home

Classic chicken Parmesan is a dish that resonates with many families. It brings warmth and comfort, while still being straightforward enough for a weeknight dinner. Every bite of this savory creation feels like a hug. The combination of juicy chicken, tangy marinara, and gooey mozzarella creates a melody of flavors that sing harmoniously together.

This meal has a special place in our family for a reason. It is versatile, easy to prepare, and pleasing to even the pickiest eaters. From my experience, making chicken Parmesan becomes a delightful affair when the whole family joins in. Whether it’s breading the chicken or sprinkling on some cheese, everyone can be part of the cooking adventure. This shared experience around food is one that fosters love and connection.

The Simple Magic Behind Classic Chicken Parmesan

What makes classic chicken Parmesan truly shine? It’s about simplicity wrapped in richness. You’ll find that this dish combines easily accessible ingredients that come together quickly. From the crunchy breadcrumb coating to the bubbling cheese melted into a perfect golden layer, it is hard to resist. Each bite tells a story of comfort—when flavors meld together and simply feel right.

With just a few steps, you can bring restaurant-quality chicken Parmesan to your kitchen. Plus, it makes you look like a master chef without the stress. I can assure you, it feels good to create something so satisfying while keeping your time in the kitchen to a minimum.

Why This Recipe Works for Our Busy, Joyful Nights

In our bustling home, busy nights are part of life. However, with a simple recipe like chicken Parmesan, we don’t sacrifice flavor or family time. It is the perfect blend of effort and ease. Once we get through the initial prep work, the cooking can actually be a joyful experience. This dish works wonders for those evenings when everyone is hungry and looking for something to fill them up.

You prepare it in under an hour, which is a win for any night. The beauty of classic chicken Parmesan is that its familiar taste brings everyone together. Even if you’ve had a long day, the process becomes cathartic. Your kitchen transforms into a space of joy, where good food becomes a comfort.

Classic Chicken Parmesan

How to Make Classic Chicken Parmesan, The Heartwarming Way

Making classic chicken Parmesan is both straightforward and rewarding. You’ll find that with each step, your kitchen fills with delightful aromas, and soon enough, your family will be eagerly awaiting dinner.

“This is where the magic happens—when the aroma fills the kitchen and my kids come running in, asking ‘Is it ready yet?’”

Step-by-Step Overview: Keeping It Simple

  1. Preheat the oven to 400°F (200°C). Starting with a hot oven ensures your dish cooks evenly and the cheese melts beautifully.

  2. Season the chicken breasts with salt, pepper, garlic powder, and Italian seasoning. This simple seasoning adds depth to the chicken. Feel free to adjust the spices to match your family’s taste.

  3. In a shallow bowl, combine breadcrumbs and grated Parmesan cheese. This delicious mixture will form a golden crust. The Parmesan adds a fantastic flavor.

  4. Dip each chicken breast in beaten eggs, then coat with the breadcrumb mixture. Ensure that every inch of the chicken is covered. The egg acts as the glue, so don’t rush this step.

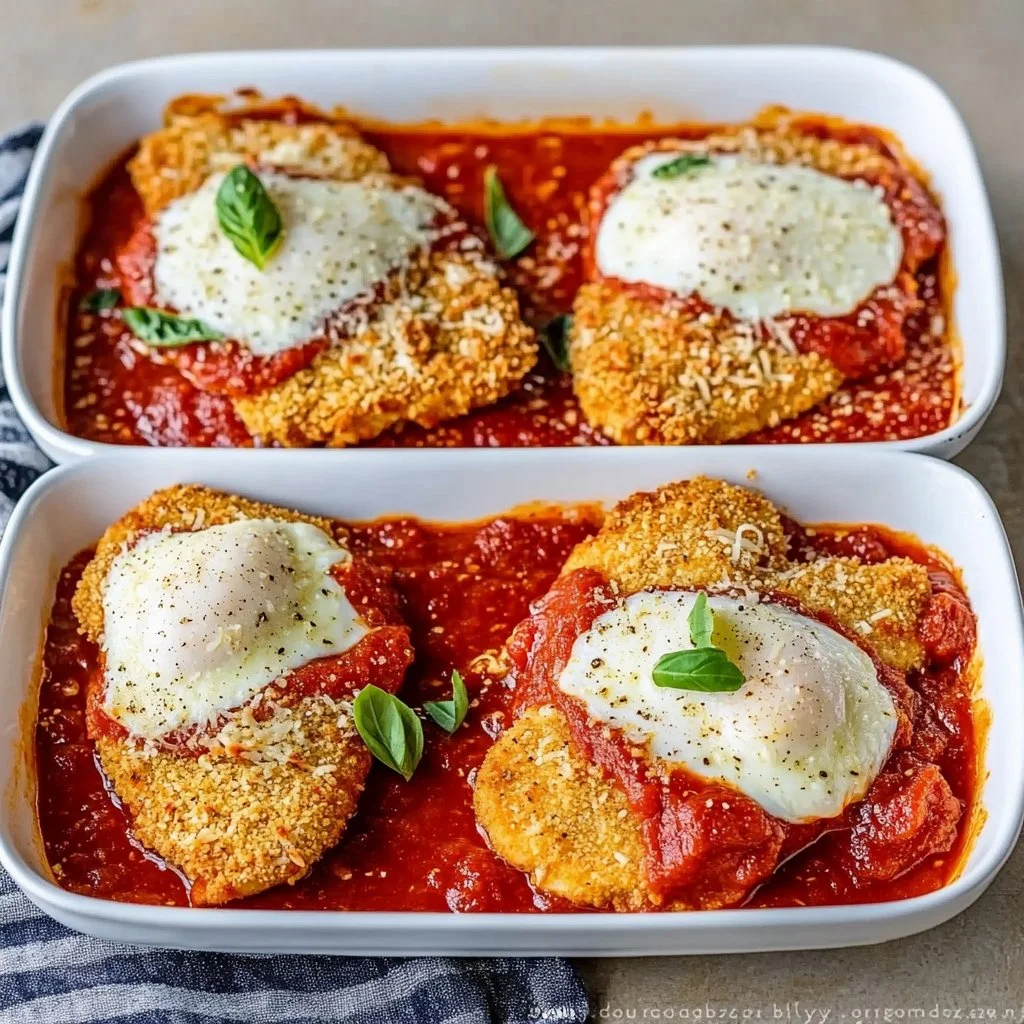
  5. Heat olive oil in a large skillet over medium heat. Fry the chicken for 3-4 minutes on each side until golden brown. A little browning here builds flavor, just like grandma showed me. Keep an eye on it to prevent burning.

  6. Once browned, place the chicken in a baking dish. It should have a nice crust on it. It is a joy to see the golden color.

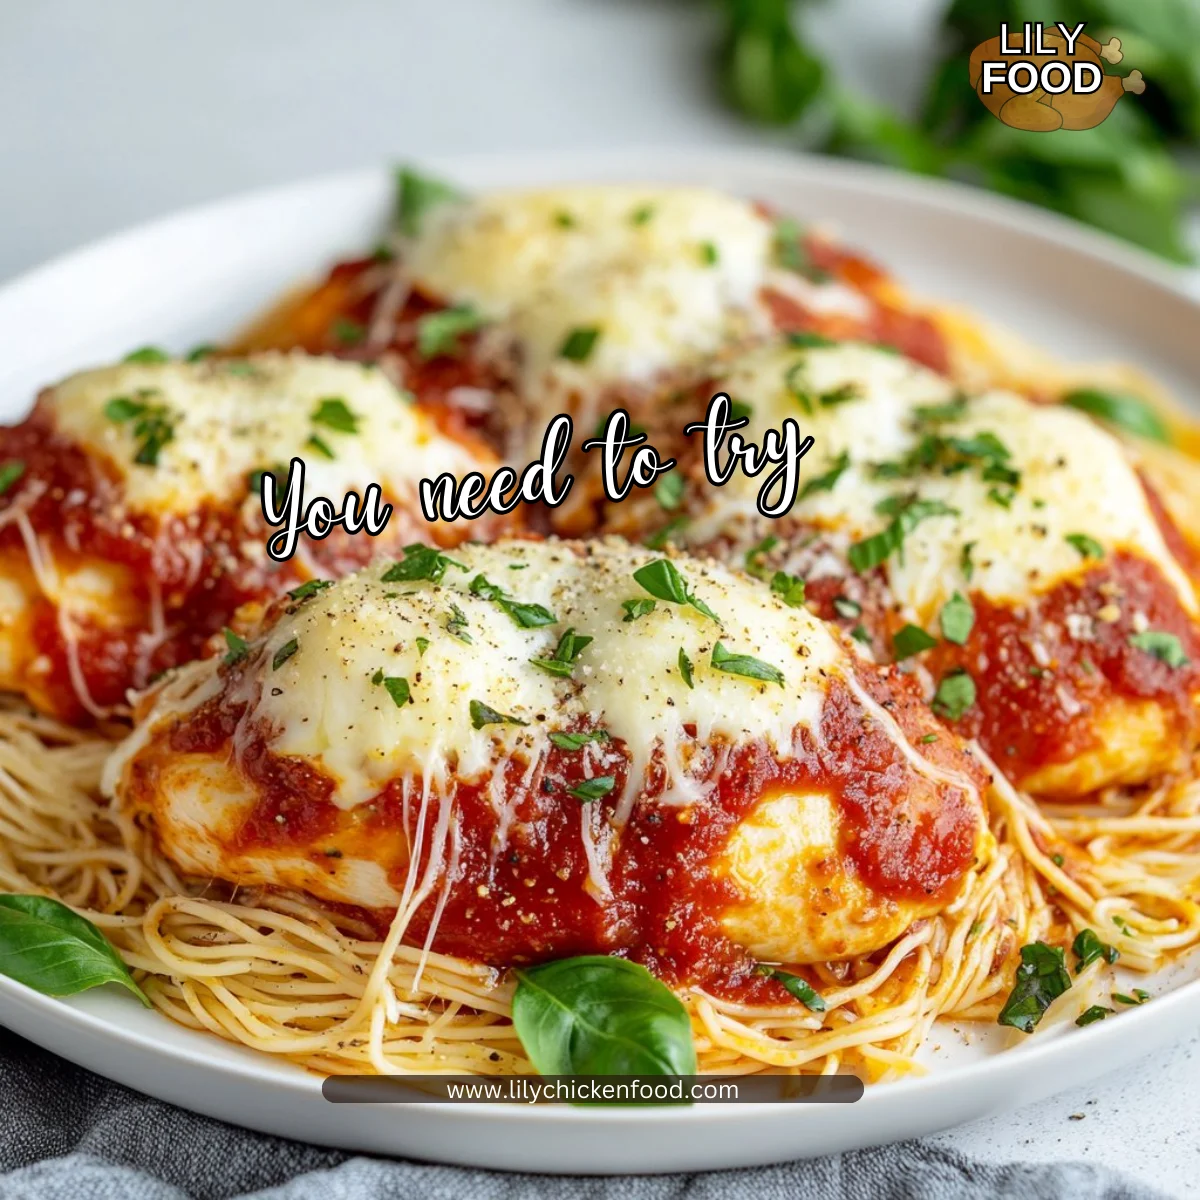
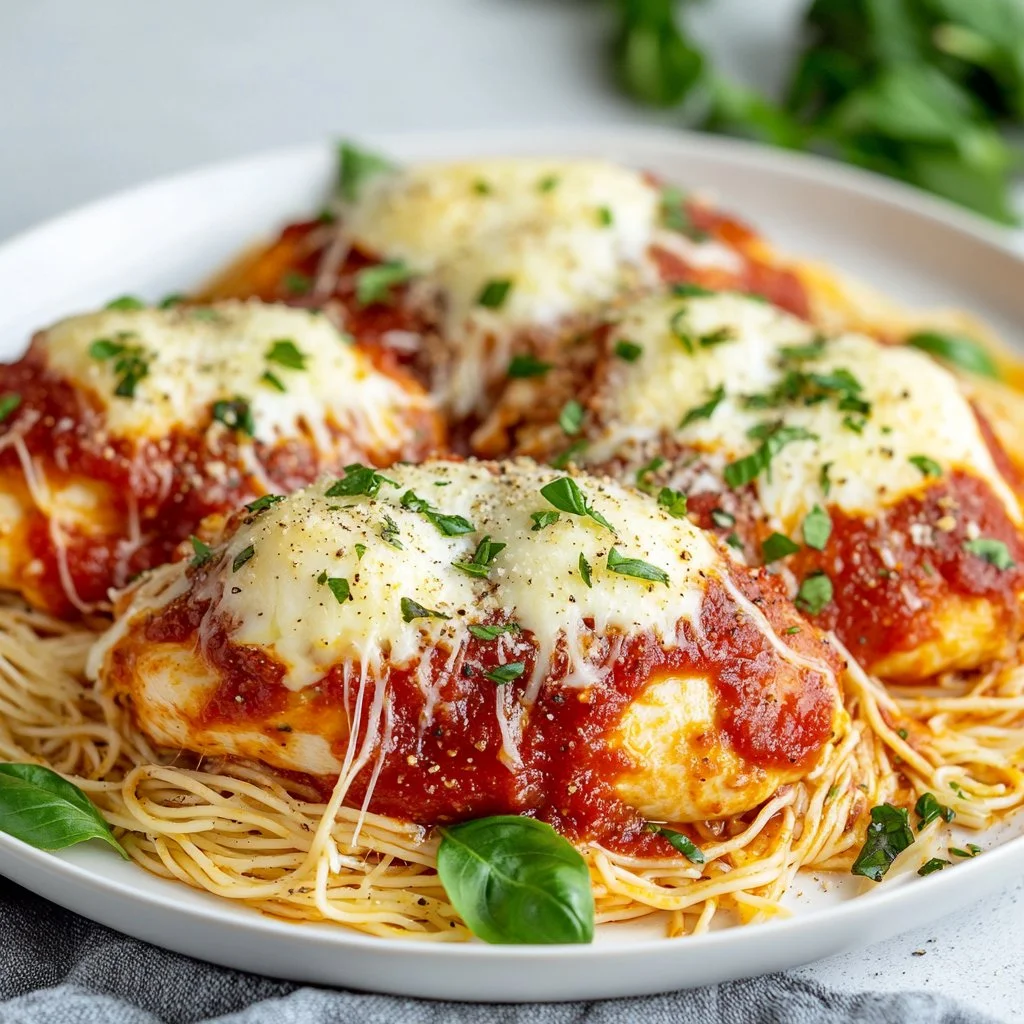
  7. Top each piece with marinara sauce and shredded mozzarella cheese. This is where things get cheesy! Don’t skimp on the sauce.

  8. Bake in the preheated oven for 15-20 minutes until the cheese is bubbly. Your home will smell incredible as it finishes baking.

  9. Garnish with fresh basil if desired and serve. Simple yet vibrant, fresh basil can brighten the dish. Remember, it’s the little things that elevate it.

Serving Classic Chicken Parmesan with Love

When it comes to serving, I love presenting our classic chicken Parmesan family-style. It creates a feeling of togetherness, with the dish in the center of the table where everyone can help themselves. This is where stories are shared, delightful conversations flow, and laughter fills the air.

Typically, I will serve it alongside a fresh salad or some garlic bread, allowing everyone to enjoy a hearty meal. The joy of watching my kids sprinkle extra cheese or pass around the sauce creates lasting memories. Each family member has a favorite way of enjoying the dish, making it special for everyone. I often tell them to load up their plates with that yummy marinara sauce—it’s all about what makes them happy.

Classic Chicken Parmesan

Storage & Reheat Tips

When we have leftovers, which is often with this dish, I make sure to store them properly. It’s a good idea to place the chicken in an airtight container in the refrigerator. When you’re ready to enjoy the leftovers, reheating the chicken in the oven retains that lovely crunch. The microwave is fine for a quick lunch, but the oven brings back that just-made warmth.

If you find yourself with too much chicken Parmesan, consider freezing it before baking. You can assemble everything in the baking dish, cover it tightly, and it will be ready for a rainy day. When the time comes, just pop it in the oven, and you have a meal that tastes freshly made.

My Kitchen Notes & Shortcuts

As with any recipe, I’ve learned a few tips and tricks that can improve the chicken Parmesan experience.

  • Use thicker chicken breasts for juicier meat: Thicker pieces allow the chicken to retain moisture better, avoiding dry bites.

  • Mix up the breadcrumbs: Panko breadcrumbs can add extra crunch. It’s a bit of an upgrade that’s worth trying.

  • Let the kids help with the breading: It’s the fun part! It keeps them engaged, and they get to take pride in their cooking contribution.

  • Experiment with different cheeses: Sometimes, I mix sharp cheddar with mozzarella for a twist. Just like in life, a little variation can lead to delightful surprises.

  • Prep the sauce a day ahead: If you’re really short on time, having your sauce ready to go makes this dish come together seamlessly.

Family-Friendly Variations

There is no shortage of ways to tweak this classic chicken Parmesan to suit your family’s preferences. For a lighter version, you might try baking the chicken without frying first. Just season your chicken and place it straight in the oven. For a kid-friendly twist, consider using bite-sized pieces of chicken and turn them into chicken Parmesan sliders.

Another fun variation is to use different proteins. You can substitute chicken with eggplant for a vegetarian option or turkey for a leaner choice. Playing with the ingredients allows you to add your family’s personal touch to the dish.

FAQs About Classic Chicken Parmesan

Can I make this ahead for a busy week?

Absolutely! In fact, letting it sit for an hour lets the flavors get to know each other, just like an old family recipe.

How can I make this gluten-free?

You can use gluten-free breadcrumbs or even ground almonds as a tasty alternative. It will still be delightful.

Can I freeze chicken Parmesan?

Yes, you can! Just assemble the dish in advance, freeze it before baking, and it will be a fantastic fallback meal.

What sides go well with chicken Parmesan?

Salads, garlic bread, or even pasta make excellent companions. It’s all about creating a complete meal.

How can I ensure the chicken stays tender?

Brining the chicken in salt water for a bit before cooking can help maintain moisture and tenderness.

One Final Thought from My Kitchen

As you venture into making this classic chicken Parmesan, remember that the essence of cooking lies in the love and care you put into it. This dish isn’t just about feeding your family; it’s about nourishing relationships and creating memorable moments. I hope this meal finds its way into your family’s laughter and stories. If it does, my grandmother’s kitchen is smiling. Happy cooking!

Classic Chicken Parmesan

Prep Time 20 minutes
Cook Time 25 minutes
Total Time 45 minutes
Servings 4 servings
Calories 650
A heartwarming dish of juicy chicken, crispy coating, and rich marinara that brings families together around the table.

Ingredients

For the Chicken

  • 4 pieces chicken breasts (Use thicker pieces for juicier meat.)
  • 1 teaspoon salt
  • 1 teaspoon black pepper
  • 1 teaspoon garlic powder
  • 1 teaspoon Italian seasoning (Feel free to adjust to taste.)
  • 2 large eggs (Beaten.)

For the Coating

  • 1 cup breadcrumbs (Panko can be used for extra crunch.)
  • 1/2 cup grated Parmesan cheese (Adds fantastic flavor.)

For Cooking

  • 1/4 cup olive oil (For frying the chicken.)

For Topping

  • 2 cups marinara sauce (Don't skimp on the sauce.)
  • 1 cup shredded mozzarella cheese

For Garnish

  • 1 bunch fresh basil (Optional, but adds vibrancy.)

Instructions 

Preparation

  • Preheat the oven to 400°F (200°C).
  • Season the chicken breasts with salt, pepper, garlic powder, and Italian seasoning.
  • In a shallow bowl, combine breadcrumbs and grated Parmesan cheese.
  • Dip each chicken breast in beaten eggs, then coat with the breadcrumb mixture.

Cooking

  • Heat olive oil in a large skillet over medium heat.
  • Fry the chicken for 3-4 minutes on each side until golden brown.
  • Once browned, place the chicken in a baking dish.
  • Top each piece with marinara sauce and shredded mozzarella cheese.
  • Bake in the preheated oven for 15-20 minutes until the cheese is bubbly.

Serving

  • Garnish with fresh basil if desired and serve family-style.

Notes

Store leftovers in an airtight container. For best results, reheat in the oven to maintain crunchiness. You can also freeze unbaked chicken Parmesan for later use.
Calories: 650kcal
Course: Dinner, Main Course
Cuisine: Italian
Keyword: Baked Chicken, Chicken Parmesan, Comfort Food, Easy Recipe, Family Dinner

Original Caesar Salad Dressing Recipe

There is a certain late-afternoon hush in my kitchen when the table gets set and my children chatter about school. I can already smell the bright lemon and garlic that will soon join at the heart of a bowl, and that smell pulls everyone in like a gentle bell. That tiny ritual of tossing crisp lettuce and pouring a dressing made with love is one of those small family moments I cherish. If you want a dressing that tastes like home and brings laughter to the table, this Original Caesar Salad Dressing Recipe is a keeper, and it pairs beautifully with leftovers like our cozy chicken salad for a quick weeknight meal.

Why This Original Caesar Salad Dressing Recipe Feels Like Home

This dressing is simple, honest, and full of flavor. It does not pretend to be complicated. It is creamy, tangy, and garlicky in a way that comforts you the same way a warm blanket would on a cool evening. Meanwhile, it comes together fast so you can spend more time around the table and less time fussing.

Original Caesar Salad Dressing Recipe

What makes this Original Caesar Salad Dressing Recipe feel like home is how it connects to small, repeatable routines. It is the kind of dressing I whisk up while the kids set plates, the kind they will argue about who gets the last spoonful of. It reminds me of gatherings where everyone reaches for the bowl and the conversation flows. That simple joy is why this recipe often becomes the centerpiece of our weeknight dinners.

Why Original Caesar Salad Dressing Recipe is Our New Family Favorite

This recipe works because it balances bold flavors without being overwhelming. It is bright from lemon, anchored by savory Parmesan, and lifted by mustard and garlic. The texture is smooth and silky, coating leaves and croutons so every bite tastes complete. It is quick enough for busy nights and special enough for company.

If you want a quick main-course idea, try drizzling this dressing on grilled chicken and serving it with a slice of crusty bread. It also pairs wonderfully with recipes such as a stuffed avocado, turning a simple salad into an easy dinner that everyone can customize.

The Simple Magic Behind Original Caesar Salad Dressing Recipe

There is a tiny bit of science in what makes a dressing stick to leaves. An emulsion of fat and acid—here olive oil and lemon juice—helps carry flavor and cling to lettuce. Mustard acts like a natural stabilizer and boosts flavor. Parmesan gives the savory backbone. Together, these ingredients create a dressing that tastes complete on its own.

This dressing requires no special tools, just a bowl and a whisk. Aim for a smooth, glossy texture and you’ll know you have a good emulsion. The color should be pale, creamy, and speckled with Parmesan and black pepper. When it smells sharp with lemon and rich with garlic, you are on the right track.

How to Make Original Caesar Salad Dressing Recipe, The Heartwarming Way

“This is where the magic happens—when the aroma fills the kitchen and my kids come running in, asking ‘Is it ready yet?’”

Start by gathering everything you need so the process feels calm and easy. This dressing is all about gentle, steady mixing and taste-checking. The aroma should be bright with lemon and warm with garlic once it is whisked together. Your goal is a smooth, creamy dressing that holds together and tastes balanced.

Step-by-step, the process is straightforward. First, measure and prepare ingredients. Next up, combine and whisk until you see a thick, uniform texture. Finally, taste and adjust. It’s simpler than it looks, and a little practice makes it faster each time.

Ingredients You’ll Need

1 cup vegan or regular mayonnaise
2 tsp dijon mustard
3 garlic cloves (minced or grated)
1/2 cup grated regular or vegan parmesan cheese
1 tsp vegan or regular Worcestershire Sauce
3 tbsp. lemon juice
2 tbsp. olive oil (optional)
1/2 tsp sea salt
1/2 tsp black pepper

A friendly note from my kitchen: don’t skip the fresh lemon juice if possible. Bottled juice works, but fresh lemon brightens everything. Also, if you have fresh parsley or a pinch of anchovy paste and want a more classic bite, go ahead and add them. Use what’s in your fridge; this recipe is about creativity, not perfection. If you are curious about other mashups for chicken and salads while you plan your meal, check out this collection of recipes that inspire simple weeknight dinners at best 30 chicken salad recipes.

Step-by-Step Directions

  1. Into a small bowl, add all the ingredients and whisk together till completely combined and smooth.
    Tip: Whisk firmly and consistently to form a creamy emulsion. If you want a thinner dressing, add a teaspoon of water at a time.

  2. Do a quick taste test and see if you need to add anything to meet your dressing flavor needs.
    Tip: If it needs more brightness, add a splash more lemon juice. If it needs depth, a bit more Worcestershire will do wonders.

  3. Transfer to a jar and enjoy on an as-needed basis.
    Tip: Label the jar with the date and store in the fridge. Let it warm slightly on the counter for a few minutes before using if it feels very cold.

Original Caesar Salad Dressing Recipe

A little encouragement: this part is fun. Let the kids stir the bowl for a moment if they want. They love being part of the ritual, and it makes dinner feel like something we all made together. If you prefer a smoother texture, use a blender or stick blender for 10 to 15 seconds.

Serving Original Caesar Salad Dressing Recipe with Love

Original Caesar Salad Dressing Recipe

We serve this Original Caesar Salad Dressing Recipe family-style, right in the center of the table. I place a bowl of torn romaine or little gem lettuce, a jar of homemade croutons, and a small dish of extra Parmesan. Everyone helps themselves, drizzles what they like, and adds more croutons if they need crunch.

On busy nights, I set out additional toppings like sliced grilled chicken, cherry tomatoes, and toasted pine nuts. The kids like a few salmon or leftover chicken pieces, and the adults love a splash of extra lemon. This dressing also shines tossed with warm roasted vegetables or as a dip for raw veggies. If you enjoy combining salads with hearty additions, try pairing it with something fresh and fruity like the bright flavors in an Asian chicken cranberry salad for contrast.

Storage & Reheat Tips (Keeping the Goodness)

This dressing stores well in the refrigerator for about 5 to 7 days. Keep it in a sealed jar or container. After refrigeration, the dressing may thicken; give it a gentle stir or add a teaspoon of water or lemon to loosen it.

If you plan to use it on leftover warm foods, allow hot items to cool a bit first before tossing with the dressing. Heat can change the texture of mayonnaise-based dressings. For a quick lunch, drizzle over chilled salad or use as a spread on sandwiches. Be honest: once opened, use it within a week for best flavor and food safety.

My Kitchen Notes & Shortcuts

  • Make-ahead tip: Mix the dressing a day ahead to let flavors mingle. It actually tastes better after a few hours.
  • Shortcut: Use pre-grated Parmesan for speed, but if you can grate fresh, you will notice the flavor lift.
  • Kid-friendly step: Let kids press the lemon and stir the bowl. They love being helpers and it keeps them engaged.
  • Vegan swap: Use vegan mayo, vegan Worcestershire, and vegan Parmesan and the result is still comforting.
  • Double it: If you like leftovers, double the recipe and use the extra as a sandwich spread or dip for roasted potatoes.

For shortcuts, I often prepare the dressing while dinner finishes cooking, which saves time and keeps the family conversation flowing. If you want to learn more about my usual pantry go-tos and shortcuts, you can visit my author page for more personal kitchen tales at my author page.

Family-Friendly Variations

  • Lighter version: Replace half the mayo with Greek yogurt for a tangy, lighter dressing that kids often prefer.
  • Protein boost: Stir in finely chopped cooked chicken or flaked tuna to make the dressing a chunky topping.
  • Herby twist: Add a tablespoon of chopped fresh parsley or chives for herbal bright notes.
  • Heat: If someone likes spice, a pinch of red pepper flakes or a drop of hot sauce livens things up.
  • Crouton-free: Use toasted seeds like pumpkin or sunflower for a nutty crunch that is allergy-friendly.

These small changes let each family member own their plate, and they make the dressing more versatile across meals. Give a few versions a try and see which one becomes your new family favorite.

FAQs About Original Caesar Salad Dressing Recipe

Q: Can I make this ahead for a busy week?
A: Absolutely. In fact, letting it sit for an hour lets the flavors get to know each other. Store in the fridge and use within a week.

Q: How can I make this dairy-free?
A: Use vegan Parmesan and a vegan Worcestershire sauce, plus your favorite vegan mayonnaise. The flavor will be slightly different but still delicious.

Q: Is it safe to use raw garlic?
A: Yes, raw garlic gives great flavor. If you prefer a milder garlic, lightly roast the cloves first or grate them finely so they blend smoothly.

Q: Can I freeze this dressing?
A: I do not recommend freezing mayonnaise-based dressings. Freezing changes the texture. It is best kept refrigerated and used within a week.

Q: What lettuce works best?
A: Romaine or little gem lettuces are classic because they are crisp and hold the dressing well. But baby greens or even kale will work if you massage the leaves lightly.

One Final Thought from My Kitchen

I hope this Original Caesar Salad Dressing Recipe slides easily into your week and into your family’s little rituals. It is the kind of recipe that lets you stay present while still creating something full of flavor. Try it on a quiet weeknight or for a small gathering. Watch how it brings people to the table and how a simple bowl can spark good conversation.

Conclusion

If you love to explore small variations on classic dressings, this version gives you room to play while staying true to comforting, bright flavors. For a classic take and background on the traditional method, I often read sources like Traditional Caesar Dressing – Always From Scratch for technique inspiration. For a regional twist and a story about a different style of Caesar, I recommend learning from recipes such as Original Tijuana Caesar Salad – The Gourmet Gourmand which offer a tasty historical perspective.

Until next time, happy cooking and may your kitchen be full of warmth, laughter, and delicious moments. Give it a try and you might surprise yourself.

Original Caesar Salad Dressing

Prep Time 10 minutes
Total Time 10 minutes
Servings 8 servings
Calories 100
A creamy, tangy, and garlicky dressing that captures the essence of home-cooked meals, perfect for salads and a variety of dishes.

Ingredients

Main Ingredients

  • 1 cup vegan or regular mayonnaise (You can use either type according to dietary preferences.)
  • 2 tsp dijon mustard
  • 3 cloves garlic (minced or grated) (Fresh garlic gives the best flavor.)
  • 1/2 cup grated regular or vegan parmesan cheese (Grating fresh cheese enhances the flavor.)
  • 1 tsp vegan or regular Worcestershire Sauce (Choose based on dietary needs.)
  • 3 tbsp lemon juice (Fresh lemon juice recommended for flavor.)
  • 2 tbsp olive oil (optional) (Adds richness; can be omitted.)
  • 1/2 tsp sea salt
  • 1/2 tsp black pepper

Instructions 

Preparation

  • Into a small bowl, add all the ingredients and whisk together till completely combined and smooth.
  • Whisk firmly and consistently to form a creamy emulsion. If you want a thinner dressing, add a teaspoon of water at a time.

Taste Test

  • Do a quick taste test and see if you need to add anything to meet your dressing flavor needs.
  • If it needs more brightness, add a splash more lemon juice. If it needs depth, a bit more Worcestershire will do wonders.

Storage

  • Transfer to a jar and enjoy on an as-needed basis.
  • Label the jar with the date and store in the fridge.
  • Let it warm slightly on the counter for a few minutes before using if it feels very cold.

Notes

This dressing can be made ahead of time, and allowing it to sit for an hour enhances flavor. Can be stored for about 5 to 7 days in the refrigerator.
Calories: 100kcal
Course: Condiment, Dressing
Cuisine: American
Keyword: Caesar Dressing, Creamy Dressing, Easy Dressing, Healthy Recipes, Salad Dressing

Classic Carol Chicken Salad

The kitchen fills with a warm aroma of savory chicken and tangy dressing. The soft sound of stirring fills the air as you prepare a dish that brings comfort and joy. This Classic Carol Chicken Salad is more than just a meal; it’s a family tradition, a gathering of flavors that unite everyone around the table. As you chop, mix, and taste, you can almost hear the laughter and stories from family gatherings echoing in your kitchen.

Why This Works

Classic Carol Chicken Salad

This Classic Carol Chicken Salad is a gem for busy families. It’s quick to make and can be prepped in advance, saving precious time during hectic weekdays. You’ll have a satisfying meal ready to go, whether it’s for lunch packing, dinner, or a picnic in the park.

The ingredients are simple and wholesome, allowing for a festive balance of flavors that appeal to everyone. This salad works not only because it is delicious but also because it’s a dish that encourages togetherness. With just a few basic ingredients, you can create a dish that feels special and gives everyone a chance to reconnect over a delicious meal.

Process Overview

“This is where the magic happens—when the aroma fills the kitchen.”

You’ll find that preparing this chicken salad becomes a cherished part of your routine. The blend of textures and flavors will have you eagerly anticipating mealtime. Each step of the process will fill your home with warmth and excitement, making it an enjoyable experience from start to finish.

Ingredients

Here’s what you will need:

  • 2 cups cooked chicken, shredded

    • Tip: Use rotisserie chicken for convenience; it adds flavor and saves time.
  • 1 cup mayonnaise

    • Tip: Choose a high-quality mayo for better flavor; olive oil mayo is a lighter option.
  • 1/4 cup chopped celery

    • Tip: Fresh celery adds a nice crunch. If you prefer less crunch, you can finely chop it.
  • 1/4 cup chopped onions

    • Tip: Green onions can be used if you prefer a milder onion flavor.
  • 1 tablespoon Dijon mustard

    • Tip: This adds a tangy depth to the salad. Adjust the amount to your taste.
  • Salt and pepper to taste

    • Tip: Start with a pinch of salt and pepper, and adjust after mixing.
  • Lettuce leaves, bread, or crackers for serving

    • Tip: Use buttery croissants for a luxurious touch or whole-grain crackers for added health benefits.

Directions

  1. In a large bowl, combine the shredded chicken, mayonnaise, celery, onions, Dijon mustard, salt, and pepper. Mix well until everything is evenly coated.

    • Encouragement: Don’t be shy about mixing! This is where your care shines through; make sure every piece of chicken is lovingly dressed.
  2. Chill the chicken salad in the refrigerator for at least 30 minutes to allow the flavors to meld.

    • Encouragement: This waiting time helps everything blend beautifully. It’s worth the wait, so go ahead and brew a cup of tea while you wait!
  3. Serve the chicken salad on bread, crackers, or on a bed of lettuce as desired.

    • Encouragement: Make it visually appealing. Layer it neatly on the plate, and add some colorful veggies on the side for extra flair!

Serving

Classic Carol Chicken Salad

When it comes to serving, think family-style. Present the chicken salad in a large bowl so everyone can help themselves. Pair it with an array of different breads and crackers, allowing each family member to create their own perfect bite. Serve it alongside fresh fruit or a simple green salad to round out the meal. The goal is to create a welcoming environment that encourages conversation and sharing.

Storage

For any leftovers, you’ll want to store your chicken salad in an airtight container in the fridge. Properly stored, it will stay fresh for up to 3 days. If you find yourself with more than you can eat, consider freezing the salad. However, keep in mind that the texture might change slightly upon thawing. To reheat, gently warm it on the stove over low heat, stirring occasionally until warmed through.

Kitchen Notes

Here are five shortcut tips to streamline your preparation:

  • Pre-cook Chicken: Prepare and shred chicken in advance. Store it in the fridge to have ready for salads or sandwiches.
  • Use a Food Processor: For chopping ingredients quickly, a food processor can save you time and hassle.
  • Batch Prep: Make a double batch of chicken salad. It’s perfect for quick lunches throughout the week.
  • Experiment with Spices: Try adding herbs like dill or basil for a flavor twist.
  • Easy Cleanup: Line your mixing bowl with parchment paper for an easy cleanup after mixing.

Variations

Picky eaters or those on special diets can still enjoy this dish with a few tweaks:

  • Gluten-Free: Serve the salad in lettuce wraps instead of bread.
  • Vegan: Substitute cooked chicken with chickpeas or tofu, and use vegan mayo.
  • Nut-Free: Add pecans or walnuts for crunch as a personal preference but keep in mind the nut-free option.
  • Spicy Kick: Mix in some chopped jalapeños or a splash of hot sauce if you enjoy some heat.
  • Mediterranean Twist: Add diced cucumbers and feta cheese for a fresh vibe and a nod to Mediterranean flavors.

FAQ

  1. Can I use leftover chicken?
    Absolutely! Leftover rotisserie chicken is perfect for this recipe.

  2. How long can I keep chicken salad in the fridge?
    Properly stored, it lasts about 3 days in the fridge.

  3. What can I serve with chicken salad?
    It pairs well with crackers, fruit, or as a sandwich filling.

  4. Can I freeze chicken salad?
    You can, but the texture may change once thawed. Use within 2 months for best results.

  5. What if I don’t like mayonnaise?
    You can use Greek yogurt or mashed avocado for a delicious alternative.

As you enjoy this Classic Carol Chicken Salad, remember that cooking is about more than just sustenance; it’s about sharing moments with family and friends. Each bite is a reminder of love, care, and connection. I hope this recipe becomes a staple in your kitchen just like it is in mine. Happy cooking!

Classic Carol Chicken Salad

Prep Time 10 minutes
Cook Time 30 minutes
Total Time 40 minutes
Servings 4 servings
Calories 300
A comforting and savory chicken salad made with simple ingredients, perfect for family gatherings and quick meals.

Ingredients

Main Ingredients

  • 2 cups cooked chicken, shredded (Use rotisserie chicken for convenience; it adds flavor and saves time.)
  • 1 cup mayonnaise (Choose a high-quality mayo for better flavor; olive oil mayo is a lighter option.)
  • 1/4 cup chopped celery (Fresh celery adds a nice crunch. If you prefer less crunch, you can finely chop it.)
  • 1/4 cup chopped onions (Green onions can be used if you prefer a milder onion flavor.)
  • 1 tablespoon Dijon mustard (This adds a tangy depth to the salad. Adjust the amount to your taste.)
  • to taste Salt and pepper (Start with a pinch of salt and pepper, and adjust after mixing.)

For Serving

  • Lettuce leaves, bread, or crackers (Use buttery croissants for a luxurious touch or whole-grain crackers for added health benefits.)

Instructions 

Preparation

  • In a large bowl, combine the shredded chicken, mayonnaise, celery, onions, Dijon mustard, salt, and pepper. Mix well until everything is evenly coated.
  • Chill the chicken salad in the refrigerator for at least 30 minutes to allow the flavors to meld.
  • Serve the chicken salad on bread, crackers, or on a bed of lettuce as desired.

Notes

For any leftovers, store chicken salad in an airtight container in the fridge. It will stay fresh for up to 3 days. It can be frozen, but the texture might change slightly upon thawing. To reheat, gently warm it on the stove over low heat, stirring occasionally until warmed through.
Calories: 300kcal
Course: Dinner, Lunch, Salad
Cuisine: American
Keyword: Chicken Salad, Classic Salad, Comfort Food, Family Recipe, Quick Meal

Classic Chicken Salad

The warm aroma of a freshly made chicken salad wafts through the kitchen. The sound of chopping vegetables and the gentle clinking of mixing bowls create a comforting symphony. It reminds us that good food brings family together. This Classic Chicken Salad is not just a meal; it’s a time-honored recipe that’s made for sharing and enjoying.

Why This Works

Classic Chicken Salad

This classic recipe shines because it is simple yet delicious. Chicken salad can be made in under 30 minutes, saving you time on busy days. It’s perfect for lunch boxes or quick dinners. The combination of flavors is refreshing, making it appealing to both adults and children alike. When you gather your family around the table, this dish sparks conversations and creates lasting memories.

Process Overview

“This is where the magic happens—when the aroma fills the kitchen.”

Getting the ingredients together and creating this dish is a fun task. You will experience the joy of preparing a meal that is not only nourishing but also comforting. The sounds of chopping and mixing add to the homey atmosphere, making everyone feel welcome and loved. Each step you take brings you closer to enjoying a delightful meal.

Ingredients

Here’s what you will need to create your Classic Chicken Salad:

  • 2 cups cooked, diced chicken: You can use rotisserie chicken for a quick option or boil and shred your own.

  • 1/2 cup mayonnaise: Opt for full-fat for creaminess or Greek yogurt for a lighter version.

  • 1 cup diced celery: Adds a nice crunch; fresh celery is best for flavor.

  • 1/4 cup chopped green onion: Use the green tops for a milder flavor, or the white parts for a bit more bite.

  • 1 cup halved grapes: Red or green grapes work well. They add sweetness and color.

  • 1/4 cup chopped fresh herbs (like parsley or dill): This elevates the dish’s flavor. Fresh herbs make a difference.

  • Salt and pepper to taste: Season gradually; you can always add more.

Gathering these fresh ingredients will fill your kitchen with delightful scents and make the cooking process all the more enjoyable.

Directions

  1. In a large bowl, combine the diced chicken. If you are using rotisserie chicken, this is where the convenience comes in.

  2. Add the mayonnaise. Stir it in gently but thoroughly. Ensure every piece of chicken is coated for the best flavor.

  3. Next, incorporate the diced celery. This will add the perfect crunch to your salad.

  4. Mix in the chopped green onion. The fresh flavor will brighten up the dish.

  5. Add the halved grapes. They will provide a delightful burst of sweetness.

  6. Finally, toss in the chopped herbs. This is your chance to experiment with flavors.

  7. Season with salt and pepper to taste. Don’t rush this step; it can make a big difference.

  8. Serve chilled, either as a sandwich filling or on a bed of lettuce.

Cooking this Classic Chicken Salad is about bringing comfort and joy to your family. Take your time and enjoy the process.

Serving

Classic Chicken Salad

Serving this salad family-style can spark conversations around the table. Place a large bowl of chicken salad in the center and let everyone help themselves. Serve it with different bread types for sandwiches or simply on lettuce leaves for a lighter option. Adding some sliced tomatoes or pickles on the side is a great way to enhance the meal.

Storage

This chicken salad is best served fresh but can be stored in the refrigerator for up to 3 days. Store it in an airtight container to maintain freshness. If you have leftovers, try to keep it separate from your bread until ready to serve. This way, you will avoid sogginess. If you prefer a warm lunch, you could always add it to a wrap and warm it up in a skillet.

Kitchen Notes

Here are some shortcuts to speed up your chicken salad preparation:

  • Use rotisserie chicken for faster prep.
  • Pre-chop your vegetables ahead of time and store them in the fridge.
  • Use a food processor for quick chopping of herbs and vegetables.
  • Swap mayo for Greek yogurt to save on calories without sacrificing taste.
  • Make a double batch and freeze half for a quick meal later.

Variations

This recipe is versatile. Here are some tweaks for picky eaters or specific diets:

  • Picky Eaters: Leave out the grapes or green onions. You can substitute with diced apples for a sweet crunch.

  • Gluten-Free: Serve on gluten-free bread or lettuce wraps.

  • Low-Carb/Keto: Skip the grapes and serve atop a salad or in avocados.

  • Mediterranean Style: Add olives, cucumbers, and feta cheese for a twist.

  • Vegan/Vegetarian: Substitute chicken with chickpeas or tofu, and use vegan mayo.

FAQ

  1. Can I use leftover chicken for this salad?
    Yes, leftover chicken works great. It’s a perfect way to use up extra meat.

  2. How long can I store chicken salad?
    You can store it in the fridge for up to 3 days. Keep it in an airtight container.

  3. Can I freeze chicken salad?
    It is not recommended to freeze chicken salad, as the texture may change upon thawing.

  4. What should I serve with this chicken salad?
    It goes well with bread, crackers, or lettuce. You can also pair it with soup.

  5. Can I make this salad ahead of time?
    Absolutely! It’s a great make-ahead dish. Just store it in the fridge until you are ready to serve.

Conclusion

As you gather around the table with your loved ones, this Classic Chicken Salad becomes more than just a meal. It evokes warmth and comfort, helping you create lasting memories. Don’t rush the process of making this dish; enjoy each step and savor the flavors. Remember, it’s not just about the food; it’s about the love shared while preparing and enjoying it. So, take a moment, breathe in the aroma, and make this dish your own. Enjoy!

Classic Chicken Salad

Prep Time 10 minutes
Cook Time 20 minutes
Total Time 30 minutes
Servings 4 servings
Calories 350
A simple yet delicious chicken salad that's perfect for lunch boxes or quick dinners, made with fresh ingredients and a mix of flavors that appeal to both adults and children.

Ingredients

Main Ingredients

  • 2 cups cooked, diced chicken (You can use rotisserie chicken for a quick option or boil and shred your own.)
  • 1/2 cup mayonnaise (Opt for full-fat for creaminess or Greek yogurt for a lighter version.)
  • 1 cup diced celery (Adds a nice crunch; fresh celery is best for flavor.)
  • 1/4 cup chopped green onion (Use the green tops for a milder flavor, or the white parts for a bit more bite.)
  • 1 cup halved grapes (Red or green grapes work well. They add sweetness and color.)
  • 1/4 cup chopped fresh herbs (Like parsley or dill; this elevates the dish’s flavor. Fresh herbs make a difference.)
  • to taste salt and pepper (Season gradually; you can always add more.)

Instructions 

Preparation

  • In a large bowl, combine the diced chicken. If you are using rotisserie chicken, this is where the convenience comes in.
  • Add the mayonnaise. Stir it in gently but thoroughly. Ensure every piece of chicken is coated for the best flavor.
  • Next, incorporate the diced celery. This will add the perfect crunch to your salad.
  • Mix in the chopped green onion. The fresh flavor will brighten up the dish.
  • Add the halved grapes. They will provide a delightful burst of sweetness.
  • Finally, toss in the chopped herbs. This is your chance to experiment with flavors.
  • Season with salt and pepper to taste. Don't rush this step; it can make a big difference.
  • Serve chilled, either as a sandwich filling or on a bed of lettuce.

Notes

This chicken salad is best served fresh but can be stored in the refrigerator for up to 3 days in an airtight container. If you have leftovers, try to keep it separate from your bread until ready to serve to avoid sogginess. For a warm lunch, add it to a wrap and warm it up in a skillet.
Calories: 350kcal
Course: Lunch, Salad
Cuisine: American
Keyword: Chicken Salad, Classic Recipe, Comfort Food, Family Recipe, Quick Meal